Das Bild des Tages von: Matthias Franke

Im Ausblick: Der Putin-Fanclub, Stunts auf einem Motorrad und Legomännchen.
kwerfeldein – Fotografie Magazin | Fotocommunity
Das Bild des Tages von: Matthias Franke
Im Ausblick: Der Putin-Fanclub, Stunts auf einem Motorrad und Legomännchen.
kwerfeldein – Fotografie Magazin | Fotocommunity
Ricoh’s Pentax-branded XG-1 is a budget-friendly superzoom with a 24-1248mm equivalent lens and relatively compact body. Continuing with our look at long zoom cameras, we’ve got a full gallery of sample photos from the XG-1 for you to browse. View gallery
Articles: Digital Photography Review (dpreview.com)
It is the digital age and therefore vitally important to have a presence on the internet. Photographers, both professional and novice, are using the internet more than ever to showcase their skill. This is imperative from a business and marketing standpoint, but with every great tool comes those who exploit it. Photographers are stuck between marketing themselves in the most Continue Reading
The post Things to Know About Protecting Your Images Online appeared first on Photodoto.

Ein Beitrag von: Bas Brader
Auf meiner Suche nach Lost Places wurde ich durch eine Bekannte auf den niederländischen Fotografen Bas Brader aufmerksam. Durch seinen minimalistischen Stil hebt er sich von den typischen Lost-Places-Bildern ab. Nach einem kurzen Mail-Austausch bot er mir ein Interview an, da er bald für einige Tage nach Bonn kommen wollte.
kwerfeldein – Fotografie Magazin | Fotocommunity
[ By WebUrbanist in Architecture & Public & Institutional. ]

Designed to provide 1,000 square meters of recreational space across four floors, this multistory structure bends and curves to accommodate bowls and ramps for skaters who can move vertically between differently-shaped levels.


The proposal by British firm Guy Hollaway Architects is to be constructed in Kent as part of a larger project to recreate the area and bring in new and diverse activities. The structure’s semi-transparent skin will allow views in from the surrounding sidewalks and streets.

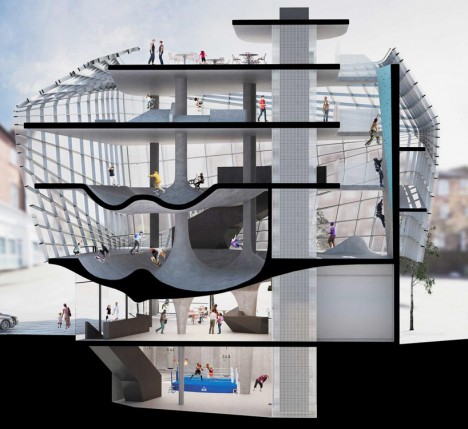
Climbing walls and boxing rings are interspersed through the floors and aimed at a variety of ages and experience levels and activity types. The ceilings of each floor are informed by activities above, making for a rich series of building sections.


While the design is still in development, it is both impressive but features a series of missed opportunities as well, including the chance to at more vertical integration through multistory tubes, ramps or pipes. In its current iteration, skaters use side ramps to traverse floors but more sectional complexity could add new elements that truly take full advantage of the height of the building.
256 plastic barrels support this multistory marvel, which stands up and out even amid a sea of buoyant and stilted architecture in this fishing village …
Click Here to Read More »»

Out of four recent proposals for a radical overhaul of Penn Station in New York City, this concept is far and away the most dramatic.
Click Here to Read More »»

We see conceptual modular designs of this kind all of the time, but rarely such exquisite real-world proof of how fast construction can be in the age of …
Click Here to Read More »»
![]()


[ By WebUrbanist in Architecture & Public & Institutional. ]
[ WebUrbanist | Archives | Galleries | Privacy | TOS ]
I hate digital noise. I’ve been a stickler about keeping it out of my images for years and have tried just about everything under the sun to aid in that process. So when Macphun offered to send over their new Noiseless Pro app I jumped at the opportunity (especially after seeing the promo video for it).
Before we get started, let’s go over the basics of noise for those who are just dipping their toes in this area of post-processing. Noise is basically an unwanted side effect of shooting at high ISO levels or super long shutter speeds (long exposures). Without getting into photodiode leakage currents and other super-techy jargon, just know that noise is the little salt and pepper type specs that show up in your low light images.
Noise reduction is a give-and-take process, just like anything else in photography. It comes at a cost most of the time, and the cost is some amount of detail. Because of the way the noise reduction algorithms work, and because of the nature of high noise images, you just can’t remove noise without losing some of the sharpness in your photo. So the task at hand for software companies who want to tackle noise is to eliminate as much as possible, without screwing up the image and making it unusable.
 Macphun came onto the photography scene fairly recently; although only for the Macintosh users as evidenced by the first three letters of their name. Each app they have created comes in two versions: A simple, easy to use version that usually goes for around $ 20, and a pro version with more features that goes for around $ 60. With any software that has the word “pro” in it, I am going to expect it to perform at a pro level. So with that said, let’s go over some of the key features that I personally expect to see in a brand new noise reduction program, as well as how Noiseless Pro measured up.
For those who prefer video content over reading, here’s a walkthrough of Noiseless Pro and how it stacked up to DeNoise from Topaz Labs with a couple different images. For those who prefer reading, or can’t watch the video at the moment, read on below!
Each product that Macphun offers comes in a basic version as well as a pro version. The base version of Noiseless is $ 17.99 and the pro version is $ 49.99. So what does the extra $ 32 get you?
Each version comes with all the algorithms that were created to reduce noise in your images, as well as advanced algorithms for smart phones and GoPro cameras. The pro version comes with a few extra noise reduction presets, Adobe RGB/ProPhoto color space support, a navigator view to easily peruse the image when zoomed in, more advanced controls in the Adjust panel, as well as the ability to use the app as a plugin with programs like Adobe Lightroom and Photoshop (this is how I use it).
So, in my opinion, it’s well worth the extra bit of cash to go with the pro version. Photo editing software has come down in price by leaps and bounds over the past several years, so $ 49.99 seems like a great deal to me.
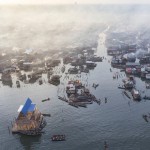
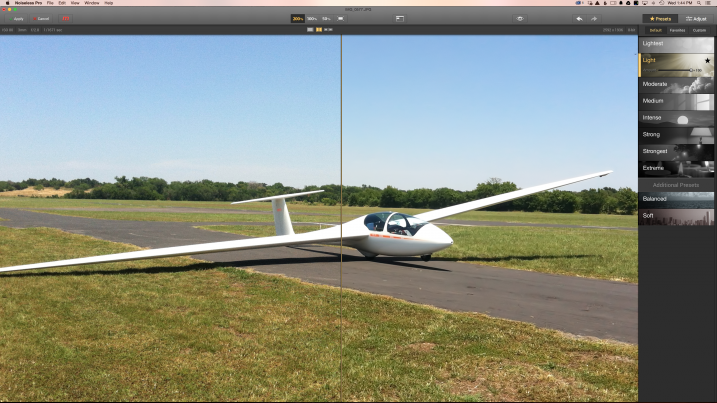
This is where all of Macphun’s programs shine. By targeting a Mac-specific audience, they had to kill it in the UI department, and they have with each product I’ve seen. The program is both incredibly fast and incredibly clean in its layout.
You can either drag an image right into Noiseless Pro, or you can use the program as a plug-in with Photoshop or Lightroom. The program opens immediately, and by default, opens up with the image zoomed in to 200%. This works well because it really lets you see what the noise looks like in the image, so you can see what needs to be done to combat it. It does throw you off a bit at first, but I think I like it.
From there, all you have to do is choose a preset on the right hand side (which couldn’t be easier). Just select the strength level that your image needs and make fine adjustments if needed. Each preset you select will have an “amount” slider appear once it’s been selected. Just use that to dial back the noise reduction strength if needed.
If you need to make even finer adjustments, just click the “Adjust” button up in the top right corner. Here you can adjust color noise, luminance noise, structure, details, etc.
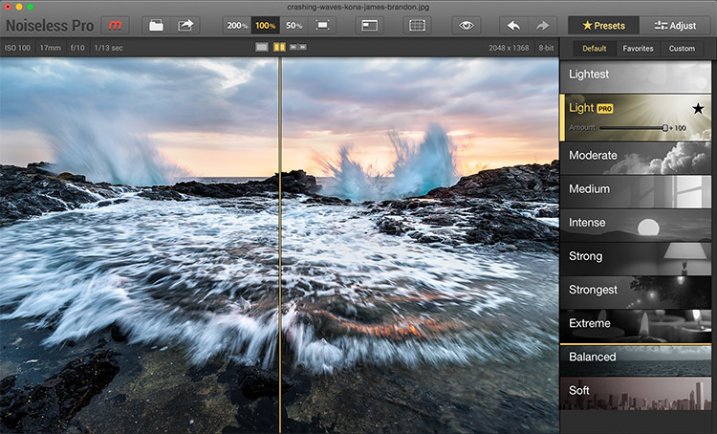
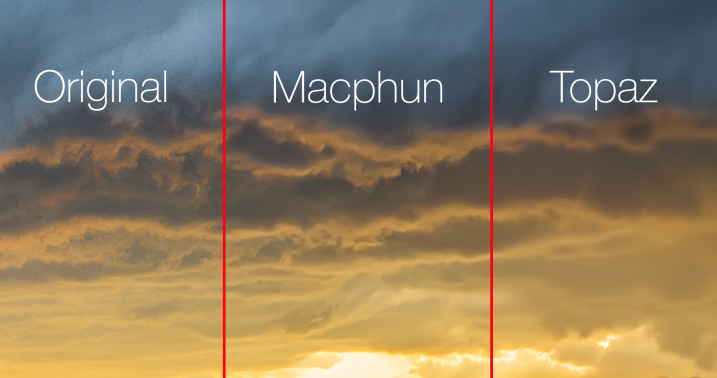
This is where Noiseless Pro exceeded my expectations. It really does a great job at reducing noise while still managing to maintain some detail in your clouds. Skies are the main thing I use noise reduction on and this is an important tip to those who are new to the idea of reducing noise in your images: Never do it globally! This is the problem with noise reduction in programs like Lightroom. They apply the reduction to the entire image, sacrificing detail in every single pixel of your image. Sure, they have some sort of intelligence built-in to preserve some details, but you’re still make a global change to the image.
Using Noiseless Pro side by side against Topaz Labs DeNoise was pretty impressive. I’ve been using DeNoise exclusively for years now really wasn’t expecting Noiseless Pro to outperform it, or even come close. After all, Topaz has been in this game for years. However, after running the minimal amount of noise reduction necessary to get rid of the noise with both programs, I was stunned to see how much more detail Macphun retained in the clouds beneath the storm.
This is one of the less common areas where I apply noise reduction. It really just depends on the image, but if I’m going to reduce noise in a foreground area, it’s usually going to be a body of water, windows on a building, the finish on a car or some other kind of flat surface that should be smooth.
Noiseless did a great job in this area, and again, it’s so fast and easy to use. It literally just works like a breeze right out of the box.
One of the pro features mentioned in the marketing materials for Noiseless is “advanced algorithms for mobile photography.” I ran a few of my random mobile images through the program and it did seem to do pretty well. I think the biggest question here is, “Why?” I mean, it’s a nice feature and all but I doubt that personally will ever care enough about a mobile photo to reduce noise in it. That could of course change in the future, as our phones will likely continue to get closer to being capable of what our SLR’s do, but that’s not going to truly be the case any time soon (no, not even with the new LG phone that shoots RAW and offers manual controls). Of course, this is just my opinion.
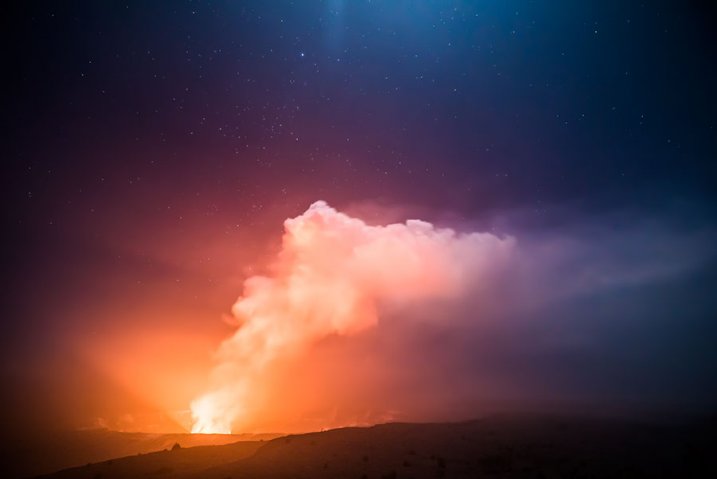
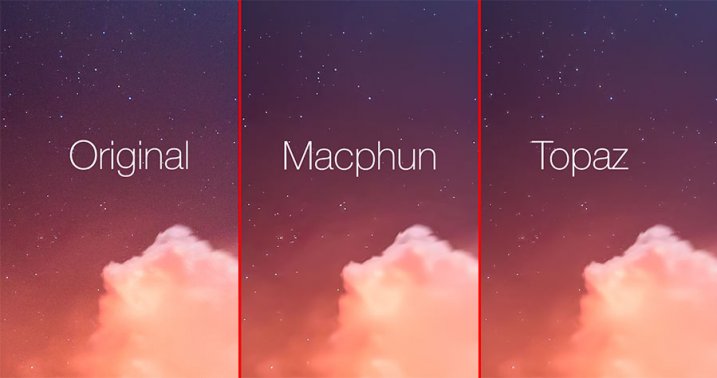
Well, every fairy tale has its villain and astro photography, unfortunately, seems to be the enemy of Noiseless at this point in the game. I was really bummed to see this, but it’s true. Here’s one of the high ISO images containing stars that I used.
Using Noiseless side by side with Topaz Labs DeNoise was pretty telling to say the least. But then again, Noiseless also did surprisingly better with clouds and skies. DeNoise seems to have something built into their software that detects the stars in an astro/night sky image and masks around them. Noiseless, on the other hand, just completely degraded the stars in every night sky image I threw at it. The good news is this is a known issue and one that has already been brought up to the team at Macphun by several other photographers/beta testers. Macphun seems to be a solid company with solid people running it, so I am pretty confident they will address this and create something for the astro photography community in a future iteration. Fingers crossed.
While Noiseless may not perform as well as I’d like with astro/night sky images, it has still found a home in my post-processing workflow, especially for images containing clouds (which tends to happen quite often with landscapes). I’m certainly looking forward to where this program goes in the future, and really hope they will incorporate some better algorithms to handle stars.
googletag.cmd.push(function() {
tablet_slots.push( googletag.defineSlot( “/1005424/_dPSv4_tab-all-article-bottom_(300×250)”, [300, 250], “pb-ad-78623” ).addService( googletag.pubads() ) ); } );
googletag.cmd.push(function() {
mobile_slots.push( googletag.defineSlot( “/1005424/_dPSv4_mob-all-article-bottom_(300×250)”, [300, 250], “pb-ad-78158” ).addService( googletag.pubads() ) ); } );
The post Macphun Noiseless Pro Software Review by James Brandon appeared first on Digital Photography School.
Editor’s Note: This is part a series on macro photography this week. Look for a new one each day. The next newsletter will have them all if you miss any!
Here are 5 quick creative tips to help you with your macro photography:
While a macro lens with a 1:1 (one to one) ratio is a terrific tool for close-up work, so too is an external flash. Contrary to what some photographers will tell you, it doesn’t necessarily have to be a ring light for successful results. The trick is to reduce the flash output to approximately -1.75 in TTL mode. This will illuminate the finer detail in your macro work such as a butterfly’s antennae. Should you need even less light, cut the flash intensity further to -2 or -3 stops.
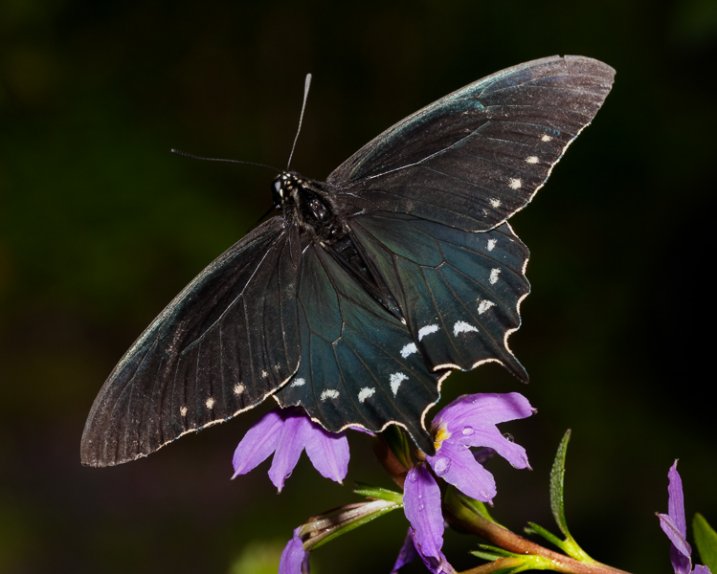
There are times when you’ll want more depth of field to keep the entire subject sharp. This can be problematic, however, as more of the scene remains in focus and can be distracting. Rather than opting for a shallow depth of field, consider using flash. With it, you can illuminate the subject, enjoy great depth of field, and render the background really dark, or even black. To do this, position yourself so there is at least six to 12 inches of separation between the subject and the background. Your reduced flash will effectively expose your macro subject without reaching what’s behind it.

Go beyond the routine snapshot by adding a layer of visual interest to your macro captures. By shooting through a flower petal or leaf, you can create a soft wash of color while keeping the main subject in sharp focus. The technique is simple but yields a sophisticated look that’s reminiscent of an impressionist painting. For this particular method, you may prefer the freedom of shooting without a tripod. By working handheld, it’s easier to position the camera directly into the patch of flowers.
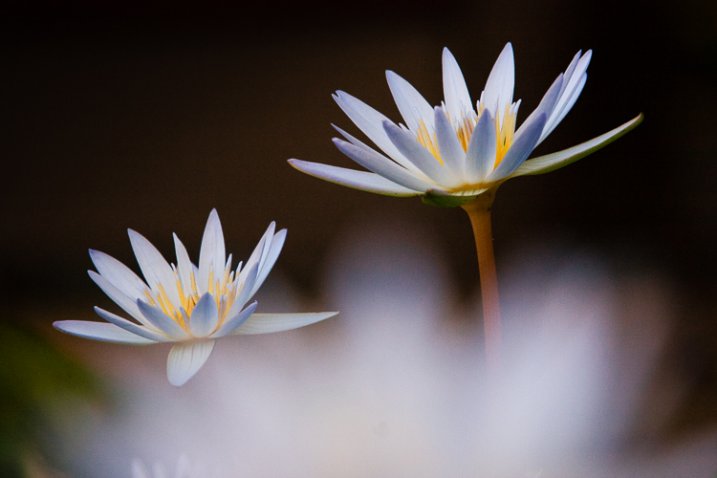
Start with your widest aperture, preferably around f/2.8. Locate a flower that’s in front of your subject, and place your lens approximately one inch away from it. Don’t worry if it largely blocks the main subject, as the extremely shallow depth of field will render it nearly transparent. The closer your lens is to the front flower, the more out of focus it will become. Carefully compose so that you can still see your subject in the background. Finally, move your single active autofocus point to the flower you want sharpest.

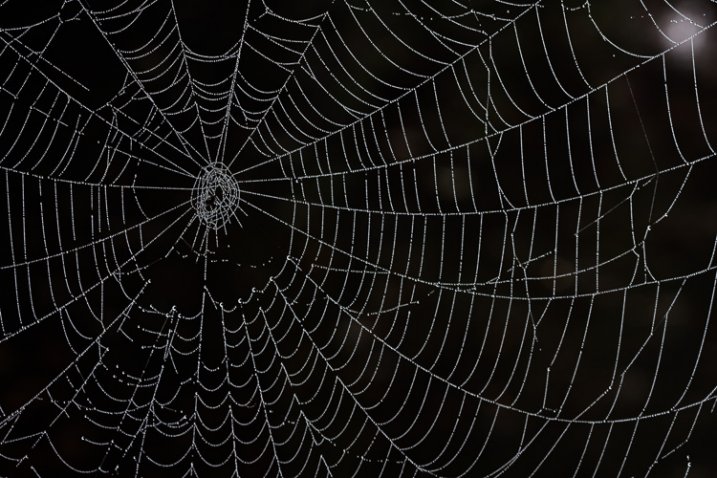
Autofocus is highly effective for the majority of shooting opportunities. In extreme close-up situations however, it can struggle to find its mark. This is particularly true with ultra fine details such as a delicate spider web. A better alternative is to use manual focus aided by Live View or focus peaking. These options take the guess work out of manual focus, allowing you to view the scene at extreme magnifications. At 5x or 10x magnification, it leaves no doubt that something is sharp. On some camera models you can even couple the enlarged view with focus peaking. This works by outlining the portion of subject that’s in focus. While it’s possible to do this handheld, a stable tripod will improve your accuracy.
When shooting macro images, the importance of clean background can not stressed enough. If the area behind your subject is cluttered, it draws attention away from your main point of focus. Rather than taking the first vantage point offered, try composing with your feet. This is a deliberate process that forces you to slow down and explore the subject from all possible angles.

Filling the frame with your subject can be an effective way to eliminate distracting backgrounds. With the close focusing ability of a macro lens, you can carefully arrange the scene to only include the flower. This enables you to work with small apertures such as f/16 for maximum depth of field. With sharp detail throughout the frame, there are no areas of soft focus to detract from the subject. For a more dynamic look, try using the rule of thirds instead of a bulls-eyed composition.

There is something serendipitous about in-camera double exposures that is lost when methodically stacking images in Photoshop. Making exposures this way builds a sense of anticipation that is normally not present in digital photography, with today’s camera’s featuring “instant everything”. Instead, you take the first image, look at it on the LCD and hold that visual in your mind while searching for a second scene to best compliment it. After capturing that, you have to wait a few seconds for the camera to reveal your creation. In that brief pause, suspense builds, and anything seems possible, much like the days of waiting for your film to be processed. Of course with a technique like this, there will be a few misses. Nevertheless, the results can be quite interesting when you get it just right.

Another creative option is to experiment with slow shutter speeds and intentional camera movement. You don’t even need a macro lens to try it, just a basic zoom. Start by filling the frame with the flower and make sure it’s in focus. For this you can be at the longer end of your focal range. Press the shutter all the way down and start the exposure, then immediately zoom out to a wide-angle perspective. You can also reverse the process, starting with a wide angle and zooming in. The following settings are a baseline to get you started.

Do you have any additional creative tricks to share? Please do so in the comments.
 Want to learn more about macro photography? Check out Ed Versosky’s Introduction to Close-Up & Macro Photography ebook – just $ 10 (over 30% off) this week with coupon code: DPS. You will need to enter the code to apply the discount.
googletag.cmd.push(function() {
tablet_slots.push( googletag.defineSlot( “/1005424/_dPSv4_tab-all-article-bottom_(300×250)”, [300, 250], “pb-ad-78623” ).addService( googletag.pubads() ) ); } );
googletag.cmd.push(function() {
mobile_slots.push( googletag.defineSlot( “/1005424/_dPSv4_mob-all-article-bottom_(300×250)”, [300, 250], “pb-ad-78158” ).addService( googletag.pubads() ) ); } );
The post 5 Creative Macro Photography Ideas that Really Work by Chris Corradino appeared first on Digital Photography School.
[ By Steve in Abandoned Places & Architecture. ]

The advent of refrigerated ships radically changed the fish and seafood processing industry, leaving dozens of isolated and uneconomical canneries behind.


The former Canadian Fishing Company salmon cannery at Butedale on Princess Royal Island, British Columbia, is typical of the genre. Located in the midst of the region’s rich salmon fishing grounds for convenience and expediency, the mossy-roofed cannery and the associated 400-population town of Butedale prospered from about 1911 through the mid-1950s.


When the cannery closed, there was no reason to stay in Butedale – it’s become a steadily deteriorating ghost town. Kudos to Panoramio users Denis Dwyer and Jack Borno for capturing these enduring images of the abandoned CFC cannery for posterity.


Flickr user Jonathan Khoo (jonjk) brings us the remarkable Bayside Canning Company building in Alviso, California, which last canned fish back in 1931. The firm mainly employed Chinese immigrants; a tribute to whom can be seen in some of the delightful murals added to the factory’s outer walls at a much later date.


A fish cannery without fish is like a sea without water, which pretty much describes both the above abandoned fish cannery in Muynak, Uzbekistan, and the once-wet Aral Sea which once supplied the cannery with fish. Over 80 miles (130 km) of toxic desert sand now separate Muynak’s abandoned fish canneries from the still-receding seashore, and few if any fish now live in the concentrated toxic soup which comprises the much-diminished Aral Sea.

What’s better than building a cannery on the waterfront? Building one on the water, of course! Brilliant concept aside, it takes more than location, location and location to keep a cannery’s books in the black and this abandoned cannery on the Columbia River near Astoria, Oregon is a case in point. Credit Flickr user Eli & Anne-Marie with the above ethereal scene captured on September 10th, 2011.
As the disconnect between the meat we eat and the places it’s processed grows, so does the number of urban and suburban abandoned meat packing plants.
Click Here to Read More »»

Though the circumstances of their liberation seem somewhat more political than practical, the thousands of fish set to be freed into the wild may not care much …
Click Here to Read More »»

Built, closed, partially demolished, boarded up and ultimately deserted, the New World Mall in the capital city of Thailand has become home a strange and …
Click Here to Read More »»
![]()
[ By Steve in Abandoned Places & Architecture. ]
[ WebUrbanist | Archives | Galleries | Privacy | TOS ]
Das Bild des Tages von: lam pok yin jeff

Ausblick: Wir stellen uns an und an und an, die Schlange ragt bis ins Nichts hinein.
kwerfeldein – Fotografie Magazin | Fotocommunity
Stephen Cheatley’s love of photography started with a Kodak Instamatic 100 and has grown significantly from there. He’s an avid astrophotographer who also enjoys capturing the dramatic sunsets of his home in the northwest of England. He’s the latest subject in our ongoing effort to feature the high quality images created by our readers. Take a look at his work and read our Q&A. See gallery
Articles: Digital Photography Review (dpreview.com)
You must be logged in to post a comment.