RSS
 

Archive for May, 2015

Buzzkill: 10 Sweet Abandoned Apiaries & Busted Beehives

11 May

[ By Steve in Abandoned Places & Architecture. ]

abandoned apiaries 1
Honey, I’m not home! These abandoned apiaries and busted beehives once dispensed sweet liquid gold but now lie deserted, de-pollenated and depopulated.

abandoned apiaries 1b

abandoned apiaries 1c

Fancy some honey? The charming red brick building housing The Altamaha Apiaries in Gardi, Georgia dates from 1900 and originally served as a post office / general store. At some point a local family took over the property and set up an apiary. Now gently deteriorating and festooned with flowering vines – descendants of those that once provided fancy pollen, perhaps – The Altamaha Apiaries no longer offers honey but serves instead as a favorite photographic subject for abandonment addicts.

Mutiny On The Botany

abandoned apiaries 2

Abandon a commercial beehive box for 8 days and you might not notice much difference. Abandoning a hive for 8 years is another story, however, and since every picture tells a story (thanks, Rod Stewart), kindly shift your gaze to the vine-encrusted hive above. According to The BeeHolder, this British bee box “had been neglected due to the beekeeper being hospitalised 8 years ago.” Hopefully the cause wasn’t being stung multiple times by his honey-making servants.

In The CatBee Seat

abandoned apiaries 3a

abandoned apiaries 3b

Better not bug this cat, it might start shooting bees out of its mouth. That would presume the ginger feline had been eating bees, mind you, and considering it’s resting in the midst of an abandoned apiary you’re free to draw your own conclusions. Kudos to Flickr user brainfeet, who captured this slightly surreal scene on May 17th of 2010.

Next Page – Click Below to Read More:
Buzzkill 10 Sweet Abandoned Apiaries Busted Beehives

Share on Facebook


[ By Steve in Abandoned Places & Architecture. ]

[ WebUrbanist | Archives | Galleries | Privacy | TOS ]


WebUrbanist

 
Comments Off on Buzzkill: 10 Sweet Abandoned Apiaries & Busted Beehives

Posted in Creativity


10. Mai 2015

11 May

Das Bild des Tages von: Jan Werner

Blumenstrauß

Im Ausblick: Ein Blumenstrauß für alle Mütter.
kwerfeldein – Fotografie Magazin | Fotocommunity

 
Comments Off on 10. Mai 2015

Posted in Equipment


Review: Flashpoint Zoom Li-on Flash

10 May

01 Packaging

Raise your hand if this sounds familiar: you’ve fallen in love with Speedlight flash photography, but you gripe at having to lug around lots of odds and ends for your remote triggers, not to mention boxes of backup AA batteries. Isn’t it time for flashes to catch up with DSLRs and be powered by rechargeable batteries, and have more discrete wireless triggers? It turns out that these features DO exist, but not with Speedlights made by major camera manufacturers.

Announced by Adorama earlier this year, the Flashpoint Zoom Li-on TTL Flash is a new and affordable system that has the key feature of being powered by a rechargeable Lithium Ion Polymer battery. This battery promises to power your flash longer than any other hot shoe mount Speedlight on the market, and it does so while keeping the flash unit at a relatively compact size. When paired with the Flashpoint Commander Transmitter and Receiver set, you have an intuitive, compact way of using the flash off-camera. Sound appealing? Read on for more specs and details.

What’s in the Boxes

02 In the Box

To be clear, the flash unit and the commander (transmitter and receiver) are two separate items that are sold separately. You don’t need to have the Commander set to use the flash unit on its own.

The Zoom Li-on unit, made specific for either Canon or Nikon, arrives in a nicely packaged box containing:

  • (1) Flashpoint Zoom Li-On TTL flash unit
  • (1) Lithium Ion Polymer battery pack
  • (1) Battery charger with cable
  • (1) Protective case for flash with a mini-stand unit

The Flashpoint Commander set arrives with a rather large transmitter (it’s about the size of a Pocket Wizard), and a much smaller receiver (about the size of a thumb drive). The transmitter runs on a pair of AA batteries.

Best Flash Feature: The Battery

Boasting more power than any AA battery, the lithium ion battery is the standout feature of the Zoom Li-on unit. It packs 11.1 volts and 200mAh, and a fully charged battery delivers up to 350 full power shots, with a recycle time of less than 1.5 seconds. You’ll need 2.5 hours to fully charge the battery, but it will function just fine on partial charges. On the unit’s display, there is also a battery icon in the upper right corner that will indicate how much power your battery has left. For longer shoots, it’s recommended that you purchase an extra backup battery, since the flash unit can’t be powered by any other means.

04 Charging

Other Flash Features: Comparable to Most Major Speedlights

Besides the rechargeable battery, the Zoom Li-on flash has all of the other functionality present in other Speedlights today. These features include standard TTL mode, Manual mode, Exposure Compensation, Front and Rear Curtain Sync, Laser Autofocus Assist, High-Speed Sync, group control, and Slave and Master optics, to name a few. This flash also has complete IR TTL control connectivity with Canon and Nikon flashes, meaning you don’t necessarily need to convert your entire Speedlight system. Other triggering modes for the flash include hotshoe, radio controller, 2.5mm sync port, and optical slave.

The flash head has a built-in wide angle diffuser and white bounce card. It also rotates 180 degrees in any direction and tilts over 90 degrees. It can also automatically or manually zoom from 24-105mm. Basically, if you’re familiar with the Nikon SB-900 or Canon 580EXII, the Zoom Li-on flash is similar in size and layout of its controls. Thanks to my familiarity with Canon Speedlites, I was able to unbox the unit and set it up intuitively without referring to the included instruction manual.

Flashpoint Commander Set: All About Convenience

The accompanying Flashpoint Commander set enters a crowded market full of all kinds of remote trigger options, but their main advantages are, an affordable price point and lots of power, packed into relatively small units. Using this set, you can view and change your flash output and trigger your flash remotely from 150+ feet away. There are also 16 channels and 16 groups of control so that you can handle multiple units of remote lighting. The newest version of the transmitter also comes with a 3.5mm sync port, allowing for a direct cable connection to the PC socket of your camera.

03 Details

The transmitter is slightly larger than a single Pocket Wizard Plus III and it sits nicely in your camera’s hot shoe mount. Unlike most other trigger systems, the receiver looks nothing like the transmitter, consisting of a flat unit that simply plugs into the side of the Zoom Li-on flash. After syncing channels and groups via manual switches on the transmitter and receiver, that’s all you need to do to set it up.

Two complaints: you’ll need slim fingernails or a tool to hit the switches on the channel sections of both units, and the group dials are a little too easy to turn, opening up room for possible syncing mistakes. On the whole, this Commander set is impressively compact and easy to set up, although you’ll want to keep an extra eye out for the tiny receiver as it seems very easy to misplace.

05 Umbrella

Flashpoint Zoom Li-On Flash and Commander Set in Practice

To test out the flash unit, I worked put it through three separate scenarios: table top food photography, on-the-fly event photography, and a posed portrait session.

For the food photography session below, the Zoom Li-On flash was paired with the transmitter and receiver and handheld to camera left. Shot in manual mode with no diffuser, the outcome was a soft, natural light that I’d expect from any speedlight.

07 Example Food

The on-the-fly event photography scenario was a quick red carpet photo op with Laila Ali. Fired in ETTL mode on-camera, the Zoom Li-on’s smooth rotating head feature plus fast recycle time came in extremely handy, and I was able to pull off the desired shots without turning to my Canon 580EXII, which I had mounted to a second body just in case.

06 Example Laila

Finally, the portrait session combined the Zoom Li-on flash, acting as the master, and a Canon 580EXII flash off-camera as the slave. Both flash units synced seamlessly, and thanks to similar control layouts, it was easy to figure out that the master/slave function on both units activates the same way (holding down the Zoom button).

08 Example KA

Overall, I declare the Zoom Li-on Flash a winner and a new staple to my camera bag thanks to its power, reliability, and the cost (and weight) savings of not having to haul tons of spare AA batteries. Are you inclined to give this flash a shot?

You can find the Flashpoint Zoom Li-on Flash at Adorama or on Amazon.com.

googletag.cmd.push(function() {
tablet_slots.push( googletag.defineSlot( “/1005424/_dPSv4_tab-all-article-bottom_(300×250)”, [300, 250], “pb-ad-78623” ).addService( googletag.pubads() ) ); } );

googletag.cmd.push(function() {
mobile_slots.push( googletag.defineSlot( “/1005424/_dPSv4_mob-all-article-bottom_(300×250)”, [300, 250], “pb-ad-78158” ).addService( googletag.pubads() ) ); } );

The post Review: Flashpoint Zoom Li-on Flash by Suzi Pratt appeared first on Digital Photography School.


Digital Photography School

 
Comments Off on Review: Flashpoint Zoom Li-on Flash

Posted in Photography


Readers’ Showcase: Sheila Murphy

10 May

Sheila Murphy took family and vacation photos for most of her life, but didn’t consider herself a photographer until her daughter got her interested in black-and-white film photography. She now pursues personal projects and occasional commercial work, and cites a love of the outdoors as the starting point for much of her photography. See more of her images and find out more about her in our Q&A. See gallery

Articles: Digital Photography Review (dpreview.com)

 
Comments Off on Readers’ Showcase: Sheila Murphy

Posted in Uncategorized


9. Mai 2015

10 May

Das Bild des Tages von: Mr. Ed

Eine Person mit Rucksack steht vor Gebirgsketten.

Unser heutiges Bild des Tages macht Lust auf Wandern. Unbedingt in groß betrachten.
kwerfeldein – Fotografie Magazin | Fotocommunity

 
Comments Off on 9. Mai 2015

Posted in Equipment


How to do More Unique Flower Photography

10 May

Do you love to photograph flowers? Flowers are the most beautiful things to photograph. They have texture, color and come in wonderful shapes.

MBeaty 2

To create unique flower photography:

  • Use a 50mm or a telephoto lens.
  • Photograph with backlighting to enhance the transparency of the petals.
  • Choose camera angle carefully – photograph from below to obtain unusual shapes, photograph at eye-level to create a realistic look.
  • Get closer – try making an abstract
  • Look for great backgrounds – declutter the is using bokeh and a shallow depth of field.
  • Quality and color of light – photograph under diffused lighting, during the golden hour, or with the sun at an angle to enhance color, texture and depth.

MBEATY 6

About lenses

A wide-angle lens will allow you to add more background and may distort a bit depending on the camera angle. You will have more details in your photograph. A 50mm or a short telephoto will allow you to show the flower with little environmental information. It will not distort the flower.

Backlight it

MBEATY Photo 1

Use back lighting to enhance the petals. Some petals have a beautiful translucence. You will see the awesome veins and their designs. Shoot your photos of flowers towards the sky. If the sky is blue it will add a nice contrast and if it’s cloudy it will add drama to your photograph. Be aware that the sun needs to be on either side of your flower. The sun should not be pointing towards your camera or you will get a silhouette or lens flare.

Choose your camera angle

Photograph from below the flower and you will see unusual shapes. Many people forget to shoot from this position. It may not be the most comfortable one (you might find yourself flat on a pebbled ground) but it’s worth a try. You will find very original views and shapes from this viewpoint.

MBEATY photo 7

Change the camera position often. Photograph with the camera at eye level for a more realistic look and then photograph from above and below.

When you find a flower, move around and look for a good angle. If the background has too many things going on you will need to change the camera height or the position.

Get close – make an abstract

Get close to the flower. Make your photograph about texture and color. Have you thought about how to extract and abstract your flower? Photograph parts of the flower with parts of background details. The closer you get the more abstract your image will become. You will eventually start to show lines or just color.

MBEATY photo 4

When you dissect an object, it will appear in a very different way than when you originally saw it. You will be showing your point of view. Your unique creativity will be taking over the composition. Study your flower and change its look with your framing.

The Background

Have you noticed that when the background looks good, everything will look good? This is why it’s a good idea for you to photograph with a large aperture. You will be able to soften up the background and make the composition exclusively about the flower.

Make sure to declutter your background so that your flower will be the center of attention. You can declutter by using a shallow depth of field and by moving around until you find a suitable background. Use the stems and leaves to frame the flower. They will add an interesting design to your image.

MBEATY photo 3

A good way to declutter the background is to shoot with a large aperture. This means that you can use f/1.4, f/2.0, f/2.8, etc. Bokeh is also a great way to declutter the background. It will add a surreal look and make the flower stand out.

If you who have a zoom lens with the largest aperture of f/4.0 or f/5.6: Set your lens to 50mm or 70mm. To blur the background nicely, the flower needs to be far away from the background. Make sure that you are close to the flower and the flower is at least three to five feet away from the background.

If you are photographing with backlight it’s not crucial to have a blurry background because the sky will provide for the background.

MBEATY  photo 2

How to show texture

Photograph when the sun is at a low angle to enhance texture. Late afternoon or early morning will provide for a good sun angle. You will obtain great texture when you photograph under diffused light. This can be in the shade, or on bright, but cloudy days. The diffused light will provide for even lighting and the textures and details of the flower will be enhanced.

If you want to show the leaves and parts of the flower an f-stop of f/8 will be good.

Light – quality and color

The color of your flower will be subject to the quality of the light you are shooting under. You will like the effect that you get when you work under a nice soft and diffused light. The nuances of the colors will show up more. You will see more tone variations. Depth will be more visible. When you add that to the shallow depth of field technique, your flower will have an artistic and special look.

MBEATY photo 5 Bad light and good light2

Photograph during the golden hour (early morning and sunset) to achieve a lovely warm tone on your flower. This light is a soft light. It will show depth and dimension and give it a realistic look. It is best to have the sun coming from either side. It’s very flattering to the flower.

The worst type of light is midday sunlight, and when the sun is hitting the subject directly (from the camera angle not the side). These two lights will make the flower look flat and the whole photograph will lack depth. Avoid midday sunlight and direct light.

Do you have any additional tips for doing more unique flower photos? Please share in the comments below.

googletag.cmd.push(function() {
tablet_slots.push( googletag.defineSlot( “/1005424/_dPSv4_tab-all-article-bottom_(300×250)”, [300, 250], “pb-ad-78623” ).addService( googletag.pubads() ) ); } );

googletag.cmd.push(function() {
mobile_slots.push( googletag.defineSlot( “/1005424/_dPSv4_mob-all-article-bottom_(300×250)”, [300, 250], “pb-ad-78158” ).addService( googletag.pubads() ) ); } );

The post How to do More Unique Flower Photography by Marguerite Beaty appeared first on Digital Photography School.


Digital Photography School

 
Comments Off on How to do More Unique Flower Photography

Posted in Photography


Big Free Library: Public Pavillion Built of 50,000 Stacked Books

09 May

[ By WebUrbanist in Architecture & Public & Institutional. ]

lacuna large volume art

Stacked books form the structural columns of this remarkable structure while support beams in between serve as shelves for even more volumes that can be borrowed, all scanned and donated by the Internet Archive. Even the roof is formed of reading material, featuring fluttering book pages suspended from support wires. Like Free Little Libraries, this huge book repository offers its wares to anyone who wants to take a novel to read and (optionally) return, in turn letting each person who interacts with it to permanently shift its shape.

lacuna building structural books

Opening in one month at the Bay Area Book Festival, this temporary building is made to dissolve – the act of removing books from its shelves will change the way it looks and how light passes through its emptying walls. Reading benches in and around its twelve alcoves provide spaces for retreat or interaction.

lacuna structural design diagram

The title of this project, Lacuna, is also an obscure word referring to missing pages or sections of a book. Its creators FLUX Foundation have a great deal of experience building robust but interactive public art and architecture, including large-scale projects for Black Rock City (as part of the Burning Man festival). Over 200,000 books were actually donated by the Internet Archive, but the remaining 150,000 volumes will be saved for future similar projects.

lacuna project sketch

The Book Festival will also feature talks and readings by hundreds of authors as well as other structures and exhibits. More on the design and its inspiration: “Lacuna is a temple to books. Each of the twelve alcoves of Lacuna are formed by pillars created out of stacked books. Connecting these pillars are shelves filled with books. Above, fluttering book pages attached to guy-wires create a thatch-like roof, creating a space in which visitors literally, and figuratively, inhabit the interiority of books and their contents. “

Share on Facebook


[ By WebUrbanist in Architecture & Public & Institutional. ]

[ WebUrbanist | Archives | Galleries | Privacy | TOS ]


WebUrbanist

 
Comments Off on Big Free Library: Public Pavillion Built of 50,000 Stacked Books

Posted in Creativity


Get Creative with Displacement Maps in Photoshop

09 May
Creating a film noir look with a displacement map in Photoshop.

Creating a film noir look with a displacement map in Photoshop.

What is a Displacement Map?

If you are new to Photoshop, the mere mention of displacement maps can be daunting. The purpose of this article is to give you an introduction to them; guide you in easy-to-follow steps on how to generate simple grayscale displacement maps from an existing image, and show you how to effectively implement them using the Displace Filter in Photoshop.

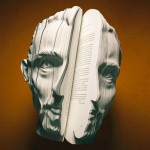
A displacement map is a grayscale version of the same image that you are working on, saved as a Photoshop (.PSD) file. This displacement map is then used to apply a texture to a flat graphic via the Displace filter, and it distorts the graphic to conform to the shape of the map. This gives the flat graphic, or 2D object, a more realistic 3D look. You may have seen images online where a texture is mapped onto someone’s face or a logo contoured onto a textured surface.

Why use Displacement Maps?

Displacement maps are a great way to map texture onto 2D objects, such as logos or text, add give depth and a 3D perspective. I hope to illustrate that displacement maps are not as daunting as they might appear, although, I do realize that this article may suit intermediate users of Photoshop rather than complete novices.

How to implement a Displacement Map?

Once a displacement map has been generated. You need to use the Displace filter to distort the 2D object, or flat graphic, onto the map. The Displace filter has been in Photoshop since version 2.0. It hasn’t changed much since then, however, it’s still a filter worth getting to know. It may appear to be a convoluted process to use, but when you have tried it a couple of times, it is straightforward. What it does is move the light pixels up and to the left and the dark pixels are moved down and to the right. This creates an illusion of depth through light. This is why your displacement map needs to be quite contrasty.

Filter-Distort-Displace

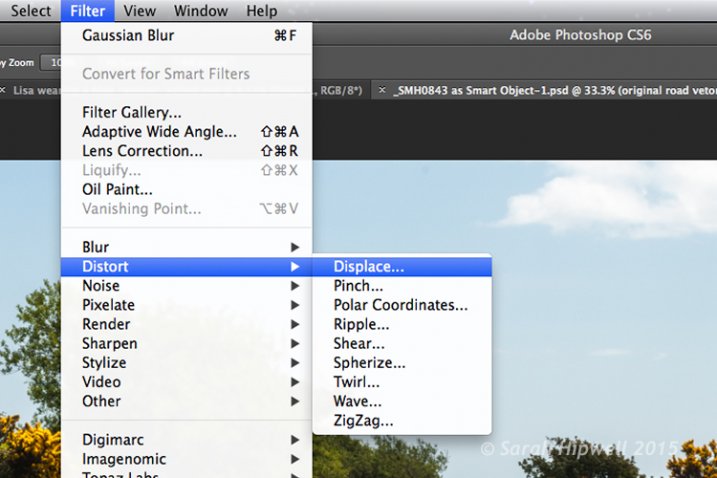
How to access the Distort filter in Photoshop.

The first method I describe below shows you how to use a vector shape to create a road marking and map this onto a road surface. This process would be the same for applying logos or text on any textured background. In the other two examples, I describe how displacement maps can be used to create shadow effects. Let’s take a look.

1. Adding a realistic road marking

Before-after-road-marking

Before and after where the road marking has had a displacement map applied.

Aim: To create a realistic road marking from a vector graphic.

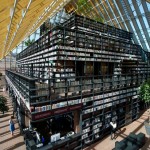
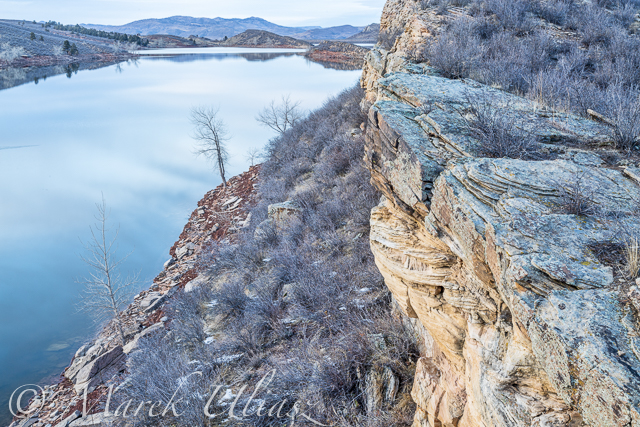
Let’s start with the base image of the road. The displacement grayscale map will be created from this image. The third image is the flat vector image of the road marking. I used the Polygonal Lasso Tool to draw a shape similar to a road marking and filled it with white. Convert this to a Smart Object, then hide this layer.

Displacement map process:

Open your Channels panel and click on each of the red, green and blue channels to see which has the most contrast. In this example, I chose the Blue one. Click and Duplicate this channel.

Duplicate-channel-panel

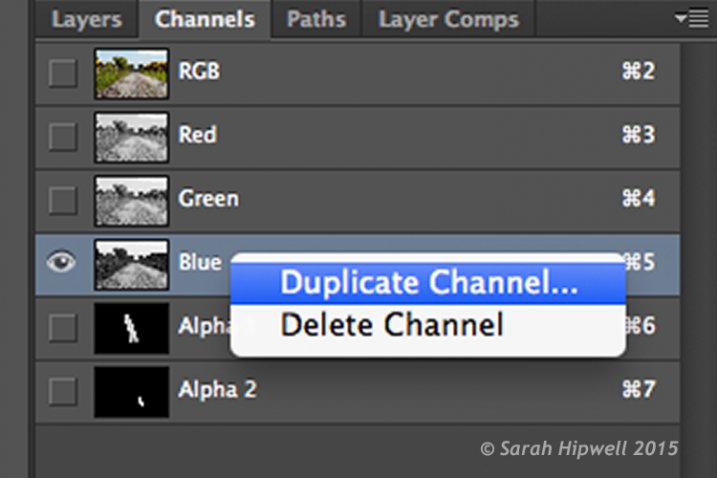
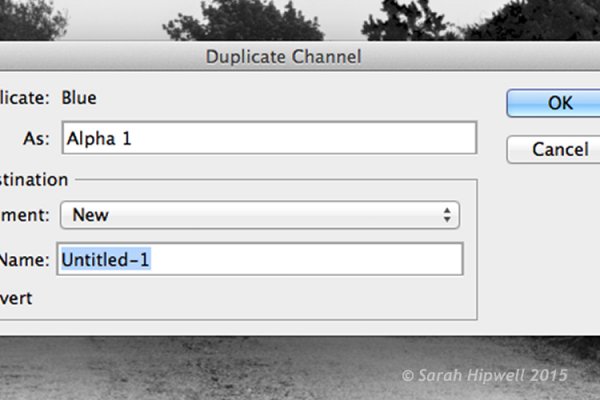
Duplicating the blue channel to create a displacement map.

This brings up another dialog box (see below). Where it says Document, click on the tab and choose New. Name this file Displace road or whatever you want and click OK.

Duplicate-channel-new

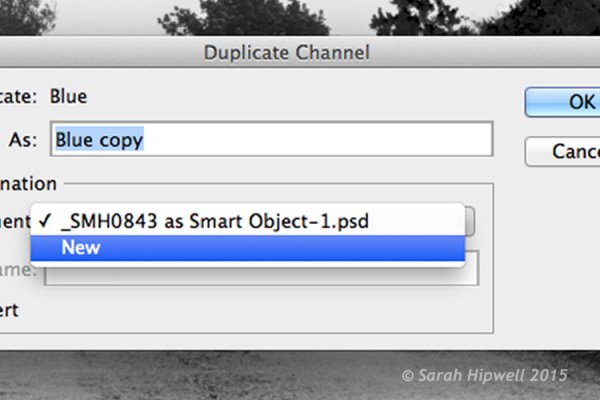
Clicking on the Document tab to select New to create a new document for a displacement map.

This creates a new document with the layer named Alpha 1. Before you save this document out as a grayscale PSD (Photoshop) file. You need to add some more contrast, go Menu> Image>Adjustments >Levels, then add Gaussian Blur of 9.9 pixels. This will allow the edges of the road marking vector shape to hug the contours of the road, rather than have a jagged edge. Convert this image to Grayscale and save it out as Displace road.psd. Close this document.

Duplicate-channel

This dialog box appears directly after selecting New in the previous step.

Displace-road

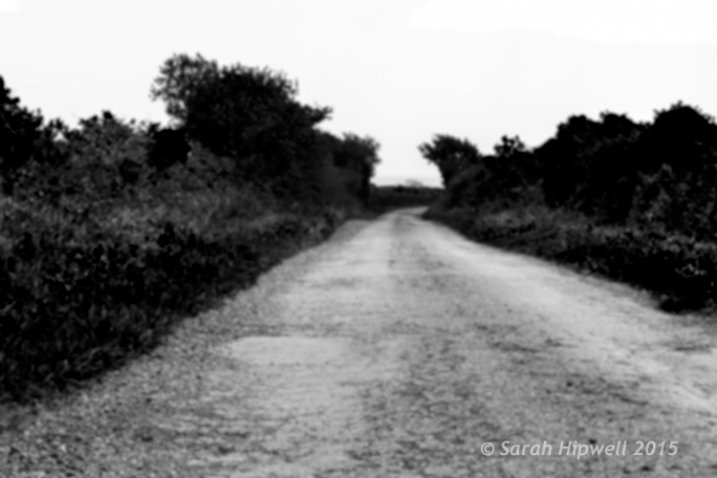
A grayscale displacement map of the road image.

Go back to the original document where we are still in the Channels panel and the blue channel is still highlighted. Click on the RGB layer, to bring back the image to colour.

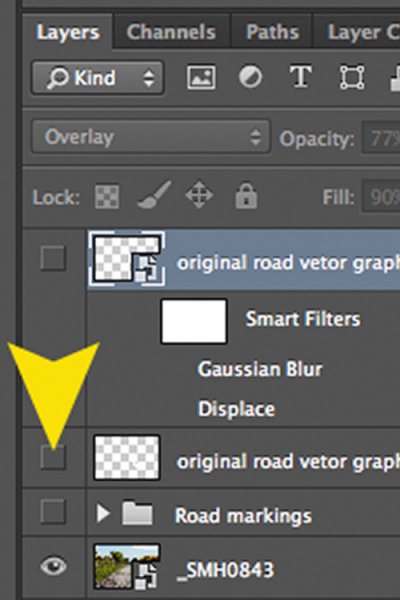
In the Layers Panel (I normally have this nested beside the channels panel) click on the square to the left of the layer thumbnail to bring back the visibility of the road vector shape that I had drawn before making the displacement map. See image below.

Layer-visibility

With this layer highlighted, go up to Menu>Filter>Distort>Displace. A small dialog box appears. The amount of distortion that you apply will depend on the values that you enter in the Horizontal and Vertical scale boxes. It defaults to 10 in each box. These values represent percentages.

The higher the values the greater the distortion. Experiment to see the desired effect that you want. When you convert your layers to Smart Objects, any adjustments that you make can be done easily and non-destructively. For this image, I chose 55 in the Horizontal scale and 80 for the Vertical one. I wanted more distortion on the road marking so that it would match the worn look of the road.

At this point your image may look a bit odd, follow the next step to make it look more blended and realistic.

Zoomed-in-road-marking

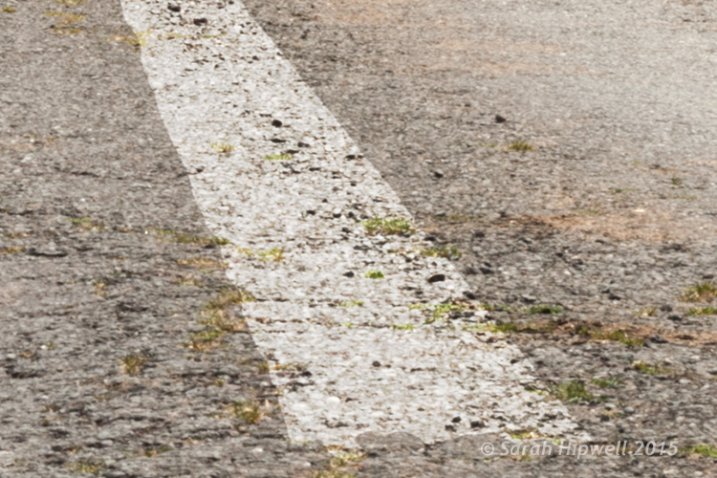
Close-up of the road marking after the displacement map and final tweaks have been applied.

Final tweaks: To give the road marking a more realistic look.

I added Gaussian Blur of 4px to get rid of the ever so slightly pixelated edge on the shape. Double-click anywhere to the right of the layer to bring up the Layer Style box. I changed the Blend Mode to Overlay, reduced Opacity to 77% and Fill to 90%. In the Blend If section, I moved the black slider to 187 on the Underlying Layer.

Tip. If you hold down the Alt/Option key when dragging the black or white sliders, this splits the slider arrow into two which makes the blend more smooth.

Layer-style

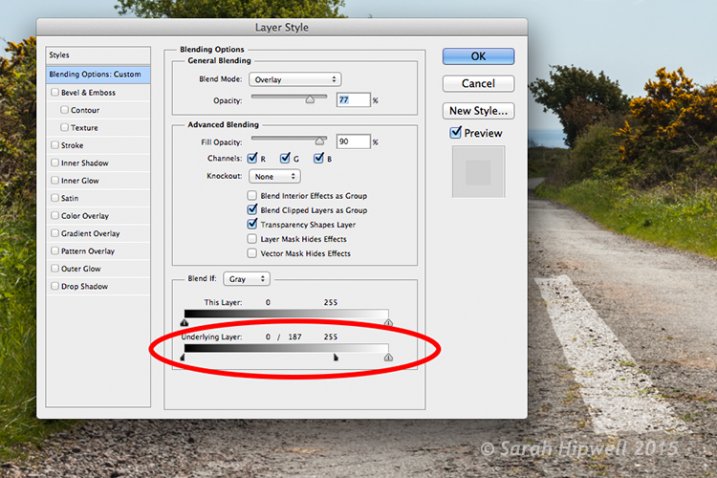
The black slider is split on the Underlying Layer in the Blending Options dialog box.

2. Shadow Effects – Water

Displace-in-water

Displace-in-water-map-applied

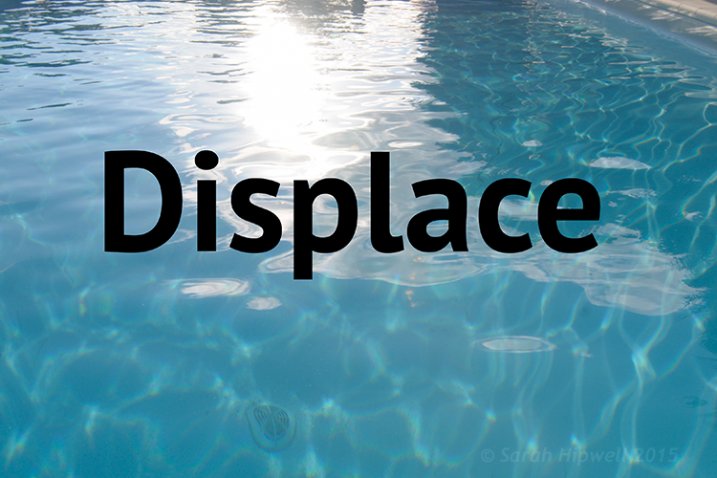
Before and after images showing the distortion on the word “Displace” when a displacement map has been applied.

Aim: To create a realistic reflective shadow in water with text.

I used the word “Displace” to show how a shadow in water can look quite effective and realistic. The displacement map I made for this image worked really well in distorting the text to wrap around the ripples of the water. I followed the same steps to generate the displacement as above but I applied a Gaussian Blur of 5.4px for this image.

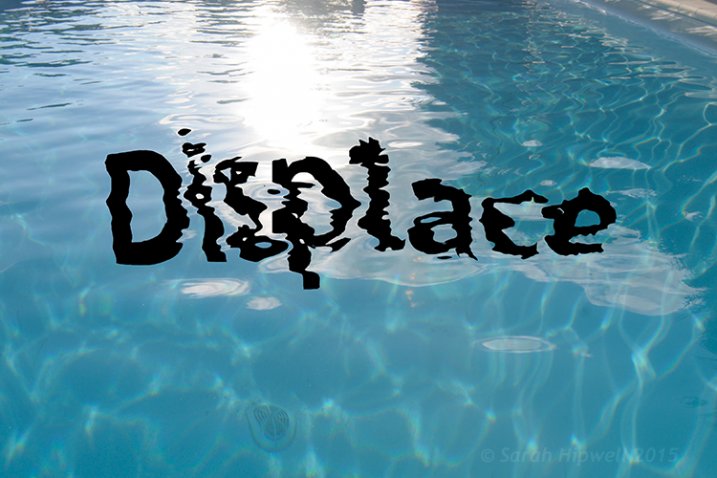
The values I added in the Displace dialog box for the Horizontal and Vertical scales were 80 respectively.

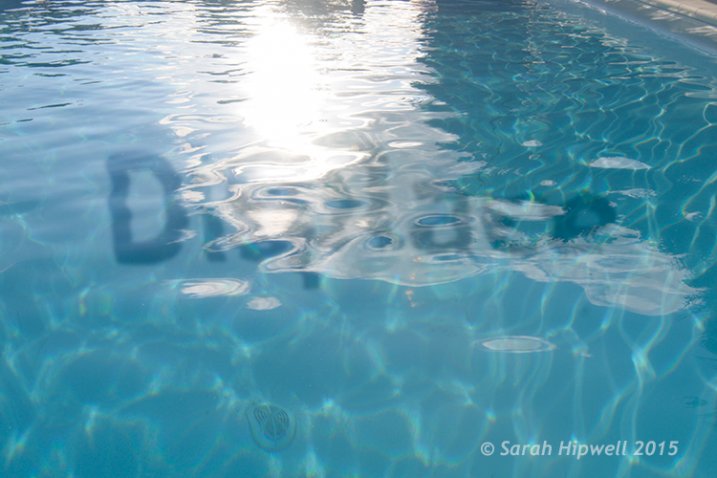
For the final tweaks, I added Gaussian Blur of 10.1px. I changed the Blend Mode to Softlight, reduced Opacity to 78%, and Fill to 80%. In the Blend If section, I moved the black slider on the Underlying Layer to 148.

Displace-in-water-final

The word Displace distorted using a displacement map.

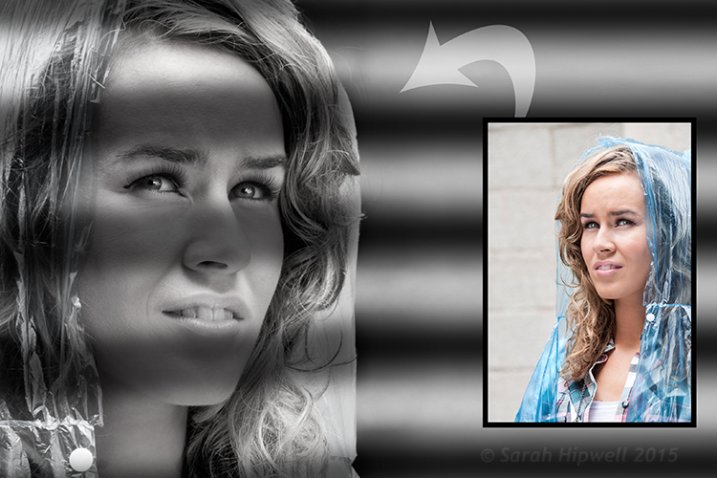
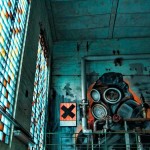
2. Shadow Effects – Film Noir Look

Woman-film-noir

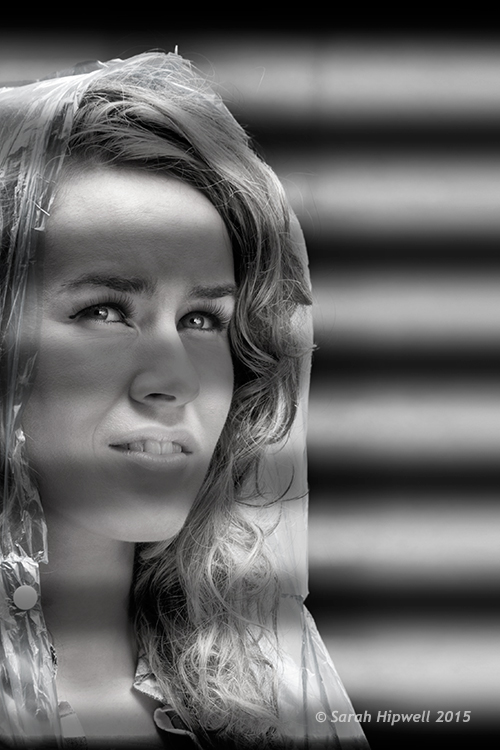
Using black horizontal lines and a displacement map to simulate light shining through window blinds.

Aim: To create a film noir look or the effect of light coming through blinds.

For this image I had to do more work in Photoshop to get the final look. The process to generate a displacement map is the same here as in the other examples. Just bear in mind that the blue channel is not the best choice for subjects as the skin tones look awful.

I isolated the model from this image and put it on a separate layer with a layer mask. I added a Black and White adjustment layer, then created thick black horizontal lines using the Rectangular Marquee Tool to resemble window slats on a separate layer. Next, I duplicated that layer. I used one for the background layer and added a significant amount of Gaussian Blur. I then moved the other layer above the model with the layer mask. I wanted to angle the black lines (window blinds) across the model’s face. I did this using the Free Transform Tool.

Woman-black-lines-film-noir

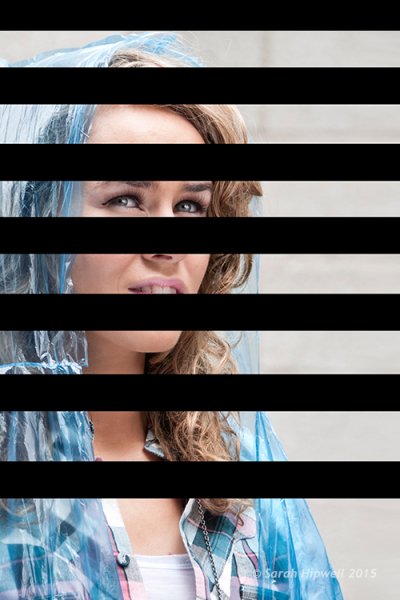
Black lines created using the Rectangular Marquee Tool.

I made a displacement map and distorted the slats over the model’s face using 15 and 20 as the values for the Horizontal and Vertical scales.

Woman-displacement-map-applied

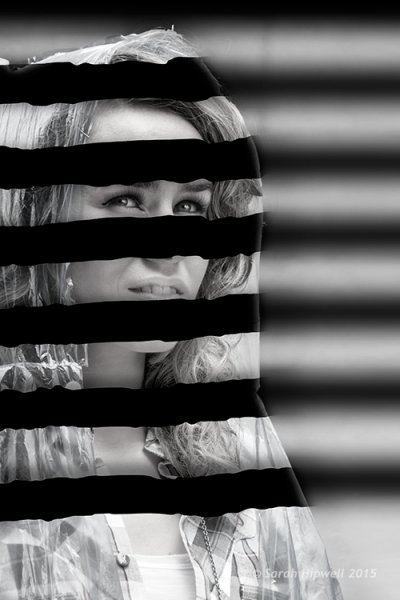
The black lines have been distorted via the Displace filter using a displacement map.

This is only a brief description of the final tweaks: I applied a Gradient Overlay and some Burning to darken the left side of the model as the light source is coming from that directoin. I added Gaussian Blur of 28.9px and reduced Opacity to 40%.

Tips

  • Blue is the worst channel to choose if you are making a displacement map where skin tones are involved.
  • The green channel usually shows the most contrast.
  • Make sure to use Gaussian Blur when generating displacement maps.
  • Displacements maps must be saved out as a grayscale .PSD file.

I hope I have inspired you to start making displacement maps and use the Displace Filter if you have never tried it before.

googletag.cmd.push(function() {
tablet_slots.push( googletag.defineSlot( “/1005424/_dPSv4_tab-all-article-bottom_(300×250)”, [300, 250], “pb-ad-78623” ).addService( googletag.pubads() ) ); } );

googletag.cmd.push(function() {
mobile_slots.push( googletag.defineSlot( “/1005424/_dPSv4_mob-all-article-bottom_(300×250)”, [300, 250], “pb-ad-78158” ).addService( googletag.pubads() ) ); } );

The post Get Creative with Displacement Maps in Photoshop by Sarah Hipwell appeared first on Digital Photography School.


Digital Photography School

 
Comments Off on Get Creative with Displacement Maps in Photoshop

Posted in Photography


Kinderfotos mit dem Handy

09 May

Kind auf einer blauen Hüpfburg

Knipsen nennt man es ja gern, wenn man mit dem Handy schnell ein paar Momente festhält. Aber damit tut man den Bildern völlig unrecht, denn sie sind oft sogar wertvoller als die Fotos vom Fotografen. Und das schreibt hier gerade tatsächlich eine Person, die als Kinderfotografin Geld verdient.
kwerfeldein – Fotografie Magazin | Fotocommunity

 
Comments Off on Kinderfotos mit dem Handy

Posted in Equipment


Springtime Paddling on Horsetooth Reservoir with Sea Wind Canoe

09 May
I started my 2015 paddling season on Horsetooth Reservoir in early February, but my favorite time is springtime: a lot of fresh green, wild plums and other bushes in bloom, high water lever with submerged cottonwood trees and little power boat traffic. The reservoir is more than 98% full at this time (see reservoir data.

Horsetooth Reservoir is 6 miles long, but I wonder how long would be a lap around the entire lake following closely the shore. 25+ miles? There is only one way to check it out. So far this year, I haven’t paddled more than 10 miles, always in Sea Wind canoe.

There are several access spots to launch your kayak, canoe or SUP:
1. South Bay – boat ramp
2. Inlet Bay – boat ramp
3. Satanka Bay – boat ramp
4. Sunrise Area from the Centennial Road (closed during winter).
5. North Eltuck Cove from the Lory State Park (trail access up to 0.25 mile at a low water)

I am avoiding boat ramps during power boat season. Off season, I am often using one of the South Bay boat ramps. It’s possible to park on a beach close to water there. Right now, boat ramps are very short and a regular parking is really close to water. I use Sunrise Area next to swimming “beach” mostly during summer. The shore there is quite rocky and not protected from waves and boat wakes. Access point 1-4 require Larimer County Parks pass and 5 – Colorado State Park pass for your car. I used to carry my light Thunderbolt kayak from the Lory State park or tow Sea Wind on snow.

winter dusk over Horsetooth Reservoir

February 5, 2015: Winter dusk over Eltuck Cove looking towards Horsetooth Dam. CameraL Canon 5D M3.

Aerial view of Horsetooth Reservoir

March 30, 2015: Aerial view of the South Eltuck Cove. Camera: Panasonic Lumix GM1 on F550 Flaming Wheel drone.

paddling Horsetooth Reservoir

April 27, 2015: Paddling north along the west coast between South Bay and Dixon Cove. Camera: Sony A6000 with 16-50mm lens.

May 1, 2015: Wild plums blooming.

May 1, 2015: Wild plums blooming. Camera: Sony A6000 with 16-50mm lens.

paddling Horsetooth Reservoir

May 6, 2015: Old sandstone quarry in Satanka Bay. Camera: Sony A6000 with 10-18mm lens.

May 6, 2015: Orchard Cove from the top of old road.

May 6, 2015: Orchard Cove from the top of old road. Camera: Sony A6000 with 10-18mm lens.

Related posts and resources:
Horsetooth REservoir map
Winter Season Paddling on Horsetooth Reservoir with Sea Wind Canoe
Early Morning Paddling on the Horsetooth Reservoir
Fisheye Lens Perspective for Paddling?


paddling with a camera

 
Comments Off on Springtime Paddling on Horsetooth Reservoir with Sea Wind Canoe

Posted in Photography