RSS
 

Archive for April, 2015

Straßenfotografie im Fokus

08 Apr

Männer an einer Mauer

Ein Beitrag von: Knut Skjærven

Ich kann mir kein anderes Genre in der Fotografie vorstellen, das herausfordernder, anspruchsvoller und lohnender ist als die Straßenfotografie. Mit der New Street Agenda versuche ich, einen neuen Weg zu gehen. Es handelt sich um eine Gemeinschaft der Lernenden. Und ich bin ihr erster Schüler.
kwerfeldein – Fotografie Magazin | Fotocommunity

 
Comments Off on Straßenfotografie im Fokus

Posted in Equipment


Lensbaby introduces Velvet 56mm f/1.6

08 Apr

Lensbaby has introduced the Velvet 56, a portrait lens with an f/1.6 aperture and 1:2 magnification, as well as a minimum focus distance of 5 inches. Lensbaby claims the lens produces ‘soft, glowing’ effects at brighter apertures for a ‘velvety’ quality the lens is named for. Read more

Articles: Digital Photography Review (dpreview.com)

 
Comments Off on Lensbaby introduces Velvet 56mm f/1.6

Posted in Uncategorized


Datacolor offers Spyder5 with redesigned calibrator

08 Apr

Color management company Datacolor has announced a new version of its Spyder monitor calibrating tool that it claims offers up to 55% improvement in tonal response, leading to ‘more accurate shadow detail and smoother gradients.’ The body of the new Spyder5 calibrator has been redesigned, somewhat losing the spider legs that got the series it name. Read more

Articles: Digital Photography Review (dpreview.com)

 
Comments Off on Datacolor offers Spyder5 with redesigned calibrator

Posted in Uncategorized


7. April 2015

08 Apr

Das Bild des Tages von: Tanja Deuß

Das Düsseldorfer Stadttor auf Polaroid fotografiert, schwarzweiß.

Im Ausblick: 1000 Jahre belichten, Überbevölkerung und Türkei schickt dt. Fotojournalisten zurück.
kwerfeldein – Fotografie Magazin | Fotocommunity

 
Comments Off on 7. April 2015

Posted in Equipment


3 Tips for Capturing Connections in Family Portraits

08 Apr

Capturing Conenctions in Family Portraits Article for DPS by Memorable Jaunts 01


We’ve all heard the dreaded words, “Okay everyone, look at the camera and at the count of three say Cheese!”. I have been guilty of using this technique too in my early days of as a family portrait photographer. I remember coming home from client photo shoots and kicking myself for not being original, botching up my client’s experience, and getting really mediocre images that lacked any emotion or connection.

Over the course of time, my style of photography evolved and I started investing more time and effort in making my clients feel comfortable before, during, and after their photoshoot. The results were images that were fun, fresh and full of emotions. Exactly the kind of images that I want in my portfolio. My clients love the experience and I often hear words like, “Oh that was so much fun!” or ‘Thank you for making it so easy”, and “I loved how you made us feel at ease”. I realized that if, as a photographer, I was having a good time interacting with and photographing my clients, they were having a great time too.

Capturing Conenctions in Family Portraits Article for DPS by Memorable Jaunts 02


At the end of the day, my job as a photographer is not only to take great, meaningful and beautiful pictures for my clients but also to make sure they have a great time and it is a pleasant experience. To that end, there are some things to keep in mind to capture connections among your clients

#1 – Family dynamics

It is very important to understand family dynamics prior to the photoshoot. This goes beyond the typical questions about the names and ages of the kids. Try and understand likes and dislikes of the people involved. If there are young children involved, take the time to understand personalities of the kids as individuals, and with their siblings. Is the family casual and easy going, or do they like formal, traditional posed pictures? Just because they like a particular style of imagery does not mean you have to stick to that. But certainly incorporate what they want first, then feel free to experiment.

Capturing Conenctions in Family Portraits Article for DPS by Memorable Jaunts 03

This family made it very clear that their new puppy was their second baby! – Rather than excluding the dog, I made sure to include him in almost all their images.

Capturing Conenctions in Family Portraits Article for DPS by Memorable Jaunts 04

Large family groups don’t have to be intimidating. Just engage with them and give them something to do.


#2 – Structure the shoot

Trust me, this is key and will ensure you maintain your sanity during the photoshoot. Have a plan of action. I make it a point to spend the first five minutes of every session educating my clients on what they can expect. The first few minutes is warmup time – testing the light, figuring out the right lens, etc. I let my clients know exactly what’s happening, and many times, I get a lot of beautiful images during this time. Clients are much more relaxed if they think these first few minutes don’t really count.

Then we incorporate an activity like walking along a path, climbing a tree, playing in the park, and I photograph around that activity. Finally we just sit down to enjoy each other’s company. This not only let’s the clients know exactly how we are going to spend our time but also helps keep me in check. Because let’s face it, for most of us, once we start clicking that shutter, it is so easy to loose track of time!

Capturing Conenctions in Family Portraits Article for DPS by Memorable Jaunts 05

A simple conversation that was set up resulted in some magical daddy-daughter moments.

Capturing Conenctions in Family Portraits Article for DPS by Memorable Jaunts 06

Sometimes just use hands to communicate connection among family members.


#3 – Make it fun

This is a critical part of capturing connections among family members during the photoshoot. For family portraits with little kids, try techniques like tickle-fest, blowing bubbles, rocking out those dance moves and other such methods to get the kids in the spirit of having fun. If kids are a little older, try cracking jokes. Bring some basic props if required and let the kids play. Photograph around the activity and capture candid moments of family interactions. If all else fails, it is okay to setup the shot and work the family into the pose. Make sure to keep clicking so that you can get some candids through out the whole process.

Capturing Conenctions in Family Portraits Article for DPS by Memorable Jaunts 07

Capturing Conenctions in Family Portraits Article for DPS by Memorable Jaunts 08

Bride + Bridesmaids + a catwalk pose = really fun images!


Remember that families that play together, stay together. Your job as a photographer is to capture these family dynamics in a fun and pleasing way. If your clients have a great time during the shoot, it is more than likely that they will love your images because they will remember the experience in a positive light.

googletag.cmd.push(function() {
tablet_slots.push( googletag.defineSlot( “/1005424/_dPSv4_tab-all-article-bottom_(300×250)”, [300, 250], “pb-ad-78623” ).addService( googletag.pubads() ) ); } );

googletag.cmd.push(function() {
mobile_slots.push( googletag.defineSlot( “/1005424/_dPSv4_mob-all-article-bottom_(300×250)”, [300, 250], “pb-ad-78158” ).addService( googletag.pubads() ) ); } );

The post 3 Tips for Capturing Connections in Family Portraits by Karthika Gupta appeared first on Digital Photography School.


Digital Photography School

 
Comments Off on 3 Tips for Capturing Connections in Family Portraits

Posted in Photography


What goes around: 6 mid-sized ball heads put to the test

08 Apr

One of the most important parts of a tripod is the head that connects the camera to the legs. Continuing where our previous ball head roundup left off, we’ve collected six ball-type heads for review that are in the medium-to-large size class. These heads are suitable for most large cameras and lenses, with only the truly gigantic or heavy devices requiring something larger. Find out which ones earn our recommendation. Read more

Articles: Digital Photography Review (dpreview.com)

 
Comments Off on What goes around: 6 mid-sized ball heads put to the test

Posted in Uncategorized


Settlers of Chernobyl: Self-Contained, Fallout-Absorbing City

07 Apr

[ By WebUrbanist in Conceptual & Futuristic & Technology. ]

pripyat self contained city

Despite warnings about dangerous radiation and an ongoing project to cap and contain further fallout, many families have already taken up residence around Ukraine’s famous failed nuclear reactor – this skyscraper would enable them to do so safely. The skin of the building provides more than just shelter, glowing like a grounded aurora as it captures and processes radiation.

pripyat design soluiton

pripyat aurora skyscraper design

Designed by Zhang Zehua, Song Qiang and Liu Yameng, Unexpected Aurora filters air and water, harvests solar energy, and creates a kind of self-contained oasis that would allow people to resettle the wastelands around Pripyat. Their design won them an honorable mention in the 2015 eVolo Skyscraper Competition.

pripyat nuclear city design

Protocol for many irradiated sites is simply a bit of soil coverage (as little as a few feet) and conversion to a park (as opposed to homes), the idea being: a bit of exposure here and there is not too harmful, though living right on top of contaminated areas could be. Many parks in San Francisco, for instance, were built on sites once used as test beds for hosing down irradiated ships, which were intentionally placed closed to nuclear tests in the ocean. As the government learned, you can’t wash away the radiation, but trying to do so does cause some to leak into the surrounding ground. Of course, the situation in and around Pripyat is significantly more severe.

pripyat city in a box

The creators set the scene: “With a big bang, the fourth reactor of the Chernobyl nuclear power plant exploded, the amount of radiation is about 400 times of the atomic bomb which was dropped on Hiroshima. About seven million people were forced to leave their homeland in two days, they had no time to say goodbye to their present life.”

pripyat active system designs

They also acknowledge the aftermath: “But not everyone accepts the arrangement of fate. The negative effects of radiation have been dafeated by a large group of settlers, more and more people are returning to their homeland which located in the restricted area, what can be sure is that they use a different way to look at the risk which they bear.”

pripyat concept science diagrams

There is no perfect solution for a complex problem like this, and the concept is unlikely ever to be realized, but at least this approach recognizes the reality on the ground and attempts to bridge the gap between an imperfect present and hopeful future.

Share on Facebook


[ By WebUrbanist in Conceptual & Futuristic & Technology. ]

[ WebUrbanist | Archives | Galleries | Privacy | TOS ]


WebUrbanist

 
Comments Off on Settlers of Chernobyl: Self-Contained, Fallout-Absorbing City

Posted in Creativity


How to Create Your Own Lightroom Presets

07 Apr
Import presets Lightroom

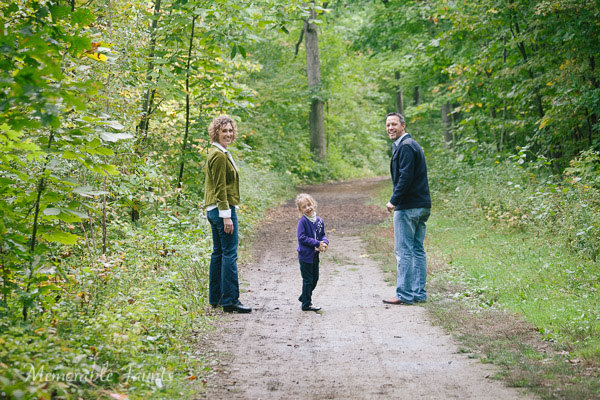
A straight out of the camera Raw file from an EOS 5D Mark II, without any corrections applied in Lightroom. This is the sort of thing you see when you import images into Lightroom without applying a Develop Preset at the import stage.

There are mundane tasks in Lightroom that you carry out on almost every photo you import. You can save time by creating Develop Presets to perform these jobs automatically upon import, so that you don’t have to do them later.

Import presets Lightroom

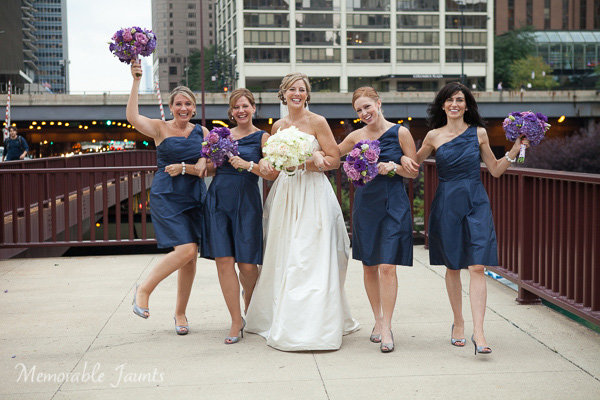
The same photo with Profile set to Landscape, lens corrections applied, chromatic aberrations removed and white balance set to auto. This is what you would see after importing the photo into Lightroom if you applied an import preset similar to the one that I show you how to make in this article. The biggest benefit is that it saves you time.

Here’s an example of how I created a Develop Preset to use when I import photos taken with my Fujifilm X-T1 camera. The idea was to create a preset that takes me to a neutral starting point from where I can process the file. You can follow along to create an import Develop Preset for your own camera. I’ll explain what I’m doing at each step and suggest some variations you can try.

Start by selecting a photo taken with the camera that you are going to create the Develop Preset for and open it in the Develop module. Zero all the settings by pressing the Reset button at the bottom (you may find it helpful to make a Virtual Copy of the photo first so you don’t undo any edits you have already made).

1. Camera Calibration panel

I set Process to 2012 (Current) the most recent, and Profile to Classic Chrome (the Film Simulation setting I use most often). The Profile options available to you vary depending on the camera.

Import presets Lightroom

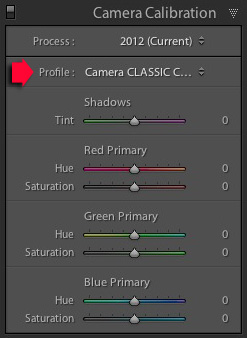
Possible variation: You can create a different Develop Preset for each Profile that you regularly use.

2. Lens Corrections panel

Import presets Lightroom
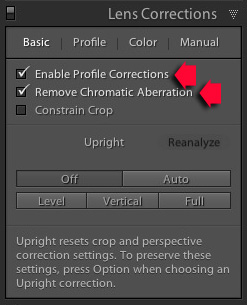
I don’t have to do anything here for the X-T1 as lens corrections are carried out by the camera, saved within the Raw file, and automatically applied by Lightroom.

Most cameras don’t do this, so if this applies to you then go to the Basic tab and tick the Enable Profile Corrections and Remove Chromatic Aberration boxes. Then go to the Profile tab and set Setup to Auto so that Lightroom adjusts the settings according to what lens is mounted on the camera.
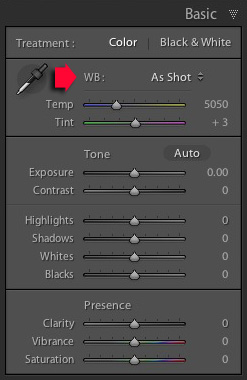
3. Basic panel

Set White Balance to As Shot and make sure all the other sliders are zeroed.

Possible variation #1: Tick the Auto Tone box to have Lightroom automatically set the Exposure, Contrast, Highlights, Shadows, Whites and Blacks sliders. This is a matter of preference, I don’t do this as I prefer to set them myself.

Import presets Lightroom

Possible variation #2: Create one preset for colour photos, and another for those you intend to convert to black and white by setting Treatment to Black & White.
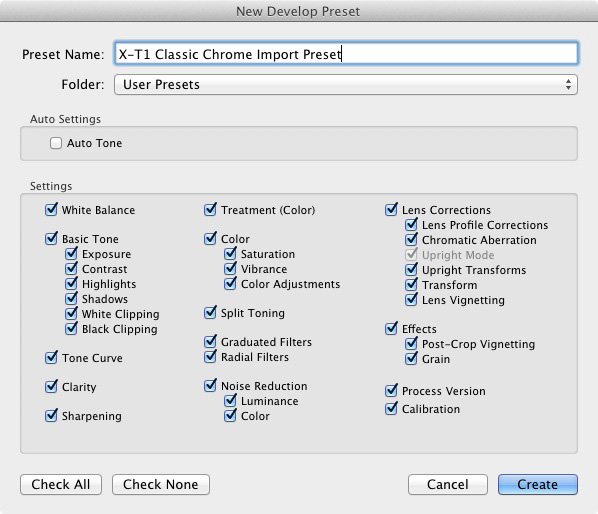
Creating the Preset

Go to the Develop Preset panel (on the left side) and click the Create New Preset icon (the plus sign at the top, to the right of the word “Presets”). This brings up the New Develop Preset window. Give the Preset a name and select a folder to save it in (User Presets is a good one). Click the Check All button and press Create when you are ready to save the Preset.

Import presets Lightroom

That’s it! It’s a simple process that doesn’t take very long and can save you a lot of time when you import your photos.

Applying Develop Presets upon Import

Import presets Lightroom
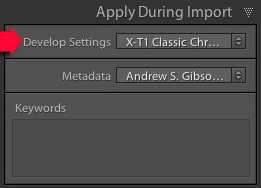
To apply the Develop Preset you just created, launch the Import Window and go to the Apply During Import panel. Set Develop Settings to the appropriate preset. This is where creating several presets helps saves time, as you can pick the most appropriate one for the photos you are importing. When you click the Import button Lightroom applies the settings in the selected preset, and renders a preview that includes those settings.

Adding Copyright Info

While you’re in the Import Window, it’s worth setting up another Preset to automatically add Copyright information to the metadata of your photos when you import them.

Go to the Metadata menu in the Apply During Import panel and select New. Lightroom opens the New Metadata Preset window, where you can add information such as your name and copyright details.

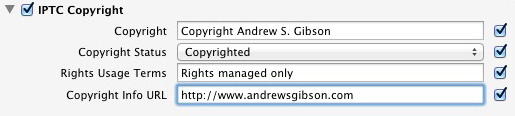
Start by giving the Preset a name and clicking the Check Filled button. Under IPTC Copyright, set Copyright Status to Copyrighted and fill in the other fields appropriately (my entries are shown below).

Import presets Lightroom

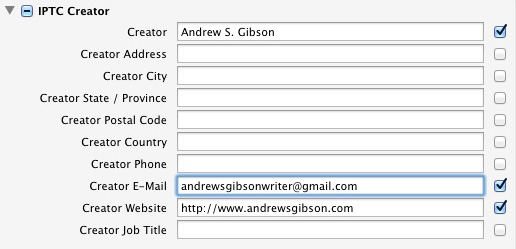
Under IPTC Creator, add your name, website, email address and any other appropriate details. I leave out my address here as I move around a lot so it’s constantly changing (plus identity theft is a risk).

Import presets Lightroom

Click Done when you’re finished. When you import photos all you have to do is select the Preset you just created from the Metadata menu.

File Renaming

If you’re in the habit of renaming your photos you can set up a Filename Template to do so. Go to the File Renaming panel and selecting one of the options from the Template menu. Alternatively, select Edit to open the Filename Template Editor and create your own Template

There are lots of variations you could use here, so make sure you pick something that makes sense to you. The idea is to give each photo a unique name so that you don’t end up with more than one photo sharing the same name, as your camera’s counter cycles back around to zero.

You could go for something like your initials, followed by the date and a sequence number, as in the example below. When it’s ready go to the Preset menu at the top and select Save Current Settings as New Preset. Lightroom asks you to give the new template a name. All you have to do to use the Preset is select it from the File Renaming menu.

Import presets Lightroom

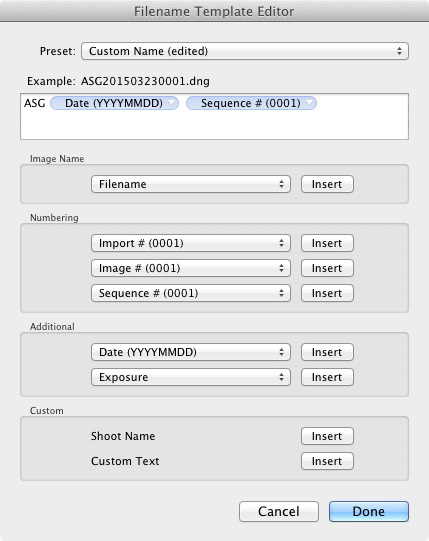
You can also add a dash in between if you like so your filename looks like: ASG-20150323-0001.dng

Your turn

Hopefully this has given you some useful ideas for creating your own Presets in Lightroom to save time and speed up your workflow. How do you use Presets when you import photos into Lightroom? I’d love to hear some good time saving tips. Please let us know in the comments.


The Mastering Lightroom Collection

Mastering Lightroom ebooksMy Mastering Lightroom ebooks will help you get the most out of Lightroom 4 and Lightroom 5. They cover every aspect of the software from the Library module through to creating beautiful images in the Develop module. Click the link to learn more or buy.

googletag.cmd.push(function() {
tablet_slots.push( googletag.defineSlot( “/1005424/_dPSv4_tab-all-article-bottom_(300×250)”, [300, 250], “pb-ad-78623” ).addService( googletag.pubads() ) ); } );

googletag.cmd.push(function() {
mobile_slots.push( googletag.defineSlot( “/1005424/_dPSv4_mob-all-article-bottom_(300×250)”, [300, 250], “pb-ad-78158” ).addService( googletag.pubads() ) ); } );

The post How to Create Your Own Lightroom Presets by Andrew S. Gibson appeared first on Digital Photography School.


Digital Photography School

 
Comments Off on How to Create Your Own Lightroom Presets

Posted in Photography


Die Hände der Musiker

07 Apr

Zwei Hände eines Musikers.

Ein Beitrag von: Marc Mennigmann

Musik umgibt mich, seit ich ein kleiner Junge war. Zuerst als passives Vergnügen zum Beispiel in Form der Sgt.-Peppers-Platte, die mein Papa manchmal hörte. Später dann auch aktiv mit der Trommel, die mir meine Tante sehr zum Missfallen meiner Eltern zu meinem 4. Geburtstag schenkte.
kwerfeldein – Fotografie Magazin | Fotocommunity

 
Comments Off on Die Hände der Musiker

Posted in Equipment


Beautiful Bacteria: Infectiously Intricate Paper Cut Art

07 Apr

[ By Steph in Art & Sculpture & Craft. ]

bacteria paper cut 1

Few people outside of research scientists are quite so well-acquainted with the bacteria that grows inside the human body as artist Rogan Brown, who spends up to four months studying, cutting and assembling his paper reproductions of microbes and pathogens.

bacteria paper cuts 11

The series ‘Outbreak,’ completed in 2014, was inspired by a meeting with a group of microbiologists planning a new exhibition center focusing on the human microbiome, and its exhibition just happened to coincide with the deadly ebola outbreak last summer, when everybody had infectious diseases on the brain.

bacteria paper cuts 7

bacteria paper cut 2

“Fascinated by this hidden world I spent months researching the strange shapes and forms of microbes and pathogens,” says Brown. “I wanted to create a piece that examined our fears of the microbiological world, so out of one of the petri domes a group of bugs burst forth, full of ferocious uncontrollable energy.”

Bacteria Paper Cuts 8

bacteria paper cuts 9

bacteria paper cuts 3

Stacks upon stacks of finely-sliced white paper make up each organism, nestled into white foamboard dishes. A more recent piece, ‘Cut Microbe,’ measures over 44 inches in length, about a half a million times the bacterium’s actual size.

bacteria paper cuts 6

bacteira paper cuts 4

The details are scientifically accurate, including the tentacle-like flagella that allow the bacteria to swim through our intestinal tracts, yet rendered in white paper, they become something aesthetically pleasing to gaze at, removed from the grotesque nature most often associated with them.

microbe detail

“People often marvel at the time I spend on a sculpture but Time is the fourth dimension that gives my work part of its value. Few other art forms foreground the amount of time spent making them as a paper sculpture does: every cut is a moment. The end result is the sense of something incredibly hard won and precious which is precisely the message I wish to convey: we need enormous concentration and effort to really SEE and appreciate what we see.”

Share on Facebook


[ By Steph in Art & Sculpture & Craft. ]

[ WebUrbanist | Archives | Galleries | Privacy | TOS ]


WebUrbanist

 
Comments Off on Beautiful Bacteria: Infectiously Intricate Paper Cut Art

Posted in Creativity