RSS
 

Archive for March, 2015

Tips for Using Golden Hour Light for Portraits

24 Mar

Memorable_Jaunts_Portraits_During_Golden_Hour_DPS_Article-12

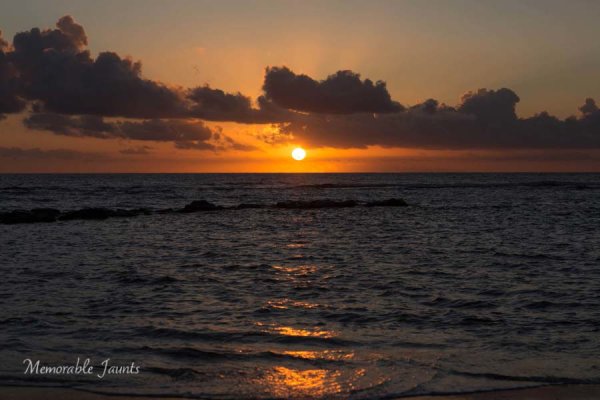
Most photographers will argue vehemently that the golden hour – that pocket of time just after sunrise and just before sunset – produces some of the most gorgeous light ever. Golden light shows up during this time, generally about an hour or so before sunset (after sunrise). However these times are not exact because golden light does depend on where you live. The further away from the equator you are located, the longer golden hour lasts. The closer to the equator you are, the shorter it is. Golden hour is also seasonal.

Memorable_Jaunts_Portraits_During_Golden_Hour_DPS_Article-13

There is a reason why most natural light photographers tend to schedule their portrait sessions around golden hour – to maximize the amount of golden light that they can use and get amazing results for their clients.

Why do you want to use golden light?

There are several reasons why golden light is so sought after.

Golden light is very soft

Memorable_Jaunts_Portraits_During_Golden_Hour_DPS_Article-7

Soft light illuminates the skin tones evenly.

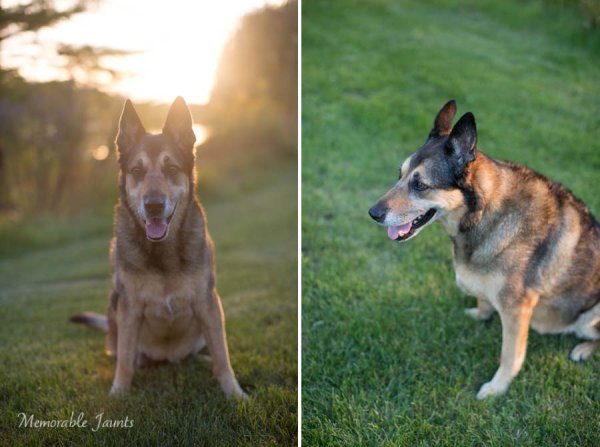
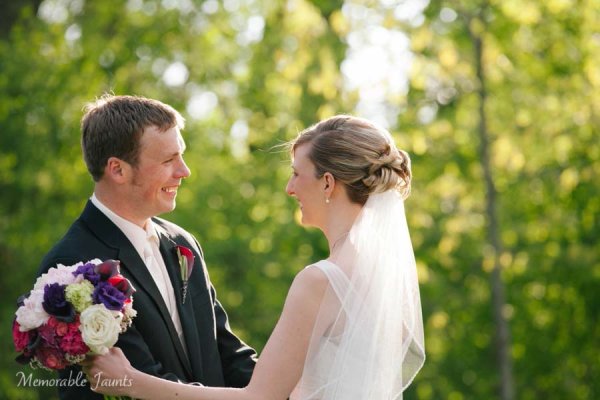
Since the sun is almost setting or just rising during golden hour, the sunlight tends to be much softer than when the sun is high in the sky. During the golden hour, you can have your subjects look towards the sun and not have to squint or shield their eyes. Practice discretion on how long you want them to stare at the sun, and also take care not to point lens and cameras directly into the sun.

Golden light is warm

Memorable_Jaunts_Portraits_During_Golden_Hour_DPS_Article-10

The warm colors of sunlight are striking against the green grass.

It is easy to think that any form of sunlight is warm – whether the sun is high in the sky, or close to the horizon. But in reality, the warmth varies as the sun moves across the sky. Sun near the horizon has less intensity of direct light since it must travel through more of the atmosphere. You may notice, it is much easier to look at a sunrise and sunset with the naked eye – not that you should because it can damage the retina. As per wikipedia, more blue light is scattered during golden hour, so the sun’s light appears more reddish.

Golden light has dimension

When the sun is high in the sky, particularly around noon, the overhead light is very harsh, creating strong highlights and dark shadows. This type of lighting is not very flattering or desirable especially in portrait photography. Most photographers will use external flash or even a reflector to add additional light to the subject’s face or body, to make the light more even. Because the contrast is lower during golden hour, shadows and highlights are not that extreme. In addition, the sun’s smaller angle to the horizon produces long shadows.

Memorable_Jaunts_Portraits_During_Golden_Hour_DPS_Article-14

How do you use golden light?

Location scouting

Take the time to know the area that you are looking to do photography. There are many website and apps that can provide exact sunrise and sunset times. Some even take it a step further and provide golden hour times – which is specifically for photographers! Even the location matters when searching for golden light. If your photoshoot is in a park that has a lot of tree cover, the light will be further diffused, giving you the option of having a spotlight type effect for your portraits. If you are in a big city, take advantage of the natural block that tall buildings provide when photographing a subject.

Metering

Golden light can be challenging from a metering perspective. Most people leave it in standard (matrix or evaluative) mode and then play around in post-production to try and get the look they want. There is an easier way to eliminate all that time spent in front of the camera. Spot metering is my preferred metering method particularly for backlighting situations. I spot meter off the subject’s face or shadowy part of the image and then recompose and adjust exposure compensation half a stop or more to get the look I want.

Front lighting

Memorable_Jaunts_Portraits_During_Golden_Hour_DPS_Article-1

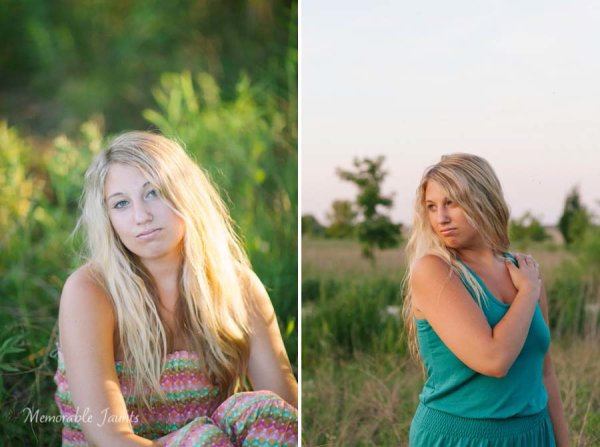
Options for front lighting include the sun along the side of the subject as well as subject facing the sun.

Front lighting is when your subjects face the sun directly. Because of the low angle of the sun and the soft light, the sun isn’t as harsh and your subjects will not be squinting as they face the sun. The light is even and warm so make sure that is the look you want – gorgeous, warmly lit, imagery!
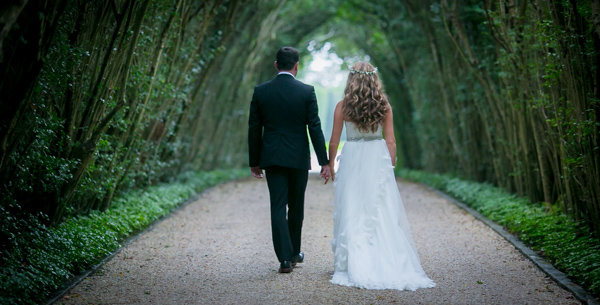
Backlighting

Memorable_Jaunts_Portraits_During_Golden_Hour_DPS_Article-9

Memorable_Jaunts_Portraits_During_Golden_Hour_DPS_Article-6

Backlighting is when you put the subjects between you and the sun. This creates a warm glow and looks really stunning. Make sure you expose for your subject’s skin tones. If you expose for the sun, then you will get a silhouette effect (which might not be the look you are going for, but is equally stunning).

Rim light

Memorable_Jaunts_Portraits_During_Golden_Hour_DPS_Article-3

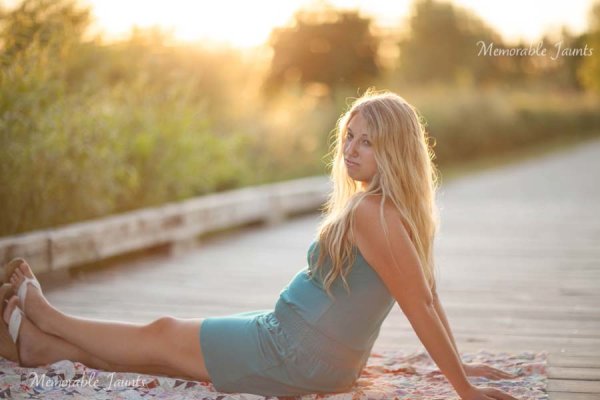
Rim lighting occurs when you are using the sun to backlight the subject. Here the subject is between you and the sun. If you have a darker background, you can see a faint glow outlining them. That is a rim light and it really helps the subjects pop out in the image, drawing attention to them, adding separation of subject from the background.

No matter what type of golden hour lighting you use, you are bound to get some awesome images. Experiment with various locations and techniques. Also go back to the same location at various times of the year and track how golden hour lighting changes – you will learn to gauge, judge, and use light as a key element in your portrait photography.

googletag.cmd.push(function() {
tablet_slots.push( googletag.defineSlot( “/1005424/_dPSv4_tab-all-article-bottom_(300×250)”, [300, 250], “pb-ad-78623” ).addService( googletag.pubads() ) ); } );

googletag.cmd.push(function() {
mobile_slots.push( googletag.defineSlot( “/1005424/_dPSv4_mob-all-article-bottom_(300×250)”, [300, 250], “pb-ad-78158” ).addService( googletag.pubads() ) ); } );

The post Tips for Using Golden Hour Light for Portraits by Karthika Gupta appeared first on Digital Photography School.


Digital Photography School

 
Comments Off on Tips for Using Golden Hour Light for Portraits

Posted in Photography


The Winners of the Four NYIP Photography Courses Are . . .

24 Mar

The Winners of the Four NYIP Photography Courses Are…

NYIP logo440x232black  In Post Top and Bottom

A BIG thank you to everyone who entered our recent competition to win one of four photography courses from our friends at NYIP.

The response was amazing with over 680 entries. In fact, it was so great that the team at NYIP decided to offer a special $ 150 discount off any of their courses (details below). But first – here are the four winners of the competition (chosen by NYIP):

  • Wedding Photography Course – Angela Pritchard
  • Portrait Photography Course – Jenn S
  • Travel Photography Course – Deonne Kahler
  • Photojournalism Course – Vicki

A Message from NYIP (and a $ 150 discount)

“Congratulations to all four winners! And thank you to all the participants for your many comments. We were so excited to see how many people were interested in our new photography courses. To those who did not win, we wanted to let you know that for a limited time we are offering you the chance to save $ 150 on the NYIP Course of your choice. Learn more at www.nyip.edu. But don’t wait, because this offer is only available until Thursday, March 26th. – The NYIP Team”

Winners will be emailed with details of how to collect their prize by the team at NYIP.

Thanks to everyone for entering and to NYIP for yet again, sponsoring another wonderful competition.

The winning comments:

By Angela PritchardFourteen years ago, when my husband and I tied the knot, we could not afford to hire a wedding photographer. Instead, we bought a few of those one-time use cameras and had family members take photos. Needless to say, we didn’t get any really good, memorable photos. Over the years I have gone through countless wedding photos posted on the internet and so many of them are images that I would have loved to have had to remember my wedding by. In the last few years I have actually photographed several weddings for friends and family. I make sure to photograph every single detail that I would have wanted captured for my big day. From the rings to the Borrowed, Blue, Old, and New, the dresses and the tuxes, the cake and the flowers, everything gets photographed. Photographing weddings can be very stressful but it’s that stress combined with all the photos I didn’t get for my wedding that pushes me to get the very best for the couple I’m shooting for. I would love to take the Wedding Photography course to help mold me into a better wedding photographer; to improve on the things I’m doing right and correct the things I may be doing wrong. I believe this course would help me immensely. I have my fingers crossed and I will be waiting right here in front of my computer for you to contact me to tell me that I have won. Thank you so much for considering me. And if by some strange reason I don’t win, I will still continue to make beautiful photos of the world around me.

By Jenn S.I would love to win the Portrait Photography Course. Last year while I was pregnant with our second son, we learned that my husband had cancer. He got through treatments (and is now cancer-free!), but the cost of those treatments took a toll on our finances, and we were left with little money for me to start the photography business I had been planning on to help support our family. Through hard work, I was able to purchase some basic equipment, but because we could not afford it, everything I have learned about using my DSLR, equipment, and running a successful business has been self-taught, and I am sure that there are many gaps in my knowledge base. I would love to take the Portrait Photography Course to enhance my understanding of posing, learn how to better run my business, and so much more. I think I would really benefit from an environment where I am able to get the (professional) feedback on my work that I desperately need, and having a mentor to guide me sounds just heavenly! I also think I’d also greatly benefit from the student forum and the knowledge base my peers could provide there! Thank you so much for the opportunity to win!

By Deonne Kahler I’d very much like to win the Travel Photography Course. I’ve been making photographs since high school, but only recently started taking it seriously, and just placed in my first competition. I’m on a mission to see every U.S. National Park, and until now I’ve been documenting those visits the best I can. I feel so strongly that it’s my job to let people know about the wonders of the parks – which include historical monuments, an easy and accessible way for all of us to learn more about this country and its past. I’m based in Taos, NM but I travel around the country with my dog Sam in my 13′ Scamp travel trailer. I’ve been winging it with my photographs up until now, but the NYIP course would push me to the next level, as I still have plenty to learn about using my Nikon D90, being more nimble with it in the field, documenting the National Park sites in a unique way (honing my voice), and translating that to books/online media where I share photos and stories about the Parks. They’re such a treasure, and with the NYIP course, i’d be much better equipped to tell their stories and get more folks involved either by simply visiting, or supporting the National Parks foundation to keep them safe from development. Thank you for the opportunity! (P.S. This is a terrific site – so much good information. Thanks for that, too.)

By VickiI am a Social worker in the military and Photojournalism is exactly what I’m looking for. I’m a beginner and have been doing a lot of learning on my own, but would love to have the opportunity to learn from professionals. I’m drawn to photojournalism because of my love for people and our stories and would love to improve my ability to capture these stories in my pictures. I’ve only been deployed once but hopefully will have the opportunity to travel more with my Army career and use photojournalism skills to capture my travels.

googletag.cmd.push(function() {
tablet_slots.push( googletag.defineSlot( “/1005424/_dPSv4_tab-all-article-bottom_(300×250)”, [300, 250], “pb-ad-78623” ).addService( googletag.pubads() ) ); } );

googletag.cmd.push(function() {
mobile_slots.push( googletag.defineSlot( “/1005424/_dPSv4_mob-all-article-bottom_(300×250)”, [300, 250], “pb-ad-78158” ).addService( googletag.pubads() ) ); } );

The post The Winners of the Four NYIP Photography Courses Are . . . by Darlene Hildebrandt appeared first on Digital Photography School.


Digital Photography School

 
Comments Off on The Winners of the Four NYIP Photography Courses Are . . .

Posted in Photography


Architectural Fiction: 35 Impossibly Surreal Structures

24 Mar

[ By Steph in Art & Drawing & Digital. ]

Fantasy Architecture Dujardin 1

Unbound by gravity, the need for structural soundness or any sense of real-world aesthetics, architecture becomes like a life form of its own, multiplying and mutating in strange and unsettling ways. These fictional architectural assemblages explore unlikely configurations that are only possible with digital art and photo manipulation.

Surreal Structures by Matthias Jung

fantasy architecture jung 1

fantasy architecture jung 2

fantasy architecture jung 3

fantasy architecture jung 4

fantasy architecture jung 6

fantasy architecture jung 7

The architectural creations of Matthias Jung seem to inhabit a fairytale realm where gravity doesn’t apply, raising Brutalist concrete structures on tiny stilts, floating stained glass windows like balloons and untethering some from the earth altogether. Some designs, however, seem like they might actually occupy some hidden rural meadow in Europe where aging country homes are actually topped with sheep-dotted hills. Jung is a German-based graphic designer who refers to his strange photo collages as “architectural short poems.”

Fictional Architecture by Victor Enrich

fantasy architecture enrich 1

fantasy architecture enrich 2

fantasy architecture enrich 3

fantasy architecture enrich 4

fantasy architecture enrich 5

Victor Enrich’s ‘architecture gone wild‘ twists, bends and turns, splitting down the middle as if the buildings are being unzipped or seeming to disassemble before our eyes. Balconies become giant slides leading down to the street, staircases meander off into the sky and individual apartments stretch out of their building toward the sun like leaves on a plant. The Barcelona-born designer travels the world and takes photographs of cities, digitally manipulating them for results that would generally be impossible in the real world.

“Once the object is chosen, it is shot from a point easy to recognize by users, not pretending to achieve the greatest picture ever, but instead, a picture that anybody could do. The shot is the basis to produce a replica of the building by using very detailed photogrammetric techniques that end with the creation of a three-dimensional model that fits almost perfectly into the picture.”

Jim Kazanjian

fantasy architecture kazanjian 1

fantasy architecture kazanjian 2

fantasy architecture kazanjian 4

fantasy architecture kazanjian 5

fantasy architecture kazanjian 6

Shadowy passages and strange interiors from horror films like The Shining and the fiction of H.P. Lovecraft tinge the disorienting and disquieting work of Portland-based photographer Jim Kazanjian, who’s inspired by “our inherent anxieties about isolation and vulnerability.” Kazanjian draws on his experience as a CGI artist working on games to create these ‘hyper-collages,’ cobbling together images of buildings, sinkholes and foggy landscapes from an archive of over 30,000 photos.

“My interest in gaming stems from my fascination with architecture and its potential to generate narrative structures,” says the artist. “My time in game development has definitely informed my photographic work. I find that the immersive qualities in both mediums have a strong correlation.”

Next Page – Click Below to Read More:
Architectural Fiction 35 Surreal Fantasy Structures

Share on Facebook


[ By Steph in Art & Drawing & Digital. ]

[ WebUrbanist | Archives | Galleries | Privacy | TOS ]


WebUrbanist

 
Comments Off on Architectural Fiction: 35 Impossibly Surreal Structures

Posted in Creativity


How to Photograph Babies from a Week Old to Sitting up

24 Mar

There is a huge trend among baby photographers to do all of those awesome shots of babies all curled up and almost “in the womb” looking. I LOVE those shots, but they have very definite parameters, meaning that you have to catch the baby while she is still curly; so 3 to 7, or sometimes, at the very oldest, 12 Continue Reading

The post How to Photograph Babies from a Week Old to Sitting up appeared first on Photodoto.


Photodoto

 
Comments Off on How to Photograph Babies from a Week Old to Sitting up

Posted in Photography


CP+ 2015: Olympus interview: ‘since 1936 our policy has been to make our cameras compact’

24 Mar

When we attended CP+ last month in Yokohama, Japan we sat down with senior executives from several major camera and lens manufacturers. Among them was Haruo Ogawa, President of the Imaging Business Group and Executive Managing Officer at Olympus Corporation. Among other things we spoke to Mr Ogawa about the current and future direction of Micro Four Thirds and the challenges of introducing 4K video. Click through to read our interview


Articles: Digital Photography Review (dpreview.com)

 
Comments Off on CP+ 2015: Olympus interview: ‘since 1936 our policy has been to make our cameras compact’

Posted in Uncategorized


6 Steps to Edit and Deliver Wedding Photographs in One Day

23 Mar

This is exactly how I process every wedding that I photograph. I am now on my fifth year of shooting weddings and have shot roughly 70 of them. I am a big fan of working smart and not hard. Every step of my workflow is thought out, and belongs for very specific reasons. Most of the time I am finishing and delivering my wedding photos within four to five days. If it wasn’t for attention span and the internet, I should be able to finish wedding photographs in 24 hours every time.

digitalphotographyschool-1-31

1/100, f/5.0, ISO 2000, 15mm fisheye

 Step #1 – Import and backup (1-3 hours)

I first import all images (1500-2000) via Lightroom into a folder (titled bride’s name and groom’s name, in alphabetical order) on my 1TB portable Lacie Porsche drive.

I work on the go a lot, and I am often editing in a coffee shop, friend’s place or co-working space, so I have my 13 inch Macbook Pro (retina display) and portable drive to work from. The drive currently holds about six months of images, or 80,000 photos.

I have a big gripe about people who organize their photos by date. In my opinion, it’s a terrible system when it comes to finding photos at a later date. When your bride Tiffany asks for a change in a photo from color to black and white, how do you find that folder with her wedding? On my drive it would be under “Weddings,” and in a subfolder titled “Jeremy & Tiffany.”

digitalphotographyschool-1-12

1/400, f/6.3, ISO 2500, on a Canon 135mm f/2

While my images are uploading I will be posting a Facebook album of the same day slideshow that I produced at the wedding, and tagging the bride and groom in it. This is usually 30-50 images that I’ve edited during dinner or during any sort of down time, like the end of cocktail hour.

Note: This means I have already added the bride and/or groom on Facebook, which is standard practice for me. Being friends with my clients is probably one of the greatest perks of my job, and it also guarantees tons of referrals. I have a competitive side that always wants to post the pictures faster and better than any friend, uncle or cousin at the wedding. Whoever posts first on Facebook will get the most attention. 

digitalphotographyschool-1-36

1/50, f/2.8, ISO 2500, 24mm with the Canon 24-70 2.8

I then plug in my backup 3TB drive, go to sleep and let my computer backup via Time Machine overnight.

Losing photos is the greatest fear of most photographers, and for that reason alone many professionals have multiple backup systems in place. I don’t usually format my memory cards until the wedding has been delivered or backed up, if I can help it. I also use Backblaze, a cloud-based backup system that constantly backs up files whenever I am online.

digitalphotographyschool-1-23

1/400, f/2.5, ISO 400 with the Canon 135mm f/2

Step #2 – Culling (30 min an hour)

In Lightroom I go through all 1500-2000 photos and select every photo that looks good, unique, and usable. I use the star rating system in Lightroom, by pressing the “1” key on the photos I like. I usually end up with about 800 photos after this. If you focus and know what you are looking for, this should only take about 30 minutes to an hour, maximum. No agonizing over which photo is best between two very similar ones. Just trust your gut and go.

One “trick” I’ve unconsciously been doing is usually selecting the last photo in a series of similar photos. If you’re like me, you take two or three photos of each thing you are photographing. I move on when I think I’ve got it, and that means the second or third photo in a series should be my selection.

digitalphotographyschool-1-17

To get photos like these, I usually have the guys grouped together in a friendly way, and then I tell them to “harass the groom.”

Next I go through and do my two-star selects. These are the best photos from the day that tell a clear story from beginning to end. They are images that would likely end up in a photo album (besides family photos). I almost always end up with 100 photos, give or take a few. This should take about 10-15 minutes, since you are selecting from a much narrower field of photos. Also, you really have to trust your gut on which photos are winners here.

Step #3 – Editing and retouching (three hours)

After I’ve selected my favorites, I edit them first. I actually enjoy editing these ones, because I am proudest of them, and they are all different. I edit everything in Lightroom. I never open photoshop unless I’m making a diptych or doing heavy changes to a photo. Sometimes I start with a base preset in Lightroom, one I called “Typical Phil.” I hand edit all of these photos. This should take about an hour or two tops. These are then exported at 2500px, 300dpi, 88 quality, (and also renamed Highlights-0001.jpg, Highlights-0002.jpg, etc.), into a folder called Highlights which has been created inside the the main folder of images. I upload the Highlights into a PASS gallery, and deliver this immediately, so the clients don’t have to wait any longer to see some of their wedding images.

Never spend more than 30 seconds on a photo. If you do, you are editing for yourself and other photographers, not the client. Most clients won’t be able to tell the difference between good, great, and perfect. Aim for great.

My export settings make each of my images only about one or two megabytes in size, but they are able to be printed up to 11×14″. Anything larger and I’m happy to provide a specific file to my client directly. I do this in the interest of hard drive and cloud storage space. Also, clients are usually only printing at most one or two photos extra large, so I don’t see the need to make every photo 30 inches on the long edge.

PASS is a phenomenal application that is incredibly intuitive and easy to use for delivering digital photos to clients. Pixieset is another popular competitor. PASS charges per album of photos; Pixieset charges for bandwith/storage.

digitalphotographyschool-1-13

This next part is the secret to my rapid editing and turnaround of images. Take each of the favorite images that you’ve edited (two-star images), and copy each edit onto surrounding photos with a similar light source. If your exposure is consistent in this range of photos, the edit you do for one image should look great for every other image in that scene. This should take about two hours straight through.

Lightroom speed tip

Here is a Lightroom secret to make the copying and deselecting of images extra fast. With your main image selected, hold down Command and select all the other images you want to copy the edit to. In Develop mode, hold down the option key and press sync. This automatically copies the edit onto all the other photos (to make sure you are copying the appropriate edits across all photos, you can simply press sync and a dialogue box will pop up showing which edits are going to be copied).

Now that the edits are synced, you can deselect each image and check for consistency by pressing “/” which is the shortcut for deselecting the current image. I do this to make sure I’ve seen and checked each image for perfect exposure.

digitalphotographyschool-2-3

Remember, you’re not retouching every face, every sky, every element of a picture. You can spend a little more time doing that on the favorites, but chances are your couple isn’t going to be printing every single photo from their wedding, so why are you retouching random shots from the reception?

Step #4 – Exporting (45 minutes)

Export all images from each section of the wedding into their own folders. Folders and images can be named according to which part of the wedding they belong to (Getting Ready or Pre-Ceremony, Ceremony, Family, etc.). These can all be exported with these settings: 88 Quality, 2500 px long edge, 300dpi. This should take about ten minutes to start doing, and maybe an hour for the computer to finish (depending on number of images and your computer’s power and speed).

digitalphotographyschool-3-6

Step #5 – Uploading (one hour)

Upload all your files to your photo sharing service of choice (PASS, Pixieset, Zenfolio, Pixifi, etc.). Ideally, the first gallery that a viewer will see is the Favorites, or Highlights gallery. No need to overwhelm them with every photo from the Getting Ready series. Your top 50-100 photos makes for an excellent opener in an online wedding gallery, like this.

That should take about 10-30 minutes (up to an hour or so), depending on how fast your internet connection is.

digitalphotographyschool-1-15

Step #6 – Delivery (10 minutes)

Email the bride/groom the following:

“Hi! How is everything going? I know I said it would be a couple of weeks until the photos are finished, but I have good news for you! I’ve finished and edited ALL the photos and they are ready for you to see and download in this gallery here.

Simply click on the download button to create a zip file with all of the high resolution images to your computer. This will save you time having to wait for me to mail you a disk or thumb drive, which would have all the exact same files in it.

As a special surprise, I am gifting you $ 50 of print credit! Simply put in “bridegroomname” in the checkout section of ordering prints under coupon code. This should buy you up to X amount of 8×10’s, or X amount of 5×7’s.

Let me know if you have any questions about anything! Enjoy the photos :)

-Phil”

digitalphotographyschool-1-34
I recognize this doesn’t involve an in-person sales meeting, delivery of albums, or anything of that nature. This is simply the fastest way you can do business and work smart, not hard. I regularly book weddings between $ 3000-4000 doing exactly this. I have sold wedding albums, and that’s room for more profit, but also more headache and work. Write to me and I’ll let you know how to make album making a painless, quick process as well. It’s all about guiding your clients’ expectations.

digitalphotographyschool-5-2

Do you have any other workflow tips for weddings?

googletag.cmd.push(function() {
tablet_slots.push( googletag.defineSlot( “/1005424/_dPSv4_tab-all-article-bottom_(300×250)”, [300, 250], “pb-ad-78623” ).addService( googletag.pubads() ) ); } );

googletag.cmd.push(function() {
mobile_slots.push( googletag.defineSlot( “/1005424/_dPSv4_mob-all-article-bottom_(300×250)”, [300, 250], “pb-ad-78158” ).addService( googletag.pubads() ) ); } );

The post 6 Steps to Edit and Deliver Wedding Photographs in One Day by Phillip Van Nostrand appeared first on Digital Photography School.


Digital Photography School

 
Comments Off on 6 Steps to Edit and Deliver Wedding Photographs in One Day

Posted in Photography


A Celebration of Droneography

23 Mar

We’ve had photo drones in the Photojojo Shop for over a year!

We’ve taken some great flights, shot our fair share of dronies, wrote the book on Drone flying (free with every Drone in the Photojojo Shop) and today we’re launching our first Photojojo designed Drone accessory!

What a year.

Click on through to see photos and videos taken by Photojojo customers (and their drone), check out a world map that lets you get a drone’s-eye-view of hundreds of cities and natural wonders alike.

Then, watch our training vids to see if you’ve got what it takes to become a pilotographer.

See Just What Photo Drones Can Get Up To
(…)
Read the rest of A Celebration of Droneography (268 words)


© laurel for Photojojo, 2015. |
Permalink |
No comment |
Add to
del.icio.us

Post tags:


Photojojo

 
Comments Off on A Celebration of Droneography

Posted in Equipment


Mutters Schuhe

23 Mar

Nina Röder

Ein Beitrag von: Nina Röder

In diesen Fotografien portraitierte ich Erinnerungen meiner Mutter an ihre Jugendzeit; nachempfunden aus den Perspektiven meiner Mutter, meiner Großmutter und meiner eigenen. Die zeitliche Grundlage basiert auf konkret erinnerten Ereignissen im Leben meiner Mutter, wie der Tanzkursabschlussball, Augenblicke vor dem Ausgehen und ihre Ausbildung zur Friseurin.
kwerfeldein – Fotografie Magazin | Fotocommunity

 
Comments Off on Mutters Schuhe

Posted in Equipment


Sans Ads: See Tokyo Scrubbed Clean of Signs & Advertisements

23 Mar

[ By WebUrbanist in Design & Graphics & Branding. ]

tokyo ad free art

Tokyo seems inseparable from the banners, billboards, logos, slogans and other flashy neon alerts, except when seen through the lens of this French graphic designer in a startling black-and-white image series turned into a alternating GIFs.

tokyo no ads new

tokyo vendor sans ads

tokyo without advertisements signs

Tokyo No Ads by Nicolas Damiens illustrates just how shocking the contrast is, particularly when switching back and forth between before and after versions. Each of the seven scenes here was meticulously edited with attention to every last pixel of graphics.

tokyo with blank billboards

tokyo street no neon

tokyo scrubbed white clean

To outsiders, Japan’s capital is nearly synonymous with signage saturation, so stripping them away changes the character of the place dramatically. Promoting everything from TV shows and movies to local shops and businesses, it is almost impossible to find a place in the city not showered in advertising. Perhaps the biggest surprise: the landscape almost looks more alien without its characteristic adverts.

Share on Facebook


[ By WebUrbanist in Design & Graphics & Branding. ]

[ WebUrbanist | Archives | Galleries | Privacy | TOS ]


WebUrbanist

 
Comments Off on Sans Ads: See Tokyo Scrubbed Clean of Signs & Advertisements

Posted in Creativity


22. März 2015

23 Mar

Das Bild des Tages von: Egi Toni

Partielle Mondfinsternis

Im Ausblick gibt es die partielle Sonnenfinsternis für alle, die sie Freitag nicht sehen konnten.
kwerfeldein – Fotografie Magazin | Fotocommunity

 
Comments Off on 22. März 2015

Posted in Equipment