RSS
 

Archive for March, 2015

Tips for Creating Landscape Photos during the Golden Hour

26 Mar

The golden hour. Even if you haven’t been involved in photography for very long, you undoubtedly have heard the term thrown around. As photographers we are in the business of capturing light, and there is no better light to have cast on our subjects, than sun light that is low on the horizon.

The golden hour is defined as periods of time; specifically, the hour after sunrise, and the hour before sunset. The length and time of these occurrences depends on your location on our planet, and time of the year.

siesta_silhouette

Regardless of the type of photography you do, natural light generally falls into two categories; harsh (hard) and soft. Harsh light is what you see when the sun is high in the sky, during the middle of the day (cloudless day).

Because the light is at its most intense during that time, and shining directly down from above, shadows are sharp and well defined. They can also appear in places you don’t want them, such as on a human subject’s face. You can sometimes counter this by using fill flash and reflectors. When you’re shooting landscapes, you see the more unwelcome effects on the sky, with less warmth and higher contrast.

Your subjects are well lit, but generally only from one direction. Images shot during at midday can be rather dull and uninspiring, and it becomes more difficult to capture something spectacular.

goldenhour_article_new4

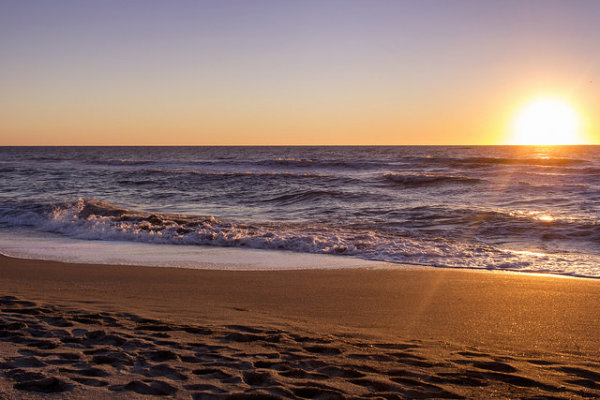
After the sun lowers in the horizon and sunset approaches however, everything changes. Simply put, taking photos during the golden hour give the images atmosphere. These times give the best light for all kinds of photography, but what advantages do you gain by shooting your landscapes during the golden hour?

Reduced Contrast

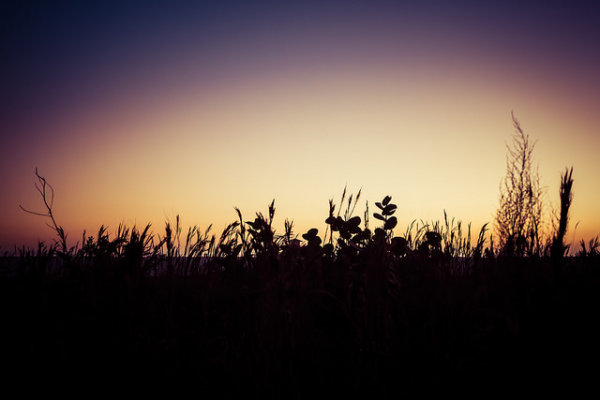
Light from the golden hour effectively reduces the contrast in your images. A black and white street shot could benefit from harsher light in the middle of the day, because the higher contrast and sharp shadows better define the subject and the environment. For landscape photos however, the world comes alive when the sun is low, and the light is soft and diffused. Shadows become longer and less defined, and the tonal range changes significantly. Clouds are illuminated differently, and their visual transitions against the sky soften.

Colors

The position of the sun during the day creattes varying temperatures of light, as you can see by the different colors as it crosses the sky. When we discuss temperature in photography, we’re discussing tthat of color, instead of heat. Neutral temperatures are what you see during the middle of the day. The main point to take away from this is that neutral temperatures are fairly uninteresting in regards to their aesthetic effect on your photography.

sunsetcolors

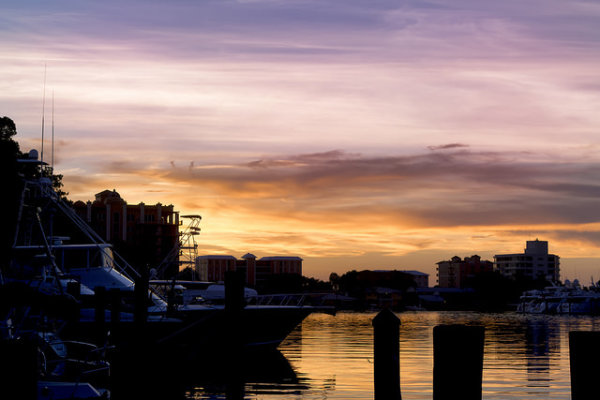
Color ranges become more vibrant and pronounced when the sun is closer to the horizon.

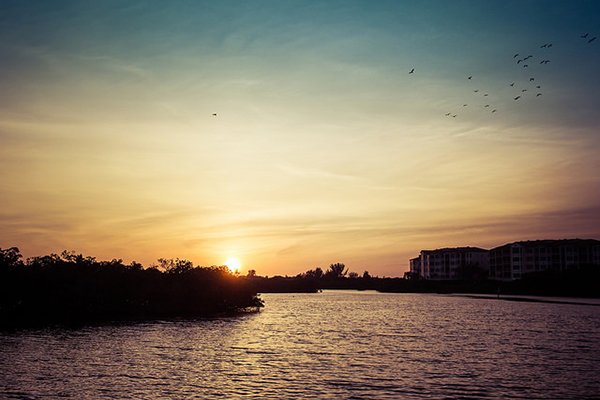
During the golden hour periods, colors tend to bend to the extremes, and give you much more pronounced effects on your images. During the morning golden hour, just after sunrise, the color temperatures are cooler, and give a moody, bluish hue to the shot. In the evening before sunset occurs, the spectrum shifts to warmer colors, providing you with warm oranges and reds.

A photo captured during the golden hour has a wonderful warmth and feel that’s impossible to capture at midday.

Softer Light Through Diffusion

Diffusion can be visualized with the words, scattering and softening. Light that is diffused is soft with less defined edges, and scattered across a greater area than non-diffused light. A good example of that is a diffuser attachment for your DSLR flash unit. The translucency of the diffuser attachment emulates the soft light you get from the sun being in a low position in the sky, and takes away hard shadows.

diffusion

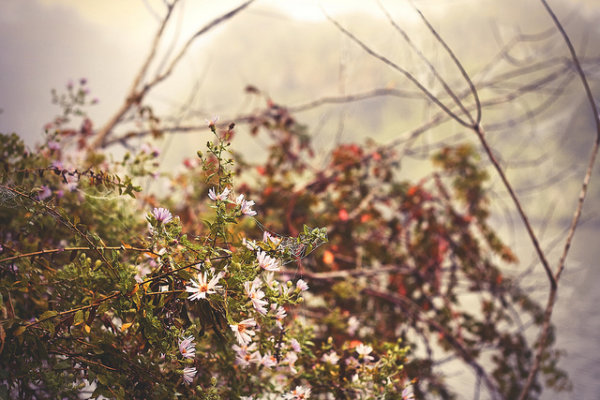
Diffused light is more evenly and softly applied throughout a scene, and a low-hanging sun or sunlight projecting through clouds becomes a great natural diffuser.

Your landscape photos benefit from this by less pronounced shadows from objects in your shot, and in general the light that falls on your subjects within the landscape scatters in a more even, favorable manner. What does this all give you? Again, the one thing you’re ultimately striving for in landscape shots; atmosphere.

Sun Flare Effects

Another advantage of shooting during the golden hours is the opportunity to introduce sun flare effects and backlighting into your images. Because of the sun’s position in the sky (low and near the horizon), you have the ability to better introduce it as a subject, or as a compliment to the subject in your shot.

flare

Sun flares are easier to capture during the golden hours, and produces a much more dramatic effect on the final image.

Flaring occurs when the sun is either at or near the edge of the frame of your photo, and while in some situations it is unwanted (photographers typically use lens hood attachments to minimize these effects), flares can add mood and drama to a landscape shot.

So now that you’re aware of the wonderful effects of photographing during the golden hour, how do you go about shooting our landscape images during these times?

Settings

Your camera settings for shooting during the early mornings or late evenings are going to depend on your exact subject, but in general, since less light is getting to your sensor, a larger aperture is usually required.

You may also need to bump up your ISO setting to compensate for the lower amount of light. This will increase noise, but usually not to a noticeable point, and even then, there are steps in post-processing that can easily remove it.

Again, this all depends on what type of shot you are doing. If you’re looking at a long exposure capture, you would set your camera for a smaller aperture and lower ISO.

goldenhour_article_new3

Use a Tripod

As a landscape photographer you are always encouraged to use a tripod. Since generally you will be shooting in one static location for each set of shots, the tripod will allow you a wider range of apertures to work with. You always want your landscapes crisp!

Prepare

By definition, you have two hours each day to shoot for the best light, so your preparation for those times are even more critical than usual (you’re always prepared for any shoot, right?). If you’re planning on just taking your gear and spending time to set everything up on location, you run the risk of missing the shots you’re looking to get in the first place.

Either prepare before you leave, or allow extra time well before the golden hour to get everything settled. Scout the location ahead of time. Have your settings ready for the appropriate shots, and pack anything extra that you might need, including food, drinks or something warm to cover up with.

Keep Shooting!

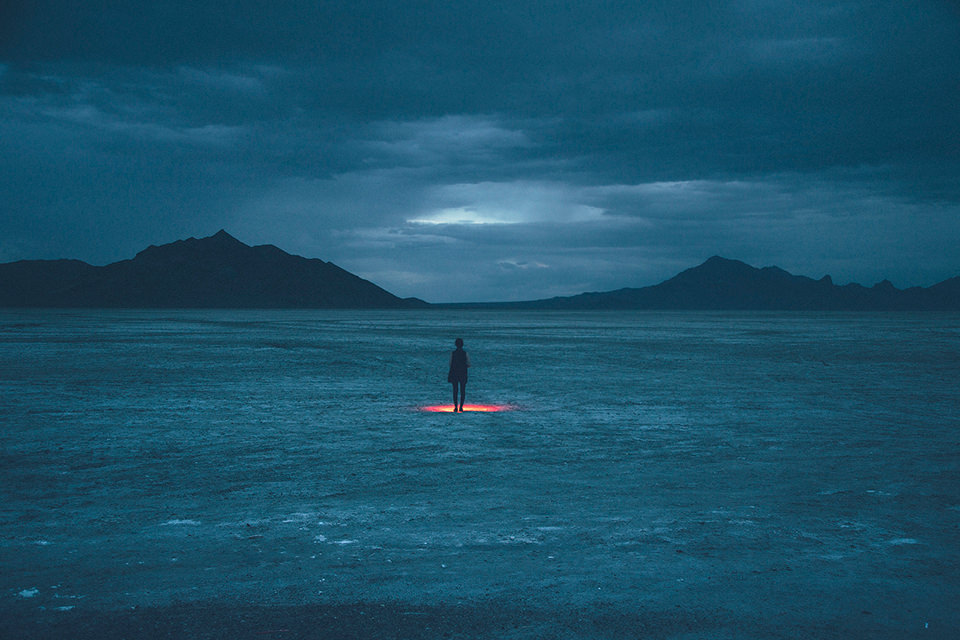
While the scope of this article has been the golden hour, don’t forget that the magic doesn’t stop after the sun dips below the horizon. After this point, the blue hour begins, when colors and tones change even more rapidly and dramatically. Keep adjusting your settings, and shoot until there’s no light left to capture. You’ll be surprised at what you have when you finally get those images unloaded on your computer.

White Balance

While white balance is a setting on your camera, because of its overall effect on the atmosphere of your images, it warrants a little extra attention when shooting landscapes during golden hour. My recommendation is to take your camera off of AWB (automatic white balance) because the camera will attempt to neutralize the warmth of the image on this setting. Most DSLR’s have a cloudy or shade setting that will retain that color tone.

If you’re shooting RAW images, this is a step that can be adjusted in post-production.

goldenhour_article_new2Helpful Apps

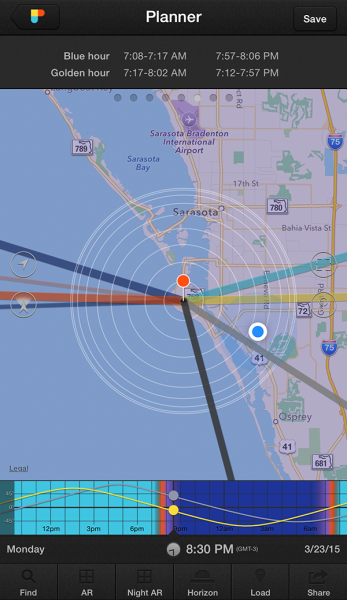
Thankfully, there are several Smartphone apps that can also help your planning process. A search on the Apple app store and Google Play shop will provide no shortage of this kind of apps, although there a few that I’ve used that seem a bit more robust, and worth the price you’ll pay. These apps provide calculators that will let you see when the golden and blue hours occur in any location in the world, and also include calculations for exposure, depth of field, time lapse, and more.

  • PhotoPills – iPhone/iPad, $ 9.99
  • Golden Hour – iPhone/iPad, £1.49
  • The Photographer’s Ephemeris – iPhone/iPad, $ 8.99, Android, $ 4.99

Enjoy the Light!

Shooting at optimal times of the day is one of the easiest things you can do to improve your photography. Nothing else adds character, atmosphere, and dimension to your work so dramatically.

What other golden hour tips do you have to share? How do you apply these guidelines to your own photography? Be sure to join in the conversation below, and keep churning out those golden shots!

googletag.cmd.push(function() {
tablet_slots.push( googletag.defineSlot( “/1005424/_dPSv4_tab-all-article-bottom_(300×250)”, [300, 250], “pb-ad-78623” ).addService( googletag.pubads() ) ); } );

googletag.cmd.push(function() {
mobile_slots.push( googletag.defineSlot( “/1005424/_dPSv4_mob-all-article-bottom_(300×250)”, [300, 250], “pb-ad-78158” ).addService( googletag.pubads() ) ); } );

The post Tips for Creating Landscape Photos during the Golden Hour by Tim Gilbreath appeared first on Digital Photography School.


Digital Photography School

 
Comments Off on Tips for Creating Landscape Photos during the Golden Hour

Posted in Photography


Impossible launches B&W 2.0 quick-process instant film for 600 series cameras

26 Mar

Instant film manufacturer Impossible has launched what it calls a Generation 2.0 film called B&W 2.0. The company claims it’s not only sharper and clearer than previous Impossible products, but also develops much quicker. The new film is the result of a new chemical formula for Impossible that has been developed by former Polaroid research chemist Stephen Herchen. Read more

Articles: Digital Photography Review (dpreview.com)

 
Comments Off on Impossible launches B&W 2.0 quick-process instant film for 600 series cameras

Posted in Uncategorized


25. März 2015

26 Mar

Das Bild des Tages von: lunakhods

© lunakhods

Im Ausblick: Wellen wie Berge, eine Kriegsfotografin und Tankstellen.
kwerfeldein – Fotografie Magazin | Fotocommunity

 
Comments Off on 25. März 2015

Posted in Equipment


Drawing with Darkness: 24 Incredible Works of Shadow Art

25 Mar

[ By Steph in Art & Installation & Sound. ]

Shadow Art Dancing

How is it even possible that a mess of steel wires or a pile of useless scraps of trash can produce shadows that so perfectly mimic human faces and figures? Whether bringing forth unexpected shapes by combining abstract sculptures with a light source or exploring the psychological connotations of shadows, artists make light and darkness a physical element in each of these works.

Amazing Illusions by Kumi Yamashita

shadow art kumi 1

shadow art kumi 2

shadow art kumi 3

shadow art kumi 4

Faces appear out of the most unlikely shapes and materials, from scrunched fabric to numbers mounted on a wall, while figures spring out of thin strips of metal. Says artist Kumi Yamashita, “I sculpt using light and shadow. I construct single or multiple objects and place them in relation to a single light source. The complete artwork is therefore comprised of both the material (the solid objects) and the immaterial (the light or shadow.)”

Steel Wire Shadow Art by Larry Kagan

shadow art kagan 1

shadow art kagan 2

shadow art kagan 3

Though they do have a certain beauty in and of themselves, look at Larry Kagan’s wire sculptures on their own, without a light source, and you may find yourself scratching your head at what the word ‘art’ even means. But when they’re illuminated from just the right angle, they transform into something different altogether, becoming birds, insects, ladders and maps of the world.

Plasticine Body Cast Shadow by Rook Floro

shadow art rook 1

shadow art rook 2

Artist Rook Floro made a plasticine cast of his body to create this eerie shadow sculpture, which he displayed in a gallery while sitting nearby with his entire body painted black. “My sculpture/performance piece is inspired by Carl Jung’s psychological theory about the shadow. It concerns with the repressed ideas, weakness, and desires of oneself that the conscious mind refuses to acknowledge. It represents my ‘shadow’ which involves my hidden desires to be different and become perfect in y own right. We always feel the pressure to be perfect by everything around us such as the media, social network, advertisement, friends, and family.”

Interactive Shadow Picture Book by Megumi Kajiwara and Tathuhiko Nijima

shadow art book 1

shadow art book 2

shadow art book 3

This adorable Japanese children’s book by Megumi Kajiwara and Tathuhiko Nijima is enhanced with the use of a flashlight to bring out extra figures via pop-up silhouettes. The book is hand-made to order.

Dancing Shadow Sculptures by Laurent Craste
Shadow Art Dancing

Two static sculptures suddenly start to dance as a light source swings maniacally around them in this interactive art installation by Lauren Craste, created for the Chromatic festival in Montreal. It seems straightforward at first, but then the figures seem to take on a life of their own, moving in ways that don’t make sense. The secret is a hidden projector that tracks the movements of the light source to create certain effects.

Next Page – Click Below to Read More:
Drawing With Darkness 24 Incredible Works Of Shadow Art

Share on Facebook


[ By Steph in Art & Installation & Sound. ]

[ WebUrbanist | Archives | Galleries | Privacy | TOS ]


WebUrbanist

 
Comments Off on Drawing with Darkness: 24 Incredible Works of Shadow Art

Posted in Creativity


Meet a PJer:Danny Edition

25 Mar

Name: Danny “Dino Dan” Lunden

What Do You Do Here? They tell me I do customer service, but really I make photo dreams come true!

Favorite Camera: My new Sony QX 100 of course (paired with my iPhone)!

Learn Even More About Dino Dan

(…)
Read the rest of Meet a PJer:
Danny Edition (54 words)


© laurel for Photojojo, 2015. |
Permalink |
No comment |
Add to
Danny Edition”>del.icio.us

Post tags:


Photojojo

 
Comments Off on Meet a PJer:Danny Edition

Posted in Equipment


The Ultimate Guide on How To Photograph Special Events

25 Mar

Weddings, birthday parties, anniversary dinners, christenings, product launches, retirement parties – these are special occasions and people always want professionally taken photographs to remember them by. This means that if you can perfect your technique and build a good portfolio of event images, you will always be in demand! The Do’s and Don’ts of Special Event Photography The important thing Continue Reading

The post The Ultimate Guide on How To Photograph Special Events appeared first on Photodoto.


Photodoto

 
Comments Off on The Ultimate Guide on How To Photograph Special Events

Posted in Photography


4 Tips for Creating Portraits with Impact

25 Mar

Faceplant

Since the birth of the camera, an overwhelming number of photographers have concentrated on portraiture. Capturing the personality, mood, or expression of a fellow human is sublimely beautiful. Because of this, many of us have thousands of portraits saved on hard drives, and eagerly await the next portrait contest. Honestly, how many of these portraits actually have visual impact? How many of our portraits are powerful enough to hold a viewer’s attention longer than a couple of seconds?

We can continue to produce countless portraits that are stale and void of visual power, or we can step back, evaluate our work, and begin to strategically create portraits that do have impact. Whether you are shooting on location or in a studio, begin adding some punch to your portraiture to captivate your audience. Here are a few ways to start creating portraits with impact immediately.

#1 INCLUDE ENVIRONMENT

When we pick up our cameras to snap a portrait, we almost instinctively move close to our subject. Yet, constantly shooting tight portraits can put us in a close-up rut. Simply moving your camera body closer to someone’s face, or using the telephoto aspect of your lens, doesn’t always lend itself to powerful photographs (the selfie is a perfect example of how easy it is to botch a close-up portrait).

Jun Temple

By physically taking several steps back, or by retracting your zoom, you allow context to enter the frame. Suddenly, what was just a photograph of a person’s face, can become an image rich with balance and environmental information. Additionally, a portrait with contextual information can easily appeal to a much wider audience by relating a story.

Steve wide

Shooting tip: When shooting wide portraits, make smart lens choices. Many wide-angle lenses (such as Canon’s 17-40mm L-Series) come with a great deal of distortion and will exaggerate a subject’s features. So that your subjects are not distorted, use a standard portrait lens (i.e. 85mm) and move your body in relation to your subject.

#2 USE NEGATIVE SPACE

Negative Monks

Stepping back and including environmental information can add impact to many portraits. However, the surrounding environment can also distract from your intended subject. At times, photographs are more powerful if the environment is minimal or void.

To draw the viewer’s eye directly to your subject, strategically add abundant negative space (area around or between a subject) in your frame. The use of negative space can be a key element in artistic composition in that it emphasizes and defines the main subject of a photograph (positive space) and adds impact.

#3 FORGET THE FACE

When we think of portraits, the first thing that usually comes to mind is a frame filled with a face. We can agree that there are many positives to this approach to portraiture. In a headshot we can see facial features, skin tones (unless we wipe them away in Photoshop or Elements) and the catchlights that draw us into the windows of the soul.

Alessa s Leg Grandmother s Hands

Luckily though, all of our photographs do not have to follow a headshot-only, antiquated view of portraiture. It is important to remind ourselves that a portrait is simply a representation of a person. Photographers are given the artistic license to determine how their subjects are portrayed. Instead of snapping a run-of-the-mill headshot, try shooting hands, feet, necks or even the cast shadow of a person. At times, moving away from a person’s face can lead to a frame that carries a tremendous amount of visual impact.

#4 CROP YOUR FRAMES

IMG 5902

Another way to add impact to your portraits is to experiment with cropping. This is one of the simplest ways to add impact to a portrait and to showcase your aesthetic as a photographer. If you are finding it difficult to see fresh or unique frames while you are actually shooting, experiment with the crop tools in post-production.

Focusing on smaller portions of your subject can have much more impact than if you neglect to adjust the original frame. Moreover, a cropped picture can completely alter the photograph’s intention or interpretation. The more you experiment with cropping, the more apt you will be in spotting unique and powerful frames in the field.

Singh

Shooting tip: If you are photographing with particular frame in mind, it is better to take photographs that are a bit wider than your intended crop. You can always crop tighter, but you cannot widen the original frame.

Whether you are an amateur or a seasoned professional, rethinking the way you shoot portraits will inevitable invigorate your craft. The next time your camera is pointed toward another human, try something new. Experiment with a variety of strategies that will add impact to your portraits.

googletag.cmd.push(function() {
tablet_slots.push( googletag.defineSlot( “/1005424/_dPSv4_tab-all-article-bottom_(300×250)”, [300, 250], “pb-ad-78623” ).addService( googletag.pubads() ) ); } );

googletag.cmd.push(function() {
mobile_slots.push( googletag.defineSlot( “/1005424/_dPSv4_mob-all-article-bottom_(300×250)”, [300, 250], “pb-ad-78158” ).addService( googletag.pubads() ) ); } );

The post 4 Tips for Creating Portraits with Impact by Andrew Faulk appeared first on Digital Photography School.


Digital Photography School

 
Comments Off on 4 Tips for Creating Portraits with Impact

Posted in Photography


Retro, refined: Fujifilm X100T reviewed

25 Mar

The Fujifilm X100T offers seemingly small improvements on its predecessors, the cult classic X100 and X100S. Its 16MP X-Trans CMOS II sensor and fixed 35mm equiv. f/2 lens are now accompanied by an all electronic shutter mode with increased 1/32000sec maximum speed, redesigned hybrid viewfinder and an upgraded 1.04m dot rear LCD. Find out how much of an impact these incremental updates make. Read review

Articles: Digital Photography Review (dpreview.com)

 
Comments Off on Retro, refined: Fujifilm X100T reviewed

Posted in Uncategorized


Etwas Persönliches

25 Mar

Eine nackte Frau steht mit dem Gesicht zur Wand.

Ein Beitrag von: Marteline Nystad

Das erste Selbstportrait habe ich 2012 im Rahmen einer Schulaufgabe gemacht und danach habe ich angefangen, immer mal wieder sporadisch solche Fotos für mich zu machen. Aber erst 2014 habe mich getraut, sie zu veröffentlichen.
kwerfeldein – Fotografie Magazin | Fotocommunity

 
Comments Off on Etwas Persönliches

Posted in Equipment


Figures & Ground: Crafty Wood Miniatures Create Urban Vignettes

25 Mar

[ By WebUrbanist in Art & Street Art & Graffiti. ]

urban rail skateboarder

Inspired by everything from personal experience to famous photography, this street artist crafts small wooden cutouts to frame scenes of action, adventure, romance and life.

urban character in grass

urban mother son waves

urban miniature fishing boat

Living in New Jersey and working both there and in New York, Joe Iurato illustrates his miniature creations with black-and-white details, setting them apart from the colorful cityscapes they occupy.

urban climber figure person

urban parkour jumping figure

While the specific sizes and subjects vary, a common thread is found in their site-specific nature and detailed drawings – each figure or set thereof participates directly in its surroundings.

urban small world child

urban street figure ground

“From break dancing to skateboarding to rock climbing to becoming a father, all of these things have helped define my character. For me, it’s just about revisiting those moments in a way that’s familiar. I’ve always appreciated seeing architecture and nature in a different light.”

urban pothole inspector

urban tree climbing boy

urban track train walkers

“As a skater, the tar banks behind a local supermarket, a flight of stairs, a parking block, a drainage ditch, a handrail, a wall – they all present possibilities for interaction and fun in ways they weren’t intended to be used.”

Share on Facebook


[ By WebUrbanist in Art & Street Art & Graffiti. ]

[ WebUrbanist | Archives | Galleries | Privacy | TOS ]


WebUrbanist

 
Comments Off on Figures & Ground: Crafty Wood Miniatures Create Urban Vignettes

Posted in Creativity