[ By Steph in Drawing & Digital. ]

Extremely narrow lots and busy urban locations are no big deal for ingenious Japanese architects creating comfortable, daylight-filled residential interiors with a few crucial design tricks, like the use of staggered open platforms instead of closed-off rooms. Interior courtyards, faux facades concealing secret gardens, strategically placed windows and totally transparent walls make the most of limited space.
Transparent House NA by Sou Fujimoto


Few Japanese houses are quite as eccentric as this one – a multi-story, glassed-in home with no stairs, no closed-off rooms and no privacy. House NA by Sou Fujimoto is built on a thin, split-level steel frame full of small platforms that don’t have a preset function, so they can be used however the inhabitants like. The house is almost more like an experimental installation than a real residence, given all that glass – you’d have to be quite an exhibitionist to live there. The further you walk into the home, however, the more complex and opaque all of those built-ins become, obscuring the vision of neighbors and passersby at least a little bit.
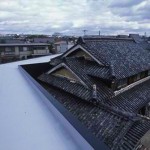
Translucent Rooftop Shed Skylights by Tato Architects


The need to extend the availability of daylight in an area of Japan that stays dark for much of the winter led to this novel solution by Tato Architects: placing transparent sheds on the roof of a partially subterranean home to act as giant skylights. From outside, the sheds look like greenhouses, while inside, they are bright, light-filled spaces for working, playing and lounging.
Treehouse Residence by Ryo Yamada


Envisioned as a treehouse in an urban context, this home by Ryo Yamada doesn’t actually look anything like a treehouse from the outside. The interiors, however, bear that tacked-together, DIY feel, especially given the wooden walkways that connect one open upper-level platform to the next. Located in Sapporo City, the house is essentially a large shell filled with individual ‘treehouses’ that can be moved around within the space, added to or removed altogether.
Courtyard Home with Street-Like Hallways by Suppose Design Office


This unusual house by Suppose Design Office is set up like a neighborhood block rather than an enclosed residence, with individual disconnected rooms under a large glass roof. The resulting spaces between the rooms function more like streets than hallways, with each room feeling like its own little house.
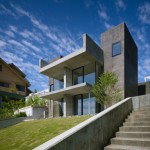
House H by Hiroyuki Shinozaki Architects


A stark white house on the outskirts of Tokyo conceals a complex, completely open interior in this project by Hiroyuki Shinozaki Architects. Eschewing interior walls, the design uses Y-shaped supports stretching from the pine floors to the ceilings and a series of staggered platforms to create individual spaces.
Next Page – Click Below to Read More:
Smart Space Solutions 14 Innovative Japanese Home Interiors
Want More? Click for Great Related Content on WebUrbanist:
Modern Design Meets Tradition in 12 Japanese Homes
These twelve homes balance Japanese traditions like recessed lower levels, adaptable interior rooms and transitional garden spaces with modern sensibilities.
Click Here to Read More »»
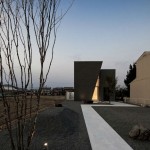
Striking Gravel-Covered Japanese House is a Study in Contrasts
A striking wedge-shaped home in Japan is covered in gravel and set back from the road, making it look like a massive sculptural object for the garden.
Click Here to Read More »»
Only in Japan : 13 Odd Houses by Suppose Design Office
Suppose Design Office specializes in bright, spacious-feeling interiors that incorporate courtyards, indoor gardens and huge windows, even on very small lots.
Click Here to Read More »»
![]()


[ By Steph in Drawing & Digital. ]
[ WebUrbanist | Archives | Galleries | Privacy | TOS ]


You must be logged in to post a comment.