Das Bild des Tages von: Sebastian Freitag

Der Ausblick führt uns heute nach Köln.
kwerfeldein – Fotografie Magazin | Fotocommunity
Das Bild des Tages von: Sebastian Freitag
Der Ausblick führt uns heute nach Köln.
kwerfeldein – Fotografie Magazin | Fotocommunity
[ By Steve in Abandoned Places & Architecture. ]

When coal mines get the shaft, only abandoned winding towers remain to mark the places where Earth’s underground bounty was winched to the surface.

Coal and metal ores are finite resources, the extraction of which requires a huge investment in machinery and infrastructure. When a site’s prime resource runs out, however, it often isn’t economically viable to move the massive infrastructure to a new location.


Such was the case at the Winterslag coal mine in northeastern Belgium, which opened in 1917 and closed in 1988. Flickr user Geoffrey Alfano (Geoffrey Vlassaks) visited the complex in June of 2011, subsequently posting a host of evocative HDR images.


The mine’s quarry, slag dumps, factory buildings and matching pair of winding towers have all been “recultivated” and preserved in recent years, with additional construction resulting in a unique tourist attraction: the C-MINE cultural center.


Old iron mines need love (and winding towers) too. The Cliffs Shaft Mine complex (now a museum) in Ishpeming on Michigan’s rugged Upper Peninsula operated from 1868 through 1967, and in 1992 it was added to the National Register of Historic Places. The abandoned mine’s oldest winding towers date from 1919 and were built in the Egyptian Revival style. Like many actual ancient Egyptian monuments, this 97-foot tall tower still looks impressive today.


Flickr user Rafal Nalepa (Rafal N.) visited the Prezydent coal mine in Chorzów, Poland back in October of 2010 and came back with a wealth of striking images of this former Silesian coal mine and its surprisingly stylish winding tower.

Soaring skyscrapers that should have been majestic additions to Bangkok’s skyline have been abandoned for over a decade, rusting and crumbling in urban ruin.
Click Here to Read More »»

In some cases disaster strikes. In others, changing technologies render old designs obsolete, leaving majestic airplanes and giant steamers to rust and gather …
Click Here to Read More »»
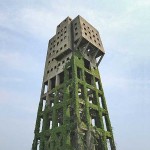
Zombie Apocalypse? Bring it on! I’ll be safe and sound above the fray in the partially moss-covered concrete winding tower at Japan’s abandoned Shime coal mine.
Click Here to Read More »»
![]()


[ By Steve in Abandoned Places & Architecture. ]
[ WebUrbanist | Archives | Galleries | Privacy | TOS ]
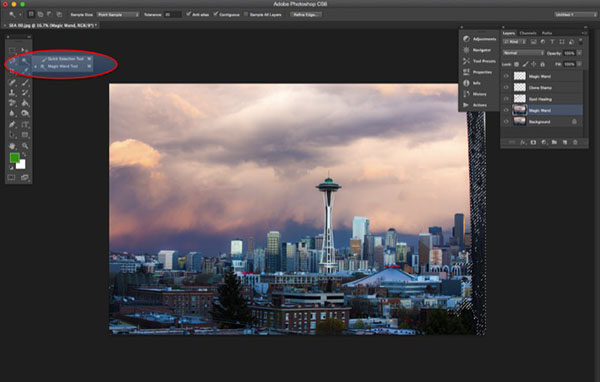
When it comes to photo-editing programs, one of the most popular among both amateur and professional photographers alike is Adobe Photoshop. While it can appear more complex than Lightroom, and certainly takes more time to learn all of its tricks, Photoshop offers four post-processing tools that come in handy for retouching images. These tools are pretty easy to locate and implement, and in this article I’ll show you how they work, specifically while retouching the image of the Space Needle in Seattle (below). I have the privilege of having this view from my home office, but the problem is that if I take a photo using anything but a telephoto lens, I get telephone pole remnants and wires in my otherwise pretty cityscape image.
Here are the four Photoshop tools I use to retouch my Space Needle images. There are of course other ways to retouch this image to achieve the same or even better results, but these are quick and easy methods that also highlight essential Photoshop skills.

Before we do anything to modify Photoshop images, the first thing to note is that within Photoshop, you can cause permanent changes to the pixels and details of your photos if you’re not careful. This is why you always want to make sure you are performing nondestructive editing so that you don’t overwrite the original image data.
There are several ways to do this in PhotoShop. For the tools I’m about to show you, the best technique for nondestructive editing will be to work within an adjustment layer or retouch on a separate layer. You can create a new layer by clicking on the New Layer icon on the bottom of the Layers panel. Repeat this every time before you employ a new editing process on your image and be sure to double click on the layer and rename it to help you remember what editing process you did on that layer.

First of all, let’s tackle those thin, yet annoying, power lines in the upper left corner of the image. To start, we’ll use the Spot Healing Brush. One of three image healing tools that Photoshop offers, this brush creates a seamless repair to your image by replacing unwanted textures of the image with good textures from another area.

To use it, head over to the Tools panel and select the Spot Healing Brush. It will be grouped together with other healing and patching tools. Be sure the Sample All Layers option is checked on the upper Options bar, as well as Content Aware (Photoshop versions CS5 or later) or Proximity Match (Photoshop CS4 or earlier). Next, zoom into the image’s problem area and click (or click and drag) on the areas you want to replace or heal. To adjust the size of the brush, press the left ([) and right (]) bracket keys on your keyboard. If you make a mistake, just hit Ctrl+Z (on Windows) or Command+Z (on Mac) to undo. In this example, I clicked and dragged the Spot Healing Brush across those thin power lines to erase them.
In this example, I clicked and dragged the Spot Healing Brush across those thin power lines to erase them, which is the quickest way of using it. However, be careful when attempting to spot heal in large chunks particularly near high-contrast edges, since some areas can appear improperly blended. For the sake of accuracy, a more effective approach could be using the spot healing brush to heal smaller chunks of the image, rather than attempting to heal the entire area in one go.
Other important settings to be mindful of are the Size and Hardness of the brush, which can be adjusted per the settings panel pictured below. Since the Healing Brush automatically blends pixels, it’s best to choose a higher Hardness value for best results.

Another alternative way to getting rid of the power lines is to use another Photoshop essential: the Clone Stamp tool, which is used for pixel-to-pixel cloning. Like the Spot Healing Brush, this tool can be used to replace unwanted areas of an image, but unlike the Healing Brush, it won’t do automatic content-aware blending. The Clone Stamping is best used to duplicate an item or pattern, remove a brand logo, or remove power lines, which is what I’m going to do in this example.

To use the Clone Stamp tool, first create a new layer and then select the Clone Stamp tool from the tool bar. This tool works similarly to the Spot Healing Brush, but before you begin clicking away, position your cursor over the area you want to clone from and Alt-click (on Windows) or Option-click (on Mac) to define and sample the source of the clone. Be sure to re-sample and re-define as many clone sources as needed to provide a seamless cloning result.
Be sure to re-sample and re-define as many clone sources as needed to provide a seamless cloning result. To make sure the result appears realistic, it is important to zoom in and make sure the same pattern is not being cloned over and over again. Per the same settings as the Spot Healing Brush, be mindful of the Size and Hardness settings that you choose as these will determine how accurately the Cloning Tool samples and clones layers. When cloning an area with lots of patterns and details, it’s sometimes best to work with a low Hardness value and low cloning opacity for smoother results.
Next, let’s get rid of the remnant of a telephone pole in the right hand side of the image. The easiest way to eliminate it would be a simple crop, but another way is to select and replace it using the Magic Wand Tool. This is one of Photoshop’s oldest selection tools and it causes many a photographer joy or suffering. The Magic Wand is incredibly easy to use, requiring just a click of its icon in the tool bar, followed by clicking on the area of the image that you want to select. Here’s where things can get complicated. The Magic Wand selects pixels based on tone and color, which means it has the tendency to select more areas of the image than you initially want. The simplest way to fix this is to play around with Tolerance in the Options bar. If the Magic Wand is selecting too much of an area, simply input a smaller value of Tolerance and then reselect the area.
After the proper area of the telephone pole is selected, it’s time to fill in that area. Hit Shift+Delete on the keyboard, and the below pop-up box will appear. Make sure Content-Aware is selected, then press OK; Photoshop will then sample pixels in the surrounding area and fill in the selected area accordingly. The results may not be perfect, and this is where the aforementioned Spot Healing Brush and Clone Stamp tools can come in handy to make the filled in area more seamless.

The final retouched image can be seen below. Using the Spot Healing Brush, Clone Stamp, Quick Selection and Content-Aware fill, the telephone lines in the upper left corner have been removed, as well as the remnant of the pole on the right-hand side.

In this brief tutorial, I’ve introduced several very important tools that all photographers should be familiar with, but it’s also important to note that I haven’t explained every possible use of them. There are many other practical and creative ways to use these tools, and I encourage you to do further research to learn more about them. But for the sake of doing quick edits and getting familiar with the tools, these are approachable ways to get started.
googletag.cmd.push(function() {
tablet_slots.push( googletag.defineSlot( “/1005424/_dPSv4_tab-all-article-bottom_(300×250)”, [300, 250], “pb-ad-78623” ).addService( googletag.pubads() ) ); } );
googletag.cmd.push(function() {
mobile_slots.push( googletag.defineSlot( “/1005424/_dPSv4_mob-all-article-bottom_(300×250)”, [300, 250], “pb-ad-78158” ).addService( googletag.pubads() ) ); } );
The post 4 Photoshop Tools Every Photographer Should Know by Suzi Pratt appeared first on Digital Photography School.

In den letzten Wochen habe ich mich mit Designer-Kollegen über den wohlbekannten Satz „Print ist tot“ unterhalten. Dabei fiel mir auf, dass Bildbände alles andere als irrelevant geworden sind. Insbesondere dann, wenn es echte Unikate sind, die in der Herstellung einer besonderen Behandlung unterzogen wurden.
kwerfeldein – Fotografie Magazin | Fotocommunity

Ein Beitrag von: Nico Baumgarten
Ich hatte mich nie wirklich mit Tierfotografie beschäftigt. Wahrscheinlich, weil mich Menschen viel zu sehr interessieren. Und vielleicht auch, weil ich Angst davor habe, den Klischees von der heilen Welt zu verfallen.
kwerfeldein – Fotografie Magazin | Fotocommunity
If you’ve ever wondered about the effects of using a tilt-shift lens this video with host Vincent Laforet will show you some of uses such as:
Here are some of the Tilt-shift lenses mentioned in the video.
Obviously these are specialty lenses and not everyone has a need for, or can afford them. But perhaps if you have the ability you may want to rent one and play around. Check with your local camera store or online with places like Borrow Lenses. Or you can try the less expensive Lens Baby for making some fun effects.
Have you ever tried one out? Do you do the type of photography that requires a tilt-shift lens? Or is it a luxury for the wish list? Share your thoughts in the comments below.
googletag.cmd.push(function() {
tablet_slots.push( googletag.defineSlot( “/1005424/_dPSv4_tab-all-article-bottom_(300×250)”, [300, 250], “pb-ad-78623” ).addService( googletag.pubads() ) ); } );
googletag.cmd.push(function() {
mobile_slots.push( googletag.defineSlot( “/1005424/_dPSv4_mob-all-article-bottom_(300×250)”, [300, 250], “pb-ad-78158” ).addService( googletag.pubads() ) ); } );
The post Tips for Using Tilt-Shift Lenses for Correction and Creativity by Darlene Hildebrandt appeared first on Digital Photography School.
[ By WebUrbanist in Art & Street Art & Graffiti. ]
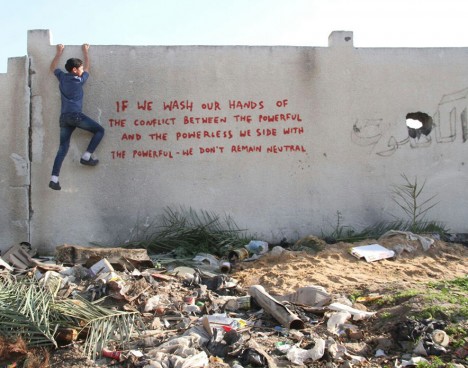
Well known for polarizing political artwork, the infamous street artist Banksy recently returned to the Middle East and filmed a short video about his new work while also commenting on the culture and conditions in a famously contentious place.

Regarding a cat mural created on this trip, he writes: “a local man came up and said ‘Please — what does this mean?’ I explained I wanted to highlight the destruction in Gaza by posting photos on my website — but on the internet people only look at pictures of kittens.”
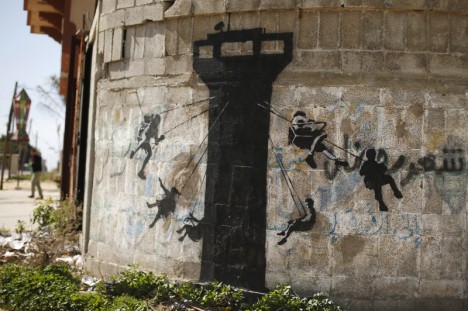
His snark knows few boundaries, if any, and is sure to spark global debate on multiple fronts: “Gaza is often described as ‘the world’s largest open air prison’ because no-one is allowed to enter or leave. But that seems a bit unfair to prisons — they don’t have their electricity and drinking water cut off randomly almost every day.”
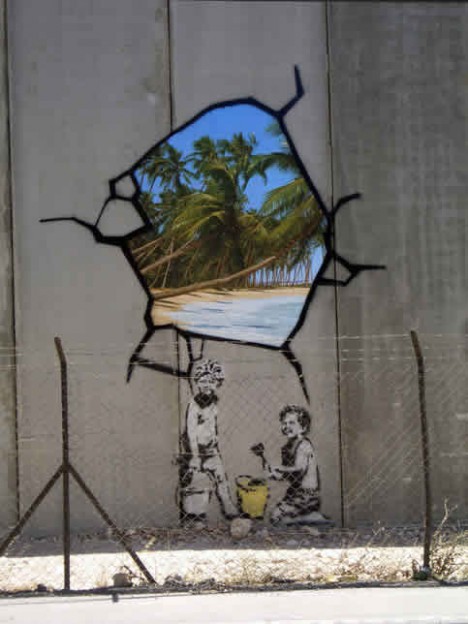
The title of the video below, “Make this the year YOU discover a new destination,” framed as a sort of satirical low-budget travel ad, speaks volumes about his opinions and intentions in revisiting Palestine, where he has worked previously and along similar lines (mainly on dividing walls in the West Bank).
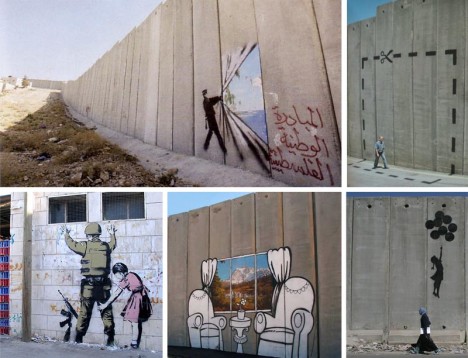
Crossing into Gaza from the north generally requires Israeli permission, hence the tunnels as an alternative- there is no functioning airport, sea vessels are turned away by the blockade and land access is limited though possible through Egypt in the south. Some argue Banksy’s work is one-sided with regards to Israel and Palestine, ignoring the role of Hamas in the ongoing conflict that has rendered so much of Palestine into rubble, and this new series is sure to spark some serious conversations, arguments and debates.

The following seven examples illustrate the fascinating range of Banksy’s life and works through his most controversial and compelling projects, stories and …
Click Here to Read More »»

Who is Banksy? No one knows for sure but many have speculated about the identity of this mysterious urban street artist – learn more about him here.
Click Here to Read More »»

The internet has long been abuzz with Banksy, the world’s most infamous street artist. But what is the big deal, where can you find his work and more …
Click Here to Read More »»
![]()
[ By WebUrbanist in Art & Street Art & Graffiti. ]
[ WebUrbanist | Archives | Galleries | Privacy | TOS ]
Cameras are complex machines and to get the most out of them you need to know how they work. When you’re a new photographer shooting with a sophisticated camera for the first time, the complexity can be overwhelming. There’s just so much to learn! Now that I’ve been shooting for more than ten years, it’s interesting to go back to my early days and see the mistakes I made.
In this article we’ll have a look at four of my first DSLR photos and I’ll share what I know now that I wish I knew then, so hopefully you can learn from these mistakes.
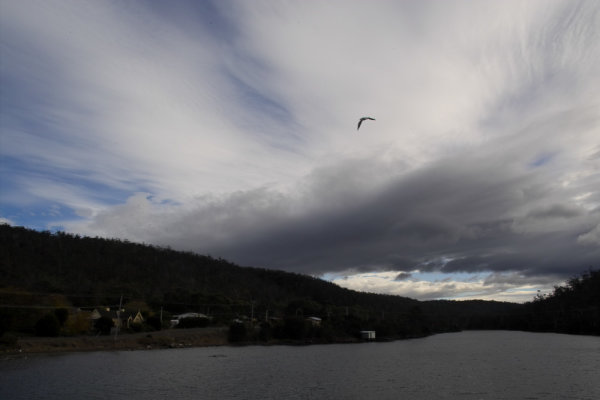
1/250th of a second, f/10, ISO100
The camera’s exposure meter will try to make the exposure “middle grey”. Since the camera has no way to tell how bright the subject is, middle grey is a good average bet. But when the subject is much brighter or darker, like the sky in this photo, it ends up getting it wrong. Today if I see a shot like this on the back of my camera, I know why it is under exposed and will adjust it by dialling in some positive exposure compensation. That would have made the clouds much brighter, and brought out details in the dark tree-covered hillside.
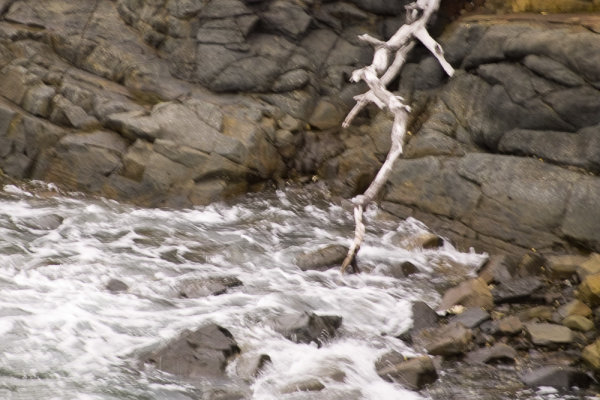
1/30th, f/5.6, ISO100
Towards the end of an overcast day, we arrived at a rocky shoreline while on holiday. I liked the texture of the rock, the white dead tree branch, and churning water. However there wasn’t quite enough light. At this stage I didn’t even know how to change my ISO, but even if I had, I’d heard that increasing it made your photo noisy. This was certainly true, especially of DSLRs 10 years ago, but 1/30th of a second at 200mm focal length just wasn’t fast enough. As a result there’s enough camera shake to ruin the photo. Today, even if I was still shooting with the old Sigma SD10 I had then, I’d know that it’s better to increase your ISO to get a shorter shutter speed, even if it results in more visible noise. A noisy photo is better than a blurry one.
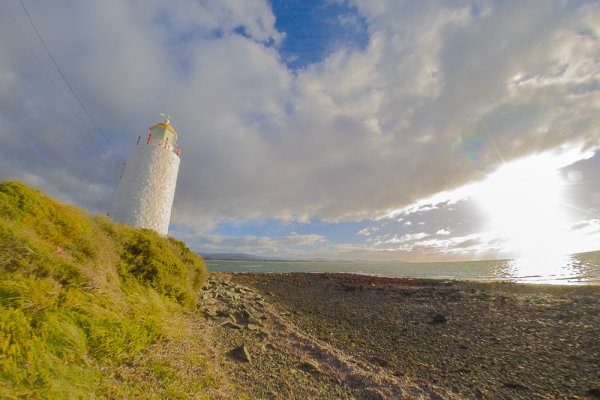
1/200th, f/10, ISO100
If some parts of the image are very bright, such as the sky and clouds around the sun in this photo, they can be “clipped” by the camera. This means that there is more brightness than the sensor can differentiate, and as such, whole areas of the photo are rendered as white with no detail. Once part of a scene is clipped, nothing can bring that detail back, and it can ruin a shot. Clipped highlights are unattractive and draw the eye in a negative way. In high contrast situations it can be really tricky to capture detail in the highlights and shadows at the same time, but because they draw the eye so much, it’s preferable to preserve detail in the highlights.
While the sun is always going to clip in a photo, preserving details in nearby clouds is possible. For this shot I should have dialled in some substantial negative exposure compensation. Even if this made the rest of the photo too under-exposed, because I was shooting in RAW, I’d still be able to bring out a lot of detail when processing the photo. That way only the sun would be clipped and the clouds and water would look much more natural.
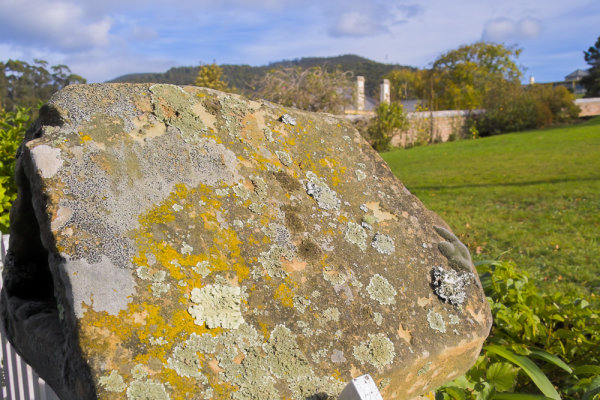
1/200th, f/8, ISO100
I wanted to capture the gorgeous texture on this interesting rock, but still show enough of the background to give it context. The background however, is too in focus and ends up being a distraction, competing for attention with the rock, which should be the star of the photo. I was shooting in program mode (auto), and there was plenty of light. The camera realized this and chose an aperture of f/8. This was narrow enough to increase the depth of field so that the background wasn’t nearly blurry enough. If I was taking this shot today I would put the camera into aperture priority mode with the mode dial, and open the aperture wider. Possibly to its full width, which on this lens was only f/5.6. This would have blurred the background more, letting the rock get all the attention.
If I could go back and tell myself something when I was starting out, I’d emphasize the importance of shooting as often as possible, not to worry about making mistakes, and keep looking to other photographers (both online and in person) as a source of inspiration and learning. Finally, I’d tell inexperienced me that you will never ever stop learning.
How about you? What are the biggest things you learned (or are still learning about) to improve your photography?
 Neil is so invested in helping others to become confident with their cameras that he has created dPS’s very first online video course Photo Nuts and Bolts. From shutter speed, to aperture and exposure, Neil explains clearly so that you can start shooting with confidence…
googletag.cmd.push(function() {
tablet_slots.push( googletag.defineSlot( “/1005424/_dPSv4_tab-all-article-bottom_(300×250)”, [300, 250], “pb-ad-78623” ).addService( googletag.pubads() ) ); } );
googletag.cmd.push(function() {
mobile_slots.push( googletag.defineSlot( “/1005424/_dPSv4_mob-all-article-bottom_(300×250)”, [300, 250], “pb-ad-78158” ).addService( googletag.pubads() ) ); } );
The post 4 Mistakes New Photographers Make and How to Avoid Them by Neil Creek appeared first on Digital Photography School.
Das Bild des Tages von: Bernd

Heute erfreuten wir uns an diesen saftigen Herbstfarben.
kwerfeldein – Fotografie Magazin | Fotocommunity
When it comes to photography, we spend most of our time thinking about taking photos – lighting, composition, exposure, and posing. Then, once the photo is taken, we may start to think about post-processing, gently nudging the photo along until it becomes exactly what we’ve pictured in our mind’s eye. Once that’s accomplished, we do it all over again.

Back in high school and college, I shot film. I can vividly remember running out of film, and sometimes having to wait weeks until I was able to buy more. Our public high school relied heavily on donations of film, and sometimes when there wasn’t any left, our teacher would have us walk around campus with our pointer fingers and thumbs shaped into a rectangle, pretending to take photographs. Now that digital cameras are on the scene and we’re using memory cards in lieu of film, with the capability to erase images and write over them again, the number of photographs that we can take in any given week or month is nearly endless.
You may have noticed that I said, “nearly” endless, and that’s because memory cards do have a lifespan, and will not last indefinitely. That said, there are a few things that we can do to maximize the lifespan of our memory cards, including making sure that we are deleting our photos off the memory card in the most efficient manner possible. This isn’t something that’s talked about all that often, but when it comes down to it, it is really simple:
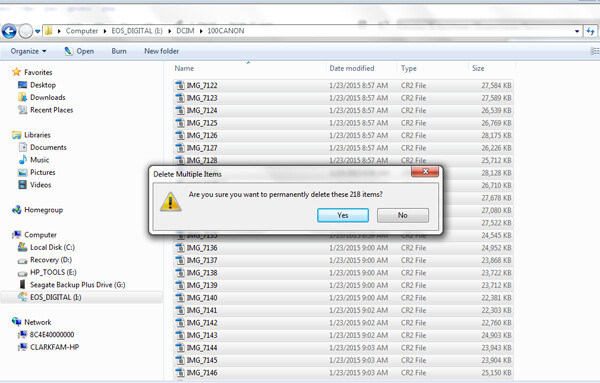
Deleting each photo individually through the camera by using the “Delete” or Trashcan Button
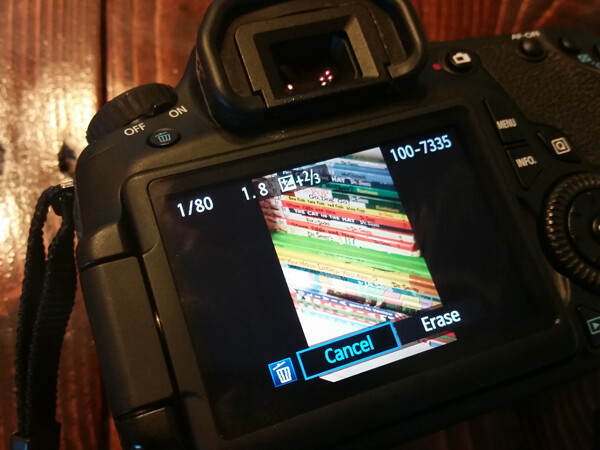
Deleting all photos through the camera by using the “Delete All” option
Plugging the camera into the computer, and dragging photos into the computer’s recycle bin and/or allowing your import software to delete the files from the card once they’re uploaded.
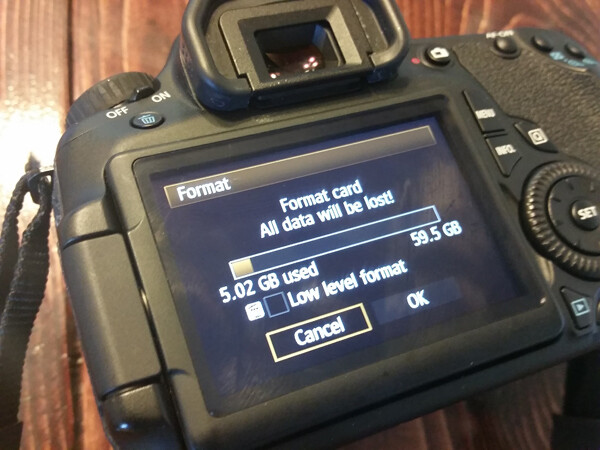
Using your camera’s Format function
In the end, all of the above methods work toward the same end, in that they remove the images from your card. However, the first three ways to delete are actually more taxing to the memory card than using the card’s Format function. I’ve heard it explained like this:
Let’s pretend for a moment that your memory card has a shelf-life of 1,000 uses. Let’s say that you go out and take 500 photos, that’s 500 uses on your memory card. You then upload the photos to your computer, and then individually delete each photo using the delete button on your camera. Deleting each photo individually counts as another 500 uses on your card. So in all, you’ve just spent 1,000 uses of your memory card, leaving you with no uses left on that card.
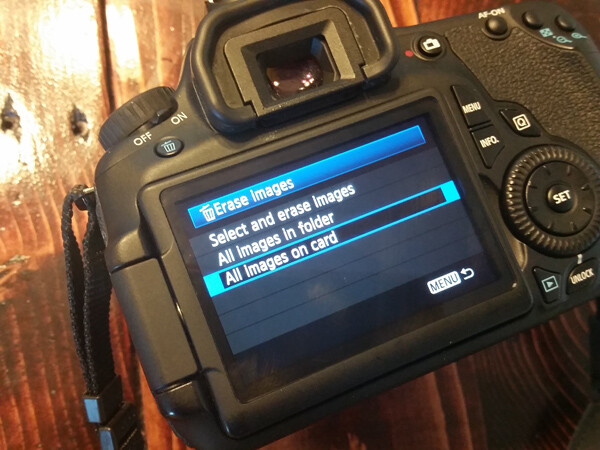
Now, let’s pretend that you’ve uploaded your 500 photos, but instead of deleting them with your delete button, you use your camera’s Format function. Formatting works in a different way than deleting, and only deletes the directory files rather than the images themselves. This then allows the images to be overwritten the next time you take a picture. Because of this, formatting only counts as ONE use of your memory card, regardless of how many photos you’re deleting. So, in the scenario above, you’d have used only 501 of your memory card’s uses, as opposed to 1,000 with deleting manually. Certainly, memory cards available today will be able to handle far more than 1,000 uses, but the illustration still rings true – formatting your card causes less wear and tear on your memory card than other ways of deleting images.
Additionally, because formatting only deletes the directory file instead of the images themselves, images on a card that has been formatted are typically much easier to recover (if needed) than those that are deleted manually, assuming that you did not overwrite them by taking more photos. Not a bad trick to have up your sleeve in case of emergencies, am I right?
I’d also like to add that I have personally seen a difference in both buffering time of the card, and also a decrease in the amount of corrupted images/cards that I’ve come across since I’ve been formatting cards rather than deleting in some other way. I’m not sure whether there’s an actual scientific basis there, but it definitely seems related in my book, and it is now pretty rare that I delete even a single image in any way other than formatting.
So, how often should you format? Some people like to wait until their card is totally full, and then format. Personally, I like to format my card before each new photo session. It just makes sense to me to start fresh each time, and be able to upload everything on the card to one location. This is really a matter of personal preference as far as I’m concerned. The one hard and fast suggestion that I do have when it comes to formatting cards is simply to be sure to format the card in whichever camera body you plan to use it in next.
How do you typically delete images, and why?
googletag.cmd.push(function() {
tablet_slots.push( googletag.defineSlot( “/1005424/_dPSv4_tab-all-article-bottom_(300×250)”, [300, 250], “pb-ad-78623” ).addService( googletag.pubads() ) ); } );
googletag.cmd.push(function() {
mobile_slots.push( googletag.defineSlot( “/1005424/_dPSv4_mob-all-article-bottom_(300×250)”, [300, 250], “pb-ad-78158” ).addService( googletag.pubads() ) ); } );
The post The Best Way to Delete Photos From Your Memory Card by Meredith Clark appeared first on Digital Photography School.
You must be logged in to post a comment.