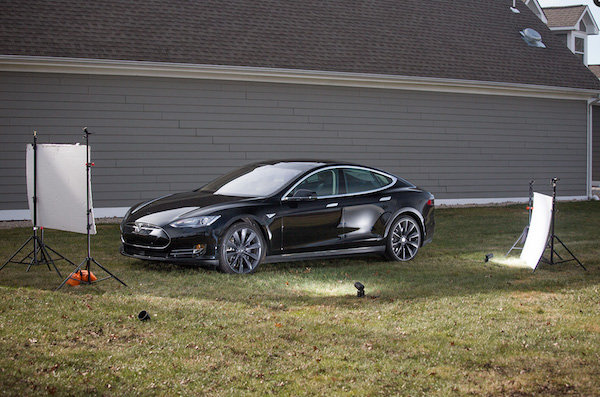
The scene setup – by placing parking a car in the shade of a building on a sunny day, you can use the ambient light as your main light, illuminating the contours of the vehicle.
Photographing reflective surfaces is no walk in the park. So, as you can imagine, photographing cars, which are essentially just giant reflective objects, is really difficult. It comes with all the same challenges, magnifies them, and adds the new wrinkle of your subject being too heavy to reposition easily. Sounds like fun, right? It can be, and it can still be pulled off without the use of a commercial studio, a giant cyclorama wall, or car-sized softboxes.
Made in the Shade
Take a look at the image above, you can see that I have a Tesla Model S set up in the shade of a building, on a sunny day. By positioning the car so that the ambient light illuminates the overall contours of the car and then placing lights in the shadow areas, it treats the ambient as the main light, and uses the surroundings to advantage, rather than fighting against them. This will minimize the frustration of trying to eliminate the ambient light, which would likely be an exercise in futility, especially when using small flashes.
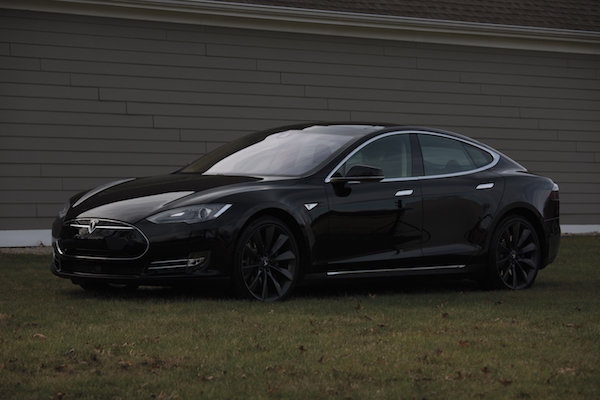
The ambient light reading – by exposing for the highlights on the car’s windshield, I was able to determine which areas in which to add flash.
Before setting up any lights it’s helpful to start by taking a test shot, getting an exposure of the car’s highlights, especially such as the windshield, which would typically be the brightest spots. This exposure will likely look pretty dark, not unlike the image above. It will allow you to see exactly what the ambient light is doing and whether you need to reposition the car to change the angles of the light falling on the car. This exposure will also help you to determine where to add your flashes. The diagram below shows the lighting diagram used for the Tesla shot.
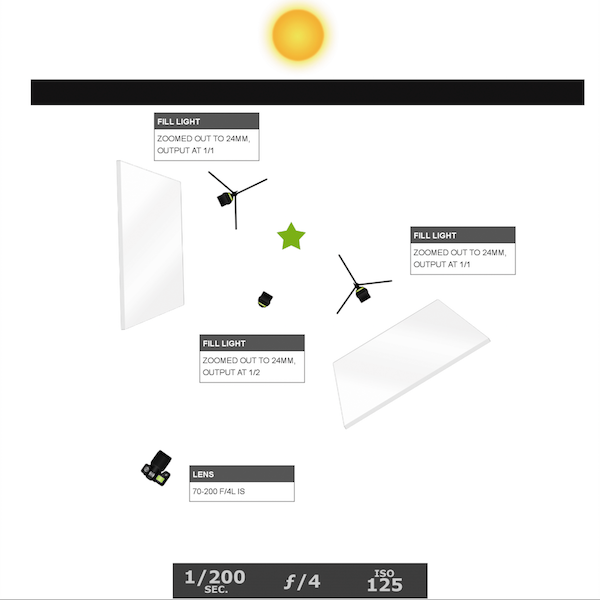
The lighting diagram – after getting an exposure of the ambient light, I was able to determine where to best place my three speedlights.
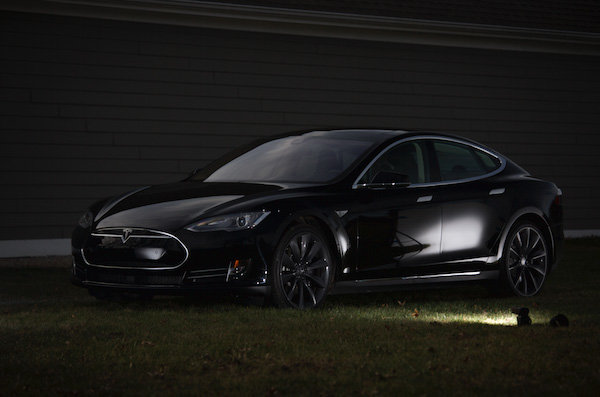
The raw file – the shadow areas are filled in with accent lights, although some cleanup in post-processing was needed.
I own three flashes, and I needed all of them for this shoot. When lighting reflective surfaces, you need a large, soft light source. To accomplish this, I brought several 40×60” white foam core panels with me, along with several light stands and sand bags. I set up two panels, one at each end of the car, securing them to light stands. I then aimed a full-powered flash into each panel. Since I couldn’t set up a third panel to light the middle of the car without blocking my view of it, I set my third flash on the ground, aiming it into the tire rim. The light placement was effective, although a bit of cleanup in post was still needed.
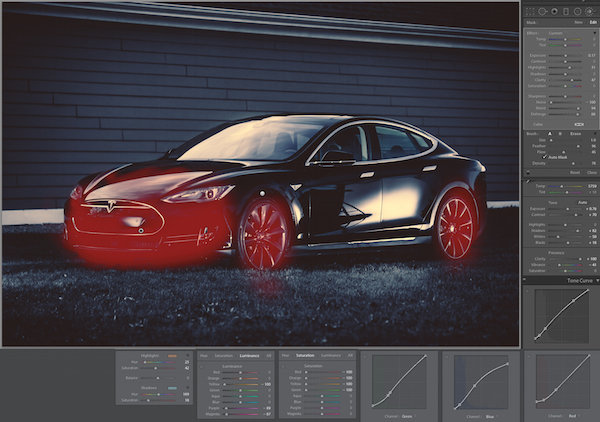
The lightroom settings – I chose to desaturated the image, one color channel at a time (rather than toggling over to Black and White mode or lowering the global saturation) in an effort to retain the mood in the photo.
The most obvious issue that needed taken care of was the unsightly reflection in the car door. Though the white panel served in lighting the contours of the side of the car, it left a garish reflection. Eliminating it required something a bit more powerful of a tool than the what Lightroom’s Spot Removal tool offered. Instead, I used Lightroom to color grade the image as well as bring up the highlights in a few areas, (see above). The red highlighted areas show where I painted in a brush adjustment, raising up the Exposure, Brightness, and Clarity sliders.
I also chose to desaturate the image, since it was already essentially monochromatic, except for the grass. Note that I kept the file in Color mode, rather than toggling over to Black and White mode or lowering the global saturation, and opted to instead desaturate the individual color sliders in the HSL panel. This is because I wanted to preserve the dark, moodiness in the image, and for reasons I don’t didn’t quite understand, the overall brightness of the image increases when I toggle over to Black and White mode. I also used the Luminance sliders to control the highlight and shadow portions of the image. For example, by lowering the Yellow slider in the Luminance panel, I dimmed the highlights in the grass, which had yellow in it, and shifted the focus back to the car.
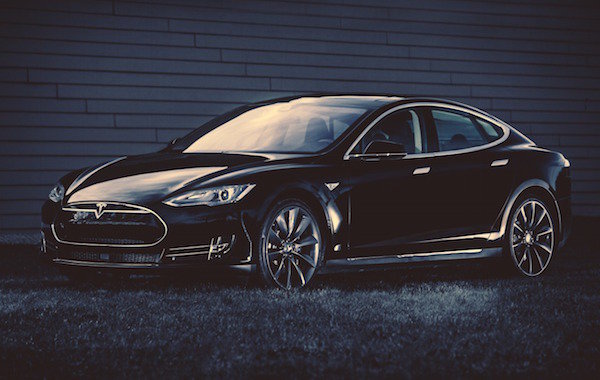
The final shot – once the image was color graded and minor spots had been removed, I opened up the file in Photoshop to remove the white-board reflections, specifically the white panels at the base of the building in the background and the edge of the roof, (Figure 6). If specialized cleanup is not your forte, it’s totally acceptable (if not recommended) that you send the file off to a retoucher to finish it up for you.
Attention to Detail

The setup – I am not a car person. By that I mean that I couldn’t tell you one old hot rod from another. That said, I find them to be absolutely gorgeous objects to look at. So, when the owner of this beautiful machine led me back to the spot where his latest project sat, I got really excited when my eyes caught sight of the immaculately restored, 1932 Ford Roadster (I only know the name because he told me). The details were phenomenal. Though I knew nothing of its history, and didn’t even really care about driving it or even riding in it, I knew that I had to photograph it. The owner pulled out a vintage magazine photo of a similar car and asked if I could make a photo that looked like that. I smiled and said, “We can do better than that.”
But first, the car needed to move. He had parked the car in front of a large, white door, in full view of the morning sun. This meant harsh, direct light, which was unflattering and boring. I quickly scanned the area, spotting a one-story brick building across the street, with a wall, still in the shade. I asked if he could drive the car over there, positioning it just inside the shade (see above).

The lighting diagram – similar to the previous Tesla scenario, I used two of my lights to illuminate the front, and back ends, of the car. This time, however, I placed my third light between the car and the back wall, creating a nice separation between them.
Since I had come to the shoot prepared to photograph portraits and not cars, I didn’t have white panels to bounce light off of. I still only had three flashes that I could use to light an entire car. But just like the previous scenario, I used the ambient sunlight as the main light, adding accent lights to the front and back portions of the car. It helped that I had less car to light. This was a two-seater roadster, and thus was about three feet shorter than the Tesla. This meant that the back rear flash was able to light both tires this time, freeing up my third light to be placed between the car and the building behind it. That created a nice separation between the car and the wall. It also served to highlight the amazing detail of the open-air hood, which allowed you to see straight through to the wall (see below)

The final shot – my favorite part is the open-air engine that allows you to see straight through to the back wall.
Do you have any other tips for photographing cars? If you’ve tried it share your ideas. If you haven’t give it a try and share your images and any questions you may have.
googletag.cmd.push(function() {
tablet_slots.push( googletag.defineSlot( “/1005424/_dPSv4_tab-all-article-bottom_(300×250)”, [300, 250], “pb-ad-78623” ).addService( googletag.pubads() ) ); } );
googletag.cmd.push(function() {
mobile_slots.push( googletag.defineSlot( “/1005424/_dPSv4_mob-all-article-bottom_(300×250)”, [300, 250], “pb-ad-78158” ).addService( googletag.pubads() ) ); } );
The post Tips for Photographing Cars by Nick Fancher appeared first on Digital Photography School.

Digital Photography School


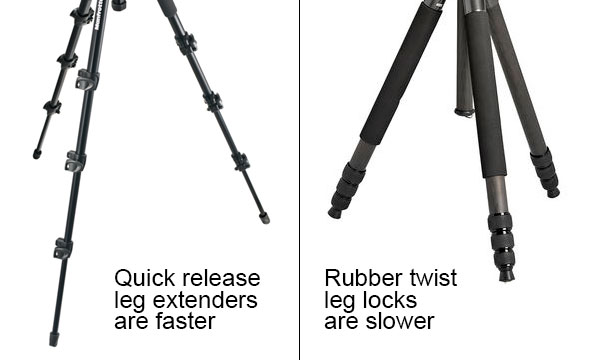
 To be fair to Yunteng, I got the sturdiest tripod I believe it’s possible to find for a measly $ 45. It didn’t fall apart, was light, and in all honesty the tripod head was made for video, not stills. I got exactly what I paid for. I’ll keep it in my studio as a demonstration tool for showing people the difference between a $ 45 tripod and a $ 400 tripod.


You must be logged in to post a comment.