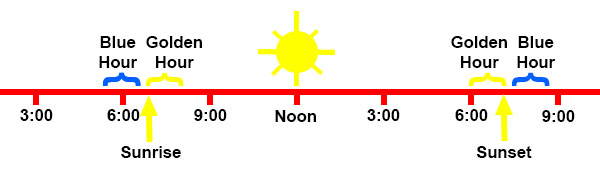
Natural light is what landscape photography is made of. Other forms of photography rely heavily on flash, but most landscapes rely entirely on the sun’s rays as their light source. That natural light from the sun is changing every second of the day. A picture taken at 9:00 a.m. will look fundamentally different than picture taken at 7:00 a.m., even if it is a picture of the exact same subject, from the exact same angle, using the exact same camera settings and focal length. Therefore, understanding these changes that occur throughout the day is critical to improving your landscape photography. By understanding these differing lighting conditions, you will know how and when to be set up and ready to take your landscape photos.
These changes in natural light don’t just affect the overall lighting and exposure level of your photos, but also things like color and contrast. Different lighting will lend itself to different camera effects. So in this article we will take a quick walk through the times of day for the landscape photographer, focusing on the unique advantages and challenges of each.
Morning
Let’s start with the morning. An hour on either side of sunrise can be a bonanza for the photographer. Unfortunately for your sleep patterns, the photographer’s day does not start at dawn, but well before it.
Some of the best photo opportunities occur before the sun is up. During this time, the sky is beginning to brighten, but the sun is not yet over the horizon. You will initially need to overcome the low light levels, meaning you will need a tripod and a remote shutter release.
But with that hurdle overcome, there are distinct advantages to shooting before the sun comes up. You will not face overly harsh contrast, or a dynamic range problem since everything in your view will be somewhat dark. Further, because of the indirect angle of the sun’s rays, you will be treated to colors in the sky that you won’t see during the day.
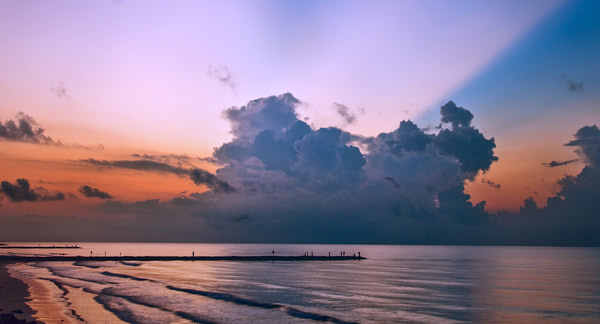
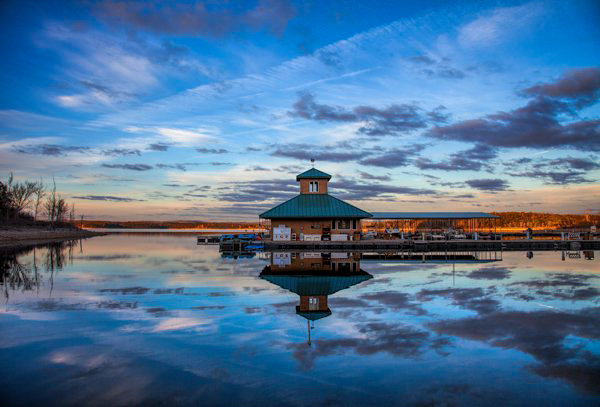
The indirect rays of the sun at sunrise and before can provide you with a sky full of interesting colors.
Twilight
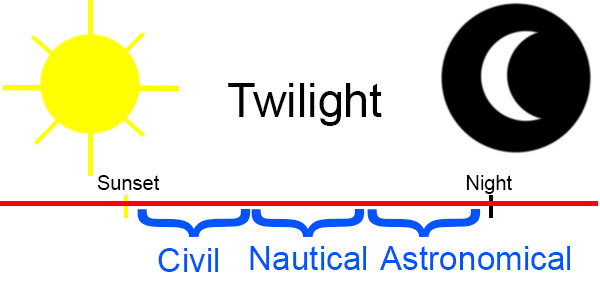
This time before the sun comes up is commonly referred to as twilight. You will want to get to know it better if you aim to improve your photos. Twilight is a rather broad term that can encompass different conditions. so it is further broken down into three segments. The actual terms and specifics below are not that important to your photography, but what is important is that you understand what is coming up next as you are out shooting.
- Astronomical twilight: During this time, it is still dark, but the indirect rays of the sun are just starting to brighten the sky. The sun will be between 12 and 18 degrees below the horizon. Stars are clearly visible and the sky is dark overall. To most of us, this will not be much different than nighttime. Therefore, when photographing during this time, you will definitely need a tripod and remote shutter release.
- Nautical twilight: The is the period of time when everything is fairly dark, but it has brightened up enough that you can see the horizon. The sun is between 6 and 12 degrees below the horizon. You can still see some stars, but the sky is noticeably brighter, particularly near the horizon line. This is when you will often see a blue tinge to the sky. You will still need a tripod, but you can now probably capture detail in the foreground as well as the stars in the sky.
- Civil twilight: This is the period of time just before the sun has come up (or just after at has set in the evening). It is when the sun is between 0 and 6 degrees below the horizon. The point for the photographer is that it is still before sunrise, but everything around you is pretty bright. You can see everything and you might not even need a tripod (although I would recommend you keep using it ).
The times and durations of the phases of twilight will depend upon your location and time of year. There are a variety of apps that will give you the exact times.
Blue Hour
It is during twilight (typically during nautical twilight) that a phenomena called the blue hour occurs. At this time, the sun is still a good distance below the horizon. Most of the sun’s red rays are shot into space, but a relatively high percentage of the blue rays enter the Earth’s atmosphere. The indirect light takes on a predominantly blue color. This lasts about 30-40 minutes and ends about 15 minutes before sunrise. This is a treasured time for many landscape photographers, so make sure you are in position at least a half hour before sunrise.
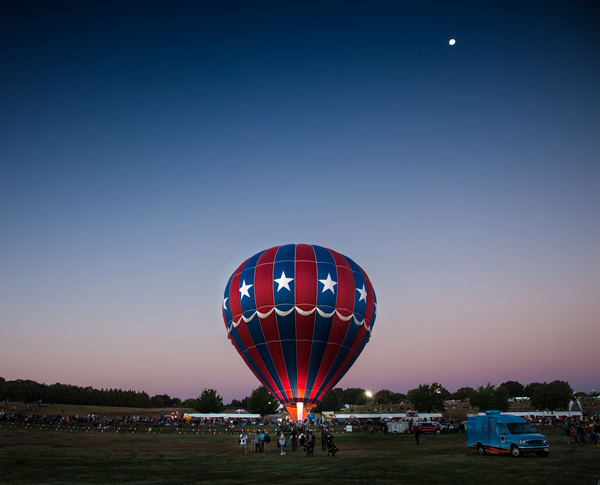
During portions of twilight, there is enough light to see the foregound, but you can still see the stars and the moon.
Sunrise
After twilight comes sunrise, which needs no introduction. The landscape is brightened by this time, but the sun’s rays are tempered by the fact that portions of the sun are still behind the horizon and the rays are coming through a lot of the Earth’s atmosphere before they reach you. The sky will typically have a warmer color to it.
What’s more, you can often put the sun directly in your picture. You can also make the sun’s rays more clear and even add a bit of a starburst effect to the sun by stopping down your aperture. Make sure your aperture is at least f/16 and perhaps even f/22 (at the risk off some diffraction).
After sunrise
The hour or so after dawn remains a good time to photograph. During that time, the sun is still low in the horizon. Therefore, the sun’s rays are coming through more of the Earth’s atmosphere, which diffuses the rays and cuts down on harsh contrasts. So even though the sun is fully in the sky by this point, it remains a good time for photography.
After that, the sun is getting higher in the sky and you get into the problems of midday photography.
Afternoon
The late morning and most of the afternoon is considered by many to be the worst time for photography. Many photographers simply put their cameras away during this time. It is the time of harsh contrast and black shadows. But you need not give up entirely during this time. There are a few things you can do to improve your photos.
The first thing you can do is use a polarizing filter. Polarizers work by filtering out certain light rays that come to the camera at different angles. The light that enters your camera is often more diffuse and colorful. The best use for our purposes is making skies a rich, dark blue (although polarizers are also quite handy for cutting down on reflections). Polarizing filters actually work the best around midday when the sun is directly overhead. Be sure to rotate your filter to achieve its maximum (or desired) effect.
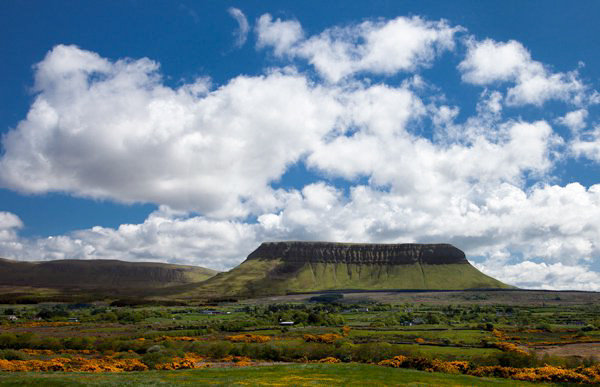
Mid-afternoon photos can often benefit from the use of a polarizing filter.
Another thing you can do to combat the afternoon sun is convert your photos to black and white. As mentioned previously, one of the primary problems with shooting during the middle of the day is the high contrast and harsh shadows it creates. However, high contrast is actually a benefit in black and white photography, so the harsh light of midday can sometimes work to your advantage.
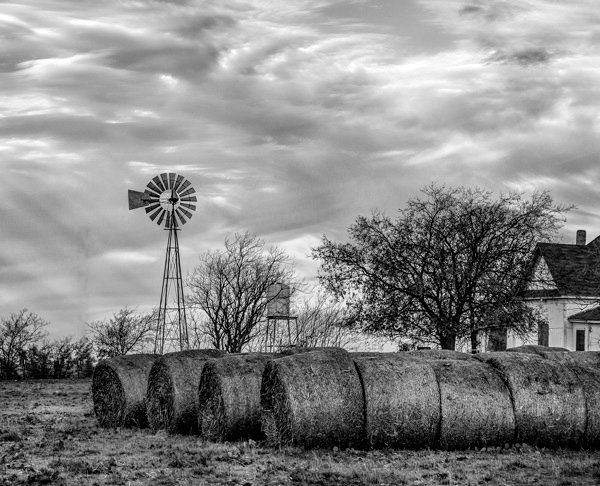
Photos taken during the middle of the day often benefit the most from a conversion to black and white.
If you must photograph in the middle of the day, oftentimes cloudy days work best. The clouds cut down on the harsh shadows, they also add some texture to the sky. Try to work them into your photos.
Evening
The evening is where you will encounter some of the best conditions for photography. It is essentially the same as you experienced in the morning around sunrise, but in reverse order. It starts with the sun dipping into the horizon, which results in some interesting changes in light quality.

The light in the late afternoon often starts to take on a yellow or reddish appearance.
Golden hour
As the Sun begins to set, the light you are receiving must travel through more of the Earth’s atmosphere to reach you. It is therefore more diffused by the time it reaches you. The light also takes on a warmer, more golden quality.
The culminates just before sunset, which is called the Golden Hour. Actually it is not really an hour, but usually last about 30 -40 minutes (length varies depending on your location relevant to the equator). It starts just before sunset and ends about 20 minutes after the sun is down. Photographs taken during this time benefit from having plenty of light, but it is more diffused and softer to avoid harsh shadows. As the name suggests, the light has a warmer hue that can make for dramatic photos.
Sunset
Sunset is another time that photographers intuitively want to photograph. The conditions are well-known to everybody, so here I just want to focus on a few things you can do to make your sunset pictures look better.
The first thing you can do is slightly underexpose your photos. That will be welcome news if you are not using a tripod, since you are rapidly losing light during this time. Underexposing will allow you to shorten your shutter speed and avoid camera shake (hopefully), and will generally make the colors in the sky much more vibrant.
At sunset, due to the angle of the sun’s rays, there is usually no longer any direct light on the foreground. That tends to make everything black. You can deal with that in one of two ways, either by accepting it, or compensating for it:
- You can accept the black foreground by creating silhouettes. This is commonly done with people, but it can work with a variety of subject matter. To do this, just meter the light of your scene from the sky. The brighter sky will be properly exposed and the foreground elements will be black.
- You can attempt to compensate for the lack of direct light on the foreground by using a graduated neutral density filter. This filter will darken the sky without affecting the foreground. Inevitably, you will need to compensate by adding exposure to the whole picture (since the filter made the sky darker and the foreground was already dark). The upshot is that this filter will tone down your sky and cause the foreground to brighten.
After sunset
It is a huge mistake, which I see lots of photographers make, to pack up and head home right when the sun dips over the horizon. After sunset, you will continue to be treated to favorable light conditions, and in fact, some of the best conditions may follow. These will be the same as already discussed in the Twilight section above. You will also be treated to another Blue Hour, when the sun is considerably over the horizon and the diffused blue rays dominate.
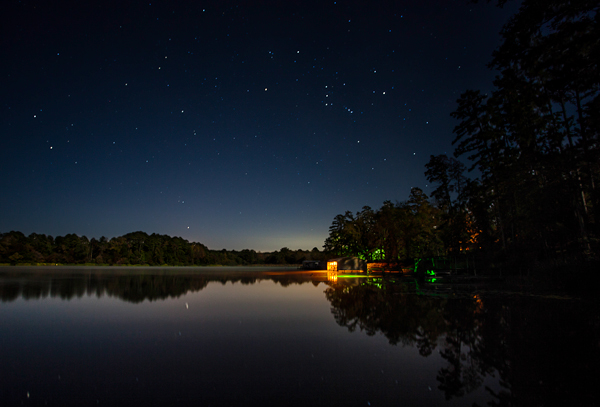
In the final stages of twilight, the scene often looks very much like a night shot.
Night
Finally, don’t forget about night photography. It is half of the day, after all. Some of the most dramatic pictures can be taken during this time. Further, you do not really need to worry about changing light conditions, making this a more relaxing time to photograph.
If you want to capture stars or otherwise needed to be true night time, be sure to wait a couple of hours after sunset. It will take a while for the sun’s rays to fully disappear from the atmosphere.
Conclusion
Photography is all about anticipation. It is about putting yourself in the best position possible to get a great shot. When it comes to landscape photography, much of that anticipation has to do with changes in the light. Those changes come remarkably quickly, especially around sunrise and sunset. By understanding the constantly changing conditions addressed here, you will better be able to anticipate the light and put yourself in the best position to get that great shot. I hope this discussion helps you get it.
googletag.cmd.push(function() {
tablet_slots.push( googletag.defineSlot( “/1005424/_dPSv4_tab-all-article-bottom_(300×250)”, [300, 250], “pb-ad-78623” ).addService( googletag.pubads() ) ); } );
googletag.cmd.push(function() {
mobile_slots.push( googletag.defineSlot( “/1005424/_dPSv4_mob-all-article-bottom_(300×250)”, [300, 250], “pb-ad-78158” ).addService( googletag.pubads() ) ); } );
The post The Natural Light Cycle for Photographers by Jim Hamel appeared first on Digital Photography School.

Digital Photography School


You must be logged in to post a comment.