Das Bild des Tages von: Khunya Pan

Straßenfotografen, die sich selbst nicht fotografieren lassen wollen? Gibt es. Mehr dazu im Ausblick.
kwerfeldein – Fotografie Magazin | Fotocommunity
Das Bild des Tages von: Khunya Pan
Straßenfotografen, die sich selbst nicht fotografieren lassen wollen? Gibt es. Mehr dazu im Ausblick.
kwerfeldein – Fotografie Magazin | Fotocommunity
The Olympus OM-D E-M5 II has attracted a lot of attention, both for its technology and because it succeeds an already popular camera. We sat down with Product Manager Richard Pelkowski to find out more about the technology that went into the E-M5’s successor and what might be possible in the future. See video
Articles: Digital Photography Review (dpreview.com)

Wouldn’t it be great if you could get beautiful, natural-looking portraits without ever having to use flash?
Well, perhaps you can. There are many different locations, often closer than you think, where you can find the right lighting for great looking portraits. Often they’re missed because we might not know where to look.
Generally, your best strategy is to look for what is called Open Shade. Ideally, you are looking for a situation where the stronger overhead light is being blocked by a structure, either man-made or natural.

There are a lot of variables to pay attention to, but with a little practice you begin to recognize good natural lighting situations that are right in front of you.
This is a particularly good technique for you to use when it’s sunny outside in the middle of the day, but it can work on overcast and rainy days as well.
It’s often a bad idea to pose your subject out in the direct sun, particularly when it is up high in the ske. That kind of lighting can produce harsh shadows, as well as cause your subject to squint their eyes.
I use the front porch location quite a bit when photographing high school seniors in the middle of the day. An overhang of any sort can block strong overhead light and allows your subject to be lit with the softer surrounding bounce lighting.

In the case above, I also used a large white collapsible reflector, off to the right side, to provide additional fill-light with this handsome young man. A large aperture was used to help create an out of focus background.
If you have no porch available you can get your model to help create a good lighting situation by using a prop like a wide-brimmed hat for a close-up head shot.
By Andrew Menage
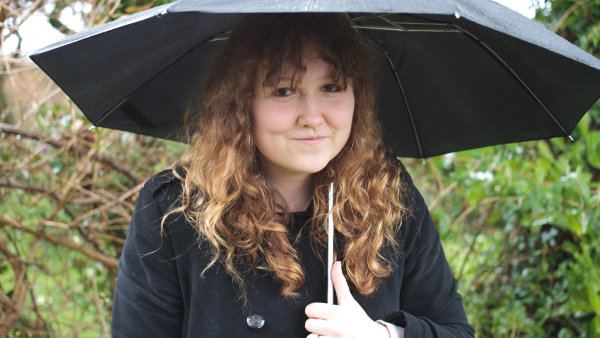
Using an umbrella can work well to protect your subject from both the rain, and overhead lighting. Note that the color of the umbrella will have a significant effect on the color of the light that is illuminating your subject. A black umbrella is neutral in color and will block almost all of the light from above.
Just because you may not be able to shoot outside doesn’t mean you still can’t use the outdoor light to create a natural looking portrait. There is a right way and a wrong way to do this.


Make sure that most of the window is forward of your subject. The larger the window, the softer the lighting. The reflector can be any light colored object that is fairly neutral in color. The closer it is to your subject, the more fill light it supplies.
If you shoot in a more urban setting, you’ll likely have bridges or overpasses in your area. The photo below was taken at the entrance to a pedestrian underpass. Not only did we get good portrait lighting, we also got the model out of the wind and snow.

One important thing to remember is to watch your background. Although I was generally happy with the pose and the lighting, I could have done a better job controlling the background in this portrait.
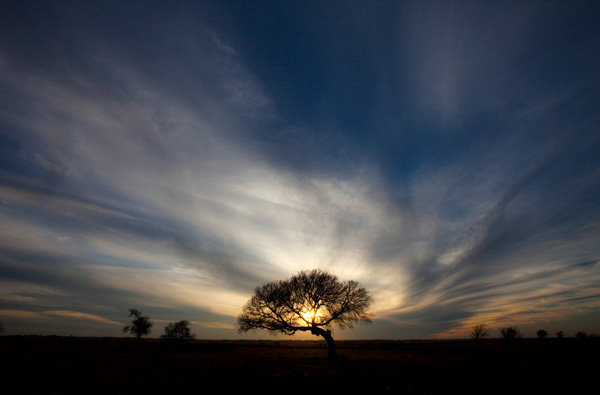
This is one time when you do want the sun in the face of your subject. You only have a few minutes of this sweet light when most, or all, of the sun has disappeared below the horizon.

Direct sun can be too bright at the beginning of sunset. You may have to wait until just after sunset to get a softer look. In the beach photo above, the light was nicely diffused by a few clouds on the horizon between my subjects and the setting sun.
Similar to the way you use an umbrella, you can create your own overhead roof by having an assistant hold a light blocker above your subject. This could be anything lightweight, a large piece of cardboard, or even one of the a collapsible, panels like the ones shown below.

There are two factors that dramatically effect how well this technique works.
The first is how far back your subject is posed underneath the covering object. If you pose her too far back, you may not have enough light to get a nice photograph. If she is too far forward, you may get too much overhead lighting.
Secondly, how high the shading object is above your subject’s head affects how the light will illuminate their features. The best way to master this technique is to play around and experiment.
It’s always a great idea to shoot a few variations in several locations, and adjust exact placement of your subject. You’ll be able to learn a lot from your mistakes and your successes.
googletag.cmd.push(function() {
tablet_slots.push( googletag.defineSlot( “/1005424/_dPSv4_tab-all-article-bottom_(300×250)”, [300, 250], “pb-ad-78623” ).addService( googletag.pubads() ) ); } );
googletag.cmd.push(function() {
mobile_slots.push( googletag.defineSlot( “/1005424/_dPSv4_mob-all-article-bottom_(300×250)”, [300, 250], “pb-ad-78158” ).addService( googletag.pubads() ) ); } );
The post Five Places for Perfect Natural Portrait Lighting by Bruce Lovelace appeared first on Digital Photography School.
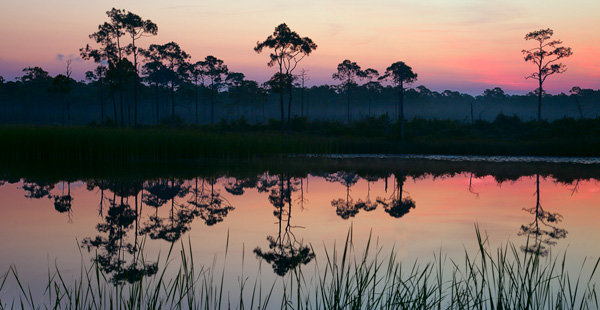
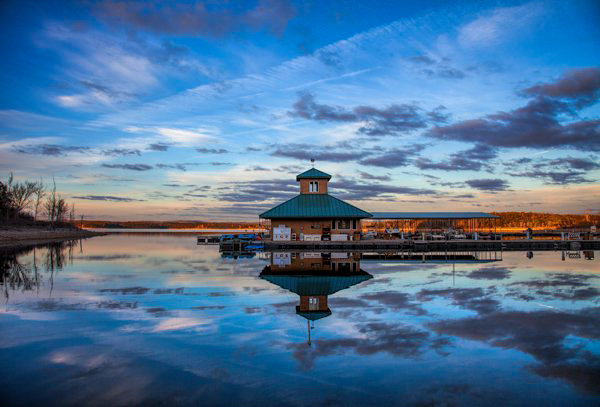
Perhaps the most important change you can make to improve your photography is to change the time of day you are shooting. It is as simple as that. Photos taken in the middle of the day all have problems that can be avoided if you photograph near sunrise or sunset. Photographers agree on very little, but they all seem to agree that the times around sunrise and sunset are the best for photography. In fact, many photographers go so far as to put their cameras away during the hours between 9 a.m. and 5 p.m.
Getting up at dawn, or hanging around after sunset, is generally not convenient. It is no fun to get up well before sunrise, especially in the summer when sunrise comes early. But if you want to elevate your photography, that is how to do it.
You may have heard all this before, but in this article I will explain why, and show you some of the reasons why sunrise and sunset can help you take better photos.
The bright light of the midday sun creates harsh shadows in your photography. Nearly every object within your view will create harsh shadows. Obviously large objects like trees and buildings create such shadows, but it goes at lot further. When photographing a person, for example, you will likely encounter harsh shadows on their faces. Even something as small as grass or leaves will leave unsightly black shadows in your pictures.
Photographing near sunrise or sunset fixes this problem. At those times, the sun’s rays are coming from a more horizontal angle, which means that the rays have to pass through a lot more of the earth’s atmosphere before reaching you. That makes the light more diffused.
In addition, the times just before sunrise and after sunset don’t involve any direct rays at all. At those times you are dealing only with indirect rays of the sun. You will not have a problem with harsh shadows.
In all outdoor photography you have to cope with the problem that the sky is invariably brighter than the foreground. Sometimes it is much, much, brighter. If you meter light based on the brightest part of your camera’s view, which is inevitably the sky, the shadows in your picture will end up as pure black. Conversely, if you meter light based on the foreground or shadows in your camera’s view, the brighter portions of your picture will be overexposed or even blown out (pure white).
For pictures taken during the middle of the day, this problem can be exacerbated. That is when the sky is at its brightest. If your foreground is not as bright, you are will have a problem where the scene is beyond the dynamic range of your camera.
When photographing around sunrise or sunset the sky is not quite as bright as it is when the sun is high in the sky. This cuts down the dynamic range your camera has to capture, so it is possible to capture the entire scene in full detail.
You simply cannot take a unique picture by photographing the same places, at the same time, from the same angles as everyone else. If you want your pictures to stand out from the crowd, you need to do something different. Photographing at sunrise and sunset goes part of the way in giving you that something different.
Most people are used to seeing the world as it exists in the middle of the day, they are not used to seeing it at sunrise and sunset. A typical day will have 10 hours of midday lighting, but the sunrise and sunset last only a little while. Further, people often miss them entirely. People are usually sleeping at dawn, or if not, are getting ready for work and not focused on the sky.
By photographing at sunrise and sunset, you are showing your viewers something they don’t see all the time. It avoids the commonplace. It will make your pictures more interesting to your viewers.
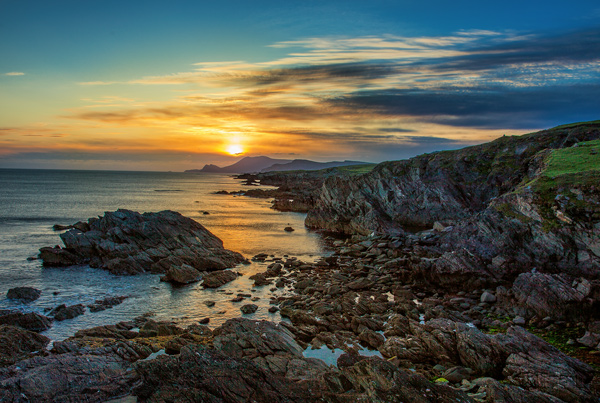
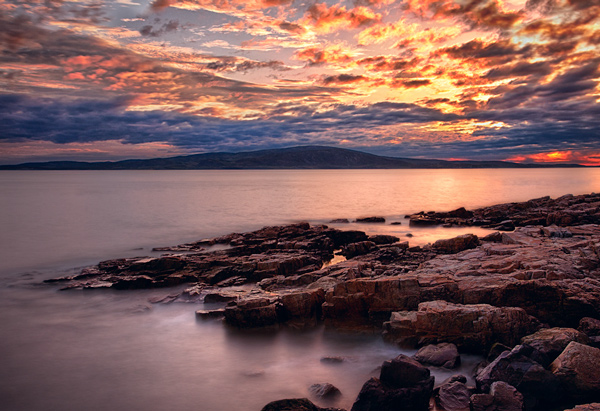
People often go to scenic locations to watch the sunrise or the sunset. There is a reason for that: because those are the times when the sky is at its most dramatic. As a photographer, that is the sky that you want to capture.
Skies at sunrise and sunset are full of color. The orange of the sun combines with the blue of the sky and creates interesting colors. When there are clouds in the picture as well, there can be a variety of different colors. Conversely, in the middle of the day, the sky is blue (if you are lucky, otherwise it is grey). By photographing at sunrise and sunset, you can capture those colors in your pictures. To make sure you are capturing the colors at their most vibrant, set your camera to meter off the sky and then underexpose a little bit.
I hope this article explains the advantages of photographing around sunrise and sunset. It is one thing – and perhaps the only thing – that I can guarantee will improve your photography. But one final note to help you maximize the benefit, is that you should not arrive at your location at sunrise and/or leave at sunset. Rather, arrive about 45 minutes before sunrise and hang around at least that long after sunset. These periods when the sky is bright, but the sun is beyond the horizon, sometimes result in more dramatic images than the sunrise/sunset itself. I have often seen people pack up when the sun dips over the horizon, only to miss the most dramatic colors of the day.
I would also encourage you to check out the importance of photographing at these times for yourself. The next time you are on your favorite photo sharing website, look at your most-liked photos. Make a quick note of how many of them were taken at sunrise or sunset. My bet is that it will be a lot of them.
So if you want to take more dramatic and interesting photos, take them at sunrise or sunset. The good news is that it doesn’t cost you anything. You don’t have to buy any special gear. Yet this one change will make more difference than any new camera or lens.
googletag.cmd.push(function() {
tablet_slots.push( googletag.defineSlot( “/1005424/_dPSv4_tab-all-article-bottom_(300×250)”, [300, 250], “pb-ad-78623” ).addService( googletag.pubads() ) ); } );
googletag.cmd.push(function() {
mobile_slots.push( googletag.defineSlot( “/1005424/_dPSv4_mob-all-article-bottom_(300×250)”, [300, 250], “pb-ad-78158” ).addService( googletag.pubads() ) ); } );
The post 4 Reasons Shooting at Sunrise and Sunset Will Help You Take Better Photos by Jim Hamel appeared first on Digital Photography School.

Alex Currie ist 17 Jahre alt und arbeitet als Fotograf und Filmemacher in Buffalo, New York. In seinen Bildern erzählt er Geschichten und transportiert Emotionen. Neben stark konzeptionellen Arbeiten finden sich in seinem Portfolio und besonders in seinen neueren Aufnahmen auch viele Bilder, die aus dem Moment heraus entstanden sind.
kwerfeldein – Fotografie Magazin | Fotocommunity
[ By Steph in Art & Installation & Sound. ]
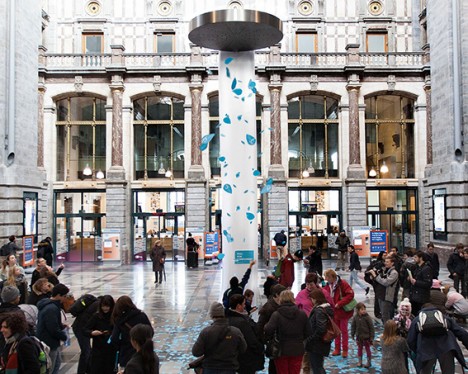
Would reading a message like “You could make a lemon laugh” make you feel good enough about yourself to spread kindness to others? That’s the idea behind the world’s biggest compliment shower, a massive spigot installed in Antwerp’s Central Station in honor of International Compliments Day 2015.
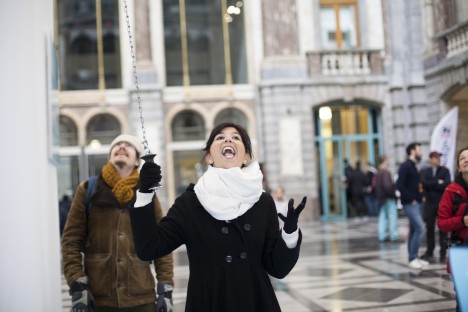
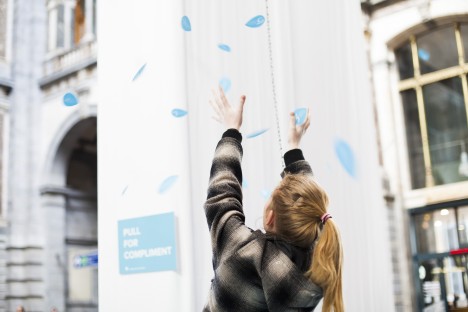
Dreamed up by creative agency FRIENDSHIP and commissioned by fashion retailer e5, the installation features what looks like the most absurdly oversized shower head in existence looming over commuters as they pass through the station. A sign simply says, ‘Pull for compliment.’
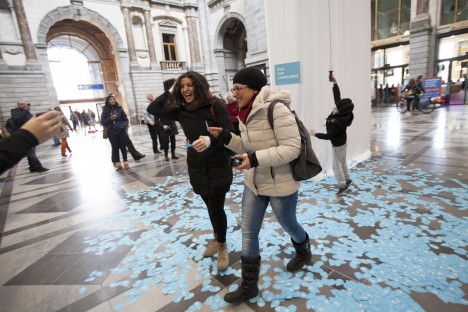
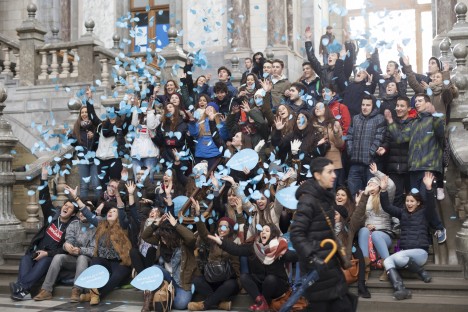
Anyone who does so (not minding the fine print, which reads ‘Smile, you’re on camera,’) instantly gets hundreds of complimentary phrases rained upon them and everyone watching. The little blue waterdrop-shaped papers bear messages like “You look like a million bucks today.”

This clever conceptual contraption pairs a shower with a washing machine to perform two essential household tasks with just one volume of water.
Click Here to Read More »»

Typography is more than just words thrown in with graphic elements. These 15 examples illustrate the depth and variety of typographic artwork.
Click Here to Read More »»

It’s Winter. Thankfully for the innovation-minded, there are a host of creative, stylish new ways to bath or shower in blessed warmth…as these 18 examples …
Click Here to Read More »»
![]()


[ By Steph in Art & Installation & Sound. ]
[ WebUrbanist | Archives | Galleries | Privacy | TOS ]
Rob’s pictures from this paddling on facebook.
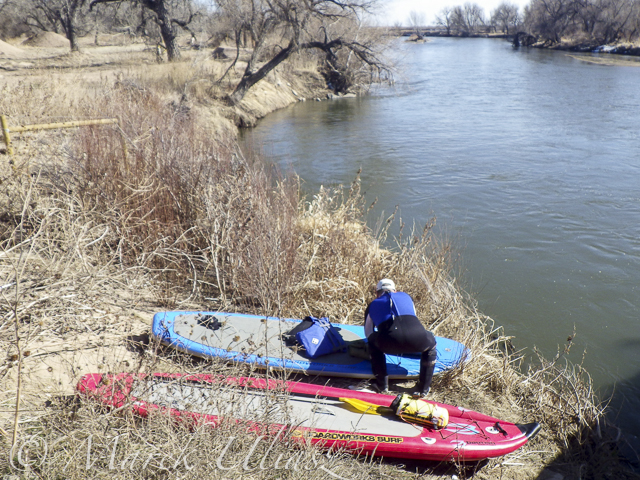
Launching our paddleboards below Kersey bridge next to water gauge station
I paddled my Badfish SUP with a short fin and never touched the bottom. Rob paddled with a regular fin and had to step out of his board once or twice, but I believe it would be possible to avoid any shallows with a more careful navigation.

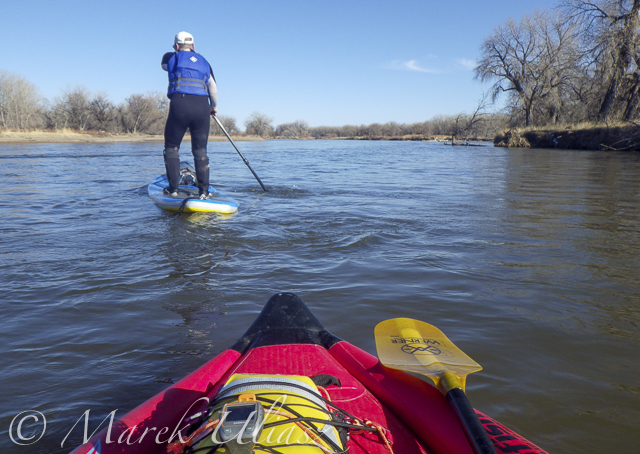
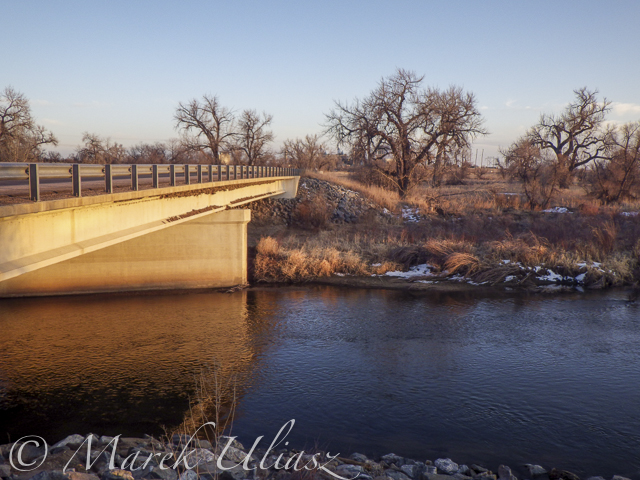
Finishing our run at Kuner on left shore above the bridge
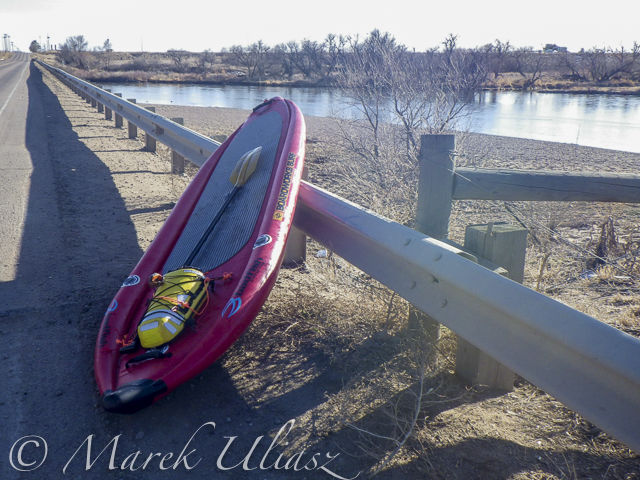
A typical bridge river access on the South Platte.
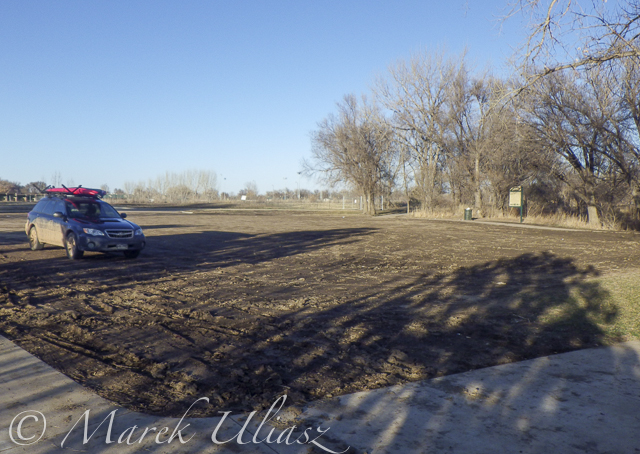
A part of Riverside Park at Evans reopened in September 2014 with entry from 42nd Street. There is access to a small lake, but no access to the river.
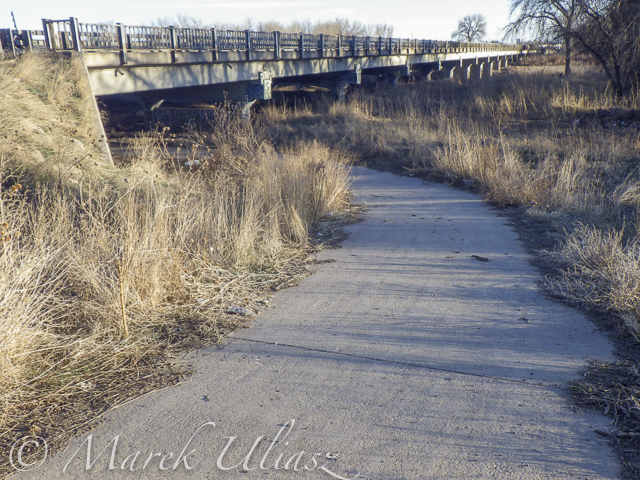
A bike trail going under hwy 85 bridge at Evans. Off road parking at the end of frontage road. The river access is not bad for the South Platte standards (no fences), but the under bridge scenery is pretty ugly.
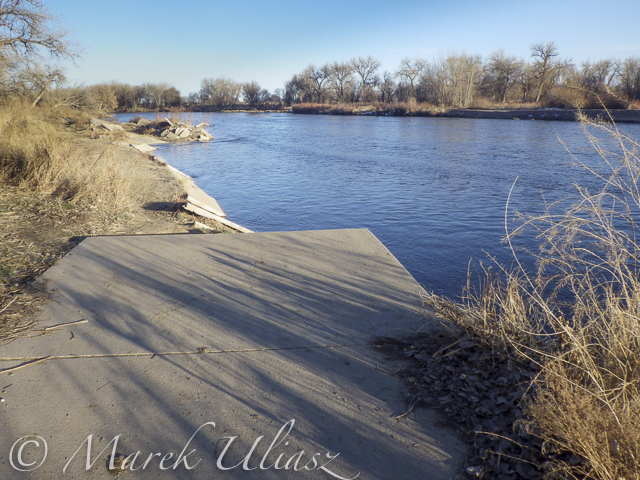
And, the bike trail ends just below the bridge. This is how probably the river shore looks further downstream at Riverside Park after the 2013 flooding.
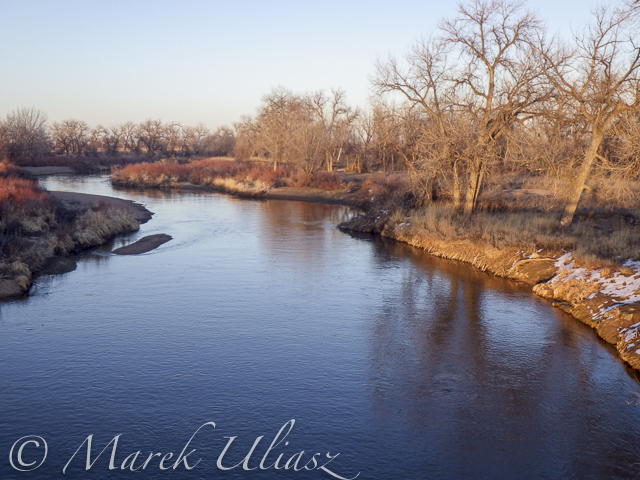
Let’s move 16 miles upstream: St Vrain Creek at Wildcat about 1 mile before the confluence with the South Platte.
Access to the river from the county road 19.5 (no fences) looks more or less the same as before flooding. River flow ~200cfs. I have started paddling trips here with flow as low as 90cfs.
Related posts:
Opening 2015 Paddling Season on the South Platte River
Scouting and Paddling the South Platte River after 2013 Flooding
South Platte River below Denver – GPS/photo river guide

Lighting Effects using Color Dodge Blend Mode in Photoshop.
There are numerous methods to creating lighting effects in Photoshop. I’m only going to cover four but they can be used in many ways. But first let’s take a look at a couple that are in the Filter gallery under Render in Photoshop (CS6 and CC). The first is Lighting Effects, which has been upgraded and is more powerful and easier to use than previous versions of Photoshop.
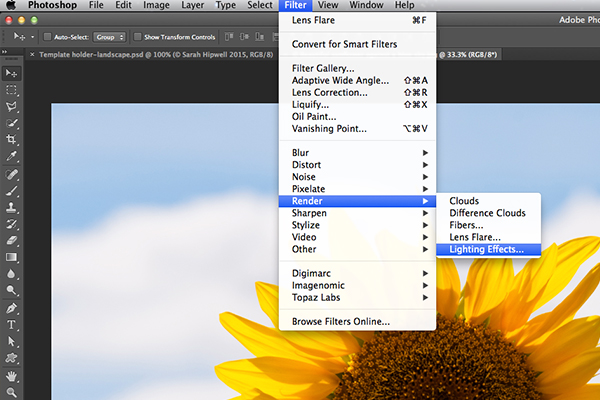
How to access Lighting Effects in Photoshop CS6.
The preview box has been replaced with a more sophisticated interface. You are presented with three different types of lighting effects in the Options Bar – Spot, Point and Infinite – and various presets to choose from. There is a Properties panel that customizes the look of the light that you want in terms of direction, placement, etc. This filter works on Smart Objects, so that you can work non-destructively. It is too comprehensive to go through all the aspects of this filter in this article. The best way to use it is simply open an image, experiment with the different options and see what you think.
Instead, I will show alternative techniques that I prefer to use in Photoshop and Adobe Camera Raw (ACR), some of which you may already be familiar with. I really like the Graduated Filter tool in ACR. This works in similar way to a Graduated Neutral Density filter on your camera. Landscape photographers use graduated filters so that they don’t overexpose the sky area. The dark bit on the ND is on top allowing less light in, as exposure is set for the foreground. You can achieve similar results using the Gradient Editor in Photoshop.
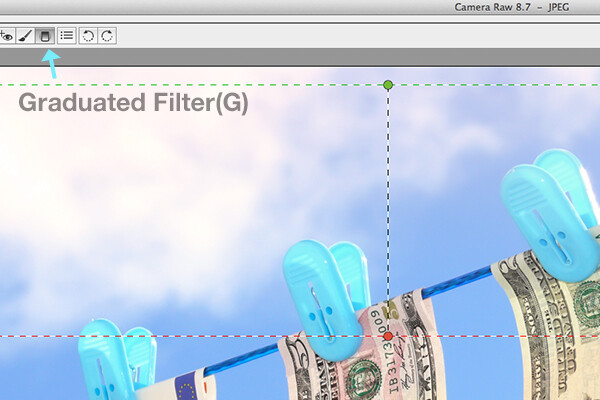
The Graduated Filter icon in Adobe Camera Raw.
With your image opened in ACR, select the Graduated Filter tool. Drag over an area on your image where you want the effect to be applied. Adjust the slider options on the right – Exposure, Highlights etc., to either lighten or darken the area. You can also choose a color to add warmth or a cooler effect.
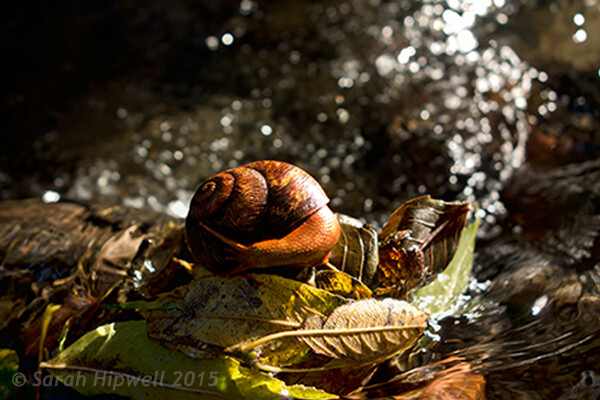
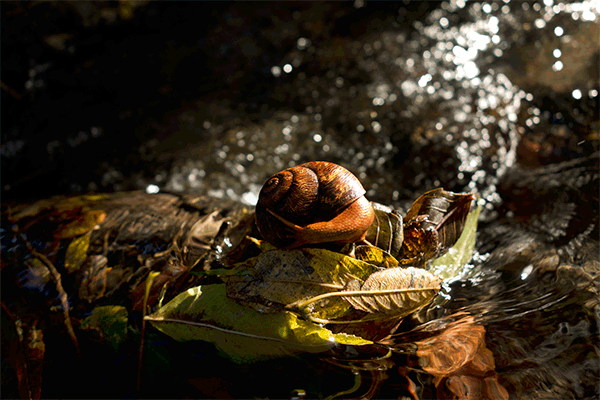
This is the original image of a snail before the Graduated Filter has been applied.
In the image of the snail, I used the Graduated Filter in three different areas on the image. I wanted to add more warmth to the water, so I used a yellow color to create an impression of a sun dappled effect. The second area was to lighten a little more of the water eddy, bottom right of the photo. Finally the third spot, I wanted to simply darken the area directly behind the snail so that the viewer’s eye is drawn to the it. Although, these are subtle light effects, they can add more drama and even change the composition of a photo.
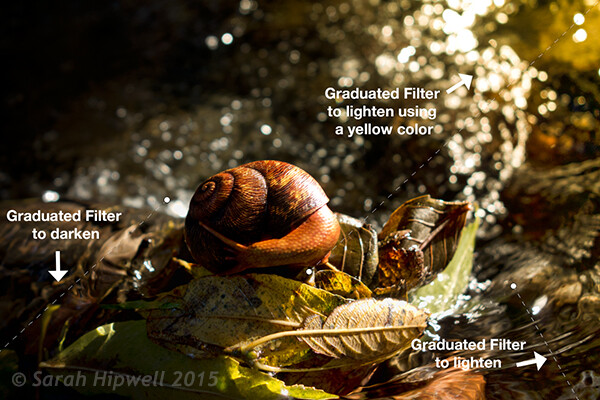
The snail image with the Graduated Filter applied in three different areas.
Animated GIF to show before and after effect from the Graduated Filters effects.
The Lens Flare, which is also found in the Filter gallery under Render, is a lighting effect that can be quite useful but you need to use it with care, using the less is more approach. For example in the image with the golf ball on the red tee below.
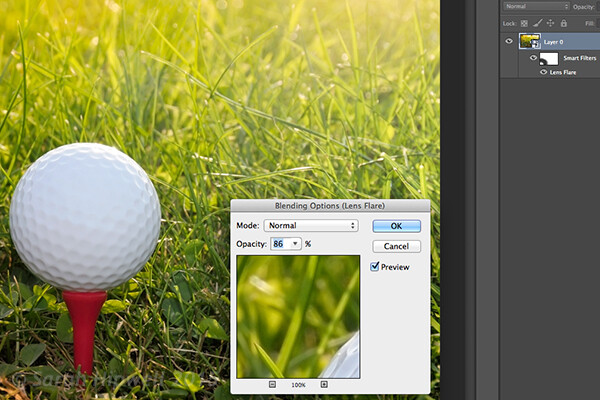
Lens Flare effect added to this image.
I used the Graduated Filter in three areas, similar to the snail image. I added a magenta color tint on the grass, bottom left of the image to break up the green flat look. Adding a different color using the graduated Filter in this way gives the image more depth. I then added a Lens Flare effect to the top right and reduced the opacity so that the effect caught the tips of the blades of grass. Converting your image to a Smart Object first before applying the filter effect, makes it easier to make changes non-destructively. I was also able to mask out some of the effect that I felt was too strong.

Animated GIF of golf ball with Graduated Filter effects and Lens Flare.
This brings me onto the third technique, the Color Dodge blend mode. I wanted to create the effect that the rear lights were switched on in this image of a car (below). This is such an easy way of creating a lighting effect in Photoshop and the result is brilliant.
First, create a new blank layer on top of the original image. Select a darker colour to the part of the image that you will be working on. For the lower section of the light, I used a dark red. Using the Brush tool set to soft, paint a small daub and then make it a bit bigger using the Free Transform tool.
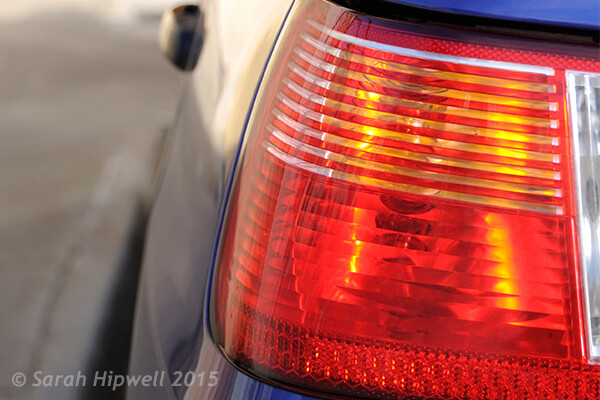
Rear taillights of a car.
Add some Gaussian Blur so that there is no ‘hotspot’ in the middle and the color looks uniform. Position this on a section of the light, change the blend mode to Color Dodge and reduce Fill, not Opacity, to achieve the desired effect. In this case, I reduced the Fill to 59%. I then duplicated this layer and moved it over to the right. You can reduce the size of the spot area if you feel the over spill is too much. So now I had the bottom tail light working. I repeated the same steps for the top section of the light. But I used a darker color yellow there.
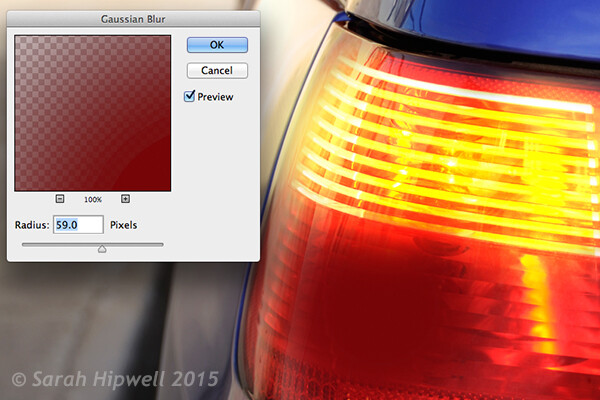
On a separate layer, paint a darker colour to the area intended and add Gaussian Blur.
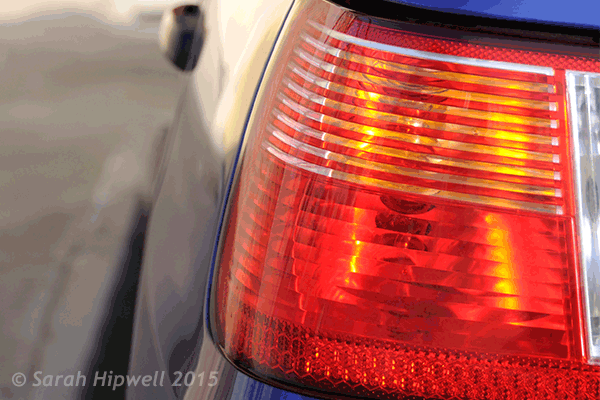
Animated GIF with flashing taillights using Color Dodge Blend Mode in Photoshop.
The forth and final technique is similar to above. When you need to add a highlight(s) to an area of an image to bring out more detail, this technique and the one above can be used on any type of image. It is so easy, quick and very effective. In the photo of the grapes (below), I wanted to create highlights on the dark areas to make them stand out. Same as the above step, create a new blank layer on top of the image and using white as your color, paint a small daub. Make it bigger using the Free Transform tool and add some Gaussian blur. Change the blend mode to Overlay or Softlight, I generally use Softlight. Reduce the Opacity until you get the result that you want.

Animated GIF to show highlights on areas of some of the grapes, using Overlay/Softlight Blend Modes in Photoshop.
Do you have any other tips for adding or creating lighting effects in Photoshop or another way? If so please share in the comments below.
googletag.cmd.push(function() {
tablet_slots.push( googletag.defineSlot( “/1005424/_dPSv4_tab-all-article-bottom_(300×250)”, [300, 250], “pb-ad-78623” ).addService( googletag.pubads() ) ); } );
googletag.cmd.push(function() {
mobile_slots.push( googletag.defineSlot( “/1005424/_dPSv4_mob-all-article-bottom_(300×250)”, [300, 250], “pb-ad-78158” ).addService( googletag.pubads() ) ); } );
The post 4 Lighting Effects You Can Create in Photoshop by Sarah Hipwell appeared first on Digital Photography School.
[ By Steph in Architecture & Cities & Urbanism. ]

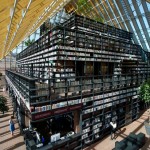
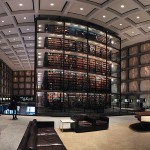
Peruse the waterproofed selections at Minnesota’s Floating Library, renew your library card at a bus stop in Bogota, or select a volume from the shelves mounted to a tank-shaped ‘Weapon of Mass Instruction.’ These 12 traveling libraries and pop-up book stands bring the love of reading to the city streets, and even to the most remote corners of Mongolia via camel.

Artist Raul Lemesoff was commissioned by 7UP to create ‘Weapons of Mass Instruction,’ a 1979 Ford Falcon transformed into a tank-shaped library, for World Book Day 2015. The vehicle features a rotating upper chamber, a faux cannon and room to store nearly 900 books in various compartments along the exterior. The library travels throughout Argentina, both urban and rural, to bring free books to anyone who wants them.


French architecture firm Matali Crasset brought more than 300 titles to becah goers in the seaside town of D’Istres via a pop-up library made of steel and tarps. The tent-like structure includes three shaded reading alcoves.

This urban book stand in Bogota, Colombia is part of the Paradero Para Libros Para Parques (PPP) program, created to promote literacy across the country. There are currently 47 of these bus stop libraries across Bogota, with many more located in other cities. A volunteer staffs each one for about 12 hours per week.

The Denver Public Library literally brought its services to the streets in the form of DPL Connect, a pedal-powered mobile library and wi-fi hotspot that can travel to parks, concerts, farmer’s markets, coffee shops and anywhere else people gather. It’s stocked with a rotating collection of books tailored to the bike’s location, and the librarian pedaling the cart can provide traditional library services like help with digital downloads and reading suggestions.
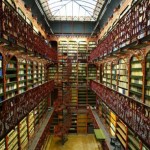
All the beauty of historic churches, but filled to the ceiling with books: these 13 libraries from Iowa to Prague dazzle with classic architectural details.
Click Here to Read More »»
A new public library in the Netherlands by MVRDV flouts the conventional wisdom of keeping books in the dark, placing them under a glass pyramid-shaped …
Click Here to Read More »»
More than just buildings filled with books, these 14 beautiful modern libraries are cultural landmarks and places to explore new media of all kinds.
Click Here to Read More »»
![]()
[ By Steph in Architecture & Cities & Urbanism. ]
[ WebUrbanist | Archives | Galleries | Privacy | TOS ]
Das Bild des Tages von: Lemmmke

Heute im Ausblick: Vielfalt, Gewinner und der Erfinder der Fotografie.
kwerfeldein – Fotografie Magazin | Fotocommunity
You must be logged in to post a comment.