RSS
 

Archive for March, 2015

Erez Marom: Why you shouldn’t always believe the forecast

11 Mar

Landscape photographer Erez Marom has taken photographs all over the world in all manner of locations, in all kinds of weather conditions. But whereas many landscape photographers are slaves to the weather forecast, Marom has learned that some of his best shots come from the most unlikely situations. Click through to read more, and see some stunning images

Articles: Digital Photography Review (dpreview.com)

 
Comments Off on Erez Marom: Why you shouldn’t always believe the forecast

Posted in Uncategorized


Have Shutter, Will Travel: Some Considerations for Travel Photography

11 Mar

Travel and photography could be considered a thing unto itself, kind of like macaroni and cheese or peas and carrots. Travel has a natural allure to photographers, promising unique views of life and existence that can only be experienced — and photographed — by throwing yourself into new worlds and meeting new people. While there’s something to be said for the Continue Reading

The post Have Shutter, Will Travel: Some Considerations for Travel Photography appeared first on Photodoto.


Photodoto

 
Comments Off on Have Shutter, Will Travel: Some Considerations for Travel Photography

Posted in Photography


Olympus offers Stylus SH-2 with Raw support

11 Mar

Olympus has announced an update to its Pen-like travel zoom: the Stylus SH-2. The SH-2 replaces the SH-1 with added support for Raw shooting, while maintaining the previous model’s 24x zoom (25-600mm equiv.), 16MP BSI CMOS sensor, 5-axis image stabilization and built-in Wi-Fi. Read more

Articles: Digital Photography Review (dpreview.com)

 
Comments Off on Olympus offers Stylus SH-2 with Raw support

Posted in Uncategorized


How to Correct Lens Distortion with the Adaptive Wide Angle Filter in Photoshop

11 Mar

The issue

When photographing subjects with a wide-angle lens, it’s pretty common for perspective problems to present themselves in the form of lines that should be straight, but appear curved and distorted. This is commonly referred to as barrel distortion, which occurs mostly in wide-angle lenses because the magnification of the image decreases the farther the subject is from the optical axis of the lens. In plain speech, it means that when looking through a wide-angle lens, anything that is at the edge of the frame will be prone to appearing curved.

BEFORE-Adaptive Wide Angle

Some lenses such as fisheyes take full advantage of barrel distortion by purposely capturing images that are heavily curved and spherical. However, there are times when other wide-angle lenses such as the Canon 16-35mm, or even mid-range zooms like the 24-70mm, might produce unwanted barrel distortion effects.

The solution

Perhaps the two easiest ways to correct this problem are to either use a tilt-shift lens or to change your perspective and zoom magnification while photographing the subject. But tilt-shift lenses are expensive, and sometimes, such as when photographing a large building, there aren’t a ton of different perspective options. In these cases, the easiest solution to correct correct lens distortion is to do so in post-processing using a unique tool in Photoshop known as the Adaptive Wide Angle filter.

Introduced in PhotoShop CS6, the Adaptive Wide Angle filter removes lens distortions in one of two ways: it either automatically detects the camera and lens model using pre-programmed details to straighten the images, or you can manually set constraints to tell the it which areas of the photo need to be straightened. In this tutorial, I’ll walk you through the manual use of the Adaptive Wide Angle filter.

The example below was photographed in a beautiful brand new bar and restaurant using a Canon 16-35mm f/2.8 at a focal length of 16mm. It was a tight space, so there wasn’t room to back up or shoot the bar from a higher angle, so the resulting image sees quite a few horizontal lines such as the upstairs white railings and granite countertop that clearly should be straight, but aren’t.

Photoshop Adaptive wide angle filter correction

To begin correcting these distortions, click on Filter in the upper drop down menu and select Adaptive Wide Angle Filter.

Photoshop Adaptive wide angle filter correction

Screen Shot 2015-02-25 at 5.18.00 PM

A large dialogue box will then appear with a host of options (see below).

Photoshop Adaptive wide angle filter correction

Begin with the right hand panel and choose a correction type from the drop down menu. Typically, I start with Auto, which will attempt for an automatic correction based on lens detection.

Photoshop Adaptive wide angle filter correction

In this case, when I select Auto, another pop up window appears saying, “No matching lens profile found.” This means I need to manually adjust the image. Hit the OK button and turn your attention back to the box in the right hand corner.

Screen Shot 2015-02-25 at 5.24.27 PM

Besides Auto, the drop-down menu has three other options to choose from. If Auto doesn’t work, I’ll typically choose Perspective as my next correction type.

  • Fisheye will correct the aforementioned extreme curves that fisheye lenses purposely cause.
  • Perspective will target converging lines typically causes by the tilt and angle of the camera.
  • Panorama corrects for distortions caused by photo merging for panos.
  • Full Spherical corrects distortions in 360 panoramas shot with a 2:1 aspect ratio.

Screen Shot 2015-02-25 at 5.20.23 PM

Other options below the drop down menu include more settings that you can fiddle with to help correct distortions.

  • Scale: A value entered here will scale the image to best minimize the blank spots that may be present after the wide angle filter is applied.
  • Focal Length: Specify the focal length of the lens that created the image.
  • Crop Factor: This can be used in combination with Scale to minimize and compensate for blank areas produced by the filter.
  • As Shot: This box can be checked if your lens profile can be detected; if not, this option will be greyed out and you will need to manually specify the values of Scale, Focal Length, and Crop Factor.

Next, turn your attention to the little vertical toolbar in the top left corner. These are the tools you’ll use to define the constraints that indicate which lines in your image ought to be straight. The primary tools to be familiar with are the first two:

Screen Shot 2015-02-25 at 5.27.14 PM

  • Constraint Tool: This tool is used to draw lines over the areas of the image that you wish to straighten. Simply click once to establish a desired starting point, and click again to close the line, holding down the shift key as well if you wish to add a constraint with a vertical or horizontal orientation.
  • Polygon Constraint Tool: This tool functions in the same way as the regular Constraint Tool except it allows you to draw a polygon instead of a single line.

For example, let’s look at the horizontal line of the granite countertop in the image below.

Begin by clicking once on the left end of the line to set one constraint point, then click once on the right end of the countertop to close it. After you set the line, right-click on it and you’ll see a small menu appear allowing you to assign either a Horizontal, Vertical, or Arbitrary constraint to the line. The default constraint is Unfixed, but in this case we want to assign a Horizontal constraint to straighten the line width-wise. In order to automatically assign a constraint to a line, hold down the shift key while in the process of creating the line. In between the two constraint points, there will be a yellow line (if you held down the shift key) or a blue one if you didn’t, indicating where the straightening occurred.

Photoshop adaptive wide angle filter

Constraints Explanation

You can set as many constraint lines as needed until your image is corrected to your satisfaction. Constraint lines typically should be vertical and/or horizontal. Some other tools in the toolbar that can help with this are the Move, Hand, and Zoom tools that allow you move the image around to make the adjustments needed. Additionally, there is the Magnification of the preview in the lower left corner that allows you to zoom in and help you see where to plant constraints.

Photoshop Adaptive wide angle filter correction

After you have corrected the image to your liking, hit the blue OK button to apply the filter.

Photoshop adaptive wide angle filter

BEFORE-Adaptive Wide Angle

BEFORE

After

AFTER

How do you correct distortion for your wide-angle images? Share in the comments section below.

googletag.cmd.push(function() {
tablet_slots.push( googletag.defineSlot( “/1005424/_dPSv4_tab-all-article-bottom_(300×250)”, [300, 250], “pb-ad-78623” ).addService( googletag.pubads() ) ); } );

googletag.cmd.push(function() {
mobile_slots.push( googletag.defineSlot( “/1005424/_dPSv4_mob-all-article-bottom_(300×250)”, [300, 250], “pb-ad-78158” ).addService( googletag.pubads() ) ); } );

The post How to Correct Lens Distortion with the Adaptive Wide Angle Filter in Photoshop by Suzi Pratt appeared first on Digital Photography School.


Digital Photography School

 
Comments Off on How to Correct Lens Distortion with the Adaptive Wide Angle Filter in Photoshop

Posted in Photography


A Compact PEN: Olympus Stylus SH-2 Hands-on

11 Mar

The Olympus Stylus SH-2 is a compact long-zoom camera that bears a remarkable resemblance to the company’s PEN series of mirrorless cameras. While it shares the design and 5-axis image stabilization of some of the PEN models, the similarities end there, as the SH-2 is very much a point-and-shoot camera. Learn more about the SH-2 in our hands-on preview. Read more

Articles: Digital Photography Review (dpreview.com)

 
Comments Off on A Compact PEN: Olympus Stylus SH-2 Hands-on

Posted in Uncategorized


Vorurteile gegen Instagram? Nicht mehr.

11 Mar

Eine Frau vor einer hohen Betonwand, halb im Licht, halb im Schatten stehend.

Ein Beitrag von: PRAMUDIYA

Immer wieder merke und höre ich, dass Fotografen-Kollegen und auch Nicht-Fotografen Vorurteile gegen Instagram haben, die sich meist auf die Filter, die weit verbreiteten Inhalte wie Essensfotos, Selfies, das Benutzen von übertriebenen, albernen oder vielen Hashtags und die Annahme, dass dort (fast nur) kitschige Sonnenuntergänge gezeigt werden, beziehen.
kwerfeldein – Fotografie Magazin | Fotocommunity

 
Comments Off on Vorurteile gegen Instagram? Nicht mehr.

Posted in Equipment


Elinchrom announces new ELB 400 portable flash system

11 Mar

Flash equipment manufacturer Elinchrom has launched a new portable flash system that promises faster recycling times, more bursts per charge and greater flexibility than the company’s current battery-powered kits. The Elinchrom ELB 400 is a 424Ws pack that can manage up to 350 full power flashes per charge and can recycle in 1.6 seconds after a maximum output burst. Read more

Articles: Digital Photography Review (dpreview.com)

 
Comments Off on Elinchrom announces new ELB 400 portable flash system

Posted in Uncategorized


Flat elements developed by Harvard could make camera lenses smaller, lighter and better

11 Mar

A team at Harvard School of Engineering has developed a method for making flat lenses that could dramatically reduce the size and weight of camera lenses in the future. The method employs tiny silicon antennas positioned on flat glass components to redirect light when it reaches the surface of the lens instead of relying on refraction and the thickness of glass to bend light in a particular direction. Learn more

Articles: Digital Photography Review (dpreview.com)

 
Comments Off on Flat elements developed by Harvard could make camera lenses smaller, lighter and better

Posted in Uncategorized


10 Reasons to Ditch Your Softbox for a Light Panel

11 Mar

So you want to create soft, beautiful light? One of the first light modifiers that comes to your mind is probably the tried and tested softbox. But, when it comes to versatility, are softboxes really worth the money? In this article, we are going to look at a viable contender to the age-old softbox – the light panel.

Now, the goal of this article is not to bash softboxes, I personally have nothing against them. I own several and use them whenever I feel that they are the right tool for the job. However, my go-to light modifier for the majority of my photography is the light panel. Why? I am glad you asked. Here are 10 reasons why you should consider using a light panel instead of a softbox for your next shoot.

Wide shot of two light panels

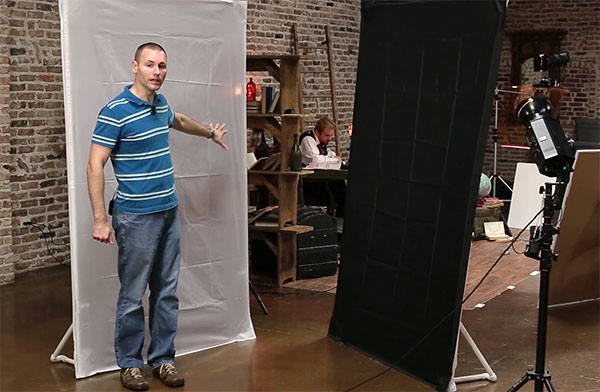
Wide shot of two self-standing PVC light panels fitted with diffusion and black fabric. The diffusion fabric is used like a large softbox, while the black fabric is used to flag or block light.

#1. They are inexpensive

For under $ 50 you can create a self-standing light panel that is larger than softboxes costing more than $ 300!

#2. They are easy to make

You can make a basic panel frame and legs with nothing more than a hacksaw. However, a pair of PVC shears is a great investment and will make your job a lot easier.

#3. Quickly change the size/quality of the light

Moving the light closer or further from a panel fitted with diffusion fabric can quickly create a different size softbox effect (closer to the panel = smaller light/harder quality versus further from the panel = larger light/softer quality). Since the panel and light are separated, the panel becomes the source of illumination and can remain in the same stationary position, in relation to the subject, throughout the entirety of the shoot.

#4. Easily change the shape of the light

By clamping pieces of black fabric over a panel fitted with diffusion material, you can create light sources of different shapes. This is a great technique if you want to create a tall, thin stripbox effect, or if you only need to use a portion of the panel.

#5. Different fabrics = different light modifiers

While softboxes can be sort of a one-trick pony, light panels can easily be turned into flags (to block light) or reflectors, just by changing out the fabric. I love to add black material to my panels and use them as flags to shape the light. I also like to use opaque white fabric to reflect and bounce light. It makes a beautiful fill for both indoors and out.

One of the coolest things you can do with light panels is harness the stray light from your strobe, to create multiple sources from one light. I oftentimes shoot through a diffused panel, then reflect some of the stray light back into the shadow side of the subject, using a second panel fitted with a white reflective material (as seen in the figures below).

portrait of bride lit with light panels

A bridal portrait primarily lit using two light panels

diagram showing how to bounce stray light with light panels

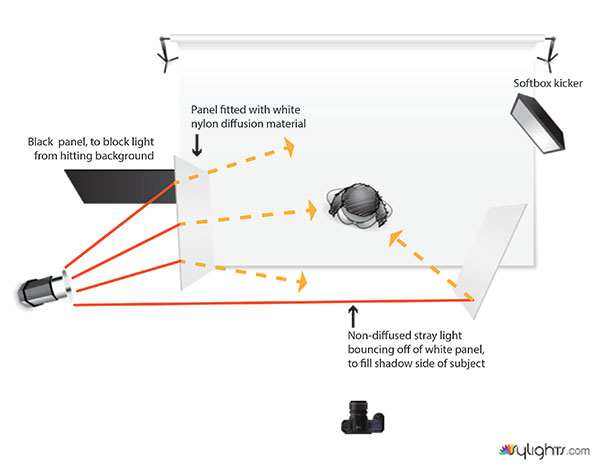
Using two panels to create a large soft key and fill from one light source. The white reflective panel was placed where stray, un-filtered, light was able to strike the front edge, which opened up the shadows more than if it were only allowed to bounce the light coming from the diffusion panel. A black panel was added to keep the light from spilling onto the background. It could have been removed, lighting the background and essentially filling the job of three lights (background, key and fill lights).

#6. No speed rings required

Speed rings can be such a hassle. After shelling out serious cash for a new softbox, the last thing you want to do is buy an adapter so you can actually use it. It can be a one-time cost, but if you ever change brands of lights you are most likely going to need a whole new set. Want to add a softbox to your speedlights? Well, you are going to need another type of speed ring adapter for that, too. With light panels, no matter the type of light source, all you have to do is place your light behind the panel and start shooting. Which brings me to #7 on our list.

#7. Home Depot light friendly

If you are just starting out and you want to try your hand at lighting with inexpensive Home Depot shop lights, then light panels are the best way to soften them. Stick multiple lights behind a panel fitted with diffusion fabric, or bounce them off a piece of white fabric to create a soft, bright, single source that can be used for photography or video. Now, all you will need is a good air conditioner to manage the heat!

#8. Gelling made easy

Have you ever tried to gel a softbox? It can be a tremendous waste of gel. Especially if your softbox is large. By shooting through a diffusion panel, you are able to attach a small square of gel to your strobes reflector, allowing you to purchase your gel in small sheets instead of giant rolls. For instance, at the time of this writing a 20×24” sheet of Rosco CTO gel cost roughly $ 7.50, as opposed to a 20”x25’ roll, which cost around $ 94.

#9. Better reflections for your product photography

Softboxes are made to distribute the light evenly over the face of the outer diffusion panel. Even with the inner baffle removed, the reflective interior creates a fairly even spread of light. When lighting reflective objects, this evenness can sometimes be a bad thing. Notice the gradated reflections in the two images below. This is the kind of reflection you will typically get when placing a light behind a light panel. Take note on how it adds contrast, depth and interest to the scene.  If these same images were lit using a softbox, the reflection would be an even tone, with no gradation or falloff.

jewelry product shot using overhead light panel

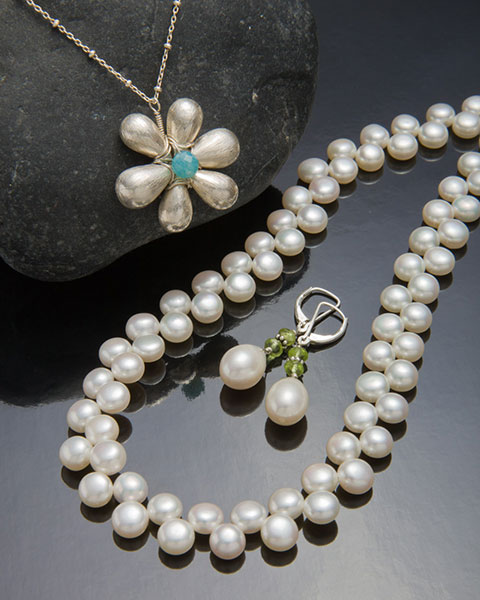
Light placed behind light panel creates gradated reflection in black reflective paper.

jewelry product shot using a gelled strobe and light panel

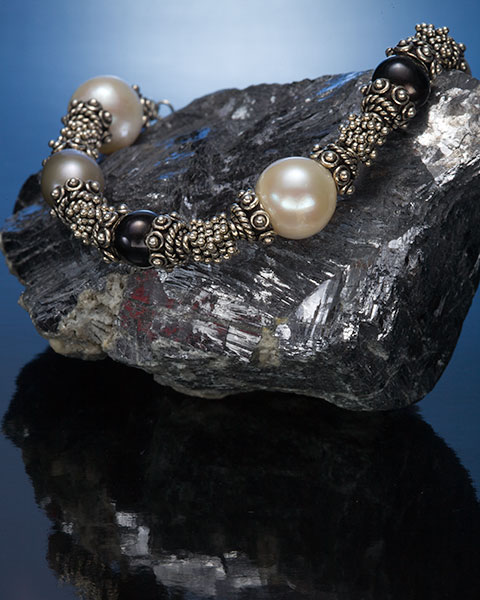
Another example of the pleasing gradation light panels reveal in reflective surfaces. The same reflective black paper from the first example is used, but the light has been gelled blue.

#10. Portable walls

Have you ever been out on a remote location where you have needed a changing area for your model? You can easily create a makeshift changing room by attaching three or four panels together using connector clips, then covering them with black fabric. If it is windy, throw some sandbags on the bottom of each panel to weigh them down, for good measure.

I hope this article has given you a little more insight on how versatile and economic light panels can be.

Many companies make and sell light panels. They are usually made from light-weight aluminum and are relatively inexpensive, compared to softboxes. However, you can save a lot of money by making your own frames out of PVC.

In a future article I will:

  1. Show you how to create your own self-standing PVC light panel frames and accessories
  2. Offer helpful tips on making them stronger and easier to assemble
  3. Share some cheap fabric alternatives to use with your new frames

Until then, go out, have fun, experiment and create something awesome!

googletag.cmd.push(function() {
tablet_slots.push( googletag.defineSlot( “/1005424/_dPSv4_tab-all-article-bottom_(300×250)”, [300, 250], “pb-ad-78623” ).addService( googletag.pubads() ) ); } );

googletag.cmd.push(function() {
mobile_slots.push( googletag.defineSlot( “/1005424/_dPSv4_mob-all-article-bottom_(300×250)”, [300, 250], “pb-ad-78158” ).addService( googletag.pubads() ) ); } );

The post 10 Reasons to Ditch Your Softbox for a Light Panel by Joel Dryer appeared first on Digital Photography School.


Digital Photography School

 
Comments Off on 10 Reasons to Ditch Your Softbox for a Light Panel

Posted in Photography


Flooded Sky: ‘Northern Lights’ Effect Fills Air with Blue Waves

11 Mar

[ By WebUrbanist in Art & Installation & Sound. ]

StudioRoosegaarde_Waterlicht_HR2

Floating above an 18,000-square-foot area of Dutch land that would be underwater were it not for defensive measures, the ethereal effect hovers between simulated aerial floodwater and imitation aurora borealis.

waterlicht surreal sky led

A temporary work in Westervoort, this latest pieced dubbed ‘Waterlicht’ by Daan Roosegaarde was created using LED projectors located on surrounding dykes, highlighting the essential role of flood prevention technology in keeping so much of the Netherlands dry. As the beams cross in the air, moved slowly up and down by motors, the effect seen in these images is created.

waterlicht northern lights effect

Visitors walking along those adjacent barriers perceive the illumination like an eerily lit surface of water below – those passing below the plane of light see something akin to the Northern Lights, normally a natural atmospheric effect reserved for rare and special conditions. “we create a virtual flood. Walking on the dike the light lines are perceived as high water, once in the flood channel you find yourself in an underwater world.”

waterlicht projected at night

The work was commissioned by the Dutch water board to keep up awareness about this vital element of the country’s infrastructure. “In Waterlicht people experience what the Netherlands would look like without its dykes. Awareness is crucial, because the Dutch (water)artworks need every day maintenance and our national water awareness is the foundation of that maintenance.”

waterlicht against the sky

No stranger to working with nighttime illumination, Roosegaarde is famous for other works including a night-lit bicycle path in the style of Van Gogh as well as schemes for glow-in-the-dark highway infrastructure.

Share on Facebook


[ By WebUrbanist in Art & Installation & Sound. ]

[ WebUrbanist | Archives | Galleries | Privacy | TOS ]


WebUrbanist

 
Comments Off on Flooded Sky: ‘Northern Lights’ Effect Fills Air with Blue Waves

Posted in Creativity