RSS
 

Archive for February, 2015

Thoughts on the Newly Released Olympus OM-D E-M5 Mark II

15 Feb


OMD-EM5-markii-1

Photo courtesy of Olympus

Olympus recently released an update to their flagship mirrorless camera, the new OM-D EM 5 Mark II. It’s been eagerly awaited by Olympus fans – let’s take a look at some of the new features and see how it stacks up.

In a hands-on field test the guys from The Camera Store (in Calgary, Canada) put the camera through its paces. See their thoughts in this video as the try out:

  • The new High Res mode for making large files
  • Image stabilization
  • High ISO settings
  • Video mode

Some other new features include:

  • Improved 5-axis image stabilization
  • Rotating and tilting screen
  • Electronic silent shutter to maximum 1/16,000th of a second
  • 10 fps burst mode
  • A new optional tilting/rotating clip-on flash
  • WiFi
  • Mic jack for video input
OMD-EM5-markii-2

Photo courtesy of Olympus

For more of an overview of some of these and more, check out this video by Olympus themselves (hosts name is Rich).

I had the pleasure of using the OM-D E-M5 original for 2 months in Nicaragua after my Fuji X-T1 had some issues and had to be sent back to Canada. A friend was nice enough to loan me her Olympus and I have to say I was really impressed with it. I’m happy with the Fuji now (they replaced the motherboard) but I’m kind of interested in giving this puppy a test drive. If it’s that much better than the first edition it could blow my socks off.

So have you considered this camera? Do you have the original and are ready for an upgrade?

What are your thoughts? Is this a real improvement or just an update for the sake of launching an update? At what point do you say, “Okay I gotta have that!”?

googletag.cmd.push(function() {
tablet_slots.push( googletag.defineSlot( “/1005424/_dPSv4_tab-all-article-bottom_(300×250)”, [300, 250], “pb-ad-78623” ).addService( googletag.pubads() ) ); } );

googletag.cmd.push(function() {
mobile_slots.push( googletag.defineSlot( “/1005424/_dPSv4_mob-all-article-bottom_(300×250)”, [300, 250], “pb-ad-78158” ).addService( googletag.pubads() ) ); } );

The post Thoughts on the Newly Released Olympus OM-D E-M5 Mark II by Darlene Hildebrandt appeared first on Digital Photography School.


Digital Photography School

 
Comments Off on Thoughts on the Newly Released Olympus OM-D E-M5 Mark II

Posted in Photography


CP+ 2015: Tokina reveals new 24-70mm F2.8 and 11-20mm F2.8 zooms

15 Feb

Tokina might not have the same presence at CP+ as Sigma and Tamron but its small booth is pretty busy, thanks to a brand new 24-70mm F2.8 for Nikon full-frame, and an 11-20mm F2.8 wideangle for APS-C. Just from first impressions, they seem impressively well-built, as we’d expect from Tokina. Click through for some images

Articles: Digital Photography Review (dpreview.com)

 
Comments Off on CP+ 2015: Tokina reveals new 24-70mm F2.8 and 11-20mm F2.8 zooms

Posted in Uncategorized


Die 5 Videos des Monats

15 Feb

Video © Aileen Wessely

Über den Tellerand blicken, um die Ecke denken, den eigenen Horizont erweitern: Die Sparten der Fotografie sind so vielseitig wie das Leben selbst und lohnen die Beschäftigung auch dann, wenn die eigene Herangehensweise völlig anders ist. Auch im Februar haben wir uns wieder durch die verschiedenen Plattformen geklickt und eine möglichst vielfältige Mischung aus Kunst, Dokumentationen und Tutorials zusammengestellt.
kwerfeldein – Fotografie Magazin | Fotocommunity

 
Comments Off on Die 5 Videos des Monats

Posted in Equipment


CP+ 2015: Sony shows off new technology

15 Feb

We swung by the Sony booth at CP+ 2015 in Yokohama, Japan, where they had displays of the latest technologies in their cameras and lenses, as well as an elaborate diorama of a bird in flight over a fabricated landscape, amongst other things. We even sat down with a couple of engineers at Sony to talk about the Alpha 7 lineup. Check out some of the interesting things we learned during our time here with Sony

Articles: Digital Photography Review (dpreview.com)

 
Comments Off on CP+ 2015: Sony shows off new technology

Posted in Uncategorized


More things we found cut in half (CP+ 2015 edition)

15 Feb

Every year the CP+ show in Yokohama Japan is a hive of activity and innovation, as hoards of Japanese and western camera enthusiasts flood the Pacifico Yokohama conference center to get their hands on the latest camera gear. But that’s not the only fun to be had – alongside the ranks of shiny new cameras and lenses, displays and presentation stages can be found a lot of things which have been cut in half. Seriously – loads. Click through to see for yourself

Articles: Digital Photography Review (dpreview.com)

 
Comments Off on More things we found cut in half (CP+ 2015 edition)

Posted in Uncategorized


CP+ 2015: Ricoh gets serious with new Pentax full-frame zooms

15 Feb

We’re at CP+ in Yokohama Japan, where Ricoh is showing off two new Pentax lenses designed for full-frame imaging. Although the company’s upcoming full-frame DSLR is still in the mockup stage, the D FA* 70-200mm F2.8ED DC AW and D FA 150-450mm F4.5-5.6 ED DC AW are very real indeed. We snuck into the show early this morning before the crowds arrived, to take a look. Click through for more details and images. 

Articles: Digital Photography Review (dpreview.com)

 
Comments Off on CP+ 2015: Ricoh gets serious with new Pentax full-frame zooms

Posted in Uncategorized


Understanding the Radial Filter in Lightroom

15 Feb

One of the most useful features in Lightroom is one that tends to get overlooked, or at least under-utilized. The Radial Filter, introduced in Lightroom 5, is an incredibly powerful image adjustment tool that can be used to enhance your photos in many ways. From creating vignettes, to enhancing colors, to adjusting the exposure, and white balance, this humble little icon sitting on the right-hand side of the Develop module can unlock a variety of creative possibilities and bring new life to not only your photos, but your photography as a whole.

bike-handle-before

Before you start using the Radial Filter, it’s important to understand just what it does. Similar to the Adjustment Brush and Graduated Filter, you can use the Radial Filter to add one or more specific adjustments to a select area of a photograph, and edit your changes dynamically after they have been implemented. But while the Graduated Filter adds a gradual adjustment in a linear fashion, the Radial Filter adds a similar adjustment in a circular pattern. For example, here’s a picture of a bicycle handle before adding a radial filter (see above image).

It’s a decent image, but I’d really like to draw the viewer’s eye directly to the yellow handle by adding a Radial Filter. In this image below the filter has been applied a bit too extreme, but I wanted to give you a clear idea of what exactly this tool does.

bike-handle-after

By adding a Radial Filter adjustment and decreasing the exposure, I created a vignette effect to highlight the bicycle handle.

Notice how the effect is centered on the hand grip and gradually fades from light to dark. Various parameters can be adjusted as well, such as the degree to which the filter darkens or lightens the image, how gradually it fades, and even whether to use a custom color for the filter itself. Radial Filter adjustments, like most edits done in post-processing, are better if the effect is subtle and understated. As you can see in the following example, the filter can be rotated to better match your creative vision for the shot.

bike-handle-radial-filter-rotated-closeup

In this image the effect is subtle, but you can see how such flexibility would come in handy in other situations as well. By matching the rotation and size of the radial filter to the bicycle handle, I was able to create the exact type of adjustment that the picture needed.

One of the best things about the Radial Filter, though, is that it is not limited to just making things brighter or darker. Lightroom gives you over a dozen parameters to adjust such as White Balance, Tint, Saturation, and even whether to invert the filter so the effects are applied on the inside of the circle, instead of on the outside.

radial-filter-panel

There are several built-in presets as well, so if you’re not quite sure where to start you can pick one of them and use it. You can also create your own presets for repeating a particular effect in the future.radial-filter-panel-presets

Finally, the flexibility of the Radial Filter can hardly be overstated. You are free to edit your adjustments at any time, and once you apply a filter to your image you can go back and change it as much as you like. You can use multiple filters on a single image too, giving you complete creative control over your photos.

For an example of how the filters can be used to adjust color and not just create a vignette, here’s a photo of a girl holding a teddy bear without any radial filter adjustments.

girl-before-filter

The original image, without any adjustments applied.

I was fairly pleased with the original, but wanted to isolate her face and focus the viewer’s attention on her, so I used two Radial Filters: one to increase the saturation and shadows on her face, and another one to de-saturate the entire rest of the photo.

I intentionally went a bit overboard with the changes here, and as with most adjustments a more balanced and subtle approach is probably best, but I wanted to give a clear illustration of how this works so you can start to see the usefulness of the Radial Filter in your own work.

girl-after-filter

Adding two different Radial Filters had a dramatic impact on the image as a whole.

At this point you might be wondering why you would use the Radial Filter, when some of these adjustments can be implemented using the Adjustment Brush tool. The key to remember is that the Radial Filter is graduated, meaning its effects are implemented in terms of increasing value–less at the edge, and more at the center. You can also control how gradual the filter actually works each time you use it, which is a bit different than the brush tool. While the latter does have a feather parameter to give you some control over how gradually a brush adjustment is implemented, it’s not well suited for adjustments that need to change in value over a wide area of the photo. That’s where the Radial Filter really shines.

Regardless of how you choose to implement it, the Radial Filter can be a powerful addition to your photo editing workflow and if you have never looked into it I would encourage you to do so.

What are your favorite uses for the Radial Filter? Do you have any other tips to share? Post them in the comments below!

googletag.cmd.push(function() {
tablet_slots.push( googletag.defineSlot( “/1005424/_dPSv4_tab-all-article-bottom_(300×250)”, [300, 250], “pb-ad-78623” ).addService( googletag.pubads() ) ); } );

googletag.cmd.push(function() {
mobile_slots.push( googletag.defineSlot( “/1005424/_dPSv4_mob-all-article-bottom_(300×250)”, [300, 250], “pb-ad-78158” ).addService( googletag.pubads() ) ); } );

The post Understanding the Radial Filter in Lightroom by Simon Ringsmuth appeared first on Digital Photography School.


Digital Photography School

 
Comments Off on Understanding the Radial Filter in Lightroom

Posted in Photography


Itty City Blocks: Build Your Own 3D-Printed Physical SimCity

15 Feb

[ By WebUrbanist in Art & Sculpture & Craft. ]

itty city modular blocks

At a scale of 1/1,000, these beautiful little models bring famous buildings to life but can also be fitted into whole blocks or assembled to form micro-metropolises.

itty block plug play

itty modular block shapeways

itty model roadway ramps

Car fanatics got Micromachines, but architecture enthusiasts have few options for collecting their favorite models – sure, there are great LEGO architecture sets, but those are more about the building process than the aesthetic of the finished product.

itty nyc city block

itty city simcity block

itty model lit up

Available on Shapeways, IttyBlox features everything from stereotypical New York townhouses to world-renowned works of architecture, including a lovely rendition of the Guggenheim at a thousandth the size of the original. Illumination from below and different thicknesses of materials above combine to allow these neat buildings to light up at night as well.

itty bitty guggenheim museum

itty city block park

Parks, highways and on/off ramps are also available to provide connective tissue between the core structures – sidewalks and streets are effectively built into the base plate pieces.

itty blocks world cities

itty city model hand

Where the real fun comes in, though, is in mixing and matching – using a modular base plate, you can remix blocks to your liking, picking favorite structures from London, New York or anywhere else and seeing how they might work when set side by side on the same street.

Share on Facebook


[ By WebUrbanist in Art & Sculpture & Craft. ]

[ WebUrbanist | Archives | Galleries | Privacy | TOS ]


WebUrbanist

 
Comments Off on Itty City Blocks: Build Your Own 3D-Printed Physical SimCity

Posted in Creativity


14. Februar 2015

15 Feb

Das Bild des Tages von: Christian Richter

Dunkle Straße führt durch eine verschneite Winterlandschaft

Im Ausblick: Eine Frage zu Hochzeitsreportagen, Kitschpostkarten und schöne Pärchenbilder.
kwerfeldein – Fotografie Magazin | Fotocommunity

 
Comments Off on 14. Februar 2015

Posted in Equipment


Vital Tips for Photographing and Editing Interiors

15 Feb

Shooting interiors can be tricky. Spaces tend to either look cold and empty, or warm and inviting. While we always strive to capture what the eye sees, the complexity of the human eye will never be matched by the lens of any camera. Still, there are things you can do before, during, and after shooting an interior space that will go a long way in improving your chances of ending up with stellar photos.

Not sure where to start for improving your architectural photos? Here are my favorite tips for photographing interiors, plus some tricks for touching them up with Adobe Lightroom.

Interiors1

How to Shoot Your Best Interior Photos

Grab your favorite camera and use these tips for snapping more professional-looking photos every time.

1. Prepare the space

Set the stage by taking the time to de-clutter and open up the space. Clear all flat surfaces and floor areas. Open all blinds and curtains. Clean any dirty dishes in the sink and put them away. Be sure to clean the space much more so than you would for yourself. We get used to clutter and become blind to it, but a bit of clutter in a photo goes a very long way.

2. Add warmth and life with personal touches

The space should feel lived-in and inviting, like the kind of place you can imagine yourself spending your days.

You can create those feelings in your photos, by adding personal touches. Set the dining table for two and place a vase of fresh flowers in the center. Transform an empty breakfast nook into a great spot to lounge by adding a newspaper, coffee cup, and a plate or bowl of light (and pretty) snacks. Hang a fluffy bathrobe on a hook next to the bathtub.

When it comes to decorations or color palettes, you want to either fill the space with personality to play up the uniqueness of it, or keep everything neutral with pops of bright color.

Interiors2

3. Fill the room with light

All interior lights MUST be on. While they’re not necessarily helpful in actually lighting the space, they help to create the ambiance. The absence of interior lights will give the space a cold, empty feel.

When using flash, never directly point it into the space. Instead, bounce it off the ceiling or walls, depending on what the space offers. If you can help it, always use flash as a source to fill in shadows, rather than as a main source. That said, if there is enough ambient light (which is your ultimate goal), skip using flash altogether.

Also, play with the strength of your flash. For my Canon, I like to slightly overexpose by about 1/3 of a stop and push the flash to about +2/3 in ETTL mode. Each camera can be different, so don’t be shy about experimenting with what works best with yours.

For outdoor shots, consider setting your flash to manual mode and using it as the fill light. I tend to set mine at 1/16th of full strength, but again, experiment with what works with your camera’s setting and your personal preference.

4. Shoot low

Keep verticals as truly vertical as possible by shooting from a slightly lower camera angle. If you’re going for a graphic composition, watch your horizontals as well. It’s quite easy to fix these issues in Lightroom during your final edit (see more in the first editing tip below).

5. Strike a balance

When composing your shot, focus the viewer’s attention on where you want it to go. Consider using staged items to add depth and interest in the foreground. Try blurring the background to make foreground objects really pop. Avoid flat looking photos by contrasting different elements in the foreground, middle-ground and background. Remember to aim for balance, not distraction.

Using the background to show a connecting room is also a great way to give the viewer a sense of space. This will add interest and make the viewer feel like they can visualize walking through the home.

Interiors3

How to Edit Your Interior Photos

Import your photos to Lightroom and follow these basic editing steps to create more powerful images. Tip: You can also use Photoshop for many of the steps laid out below.

1. Straighten out the lines

Doing this will instantly polish up your photos. If you shot at a height of roughly five feet from the floor and kept the camera level, the amount of straightening you have to correct should be minimal. In Lightroom, you can find this tool under Lens Correction under the Manual section (tab).

2. Fill in and even out the light

Screen Shot 2015 02 10 at 2 01 28 PM

Before doing any adjustment to brightness or exposure, be sure to correct any lens vignetting that may have happened. This is when the corners of the image are a bit darker, and is a common effect in wide lenses. You can find the slider for this setting in Lightroom under Lens Correction, Manual, then Vignetting.

Once your corners are corrected, use the Adjustment Brush to correct the exposure in bright or dark areas. This is your time to “dodge and burn.” I find that erring on the side of overexposure actually has a more natural feel to the space. I recommend pushing the overall exposure up slowly, then when it feels too bright, start pulling back.

You can also lighten dark areas slightly with the shadows slider in the top (Basic panel) section. However, be careful not to lighten so much that you bring out grain (noise) or that the image looks fake.

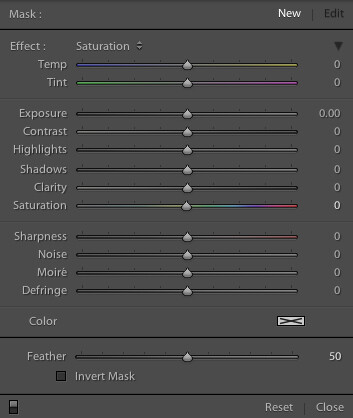
3. Perform color corrections

Adjust the overall temperature as needed. You’re aiming for warmth, not yellow. Also, bump up the Vibrance a bit instead of messing with the saturation. Oversaturating can quickly make a photo look too fake, while Vibrance is a more subtle tool that helps give the color a little extra kick. Again, playing with the sliders on these settings, and seeing what your eye is comfortable with, will go a long way toward honing color-correcting skills.

Interiors4

4. Adjust the clarity and sharpness

Push the Clarity slider up (to the right) slowly. Clarity is a great way to polish up a photo without going overboard on contrast; plus, it gives the photo an overall crisp look. Depending on the image, you may want to simultaneously play with darkening the blacks a bit, too.

Lightroom has two great presets built-in for sharpening: faces and scenic. I use scenic for architectural mages because it sharpens a bit more than the preset for faces. It’s a subtle, but vital, touch.

5. Clean up with spot removal and cloning

Use the Spot Brush tool to remove any dust spots or other anomalies that may have gotten onto the photo. You will see two options in Lightroom for the brush: Clone and Heal. Healing is a great option when correcting small spots, as it will have a softer blend to it. Next, use the Cloning tool to remove any glares or reflections of you in the photo. You can also use it to remove address numbers, if requested.

While I typically use Lightroom for editing photos, my personal preference for cloning is Photoshop’s stamp tool. It seems to allow for more control over the brush itself, therefore making it easier to clone in a way that looks natural.

How do you shoot and edit interior spaces? Share your tips and photos in the comments section below.

googletag.cmd.push(function() {
tablet_slots.push( googletag.defineSlot( “/1005424/_dPSv4_tab-all-article-bottom_(300×250)”, [300, 250], “pb-ad-78623” ).addService( googletag.pubads() ) ); } );

googletag.cmd.push(function() {
mobile_slots.push( googletag.defineSlot( “/1005424/_dPSv4_mob-all-article-bottom_(300×250)”, [300, 250], “pb-ad-78158” ).addService( googletag.pubads() ) ); } );

The post Vital Tips for Photographing and Editing Interiors by Natalia Robert appeared first on Digital Photography School.


Digital Photography School

 
Comments Off on Vital Tips for Photographing and Editing Interiors

Posted in Photography