RSS
 

Archive for November, 2014

Real-world test: Going pro with the Samsung NX1

27 Nov

As often as we can, we like to put the cameras that we test into the hands of working photographers to find out what they think. Recently we gave the Samsung NX1 to Jordan Stead, staff photographer at SeattlePI.com, and ventured out to nearby Carkeek Park to photograph the salmon run. A seasoned shooter accustomed to pro camera bodies, Jordan gave the NX1’s hybrid AF system and 28.2MP BSI-CMOS sensor a try. See the video

Articles: Digital Photography Review (dpreview.com)

 
Comments Off on Real-world test: Going pro with the Samsung NX1

Posted in Uncategorized


Small change: Samsung NX mini review

27 Nov

The Samsung NX mini is truly tiny, offering a 20MP 1″ sensor inside a highly compact body which features a 180-degree tilting LCD and extensive connectivity features. The mini’s touch-sensitive display is the camera’s primary interface for changing shooting settings, and an interchangeable lens mount should make this the ideal combination of versatility and point-and-shoot simplicity. Read our review to find out how it compares

Articles: Digital Photography Review (dpreview.com)

 
Comments Off on Small change: Samsung NX mini review

Posted in Uncategorized


2014 Consumer DSLR Roundup

27 Nov

Despite the emergence of the mirrorless class, the market is still dominated by conventional DSLRs. Large sensors, optical viewfinders, and sizable grips make them comfortable choices for many aspiring photographers. We cover seven consumer and mid-level models in this roundup. Find out which we recommend. Read more

Articles: Digital Photography Review (dpreview.com)

 
Comments Off on 2014 Consumer DSLR Roundup

Posted in Uncategorized


The 6th Borough: 9 River-Based Proposals for New York City

26 Nov

[ By Steph in Architecture & Cities & Urbanism. ]

floating plus pool new york 1

While the waterways connecting the five boroughs of New York City are already home to everything from food-producing barges to boats reclaimed as hotels, they could become an even more productive part of the urban landscape, harnessing clean energy from the tides or hosting floating, human-powered gyms. These 9 river-based proposals include pier-based parks, floating swimming pools that filter river water, and a retro-futuristic vision for an airport on the Hudson.

Cross-Shaped Pool Cleans the Waters of Manhattan Rivers

floating plus pool new york 2

floating plus pool new york 3

floating plus pool newy ork 5

A swimming pool shaped like a giant plus sign could provide a cool place to swim in Manhattan’s various river parks while simultaneously filtering and purifying river water. The four separate ‘arms’ of the pool enable different activities, from a lap pool to a shallow area for kids. The pool walls are made of a stack of materials that collectively screen odors, pollutants and bacteria to make Manhattan’s notoriously uninviting waters safe to swim in. It may look like a dream, but the concept is well on its way to becoming a reality, with the designers raising nearly $ 275,000 to get started. It’s far from the first floating pool to come to New York City; such attractions were popular as far back as the 19th century and the city has maintained a conventional chlorinated one at Barretto Point Park in The Bronx since 2007.

Pier55: Island Park & Performing Arts Venue

new york city island park

new york city island park 2

new york city island park 3

The Hudson River could get an artificial island of sorts in the form of a new architectural wonder from Thomas Heatherwick’s London-based studio. Funded by a non-profit organization started by fashion designer Diane von Furstenberg and her billionaire media mogul husband Barry Diller, Pier55 is a 2.7-acre park with footpaths, grassy lawns and an 800-seat amphitheater, and is supported by 300 concrete pylons. The project is pending approval from the Army Corps of Engineers and expected to begin construction in 2016.

City Beach Recreational River Barge

floating city beach 1

city beach nyc 2

citybeach 3

New York City residents who want to lounge in the sand needn’t leave Manhattan at all if the City Beach NYC project ever comes to pass. Essentially a floating beach park on a barge, the project aims to create a two-level destination with shops and restaurants placed underneath a curving, sand-covered platform overlooking the waters of the Hudson River. Since you don’t exactly want to swim in the Hudson, the purpose of the park is more sun bathing than actually getting wet, though the design includes a large water feature to mimic the sounds of the sea. The barge would be permanently moored on the west side of Manhattan. Unfortunately, the creators were unable to raise enough funds to hire a team to get started.

Human-Powered Floating Gym

floating river gym 1

floating river gym 2

Want a view of something other than terrible reality television while you’re cycling or running on the treadmill at the gym? You could be gazing up at the skyline instead, or taking in the sights of the Hudson and East Rivers, from a “soft floating micro-island gym’ powered by human motion. The River Gym is a series of small floating facilities programmed on a specific path moving from one point to the next, so they also serve as transportation. Each is equipped with onboard purification devices to help mitigate water pollution.

Floating Docks that Harvest Clean Energy from the Tides

floating docking station nyc 1

floating docking station nyc 2

floating docking station nyc 3

Energy-producing docking stations ‘plug in’ to New York City’s existing piers in this concept by local firm GRO, developed for the Metropolis Magazine Next Generation design competition. The floating system not only harnesses and stores powers from the tides in the river, they also extend public green space and create tidal pools for wildlife. The energy produced by the network of docks could be used to power street lights throughout the city.

Next Page – Click Below to Read More:
The 6th Borough 9 River Based Proposals For New York City

Share on Facebook


[ By Steph in Architecture & Cities & Urbanism. ]

[ WebUrbanist | Archives | Galleries | Privacy | TOS ]


WebUrbanist

 
Comments Off on The 6th Borough: 9 River-Based Proposals for New York City

Posted in Creativity


The Easy Way to Make Your Own Custom Photoshop Brushes

26 Nov

If you’ve never heard about the creative use of brushes in Photoshop, this article is for you. If you already know about using brushes, you’ll be able to ramp up your creativity once you learn this easy skill – making your own brushes.

DSC_0974Pond2W

What are Photoshop brushes and why you’d want to learn how to make your own?

Photoshop brushes are tools that are mostly used just like regular paint brushes to add strokes of color to your images. Most often people will use them as part of their dodging and burning workflow. Some people also use them in digital painting. The built-in brush set comes with a great assortment of  brush styles, such as soft bristles, round, square etc., but you can also make your own “fancy” custom brushes (which are reusable) to speed your workflow and add elements of interest to your images.

The creative side of custom brushes allows you to use all sorts of imagery, textures, individual shapes, and even other photos like an old fashioned stamp pad, so you can quickly add artistic treatments to your images. You can even make a brush of your signature to easily sign your work.  Then combining the stamped brushes with layers and blending modes you have a whole other set of easy creative tools you can use to multiply your photographic impact.

brushes-palette

Screenshot of the Brushes Palette – notice the birds and my name close to the bottom? These are custom brushes.

Making reusable items into brushes helps you to easily add objects of interest or even subject matter to your images. Birds are very popular in landscape images these days. Who doesn’t instantly feel the freedom and purpose of birds in flight? Adding a carefully placed flock of birds, or even just one bird in flight, can change the entire story of the image and add a powerful element to your composition.

_300385203W

Adding a “flock of birds” brush to create a better story.

By creating your own “instant flock” with brushes you will never be at a loss to fill an empty sky. As well, this technique is the same whether you’re making a birds brush, a signature brush, sparkles, snow flakes, or music notes – what you can create is entirely open, limited only by your imagination.

The Simple Process for Making Custom Brushes

Let’s use birds for this example. Birds are popular and a versatile addition to landscape images, so this demo will show you how to make a custom reusable brush for adding a flock of birds to your images. This assumes you have a photo of birds. If you don’t, but still want to follow along, the zip file below contains all the elements you need to replicate this specific tutorial.

Step 1

Open the image you want to make the brush of – birds, trees, etc. – in Photoshop. The best images to use are ones where the item that is to be the brush is isolated on a plain background, in the case of birds a clear blue sky is perfect. If you want to make brushes from images of trees, try to use images where the trees are against a plain uncluttered background.

A good image for a brush base.

A good image for a brush base.

Step 2

Double click on the background layer to make it editable – it should now be called Layer 0. Make a new empty layer and move it beneath Layer 0 as shown below.

layers

Step 3

Next,  you are going to select the background and cut it out. Using the Magic Wand tool, set the Tolerance in the top menu to around 50. This will ensure that all your background pixels are selected. If you have a more complex background, you will have to play with the Tolerance, or perhaps try the Lasso tool to cut out the background.

magicwand

Background selected with the Magic Want tool.

Step 4

With Layer 0 as your active layer, and the background with the marching ants, hit Backspace on your keyboard to delete the background. Click CTRL D to remove the marching ants. Your image should now look like this:

brush-base

Step 5

Now you’ll will make the actual brush. You can use the Rectangular Marquee tool or the Freehand Lasso to select the birds or the subject of your brush. Which tool you use will depend on your brush subject. I will use the Rectangular Marquee tool for this example. Using the marquee tool draw a selection  around your birds.

selection

Under the Edit menu, look for Define Brush Preset and select it. You’ll get a pop up that wants you to name your brush. Give it a creative name and click ok.  Now go into your Brush Preset palette by clicking on the brush tool, and you’ll see your newly minted brush at the bottom of the list.

brush tool     brushes context menu


your-new-brush

Step 6 IMPORTANT!

The final step is to SAVE your new brush so you can use it over and over. Look for the little gear in the top right corner of this brush preset palette. Click Save Brushes and give your new set a name.

You’re done! Yay. Birds in flight forever. Whenever you want to add birds, just select this brush from the palette and stamp away (use the brush at 100% to have solid birds, anything less they will become see-through).

One big hint for using ANY brush is to use it on a new layer. This way if you don’t like its position, opacity, size, etc., you can easily edit it without having to start your image over again.

You may have noticed that this SAVE you just did, saves all the other brushes together with your new one.  If you want to really get savvy with custom brushes to create special brush sets with only your brushes watch for my article on Advanced Brush Creation and Management.

Download the zip file for this image: DPS Making Brushes – use it to create your bird brushes. Show us the images you’ve made using brushes,  especially the ones you’ve created with this file!

The post The Easy Way to Make Your Own Custom Photoshop Brushes by Alex Morrison appeared first on Digital Photography School.


Digital Photography School

 
Comments Off on The Easy Way to Make Your Own Custom Photoshop Brushes

Posted in Photography


Sony announces US pricing for full-frame Alpha 7 II

26 Nov

Sony Electronics has announced US pricing and availability for its recently announced Alpha 7 II camera. The a7 II is the world’s first full-frame camera with in-body image stabilization (5-axis, no less), and also offers improved controls, focusing performance, and video specs. It will be available on December 9th for $ 1700 body only and $ 2000 with the 28-70mm F3.5-5.6 FE lens. We’ll be getting our hands on a beta version shortly and will post samples as soon as possible. Read more

Articles: Digital Photography Review (dpreview.com)

 
Comments Off on Sony announces US pricing for full-frame Alpha 7 II

Posted in Uncategorized


3 Tips to Take Better Landscape Photos Regardless of the Weather

26 Nov

Photographers are a special type of people that usually pay a lot of attention to detail. They’re also known to be patient and perseverant. However, in my opinion, landscape photographers are a unique breed. I’m sure that only a hand full of people are willing to hike 10 miles with 25 pounds of photography gear on their back, just because they hope to seize the perfect moment.

Golden Hour in Pyramid Mountain  Jasper National Park  Alberta  Canada

Generally, in photography, practice leads to improvement. However, practicing landscape photography is a bit trickier since you don’t have control over the light setup, the weather, or the subject. Sometimes, you might plan a trip for three months; you research the best spots, and you bring all your equipment. Then, when it’s show time, you walk outside to face a cloudy, rainy day, if not a snowy mess. All that can be very frustrating. Over the years I’ve learned a few tricks to deal with that. In this article, I will share three simple tips to help improve your images and take better landscape photos, regardless of the weather.

1. Using clouds to avoid harsh light

Let’s start by talking about one of the most important topics in photography, light. Usually, landscape photographers revolve their schedule around the Golden Hour, meaning the early morning or late afternoon. Photographers choose those portions of the day to take full advantage of the magical, warm, rich, natural light available. Yet sometimes, you cannot reach the planned location by car, making a strenuous hike of 10 miles the only available option to get to the desired place. Hiking is great, and if you love landscape photography you probably love the close contact with nature, but sometimes this passion doesn’t translate into mountain exploration at 3:30 a.m. Occasionally, you will find yourself starting your day hike around 6:00 a.m. to reach the desired area around 10:00 a.m., meaning that you will have to work with hard sunlight.

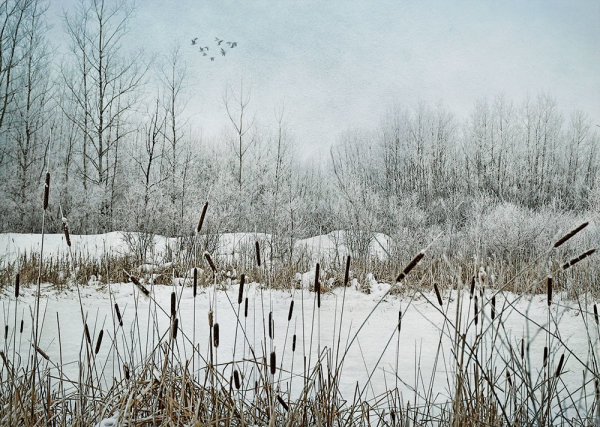
Portrait photographers have an easy fix for that problem, move the model to the shade. I’ve tried using the same approach in landscape; but I’ve never had any luck trying to move mountains and lakes around. Another approach that portrait photographers use to avoid hard light is using light modifiers such as diffusers and softboxes. Unfortunately I don’t believe you can buy one of those big enough to use on a mountain. What you can certainly do is use the clouds as a light diffuser, thus avoiding the harsh sunlight from midday. Depending on how you capture your image, clouds can also help improve your composition by adding depth or a sense of movement. After I grasped this concept my mindset shifted, now I’m always hoping for the perfect cloudy day.

Bald Hills  Maligne Lake  Jasper National Park  Alberta  Canada

2. It’s all about the drama

If this tip wasn’t enough to make you enjoy a cloudy day, let me tell you about a second trick that involves clouds when capturing landscape images. We all like to go online to wonder around photo sharing communities, looking for inspiration, a different point of view or even a new technique. I’m no different. I like to believe that I’m very active in some of those social media channels, however, when I look through pictures, I avoid focusing on landscapes. I like to explore portraits, Black and White, macro, pretty much anything but landscape. I can imagine you asking yourself, “Why would a landscape photographer do that?”. The answer is quite simple; I like to borrow successful techniques used in other fields. Sometimes, when I’m trying to capture an image of a mountain, I don’t face it as a landscape. I try, for example, to approach that image as a portrait. Once you learn how to repurpose techniques from one type of photography to another you will notice an improvement in your art.

In most types of photography, the most striking photos are those with strong contrast; images that harmonize shadows and highlights seamlessly. One side effect of the current advances in digital photography, sensors, and the digital darkroom, is that a lot of landscape artists try to capture everything in one single image. Some will use HDR to bring up the shadows, others will use masking and blending to create a final image. I was no different.

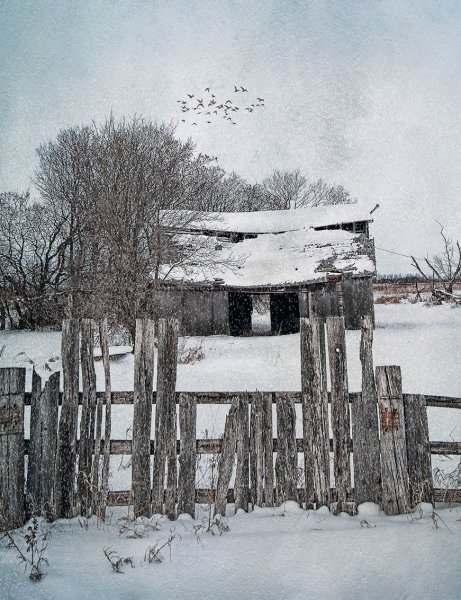
Lately, inspired by the work of great masters such Ansel Adams and Henri Cartier-Bresson, I’m trying to play with the shadow to highlight ratio in my images. Portrait photographers are very good at using artificial light (strobes or speedlights) to create dramatic images. In landscape it might be a bit more difficult to position the sun at a different angle. Still you can use clouds as a light filter, concealing light from distracting spots while revealing patches of bright sunlight that will accentuate your main subject. Once you start to play with this idea you will be able to create very dramatic images during those dreadful cloudy days.

Tekarra Mountain  Skyline Trail  Jasper National Park  Alberta  Canada

3. The path of balance

Finally, keeping up with the idea of creating a dramatic image, photographers must be able to understand an important concept called balance. Not only the shadow and highlights balance, but also color balance, subject positioning, overall image balance and so forth. I remember some of the first photos I took, very often I liked the concept behind the photo, but the final image just didn’t convey what I had envisioned. That was when I discovered the concept of balance.

This concept is very basic, yet extremely powerful. A well-balanced image will stand out on its own and will captivate your audience. Balance, simply put, is how you distribute the elements, colors, and brightness in the frame. There are countless ways to achieve balance, so many that we would probably need another entire article just to talk about it. As a general rule though, a well-balanced picture aims to distribute the elements evenly throughout the image. So next time you are out capturing an image, try noticing how you arrange the elements in the frame. Check if the amount and position of the shadow and highlight are reflecting what you want to show in your photograph. Finally, before you press the shutter, ask yourself if all the elements in the frame are contributing to the overall image. Sometimes, you can get overwhelmed by the landscape, and in an attempt to capture all the beauty you end up with a busy, unbalanced, and unappealing image.

Silence  Banff National Park  Alberta  Canada

I will leave you here, but next time you’re out there during a cloudy day, instead of complaining about it, just try your luck. You might be surprised by what you can achieve when you open your mind to work with whatever mother nature throws at you.

Mountain tops  Banff National Park  Alberta  Canada

Do you have any other cloudy day or landscape tips? Please share in the comments below.

The post 3 Tips to Take Better Landscape Photos Regardless of the Weather by Diego Lapetina appeared first on Digital Photography School.


Digital Photography School

 
Comments Off on 3 Tips to Take Better Landscape Photos Regardless of the Weather

Posted in Photography


26 November, 2014 – Luminous-Endowment Grant Winners Announced and More

26 Nov


For our US readers, Happy Thanksgiving.  We wish you a great Holiday and we hope you enjoy a lot of turkey and time with your family as well as some good ole US football.  

So much is happening at LuLa these days.  We’re busy working on a lot of projects and on  new interesting articles and reviews as well as videos.  Today though we want to share some special news.

As you hopefully are aware Michael Reichmann the founder of Luminous-Landscape started earlier this year the Luminous-Endowment.  This is a program to help fund photographers that are working on special photographic endeavors.  Today we announce the winners of the first round of grants. We are proud to announce that we have awarded $ 20,000 USD in grants this past week.

Luminous-Endowment Grant Winners

The amount of grant requests were incredible and we hope to see many more in our next round of grant requests.  This program would not be possible without donations from our readers as well as some very generous private and corporate donors.  Please take a look at our site and consider how you can be part of helping aspiring photographers make their dream projects come true.

A Special Opportunity For Giving And Receiving

We are also announcing a Special Opportunity For Giving and Receiving starting today and running to Christmas Day. To help raise money for the Endowment, to be used to finance future grants, The Luminous Endowment has created a special new and lower donation level of $ 200. The reward that you will receive for this tax-deductible donation is a copy of Michael Reichmann’s new book – A Twenty Year Retrospective. Normally this book requires a $ 350 donation to be received as a reward for your donation. This will be the price again after December, 25th.  Please consider donating and helping the Luminous-Endowment.


Michael’s beautiful book would make a great Holiday gift for the photographer in your life or maybe you want to hint to someone special that you would like this as a gift.  To learn more on how to Give and Receive – click here.


The Luminous Landscape – What’s New

 
Comments Off on 26 November, 2014 – Luminous-Endowment Grant Winners Announced and More

Posted in News


Shooting Sunspots or How to Get a Beautiful Lens Flare

26 Nov

Sunspots, they’re such an enigma. They’re huge right now. Everyone wants to see them in their photos, but they don’t want to have them on their wall…unless you do it right. When I first started in photography, 20 years ago, there were Big Taboos, the Uncrossable Chasms that one never even considered crossing; Never use a flash on camera, keep Continue Reading

The post Shooting Sunspots or How to Get a Beautiful Lens Flare appeared first on Photodoto.


Photodoto

 
Comments Off on Shooting Sunspots or How to Get a Beautiful Lens Flare

Posted in Photography


26. November 2014

26 Nov

Ein Beitrag von: Jannik Holdt

© Jannik Holdt


kwerfeldein – Fotografie Magazin | Fotocommunity

 
Comments Off on 26. November 2014

Posted in Equipment