RSS
 

Archive for September, 2014

Capturing Unenthusiastic Teens: Forget the Perfect Pose and Get Photos You Truly Love

03 Sep

guitar

I wrote an article recently sharing some tips for Capturing Busy Little Ones, and had a request for a similar article for photographing teens. Since I love photographing teens (who doesn’t??), I’m thrilled to share some tips. These aren’t tips for photographing the aspiring model teens. Those teens are usually pretty easy to photograph, they will pose for you until the cows come home, and love every minute of it. No, I’m going to let you in on some ideas for photographing those teens that aren’t so enthusiastic about being there.

Sometimes they’re super shy, and they just feel uncomfortable with the attention on them. Sometimes they are self-conscious, and think that they aren’t photogenic, so they feel awkward. Sometimes mom made them get pictures taken, and they’d rather be shoveling manure than sitting there with you and a camera. Whatever their hang-up is, these tips will help you capture them in the truest way possible, and get through it with your sanity intact. You might even get through it with a new teenage friend!

read

Get to Know Them

Here’s a newsflash: teenagers are people too. They have real feelings and ideas, and sometimes very strong opinions about what they like, and what they don’t like (if you have a teenager of your own, you didn’t need me to tell you that). Spend some time feeling them out, and finding what makes them tick. Watch for cues to let you know what they are going to be down with, and what they might roll their eyes at.

For example, you might notice that they avoid eye contact, and act very uncomfortable when you talk to them a lot. In that case, you may want to do more photos where they are looking at something in their hands, or looking away from you, and ask for eye contact only briefly. Maybe you might notice that the photo shoot was all mom’s idea, and the teen is not at all happy about it. You could diffuse the situation by addressing it directly. “Hey, it’s a bummer to get pictures taken, huh? Moms are so annoying sometimes.”  Ask them questions about their life. Pay attention to more than just the words they say; their body language will give you cues about their personality too.

fence

Don’t Force a Smile

Some kids just don’t like to smile, or they might be angry that they are getting their picture taken in the first place. Repeated requests to “smile” will only make things worse, and at best, get you a fake cheesy smile. Your goal during your session with an unenthusiastic teen, is to gain their trust. Let them know that you are on the same team, and that you aren’t there to torture them. Assure them, through your actions, that you aren’t going to try to make them into something they’re not. The easiest way to do this, if you haven’t picked up on enough cues, is just to ask them.

I might say, “Sometimes people really love jumping pictures. Is that something you would do, or is totally not your style?” They’ll usually let you know exactly how they feel about it, in words or expression, and you can quickly move on if it’s not their thing. Sometimes those that resist the smile the most may actually give you a real, genuine, smile towards the end of the session when you’re best buddies, and they trust you.

skateboard

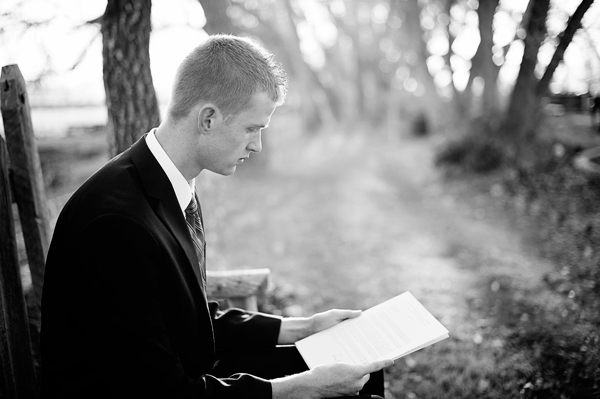
Photograph Their Passion

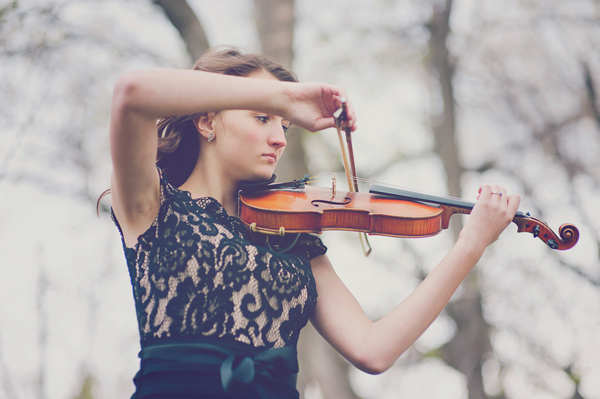
Before your session together, encourage your teen subjects to bring things that are important to them. It’s fun for both of you to capture those “action” shots of things that they truly love to do. This also gives you opportunity to give them genuine praise, and puts them at ease. Help them think outside the box. If they are a writer, maybe they’d want to bring a few favorite journals to “write” in, as you photograph them. If they love to run, capture some action running shots, and then a few with them holding their track shoes, or a race medal.

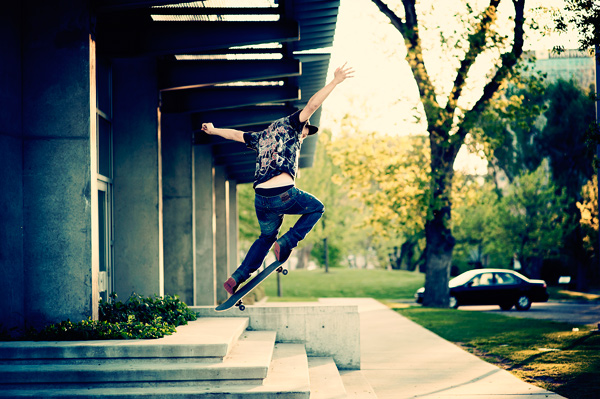
Giving them something to do really helps the shy ones. If they play a musical instrument, you could take some photos of them holding it, but don’t forget those action shots too. Ask them to play something for you, or show you some tricks on their skateboard. If they’re hesitant to actually perform, remind them that the camera won’t capture mistakes, and you’re an expert at making people look really good. That might be enough to loosen them up, and let their passion show.
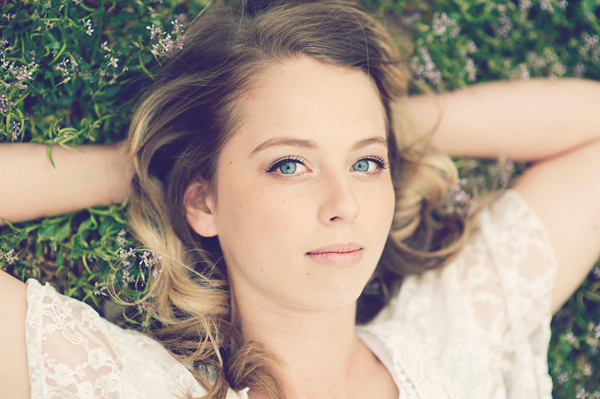
grass

Do the Unexpected

Most teens will expect you to ask them to smile and look at the camera. They’ll expect you to ask them to “sit there”, “stand here”, “look at me”. Sometimes just shaking things up a little will help them loosen up. You could ask them to lie down in the grass, or climb on a big rock. Maybe a silly expression, or twirling in a field, will shake it up a bit. DO be careful that you watch for cues from your subject before you ask them to do crazy things. Remember to ask them first, like I mentioned before. Some teens will do whatever you tell them to, but they will become increasingly uncomfortable if they aren’t feeling like themselves. Also, sometimes it helps to explain to them WHY you are asking them to do an unexpected thing. You could say, “The sky does amazing things with your beautiful blue eyes when you look up into it. Would you be okay lying down in the grass so we could give that photo a try?”

eyelashes

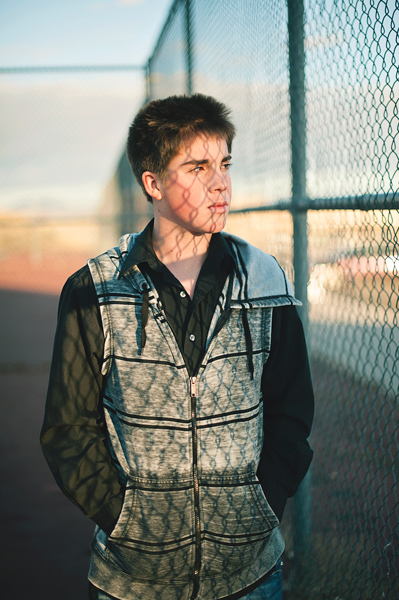
Capture Something Different

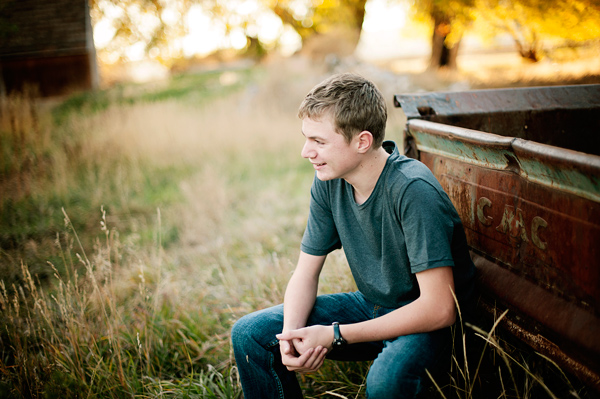
Teens like to be unique. They like to have photos that their peers think are “cool”. You might be tempted to just snap the basic head shots when you have a teenager that isn’t super easy to photograph, just to get it over with. Instead of going into safe mode, use this opportunity to capture something unique. There are lots of details that you can capture without them needing to look at you and smile. Eyelashes sweeping the cheek, hands clasped at the knees while sitting down, profile looking at a distance, details of a guitar with their face blurred in the distance, a close-up of their favorite quote in a book as they read it; those details can tell more of the story of who they are, and sometimes give them a moment to relax. If I’m not taking a photo with their face in it, I’ll tell them that they don’t even have to worry about their expression right then, because it won’t be in the picture. Sometimes they breathe a visible sigh of relief when I tell them that.

truck

Be Yourself

Teens know when you’re being fake. Don’t change your personality to try to be more like them, or to attempt to be “cool”. They’ll trust you more if your compliments are genuine. Look at them when you compliment them, don’t give a routine “you look great” while fiddling with your camera. If you’re a jokester, throw those zingers out. If you are quiet and thoughtful, let that thoughtfulness shine through. You won’t connect with every single person, but you will show your reluctant teen that you are sincere, and that means a lot to them.  Don’t treat them like little kids. They need to know that you recognize them as the almost-adults that they are. If you show them respect, they will usually show you respect right back.

Whether you are photographing a teen who loves to pose and smile, or a teen who is less than enthusiastic about the whole thing, you are lucky. What a privilege to photograph a person at a time of experiencing such beauty, daily transformation, and figuring out the world! Now, go have some fun with your camera and a great teenager. I’d love to see your teen photos in the comments if you’d like to share!

violin

The post Capturing Unenthusiastic Teens: Forget the Perfect Pose and Get Photos You Truly Love by Melinda Smith appeared first on Digital Photography School.


Digital Photography School

 
Comments Off on Capturing Unenthusiastic Teens: Forget the Perfect Pose and Get Photos You Truly Love

Posted in Photography


25 Helpful & Free Lightroom Tutorials to Post-Process Like a Pro

03 Sep

Adobe Lightroom is one of the most popular options for photo editing and with great reason. Thanks to a number of various Lightroom features, photographers may decrease the time spent processing and increase efficiency. Moreover, one of the greatest time-saving features of Lightroom is the ability to save your actions, which means creating presets. In this article, I’d like to share Continue Reading

The post 25 Helpful & Free Lightroom Tutorials to Post-Process Like a Pro appeared first on Photodoto.


Photodoto

 
Comments Off on 25 Helpful & Free Lightroom Tutorials to Post-Process Like a Pro

Posted in Photography


Hit the Road! Must Have Photo Accessories

03 Sep

On a cross country road trip, selfies just won’t cut it. Is that the Lincoln Memorial or Lady Liberty behind you?

So, we’ve packed our shop with camccessories to take on your next trip: a comfy strap, our favorite tripod ever and a bright ring light.

Three Essentials for Travel Photography

(…)
Read the rest of Hit the Road! Must Have Photo Accessories (124 words)


© Britta for Photojojo, 2014. |
Permalink |
No comment |
Add to
del.icio.us

Post tags:


Photojojo

 
Comments Off on Hit the Road! Must Have Photo Accessories

Posted in Equipment


Meer-Menschen

03 Sep

Ich habe nie am Meer gelebt und habe daher keine Verbindung zu den Menschen der See. Mein Bild von ihnen formt sich aus Geschichten und Märchen und ist vielleicht voller Vorurteile. Ich sehe wettergegerbte Gesichter, tiefe Falten und wilde graue Haare. Ernste und ruhige Menschen stelle ich mir vor.

Ingo Gebhard bestätigt dieses Bild. Er wuchs auf der Nordeeinsel Wangerooge auf und fotografierte dort Landschaft und Menschen. Ob er für seine Portraits diese Charakterköpfe suchte, die so perfekt in mein Bild passen? Auf seinen Schwarzweiß-Fotos blicken mir sehr erste Gesichter entgegen. Zeichnet das Meer diese tiefen Furchen in die Haut der Älteren, lässt der harte Wind die Haare wild und unbändig werden?

Meer-Menschen

Gebhard zeigt in seinem Buch „Meer-Menschen“* Hafenmeister, Kapitäne, Seenotretter und Strandwärter. Aber auch die Künstler, Hoteliers, KFZ-Mechaniker und Blumenhändler. Obwohl die Portraits alle sehr nah und schwarzweiß sind, schafft Gebhard es, jeden Einzelnen individuell festzuhalten.

Dass er selbst am Meer aufwuchs, erleichterte die Suche nach passenden Modellen sehr. So konnte Gebhard den zur Zeit der Aufnahme bereits über 90-jährigen und schwerkranken Schiffsmaler Günther Schmidt portraitieren. Hin und wieder sieht man auch in sehr bekannte Gesichter, wie die des Komikers Otto Waalkes, des Polarforschers Arved Fuchs und des Einhand-Nonstop-Weltumseglers Wilfried Erdman.

Zwischen den Portraits finden sich Panoramen der Nordsee. Mal rauh und wild bei starkem Wellengang und Springflut, mal durch extreme Langzeitbelichtung von bis zu 60 Minuten scheinbar völlig ruhig, wie Eisflächen, auf denen man glaubt, wandeln zu können. Bei den Sturmbildern frage ich mich ernsthaft, wie Gebhard die Kamera noch ruhig halten konnte.

Die Kombination von Portraits und Landschaften wirkt sehr schön und ich habe beim Blättern im Buch nicht den Eindruck, dass die Fotos nicht zusammengehören. Ganz im Gegenteil: Sie unterstützen sich und erzählen zusammen die Geschichte der deutschen Küstenregion.

Langzeitbelichtung des Meeres

Es ist ein sehr persönliches Buch. Das wird nicht erst durch das Portrait von Gebhards Großmutter auf der letzten Seite deutlich. Das Meer ist die Heimat des Fotografen, auch wenn er im Alter von 20 Jahren nach Berlin zog, wo er heute als Fotograf arbeitet.

Der Bildband „Meer-Menschen“* ist einer der schönsten Schwarzweiß-Bände, die ich bisher gesehen habe. Er ist im Verlag Hatje Cantz erschienen und kostet neu 39,80 €. Das große Format von 31 x 31 cm gibt den rund 80 Bildern genügend Platz. Eingeleitet wird das Buch mit einen Vorwort von Nicolai Max Hahn.

Wer die Bilder einmal in groß an einer Wand sehen möchte, dem empfehlen wir eine kleine Reise nach Bremen. „Meer-Menschen“ wird dort vom 7. September bis zum 2. November 2014 im Hafenmuseum Speicher XI ausgestellt.

* Das ist ein Affiliate-Link zu Amazon. Wenn Ihr darüber etwas bestellt, erhält kwerfeldein eine kleine Provision, Ihr zahlt aber keinen Cent mehr.


kwerfeldein – Fotografie Magazin | Fotocommunity

 
Comments Off on Meer-Menschen

Posted in Equipment


Fujifilm X30 (beta) real-world samples

03 Sep

The Fujfilm X30 offers a 2/3″ X-Trans II CMOS sensor and a 28-112mm equivalent F2.0-2.8 lens – both of which are retained from the X20 that precedes it. New features include a larger, tilting 3″ LCD, an XGA OLED electronic viewfinder, a control wheel around the lens, and greatly improved battery life. We’ve had access to a pre-production camera for a few days now, and we’ve been given permission to post some images. Click through for a link to our gallery. 

Articles: Digital Photography Review (dpreview.com)

 
Comments Off on Fujifilm X30 (beta) real-world samples

Posted in Uncategorized


Choosing Lights

03 Sep
Because big lights and small lights each bring a different set of considerations to the party, I am splitting my recommendations into speedlights and “studio lights.” (Although I hate that term.)

For speedlights, you have to decide if you wanna drive stick or automatic—AKA manual or TTL. I live in manual mode, which means I sacrifice some convenience for reliability and repeatability. It also means I can pay about a third as much for each of my flashes.

If you live by TTL, you will die by TTL. Or, at least your wallet will die a small, unnecessary death every time you need to purchase a flash.
__________

For manual speedlights, I wholeheartedly recommend the LumoPro LP180, about which I go into far more detail here. It’s built like a tank, syncs four different ways, has a fluid and intuitive user interface, a built-in light-stand socket, a built-in gel holder and has a two-year manufacturer’s warranty. No other speedlight comes close to claiming all of those useful features.

That it costs about a third as much as you would pay for an OEM branded flagship TTL flash is icing on the cake. If you can commit to shooting manually, this is your flash.

If you need TTL (and remember, this is the gear acquisition equivalent of joining the TTL mafia) I would consider eschewing the OEM flagship TTL flashes. They can run north of $ 500USD, which is just nuts.

The Phottix Mitros comes in Nikon and Canon variants and sells for about $ 300USD—with twice the warranty length. It does pretty much all the fancy stuff most of the OEM flashes do including the optical TTL triggering of other TTL units, be they other Mitros units or OEM units.

I will say that for the lesser price you will give up some ease of user interface. But this may well be that I was used to the OEM flash user interface and that of the Mitros is pretty radically different.

Finally, for some people the flagship OEM flashes will be just fine. For instance, if your name is Bill Gates they are a perfect choice for you.

On the opposite end of the spectrum, there are a ton of flashes constantly hitting the market from the far east, from a variety of pop-up brands. Some of the brands are recognizable because they bought the rights to use familiar but now bankrupt brands that were formerly trustworthy. They have spotty track records for quality. Factory warranties are short to nonexistent.

Many who read this will be tempted to go that route because of prices that are almost too good to be true. If that’s you, by all means knock yourself out. Some people need to be stung in the wallet to remember a lesson or bit of advice. I know I did when I was young. Good luck with that!
__________

As far as big lights go, there is a completely different set of variables to consider. Big lights are system-oriented, and you would do well to choose wisely in what will likely be a long-term relationship.

I spent a lot of time and money auditioning big lights over the past 25 years. I am really happy where I am now, and would have loved to make this good of a choice from the get-go. I wrote about researching and choosing big lights a couple years ago and at the time settled on a Profoto/Paul Buff hybrid choice.

I loved Profoto’s light mods and quality of light, but they were very expensive. And the battery options insanely so. So instead of battery versions of my Profotos, I went with Profoto plug-ins and a full Paul Buff Einstein setup for portable, battery-powered big lights. Sounds crazy, but for the price of just two AcuteB battery generators you can outfit yourself like an Einstein King.

So for the last couple of years I have had two full systems in my gear closet: Profoto plug-ins and Einstein 640s with portable battery packs. (But they also plug in.) And even though the Profotos are far more expensive, rugged and “professional” (whatever) I found myself again and agin choosing the Einsteins to use.

That’s because inexpensive or not, they are simply amazing flashes. And they come with a 2-year warranty (sensing a trend here?) and legendary factory service. Further, Paul Buff has finally taken some time to develop the modifier system that a good flash deserves. The reflectors and accessories are well-designed—and wonderfully inexpensive.

The caveat here is, this is pretty much a US-based choice/suggestion. One of the main reasons Paul Buff lights are so inexpensive is that he only sells direct, and mostly in the US. There are a couple of dealers outside the US but that starts to erode the value proposition pretty quickly.

So, to beginners looking for a great light at an amazing price in the US, I would suggest you strongly consider Einsteins. Not the similarly shaped and even cheaper AlienBees, however. They look similar, but are not in the same league as the Einsteins. Save your money and go Einstein. It is not that much more.

If you are outside of the US, I am sorry that this choice will be either not available or not nearly as good a value to you. So I would suggest that you look at other reputable flash brands (Bowens, Elinchrom, Hensel, Profoto, etc.) and choose the brand that works best for your needs and your wallet. This advice also holds for people for whom the Einsteins aren’t a good fit.

Again, I would suggest avoiding the temptation of the super-cheap mystery brands from the far east. Personal experience. But if you need some personal experience of your own to dissuade you in the future, by all means go right ahead.

Next: Triggers


Strobist

 
Comments Off on Choosing Lights

Posted in Photography


Bad by Design: Everyday Objects Reworked to Frustrate Users

03 Sep

[ By WebUrbanist in Design & Products & Packaging. ]

frustrating watering can redesign

They say great design is in the details, so what would happen if you were to twist a key element here or tweak a core feature there? As it turns out, rendering an item relatively frustrating (but still functional) is quite easy and at times fairly humorous as well.

stacked fork frustrating design

sideways key

handled pot

backward borom

In an ongoing series dubbed The Uncomfortable, Katerina Kamprani “decided to create and design for all the wrong reasons. The goal is to redesign useful objects making them uncomfortable but usable and maintain the semiotics of the original item. Vindictive and nasty? Or a helpful study of everyday objects?”

distorted seat

frustrating seatback design idea

bent chair sloped seat

Much of her work deals with the most common items we use everyday, from tableware and cookware to keys and chairs, each recognizable but distorted, usable but difficult.

concrete umbrella

chain fork useless plate

hinged silverware functionless design

wine glass shape design

frustrating mug

Adding hinges and chains to spoons, forks and knives readily defeats their purpose, as does bending the handle on a mug or adding a nose-bumping extrusion to a wine glass. While the works are conceptual renderings, some are for sale as art prints and many others could be 3D printed as gag gifts, too.

Share on Facebook


[ By WebUrbanist in Design & Products & Packaging. ]

[ WebUrbanist | Archives | Galleries | Privacy | TOS ]


WebUrbanist

 
Comments Off on Bad by Design: Everyday Objects Reworked to Frustrate Users

Posted in Creativity


Choosing Light Stands

03 Sep
Light stands are designed to oppose gravity. Pretty simple. And the designs are, for the most part, pretty similar. I think of light stands as being in three categories: normal stands, compact stands (seen just above) and specialty stands such as C-stands.

For light stands I like LumoPro for many of the same reasons I like the LumoPro LP180 speedlight. Their stands are well-built, reasonably priced and guaranteed out the wazoo. LumoPro has good service, too, should you need to replace a broken knob or bolt or whatever.

Honestly, it makes me wonder why other manufacturers don’t warranty their grip gear like this. Seems like a no-brainer, if you are making good stuff.

For normal, full-sized stands, I like the 10-foot LumoPro LP608. It is air-cushioned, has a five-year warranty and costs $ 45. It is a solid value choice and you can certainly spend more but get less.

Most stands are pretty interchangeable. That’s not to say that there aren’t some cool designs to be had. For a “splurge” light stand I’d consider Manfrotto stackers. They have a unique design that allows them to snap flat together for easy transport and space-saving storage. They are more expensive ($ 84 for 8-foot version and $ 115 for the 12-foot) so you’ll have to make that call. But they are a great upgrade if you frequently lug around a flock of light stands.

If you don’t need all of that functionality, skip the stackers. In fact, many speedlight folks who don’t need a lot of stand height prefer to use “compact” 5-section stands. They rise to about 7 feet and collapse to about 21″.

For that, my recommendation is easy and clear-cut: get the LumoPro LP605, seen above. It is the best-built of the five-section stands, includes ground spikes for more stability in wind and has LumoPro’s outsized warranty.

For $ 40, it is hard to go wrong here. There are more expensive versions of this, but they are not as well-built, have no ground spikes and you won’t get a five-year warranty either. Done deal.
__________

As far as C-stands go (more on what they are, here) they are pretty much all built like tanks. Which is part of their weighty charm. LumoPro C-stands ($ 100 for the riser and another $ 35 for the arm—make sure to get both pieces) are a good value choice as they back up the build quality with their five-year warranty.

If you want to get fancy, Kupo C-stands offer a quick-release mechanism for faster setup. But both are all but indestructable.
__________

While we are on the subject of stands, please do this: Take $ 20 and buy some sand bags. Get the bags from Amazon ($ 13 for 2, shipped). Get a few to start.

And don’t fill them with sand but rather “pea gravel,” from your local home improvement store. It’s super cheap ($ 3.50 worth will fill three sets of sandbags) and way less messy than sand.

You won’t need these cheap insurance policies until a stand comes down in the wind, breaking your flash or your mod or your subject’s noggin. Then you will have needed the sand bags retroactively.

Start with three or four. You’ll probably end up getting more as you go. Cheapest insurance (and piece of mind) policy you’ll ever buy.

NEXT: Soft Modifiers


Strobist

 
Comments Off on Choosing Light Stands

Posted in Photography


Canon marks 80 years since the Kwanon, its first camera

03 Sep

In the build-up to Photokina, Canon is celebrating its 80th anniversary. The seed was planted in 1934 when a company called Seiki-Kogaku Kenkyusho placed an advert for a camera called the Kwanon in the Asahi Camera magazine. The company, whose name translates as Precision Optical Instruments Laboratory, was formed to develop the first Japanese 35mm rangefinder camera in a world where European brands, such as Leica and Contax, dominated. Read more

Articles: Digital Photography Review (dpreview.com)

 
Comments Off on Canon marks 80 years since the Kwanon, its first camera

Posted in Uncategorized


1. September 2014

03 Sep

Ein Beitrag von: Florian W.

Ein surreales Waldportrait


kwerfeldein – Fotografie Magazin | Fotocommunity

 
Comments Off on 1. September 2014

Posted in Equipment