RSS
 

Archive for September, 2014

Samsung introduces Galaxy Note 4 phablet with OIS

04 Sep

Samsung has announced the latest iteration of its top-of-the-line phablet, the Galaxy Note 4, at simultaneous events in New York and Berlin today. In terms of design the new model is very close to its predecessor, the Galaxy Note 3, but the big news about the Note 4’s 16MP camera is its optical image stabilization system – making it the first Samsung smartphone to offer this feature. Read more

Articles: Digital Photography Review (dpreview.com)

 
Comments Off on Samsung introduces Galaxy Note 4 phablet with OIS

Posted in Uncategorized


Grünes Land – eine Reise

04 Sep

Vorsicht! Ihr befindet Euch auf einem recht intimen Streifzug durch meine Gedankenwelt. Aber keine Sorge, pornoreske Ansichten, wie man sie bei Shades of Grey findet, sind hier völlig außen vor. Ich sehe schon, die ersten Leser habe ich verloren. Es geht ehrlich gesagt auch nur um Schottland.

Warum fahre ich drei Mal in dasselbe Land, fragte ich mich. Mir steht quasi die ganze Welt offen. Die Flüge in alle Himmelsrichtungen sind günstig. Alles rückt zusammen, alles ist möglich.

Ich kenne Schottland noch immer nicht, obwohl ich das dritte Mal dorthin reiste, obwohl ich zum wiederholten Male auf unbequemem Untergrund schlief, obwohl ich die Schafe auch dieses Mal nicht zählen konnte und ich doch weiß, dass es mehr sind als die Anzahl an Menschen, die ich traf.

Ein Fluss in der grünen Landschaft Schottlands.

Blick aufs Meer und im Vordergrund ein Vogel auf deinem Baum.

Aber dieses Schottland ist mir wohlgesonnen. Es ist groß, es ist weit und vor allem, wenn man zu Fuß unterwegs ist, nimmt diese Weite zu. Es ist vielfältig an Natur und für einen Großstädter wie mich eine Wohltat an Einsamkeit. Und das Beste: Es ist mit Bahn und Bus und ja, auch mit dem Flugzeug, gut zu erreichen.

Beim ersten Mal reiste ich mit meiner Polaroidkamera, ein System steckte dahinter. Denn ich wollte nur ein Bild am Tag machen. Den Eindruck eines Tages auf ein Bild bannen. Geglückt ist mir das nicht wirklich, denn es kommt immer anders als man denkt.

Beim zweiten Mal reiste ich mit meiner Holga und einigen abgelaufenen Rollfilmen. Auf den Bildern entdeckte ich ein anderes Schottland. Es war verwaschen und grau. Es war das Schottland hinter dem Grün. Ich mochte die Bilder sehr.

Dieses Mal nahm ich meine „normale“ Kamera mit, also die, die sowieso immer bei mir ist. Meine Canon A-1 und genügend Kleinbildfilme in allen Variationen. Das fühlte sich an wie immer und so nahm ich eine Gewohnheit mit in das Land, das ich immer noch nicht wirklich kenne.

Detailaufnahme vom Strand mit seltsamen Bewuchs.

Detailaufnahme vom Strand mit Linien im Sand und im Stein.

Ich möchte kein Plädoyer dafür halten, sich genau zu überlegen, wohin jemand reist und warum. Aber für mich ganz persönlich habe ich viele Antworten erhalten, auf Fragen, die ich nie ganz genau ausformulieren konnte.

Nämlich, warum reise ich, warum fotografiere ich und lerne ich über die Fotografie das bereiste Land und die Menschen kennen? Die Antwort ist ja und nein. Das Medium ist ein Schutz, es ist etwas, das ich vor mich halten kann und durch das ich mich fokussiere. Ich blende die Weite um mich herum aus. Ich schaffe Inhalt, wo ich vielleicht vorher Leere fühlte. Ich baue mir meine Welt zuammen wie ein Puzzle, Stück für Stück. Ich klebe die Details aneinander und betrachte sie hinterher, wenn ich wieder zuhause bin.

Denn das Reisen hört nicht auf, wenn ich in den Flieger steige. Es geht weiter, wenn ich die Filme entwickle und darüber schaue. Ich freue mich immer sehr auf dieses Prozedere, denn es ist, als würde ich noch einmal dort sein und es auf eine gänzlich andere Art und Weise bereisen und kennen lernen.

Ein Pferd auf einer Weide.

Eine tote Maus auf Asphalt.

Aber vielleicht fahre ich das vierte Mal ohne meine Kamera in das Land. Halte nicht fest, was nicht festzuhalten ist und stelle mich der Natur und den Dingen ohne das Schutzschild, das die Weite zusammenfasst.

Ich glaube, ich bin langsam soweit.


kwerfeldein – Fotografie Magazin | Fotocommunity

 
Comments Off on Grünes Land – eine Reise

Posted in Equipment


3. September 2014

04 Sep

Ein Beitrag von: Kai Rennert

Berge in der Unschärfe.


kwerfeldein – Fotografie Magazin | Fotocommunity

 
Comments Off on 3. September 2014

Posted in Equipment


How to Clean Your Camera Sensor in 3 Easy Steps

04 Sep

There is really nothing more frustrating for photographers than a camera sensor that is full of dust and specks. Dust on the sensor happens, it’s just a fact of digital photographic life. If you’re an outdoor photographer with a zoom lens, or one who changes lenses in the field, dust and particles will find a way onto your sensor on an almost regular basis. But even studio photographers experience the distress of a dirty sensor.

_2DS3368Wjpg

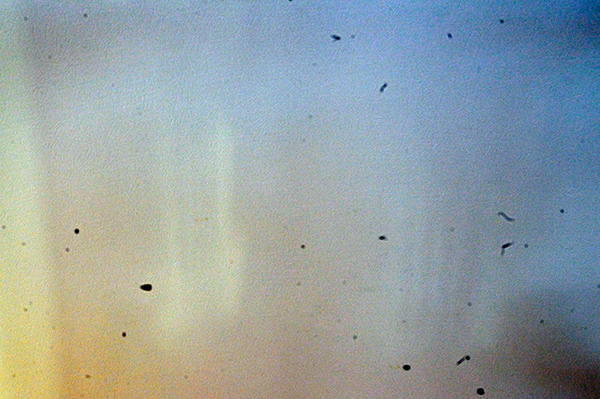
The world’s dirtiest camera sensor. Yuck.

A few weeks ago I was on a mountain photo tour, and was constantly changing lenses in the windy and dusty alpine weather. This is a photo taken to show you my sensor dust. All those black specks are fragments of airborne stuff that either gets sucked into your sensor when you use a zoom lens, or when you change your lens outdoors. The image above is the result.

There’s not too much you can do about it if you’re out on a shoot, other than know that there will be many hours spent on your computer editing out those miserable spots from your otherwise beautiful photos. However, you needn’t stress once you get back to your home base, where you can easily take care of cleaning the sensor and removing the smudges in three easy steps.

Is Your Sensor Dirty?

Check to make sure your sensor needs cleaning. It’s quite possible that it does, but you may not know it. If you shoot wide open, or at larger apertures (smaller f-stop number, such as f/2.8) you may not really see any sensor gunk on your images unless you view them at 100% on your monitor. But one day you’ll want, or need, to set your aperture to f/8, or f/16; then sensor dust will become visible, almost as if from nowhere, to torment you, frame by frame.

To see if you have sensor dust right now, so you won’t be surprised when you’re out in the field shooting, stop down to the smallest aperture on your lens (the largest f-stop number, f/32 for example) and take a photo of a white or light colored wall. What I do then, is open the image in Photoshop and click on Auto Tone (under the Images Menu item). Horrors! Do you see it? Hopefully your sensor dust won’t look as bad as mine, above. But if you see the dreaded black specs, read on.

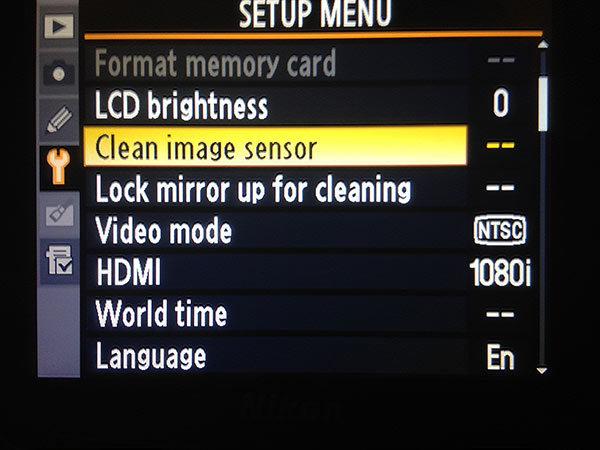
Step 1) Using the Auto Clean Function

Many newer DSLRs have a special function for automatically cleaning the sensor.  Look for it in the Tools menu on your camera. When you use this tool, the camera gives the sensor a series of micro-vibrations that “shake” the dust loose, in theory anyway. You may have to repeat this process several times. But with some patience, and providing your sensor is not as bad as the example in my image above, you’ll be relatively free of most of your sensor dirt in a few minutes.

sensorclean-menu

If you don’t have this feature on your camera, don’t worry, there is a way to manually clean your sensor. Sooner or later, even those photographers with auto-clean cameras will have to wash their sensors using this manual method, Step 2 below.

Step 2) Using Sensor Swabs and Eclipse Fluid

Sensor swabs are specially designed cleaning pads for camera sensors. Used with a few drops of Eclipse cleaning fluid they will wipe you sensor clean. Think of it as a tiny Swiffer for your sensor. You can get the swabs in exactly the right size for your sensor, so one swipe in each direction could be all you need.

comboW

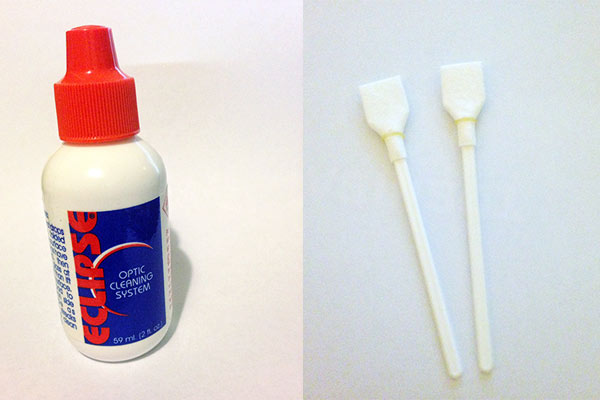
The procedure is easy. You’ll simply put 2 drops of the fluid on a pad, and then gently wide the swab across your sensor ONCE, ONE WAY. Then change directions and swipe the other way. Throw that swab away. If you need to repeat the process, use a new swab.

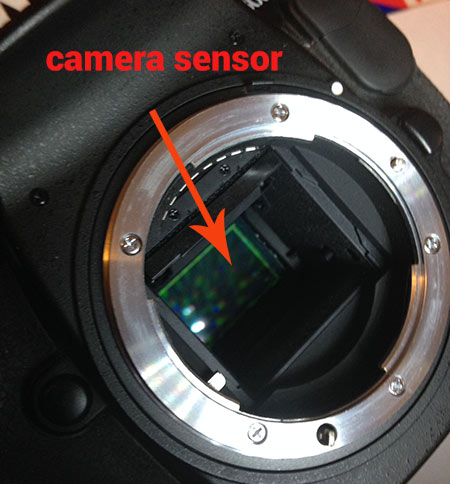
Step 3) Power up, Mirror Up

To use the swabs you’ll need to keep your mirror up to give you access to your sensor. This is the tricky part – you don’t want your mirror to come down while the swab is still inside your camera.

If you don’t have a setting for Lock Mirror Up for Cleaning, make sure your battery is fully charged, and set your camera exposure on Bulb. The Bulb setting will allow you to keep the mirror up until you release the shutter (use a locking shutter release to hold it not your finger). This way you can access the sensor, and do the quick sensor two-step, swipe left, swipe right.

sensor1W

Check your results: take another shot at the same stopped down aperture and take a look at the difference.

_2DS3392w

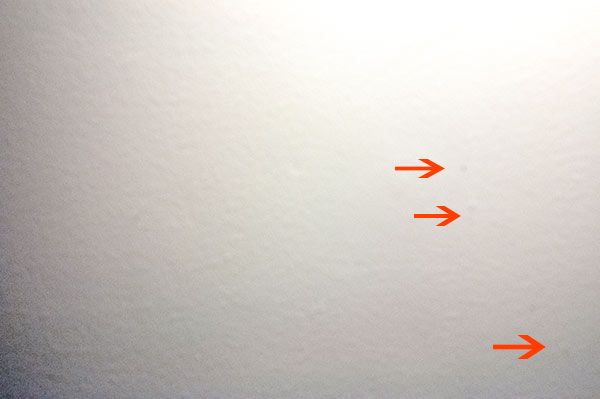
Image of sensor dust after using Sensor Swabs. The main culprits are gone.

There are still three spots but all the big blobs, and large dust particles are gone. Depending on your preferences, you may be happy with this knowing that it’s a few easy clicks of the clone tool to remove these small faint marks. Or you may want to give the sensor another round of swabbing. Either way the sensor is super clean compared to the initial test image.

Cleaning your sensor is not difficult, you do need to be careful but it’s very worth the effort. Your photographs will love you for it.

I’d love to see your sensor dust horror stories – post your before and after cleaning shots here.

Editor’s note of warning: if you are terrified of damaging your sensor (it is delicate) you can usually find a local camera store that offers this service. You will pay a lot more for it than doing it yourself, but if they damage it, they have to replace it for you. The camera that is! If you damage your sensor there is no going back. So do follow the directions exactly, and do be cautious. Perform this procedure in as dust-free, windless room as possible. And remember to NEVER, EVER touch your sensor with your fingers. The oil from your fingers will do more damage and is much harder to remove (i.e. you’ll likely be sending it to the manufacturer to get that off).

The post How to Clean Your Camera Sensor in 3 Easy Steps by Alex Morrison appeared first on Digital Photography School.


Digital Photography School

 
Comments Off on How to Clean Your Camera Sensor in 3 Easy Steps

Posted in Photography


Modern, Modular & Transforming Kids’ Furniture: 13 Designs

04 Sep

[ By Steph in Design & Furniture & Decor. ]

Kids Furniture Klou 1

Why spend a fortune on a virtually endless array of aesthetically questionable kids’ furniture, from birth to their teen years, when you could choose customizable, transforming, modern furniture elements instead? These 13 smart space-saving solutions are just as well-thought-out as furniture made for adults, and can keep up with kids’ growth.

Rubik’s Cube Modular Kids Furniture

Kids Furniture Rubiks Cube 1

Kids Furniture Rubiks Cube 2

The Magic Module is a bunch of colorful foam and fabric cushions that can be clipped together to resemble a giant Rubik’s cube, or disassembled into seats, lounges, footrests and beds.

Smart Kid Bedroom in a Box

Kids Furniture Smart Kid 1

Kids Furniture Smart Kids 2

This kids bedroom-in-a-box starts out as a solid birch and plywood crib and then reconfigures into a variety of items that can be used throughout childhood. Take it apart once your toddler is too big for it and re-assemble it into a playpen, junior bed, desk or chalkboard and book rack.

Dumbo Double-Tuck Bed

Kids Furniture Dumbo Double Tuck Bed 1

Kids Furniture Dumbo Double Tuck Bed 2

Tuck Beds by Casa Kids are ‘modern murphy beds for kids,’ with the ability to be mounted horizontal or vertically to practically any wall. It takes up just 13 3/4″ of floor space when it’s all closed up, leaving lots of space for play. An integrated shelf doubles as leg support.

Convertible Crib Turns into Toy Bin & Bookshelf

Kids Furniture Convertible Crib 1

Kids Furniture Convertible Crib 2

The Yiahn Bassinet is another design that goes from birth to late childhood, starting out as a safe place for baby to sleep and transforming into a toy bin and bookshelf for toddlers, and then a chair and table for kids aged 4-8 years. If the family has a second baby, it can be reclaimed for its original use.

SPOT All-in-One Wooden Furniture Series

Kids Furniture SPOT 1

Kids Furniture SPOT 2

Kids Furniture SPOT 3

Free of all the visual clutter typically associated with children’s bedroom sets, SPOT by Polish designer Wiktoria Lenart is a space-saving furniture set with a neutral look and highly customizable character so kids can craft their rooms according to their own personalities and needs. Lofted beds, sliding compartments and a bed frame that doubles as a play space make it fun and easy for kids to create their own personal spaces.

Next Page – Click Below to Read More:
Modern Modular Transforming Kids Furniture 13 Designs

Share on Facebook


[ By Steph in Design & Furniture & Decor. ]

[ WebUrbanist | Archives | Galleries | Privacy | TOS ]


WebUrbanist

 
Comments Off on Modern, Modular & Transforming Kids’ Furniture: 13 Designs

Posted in Creativity


Choosing a Camera

04 Sep

There is no perfect camera. So get that idea out of your head right now. Far better to think of any camera as a set of compromises. Size, speed, image quality, low-light performance, price, etc., can all be features—and they can all be liabilities.

You want image quality? Get an 11×14″ film camera. Great for detail and tonal range. But sucks for action sequences / portability / low light performance.

Every camera is a compromise in at least one area. So to start, list your most important features on a sheet of paper and let that guide your choosing strategy.
__________

• If you want best-possible image quality, you might sell your car/house/plasma and buy a digital medium format camera.

• If you need super long glass and/or FPS speed (sports, nature, etc.) maybe grab a fast Nikon (or Canon) and a super-telephoto lens.

• If you shoot people, speed and high ISO performance might not matter as much as gorgeous color.

• I you travel a lot you might put a premium on your cameras being small and lightweight, with good low-light performance.

• If you are following a toddler around the living room, continuous AF performance may trump price.

So think about what is important to you (and your budget, of course) and begin your search for cameras using that as a compass point.

If you are old like me, you might be tempted to only consider cameras built around the dated form factor of film cameras to be the only cameras worth serious consideration. That’s an age bias. Have it if you like, but be aware of it. To a twenty-year-old that doesn’t matter any more.

Speaking of age, if I were just dipping my toe into the water I’d strongly consider a late-model used digital camera and a used lens or two. If I was not happy, it would be a cheap marriage to unwind. Within a year I could probably sell the lot on eBay for a couple hundred less than I paid, max.

And if I was happy it would be a great platform to build on. Once committed, my next body might something current and the original body goes to a second/backup. Either way, I would not expect to be using the camera after five or six years.

Point is, you don’t have to jump in the deep end. Buy one body and a lens or two. Maybe buy used from a shutterbug friend, knowing the camera implicitly comes with ad hoc tutoring. (And a good outlet to borrow/lend lenses, bodies, etc.)

I spent over 30 years with Nikon film and digital SLRs as my primary cameras. But the further I got away from shooting for newspapers (which at the time had included lots of sports photography) the more my priorities shifted. Here is what is important to me now: small, lightweight, good image quality, great in low-light and quiet/unobtrusive. That led me to move to mirrorless (Fuji) a couple years back.

Pictured at top are the cameras that currently get more use than anything else I have (save maybe my iPhone): a Fuji X-E2 and a Fuji X100s.

Whatever camera style/brand you are considering, you can use the ‘net to easily scope out how other photographers are using it and what kind of image quality it has.

For instance, try this: click on the night photo just above, which will take you to its Flickr page (in a new window). Scroll down beneath the photo’s page where it says “Fujifilm x100s” (or just click here) and you go to a page that will show you lots of different photos shot with exactly that model of camera.

And here’s the thing: clicking on that link from just about any camera icon on a Flickr photo page will quickly show you that you can make amazing photos with just about any current camera. So don’t sweat it or pixel peep too much.

Instead, focus on how you will be using the camera and what features are truly most important. Then let that drive your choices. And understand that the camera you use today probably won’t be the camera you are using in five years.

NEXT: Lenses


Strobist

 
Comments Off on Choosing a Camera

Posted in Photography


Sony introduces QX1 with APS-C sensor and E-mount for smartphones

03 Sep

Sony has announced the QX1 and QX30, expanding its line of ‘lens-style’ cameras ready to be paired with a smartphone. The QX1 is an interchangeable lens model, containing a 20MP APS-C sensor and a Sony E-mount for use with lenses designed for Sony’s mirrorless interchangeable lens cameras. More like the existing QX10 and QX100, the QX30 is single unit containing a sensor and lens, providing a 20MP 1/2.3″-type sensor and a longer 30x optical zoom. Read more

Articles: Digital Photography Review (dpreview.com)

 
Comments Off on Sony introduces QX1 with APS-C sensor and E-mount for smartphones

Posted in Uncategorized


Choosing Lenses

03 Sep

If you date your cameras, you marry your lenses. That’s because, unlike digital cameras, a well-chosen lens can serve you for a very long time.

I still have one lens that I bought thirty two years ago. And I bought it used. I doubt that will be the case with any of my digital cameras, ever.

In the past, I was a lens speed freak and was willing to spend great sums of money to have very fast glass. I now realize that lust was misplaced. If I had it to do over again (and I do, and have) I would lean more on reasonably fast primes and here’s why.

Moderately fast primes are (much) lighter, (much) cheaper and often just as sharp (or sharper) than their speedy siblings. For Nikon shooters, the Nikon 28, 50 and 85 f/1.8 trio of lenses are great examples of this. They weigh next to nothing in my bag and offer great performance. Also, I have moved away from primarily using fast zooms. Rather than a fast 24-70/2.8, I’d now opt for a trio of fast-ish primes and a decent, slower zoom to back them up.

This way, you get a stop (plus) faster at each focal length, backups throughout the 24-70mm range and you lose the most daunting aspect of the speed zoom: an expensive single point of failure.

In general, remember this when it comes to ultra-fast DSLR lenses: you pay through the nose for them when you buy them. And then you pay again, in weight, every time you lug them around. Remember that cameras have amazing high-ISO performance these days. And they are just going to get better as we go.

As for my Fuji lenses, it is pretty hard to go wrong with their primes (although I’m not a huge fan of the 60mm macro…) But the others are small, gorgeous and fast. I love the built-in 23mm (35 equiv.) of the X100s. It’s sharp wide open and it has beautiful flare when you point it right into the sun as seen above. It’s my most-used lens. Which is a good thing, given that it’s welded to x100s.

Along with that, the 35/1.4 (50mm equiv., seen at top on left) and 14/2.8 (21mm equiv., on right) are my go-to lenses on the interchangeable lens Fuji bodies. If I am shooting tight headshots, maybe the 56/1.2 in the middle.

As a backup, I like the 18-55 kit zoom (not shown). Which, although not a speed lens at f/2.8->f/4, is great optically and has stabilization.

Good performance from a kit lens (the zoom that often comes packaged with a camera) is not a given, as many of them are crap. If you are using a kit zoom as your main lens, know that it will be be sharpest near the middle of the aperture scale—let’s say around f/8. In fact, most lenses are great at f/8.

If you like to hang out close to wide open, grab a (used, if necessary) prime at your most-used focal length. You’ll be a happy camper—and have a backup if needed.
__________

What to buy? And when? That should be driven by what/how you shoot.

Here’s my thinking on lens progression, driven by how I shoot. Most of the time I am going to go out with a single, prime lens. I like the size, the weight, the speed and sharpness. Actually, I also like the discipline of having a single focal length. It helps me to see better.

With a new system I’d build out my wide/normal/short-tele primes, then get a decent wide- to short-tele zoom as a backup or for times when I would want one-lens variability. Only then do I start going for more exotic lengths if needed.

The reason is simple: most of my work will be done with the bread-and-butter focal lengths of moderate wide to short tele. So I want good quality, speed and backup in those lengths before I start to get crazy with a superwide or whatever.

You can easily try out a lens for no risk. Buy a good example used, from someone with a good return policy. If the lens is a dog, return it immediately. If it is good enough to where you want to keep it and play, you can always resell the used lens for about what you paid for it within a year or two.

So, very little risk. (In fact, if I was going to need to rent a lens for more than a week I’d do it this way. Your rental would be practically free.

And obviously, if you love a lens and decide to marry it and keep it forever that’s best possible case.

NEXT: Lights


Strobist

 
Comments Off on Choosing Lenses

Posted in Photography


A guided tour of the Sony QX1 and QX30 smartphone cameras

03 Sep

Sony got a lot of attention when it released a pair of cameras which clip onto a smartphone last fall. They’re really going to raise a lot of eyebrows now, with their QX1, which features an APS-C sensor and E-mount. Yep, an Alpha on your phone. Take a tour of the QX1 and the superzoom QX30 cameras right here.

Articles: Digital Photography Review (dpreview.com)

 
Comments Off on A guided tour of the Sony QX1 and QX30 smartphone cameras

Posted in Uncategorized


Körper, Licht und Raum

03 Sep

Celeste Ortiz ist eine chilenische Fotografin, die sich intensivst mit ihrem Körper im Raum auseinandersetzt. Selten arbeitet Celeste mit Modellen, für sie ist es nahliegender und natürlicher, sich selber zu fotografieren und dafür benutzt sie am liebsten die Orte in ihrer direkten Umgebung. Ihr Zimmer, ihre Wände, ihre Fenster, ihren Garten, ihren Körper.

Sie zeigt uns durch ihre Körpersprache, wie sie sich sieht und hält für uns fest, was sie sieht, ohne Angst vor einem Betrachter. Licht im Nacken, wie eine Hand sich bewegt, fallende Haare, ein blattloser Zweig, eine romantische Detailliebe, Intimität und unheimlich viel Weiblichkeit ziehen sich durch ihre Arbeiten. Ich mag die Sanftheit und Einfachheit ihrer Bilder, dass nicht viel auf ihnen passiert, außer dass einfach der Moment eingefroren wird.

Das Foto ist nicht wirklich geplant, mehr eine vage Idee … Ich denke über das Licht nach, über den Raum um mich herum, wo ich die Kamera hinstelle. Ich stelle sie auf das Stativ, kontrolliere das Licht, fokussiere. Darüber denke ich nach. Ich liebe den Prozess.

Seit 2008 fotografiert Celeste, damals noch ausschließlich digital. Erst, nachdem sie 2012 ein Diplom in Digitaler Fotografie am ARCOS Institut Santiago de Chile gemacht hat, hat sie sich der analogen Fotografie zugewendet und den Film für sich entdeckt, weil sie so entschleunigter und langsamer arbeiten kann.

Sie fotografiert mit verschiedenen Modellen, ihr Lieblingswerkzeug ist aber die Zenit E. Und auch, wenn ihre Fotos nicht perfekt sind, ist Celeste nun zufriedener. Sie ist nicht mehr auf der Suche nach Perfektion und gibt offen zu, dass sie viele Fehler in ihren Bildern hat, die für sie aber zum Prozess gehören und die sie nun zulassen kann.

Das ist dabei herausgekommen. Ich habe viele verschiedene Stile ausprobiert, als ich noch digital gearbeitet habe, aber jetzt ist meine Fotografie ehrlicher geworden und ich bin dabei geblieben.

Doppelbelichtung mit Frau und Blumen

Frau in blauem Kleid mit nackten Beinen

Blütenblättchen auf nackten Beinen

Dreifachbelichtung von Frauenbeinen

Dreifachbelichtung von Händen

Eine Frau steht an einer Wand mit einem Ast vorm Gesicht

Ein kahler Ast wird an eine Wand gehalten

Eine Frau hat einen Efeukranz umgewickelt

Frauenbeine und Lavendelhalme

Gekreuzte Hände vor unscharfer Landschaft

Frau kniet am Fenster mit Kamera in der Hand

Frau liegt auf Holzboden

Frau lehnt an Blümchentapete

Halbnackte Frau umfasst ihren Körper

Frau mit nackter Brust verschränkt ihre Arme

Frau lehnt nackt an einer Wand mit wenig Lichteinfall

Frauen spiegelt sich oben ohne in einem Spiegel

In Chile hat sie verschiedene Ausschreibungen gewonnen und auch schon einige Gruppen- und Einzelausstellungen vorzuweisen. Ihre Arbeiten sind auf Facebook und Flickr zu finden und ein kleines Video über eine ihrer Ausstellungen gibt es hier.


kwerfeldein – Fotografie Magazin | Fotocommunity

 
Comments Off on Körper, Licht und Raum

Posted in Equipment