Ein Beitrag von: Roman Strohschneider

kwerfeldein – Fotografie Magazin | Fotocommunity
Ahead of a Photokina launch, Hong-Kong based SLR Magic has announced the HyperPrime Cine 10mm T2.1 lens for Micro Four Thirds and SLR Magic 77 ND 0.4-ND 1.8 filter. The manual focus lens offers a 20mm equivalent angle on a Micro Four Thirds body, and is designed to a videographer’s taste with a stepless aperture ring. It will be available at the end of October for $ 799. Read more
Articles: Digital Photography Review (dpreview.com)
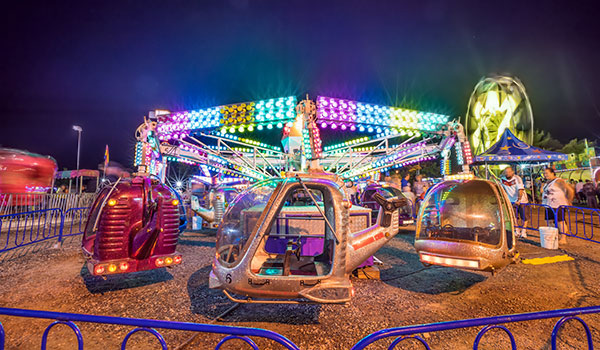
When it comes to taking pictures of the fairground or amusement park, you’ll be amazed at just how easy it is to get super colourful, vibrant, and bright images of those awesome rides. Twilight is the best time to shoot, when all those mega-joules of artificial lights burst into action to give you amazing effects that aren’t possible during the day time.
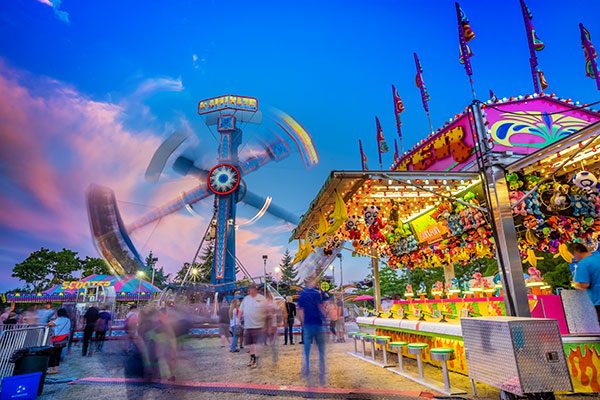
The optimum time is about 30 minutes after the sun has set. If you’re lucky, there will be a beautiful colourful afterglow in the clouds, but it will still be dark enough for all the artificial light to be the brightest parts of your image. When it gets fully dark you can still get stunning shots, but the sky may just be a dark blanket if there is cloud cover.
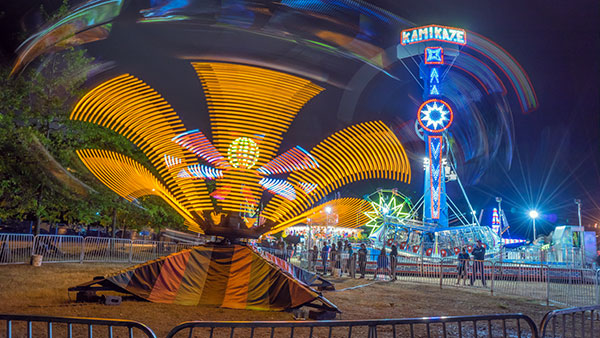
By increasing your ISO settings to around 400, you’re increasing the light sensitivity of your camera. You can try higher settings (larger ISO numbers) but your goal here is to achieve an exposure time of around one to two seconds so that you capture some motion blur in the people and in the rides. Using a higher ISO than 400 will speed up your exposure time and you don’t necessarily want that, unless you want to totally freeze all of the motion in your shot. There’s some trial and error involved, depending on the available light of your scene, so my number of 400 is approximate.
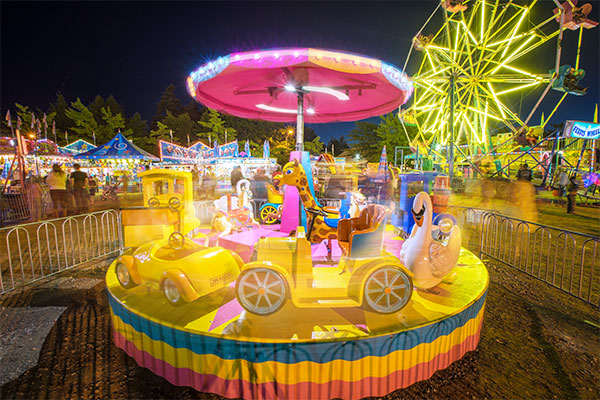
When the rides are static, you won’t capture any motion blur but as soon as they start to move (and they usually move fast), you’ll find that the one to two second exposure time is ideal for capturing a lot of movement.
By taking pictures every four seconds, you’ll end up with a huge variation of different motion blur as the rides progress through their cycle. It’s almost like shooting video, but by shooting time-lapse, you’ll ensure that every frame is a full resolution image – video can’t compete with that. This technique ensures that you capture lots of images at different stages of the ride. Here’s a one minute time-lapse movie I made while shooting stills at the fair using this technique.
If your camera has a built-in intervalometer or time-lapse app, you’re in luck. Set your interval at four seconds, and your camera will take a picture every four seconds. If you’ve set your exposure time to two seconds that gives you a two second gap after your shot has finished before the next shot will be triggered. Make your time-lapse last for about a five minute duration, and you should be able to capture images of the rides while they are static and while they are moving – it depends on how busy the rides are and how long the ride cycle lasts.
You can then overlay those blurred images with the static images in Photoshop to create the ultimate composite of sharp static scenes, and motion blurred scenes.
Don’t worry if your camera doesn’t have a time-lapse function, you’ll just need to take as many pictures as you think will capture your desired motion blur and static states. Alternatively you could buy an intervalometer which will connect to your camera and trigger the shutter for time lapse shooting.
Top Tip: Be sure to switch off your built-in noise reduction as this will slow down your write times to the memory card, and will mess up your intervals.

It’s important to set the right white balance on your camera for this type of shooting. Don’t trust the auto setting because there are so many different light sources that your camera won’t know which setting to choose. For all of the shots I took with the Sony A7R, I used the Fluorescent Warm setting.
Experiment to get the most pleasing looking white balance for your scene, try to avoid everything looking super orange. Look at the scene with your eyes, then look at your shot to try and get the most accurate colour temperature.
In shots like the one above, you can see a very pleasing looking blue star on the lamp post. All lenses produce their own characteristic stars, some are better than others. One thing you can do to get the best star out of your lens is to select a very narrow aperture like f/16 or f/22. This will also have the added benefit of forcing your shutter speed to be slower which gets you closer to the two second exposure time I mentioned earlier.
Remember that wide angle lens I mentioned at the start? That lens will allow you to fill your frame with all the fun of the fair. Wide angle lenses create a pleasing looking distortion that adds drama and intensity to your shot. A 14-16mm shot on a full frame camera can cram in a LOT of action. By getting close to your subject and positioning yourself at a point that creates a nice looking distortion effect, you’ll really make your images POP!
What happens to your image quality when you use higher ISO settings? Noise, that’s what. We don’t like noise do we? No, so lets get rid of it using the brilliant noise reduction of Adobe Camera Raw. Your specific settings will depend on your camera’s sensor, as not all sensors are made equal. Here are the settings that I found gave me the best results for my pictures. Experiment with these sliders to get rid of as much noise as you can while still retaining image detail.
You’ll probably want to brighten up your shadows and blacks a little but don’t overdo it. We actually need those dark areas in our image to contrast with the bright lights, that’s what gives our image its PUNCH!
If the brightest parts of your image look a little blown out, pull them down a little with the whites and highlights sliders. Again, don’t overdo it or you’ll run the risk of ending up with a totally fake looking image.
Increase the clarity a little to introduce some contrast to the mid tones.
Increase the vibrance a little to make the colours pop and give a subtle blue hue to the sky area.
The graduated filter simulator is a really powerful tool, but did you know it’s not just for making a part of your sky darker? You can use multiple graduated filters to selectively brighten or darken large parts of your image. If you want to brighten just your foreground, simply add a graduated filter and increase its exposure value like in the image below. You can further tweak just that selected area with the other powerful ACR tools like shadows, clarity, contrast etc.
Once you’ve finished tweaking your images in Adobe Camera Raw, it’s time to open them in Photoshop to make a composite image that captures the motion blur and the static state of your fairground ride. It’s worth pointing out that this is just a creative choice, if you’re happy with just a single image, that’s cool too.
From your images, choose one that shows your ride in its static state. This could either be while it’s not moving or perhaps you took a super fast, high ISO shot while the ride was moving and managed to freeze the motion nicely. Either way, pick an image that you like, and open that in Photoshop.
Next you’ll choose an image, or images, that perfectly capture the motion blur of the ride; maybe it’s a roller-coaster ride and you want to catch the long streaking lights of the carriage. Open this in Photoshop so that you’ve now got two tabs, each with their own image.
With the motion blur image open, hit ctrl+a (or Cmd+A for Mac) on your keyboard to select the entire image. You should see the marching ants around the image. Next hit ctrl+c (Cmd+c) to copy that image on to your clipboard.
Now click on the other tab to switch to your first image which shows the static or frozen motion shot, and hit ctrl+v (Cmd+v) to paste your clipboard image on to a new layer above the default (Background) layer. Photoshop will call your new pasted layer “Layer 1″.
Assuming that you used the exact same ACR develop settings for both images, just go ahead and change the blend mode of the motion blurred image (Layer 1) that you just pasted on to the new layer to “Lighten”. The blend mode lives in your Layers panel and defaults to Normal, so change Normal to Lighten.
Now you should see both images combined to give you a lovely composite of both moments in time. If the effect is too pronounced, try turning down the opacity of the second layer to around 50%. For fun you could also try the Overlay blend mode or Screen, for a more intense effect. Remember to play with the layer opacity to get the look you want.
It’s likely that when you’ve blended both layers together by choosing the Lighten blend mode, you’ll want to erase certain parts of Layer 1 if the image gets too complicated. You can do that easily by choosing the Eraser tool and selecting a soft brush size, appropriate to the area you’d like to erase. Simply click on Layer 1 where you’d like to erase and bam – it’s gone (or use a layer mask for non-destructive editing).
That’s it! You’ve now learned how to shoot and process your amazing images of those mind blowing fairground rides. Go out and have some fun with this, just don’t overdo it on the cotton candy and doughnuts like I did, ugh.
If you have another other tips for photographing fairground rides, please share in the comments.
The post How to Photograph Fairground Rides by Gavin Hardcastle appeared first on Digital Photography School.
Cole’s Newborn Photography Workshop is on sale now at Snapn Deals. Save 72% until September 16th, grab a seat now!
 Newborn photography requires a tremendous amount of patience, skill, a willingness to be okay with accidents, and even stronger photo editing skills as these precious little newborns often have numerous skin imperfections that can cause you to spend a significant amount of time editing and retouching the photos.
Until recently, to truly excel at editing newborn photos you had to be quite proficient using Photoshop, but now with Lightroom 5′s newest tools you can get great results with far less time!
Here are my top 6 tips for quicker and more effective newborn photo editing in Lightroom:
To get amazing final edited newborn photos you first need to focus on getting your exposures as close as you can in camera. Since newborns often have some redness to their skin, the best way to help minimize that is to slightly overexpose your photos while shooting. Doing so will help you achieve that soft, creamy and bright skin that we all love!

I always shoot in the RAW file format. There are many advantages of shooting in RAW, but for newborns which require a lot of touching up and white balance changes, shooting in RAW will help keep the color tones of your images as natural as possible – even when making big adjustments.
If you’re after soft and creamy skin tones, the two sliders in Lightroom that will help you the most are the contrast and clarity slider. By reducing contrast you will smooth out the tonality of the image (just watch the histogram when you change contrast) and it will help remove the dark shadow areas or even bright highlights. Remember, for most of us, the goal with newborns is soft, airy photos – rather than edgy high contrast imagery. Adjusting the clarity slider downward a bit will help give you the “creamy” factor. Just be very careful to not remove too much clarity! I recommend somewhere between -10 to -20.

Adjusting the white balance will only get you so far, sometimes you need some fine tuning on the skin tones and that is where the HSL sliders can really help. While you can manually adjust each color slider, the real trick is to use the targeted adjustment tool on each element (Hue, Saturation, and Luminance) to fine tune your skin tone corrections. Simply click on the targeted adjustment tool, go over a part of the image with the skin tone color you want to fix, click (and hold) then adjust with your mouse up or down and you’ll see the sliders adjust.

Tip: if you are trying to remove redness, click in the photo where there the skin is red, and follow this sequence with each slider using the targeted adjustment tool:
Hue: move the mouse up and the red/orange sliders will move to the right
Saturation: lower the mouse and the sliders will shift to left lowering saturation
Luminance: raise the mouse to adjust the targeted color sliders to the right, raising the luminance (brightness) of those tones in the photo.
See below for video tutorial of this technique if you are a visual learner.
Extremely light colored wraps or blankets can be so cute, and can look great with color images. But, if you are a fan of classic, timeless, black and white images I’d urge you to stay away from blankets or wraps that are too light, or even white in color. There simply isn’t enough contrast in color between the baby and the blankets for an effective, and attractive black and white image, and your photo will often look too washed out.

Once you find an edit or a look that you love, make sure to save it as a preset so you can use it on other photos that were taken with similar lighting and settings. Not only are presets vital for saving you a ton of time while editing, but they also will help you create a consistent look to your photos.
Specifically for newborn photography, I created a complete Lightroom presets collection that make soft, creamy and dreamy newborn photos with the simplicity of just one-click.

I sure hope that you can put these six tips into use right away and start editing your newborn photos quicker, with better results. If you have any questions at all, just let me know down below, I’d love to hear from you.
Cole’s Newborn Photography Workshop is on sale now at Snapn Deals. Save 72% until September 16th, grab a seat now!
The post How to Edit Newborn Photos Using Lightroom by Cole Joseph appeared first on Digital Photography School.
[ By WebUrbanist in Culture & History & Travel. ]
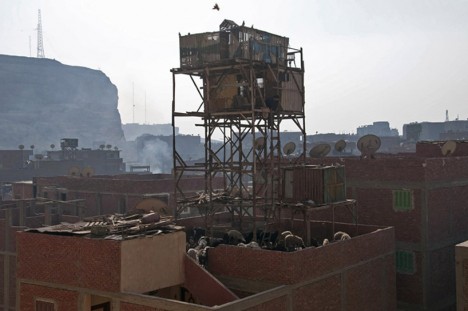
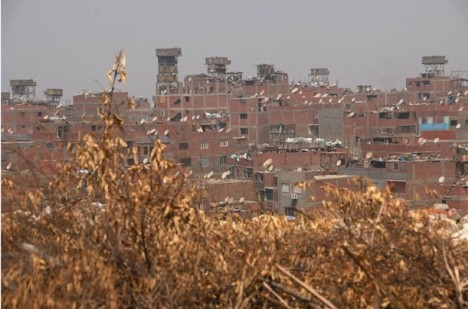
In the trash-ridden outskirts of Cairo, Egypt, precariously lofted structures rise up on stilts, home to birds that, come sunset, are set loose as the strange race begins to reroute and capture the free-flying flocks of one’s neighbors. The goal: to use flags and whistles to navigate your own birds and bring them back to their roost, all while hopefully entrapping your neighbors’ pets in the process.

Photographer Manuel Alvarez Diestro (via CityLab) flew in from London to document this bizarre phenomenon. Dating as far back as 4,000 years ago in various forms, this sport-like activity involves breeding, raising, releasing and recapturing huge collections of pigeons.
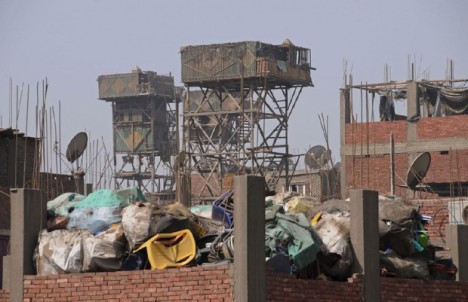
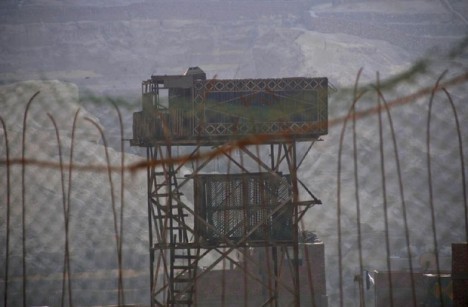
Garbage City, the informal name of the trash-collecting suburbs surrounding Cairo, plays host to many of participants, its lack of building code regular contributing to the unsteady-looking structures used to house the birds.
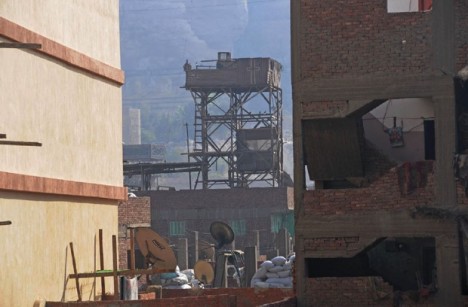
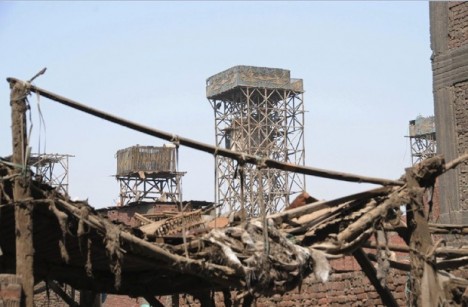
Not made to support heavy loads, many of these informal roosts are cobbled together from scraps and assembled like scaffolding from wood and whatever else is available.

PigeonNews gives a great deal of detail on everything from the types and ratings to behaviors of the birds and their masters, including stories of training, endurance and skill as well as sickness, predators and other mishaps.
Notably, pigeon is also eaten in the region, so while many treat it as a hobby or sport, some participants may also have other incentives for breeding (or catching) these birds.
![]()
There are as many as 2,000,000 people actively raising these birds in Egypt today, with some people spending hundreds of dollars a month on the upkeep of hundreds of birds.
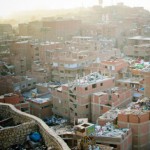
Brimming with trash, Garbage City is the destination for all of Cairo’s refuse – but it’s not a dumping ground. 30,000 people called the Zabbaleen live here.
Click Here to Read More »»
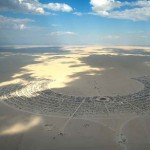
The following three events are vastly different in terms of geography, history and purpose but are all impressive in their own way and right as these images …
Click Here to Read More »»

One Manhattanite’s trash is another person’s kitschy plastic knick-knack. Artist Justin Gignac packages and sells NYC trash for $ 50 a pop.
Click Here to Read More »»
![]()


[ By WebUrbanist in Culture & History & Travel. ]
[ WebUrbanist | Archives | Galleries | Privacy | TOS ]

There has been a lot of talk about major camera companies possibly taking steps into the medium format digital marketplace. Till now these have just been rumors. But this is a market segment that is not going away, regardless of what some people say. One of the relative newcomers to this market is Pentax. Over the last few years the Pentax line has evolved, and recently Pentax introduced the Pentax 645Z as a major upgrade to their previous 645D. Did they get it right:? The Pentax 645Z – In Depth Review by Michael will try and answer these questions for you.
Have you wanted to travel to the bottom of the world and experience one of the most incredible photographic environments there is? Well you can this January and February with the Fly Over The Drake – Antarctica Workshop. Don’t hesitate register today.
The Ultimate Iceland Workshop. See the Iceland others don’t.
Michael’s Phlog was updated on September 3rd
…
The Luminous Landscape – What’s New
Winners of the 2014 British Wildlife Photography Awards have been announced, with an overall winner, category winners and highly commended photos receiving recognition. Winning entries will be included in an exhibition touring the UK as well as a photo book, and the overall winner will be awarded a £5000 cash prize. Take a look at the photo that took top prize as well as category winners. See gallery
Articles: Digital Photography Review (dpreview.com)
Ein Beitrag von: Tabea Borchardt
Es scheint, als würden zur Zeit mehr und mehr solcher Bilder auftauchen. Bilder von Menschen, die an Krebs verstorben sind, Leidenswege fotografisch dokumentiert und berührende Bilder von einem totgeborenen Mädchen, die viral wurden auf Facebook. Und das sind nur Beispiele. Es gibt eine Menge Bilder dieser Art, wenn man Google fragt.
Im Netz tauchen sie auf. Im großen öffentlichen Worldwideweb. Dem virtuellen Vielfang, der nichts vergisst und in dem beinah jeder etwas Privates verbreitet. Etwas Privates?
Vor Kurzem entdeckte ich die Bilder von Nancy Borowick – speziell die Serie „Cancer Family“ – berührend echte Bilder, die neben der blanken Tatsache, dass Krebs nun einmal eine teuflische Krankheit ist, die in vielen Fällen zum Tode führt, auch zeigt, wie sehr eine solche Schreckensdiagnose Zusammenhalt in eine Familie bringen kann.

Cancer Family © Nancy Borowick

Cancer Family © Nancy Borowick
Eine Offenheit, Freude und Ehrlichkeit an den gemeinsamen Momenten, die vielleicht die letzten sind. Die jeden Tag auf’s Neue die letzten sein könnten. Die trotz alledem aber bis über den Tod hinaus auch immer etwas Positives mitschwingen lassen. Es wird auch gelächelt und gelacht. Es wird gelebt. Auch, wenn einer geht.
Es werden gemeinsame, ganz intime Momente in solchen Serien gezeigt. Von Situationen, die man vielleicht nicht mal engen Freunden bildhaft erzählt oder erzählen kann. Durch eine Fotografie sind sie dann jedoch sehr real, unverschleiert festgehalten. Solche Bilder werden meist nicht retuschiert, verschönert oder mit Filtern überlagert. Ganz schön echte Fotos für unsere heutige Zeit. Obwohl sie nichts zeigen, was wir wirklich schön finden können oder wollen.

Cancer Family © Nancy Borowick

Cancer Family © Nancy Borowick
Weiter oben steht hinter dem „Privaten“ ein Fragezeichen. Warum?
Weil wir die Gewissheit des Todes seit dem Moment unserer Geburt haben. Wir alle. Keiner, egal woher, wie alt, wie jung, wie arm, wie reich, kann sich dem Tod entziehen. Dies ist wohl auch die einzige Gewissheit, derer wir uns wirklich sicher sein können. Da unterscheidet uns plötzlich nichts mehr.
Daher die Frage, wie privat diese Angelegenheiten sind. Da so weltbedeutend und bedeutungsschwanger für jeden Einzelnen.

Cancer Family © Nancy Borowick
Und welche Rolle spielt die Fotografie als Medium, das versucht, Zeit festzuhalten und Momente einzufrieren, die ja so doch nie wieder sein werden? Hilft sie beim Erinnern? Oder verschleiert sie Erinnerungen, da sie kein bewegtes Bild, kein Film ist? Keinen Ton hat, keine Gerüche? Helfen uns Bilder von anderen dabei vielleicht, im eigenen Umfeld besser mit solchen Situationen umzugehen, wenn sie uns dann ereilen? Wenn die Zeit naht, in der unsere Eltern altern und die Großeltern vergessen, ob wir gestern schon zu Besuch waren?
Meine intensive Auseinandersetzung mit der Thematik ist auch nicht ganz zufällig passiert. Mir begegnen diese Bilder sicher nicht auf’s Geratewohl. Ich selbst habe am 9. Mai dieses Jahres meinen Vater viel zu früh an den Teufel namens Krebs verloren. Nach zwei Jahren intensiver Krankheitsphase und Leidenszeit für alle Beteiligten. Doch auch mit sehr vielen sehr schönen Momenten, die wir ohne den Krebs so vielleicht nie erlebt hätten. Sonst hat man das Ende nie so sehr im Fokus.

© Tabea Borchardt
Für mich ist die Fotografie als mein Medium treuer Begleiter in dieser Zeit „davor“, „währenddessen“ und „danach“ geworden. Diese Zeit hat nicht nur menschlich viel bei mir verändert, sondern auch fotografisch. Die Art, wie ich Bilder betrachte, speziell Bilder von Menschen, hat sich verändert. Ich nehme intensiver wahr und überfliege vermeintliche „Alltagsfotografien“ nicht mit nur einem Blick, sondern habe immer im Hinterkopf, dass dies ein wahnsinnig wichtiger Moment gewesen sein könnte.
Wer kann das später nachvollziehen und wem steht es zu, das zu beurteilen ohne Kenntnis der Situation? Fragen über Fragen in diesem Text, doch genau mit ihnen möchte ich Euch gern in Berührung bringen. Es kann meines Erachtens nach nicht schaden, sich frühzeitig auch mit den unangenehmen Seiten des Lebens auseinander zu setzen. Tut mir leid, wenn ich Euch darauf schubse.

© Tabea Borchardt
Neu sind Bilder von „davor“ und „danach“ übrigens nicht. Wir kennen die Post-Mortem-Fotografie aus dem 19. Jahrhundert, doch Dokumentationen aus jener Zeit bezüglich einer Krankheitsphase sind seltener. Oder ich habe keine gefunden.
Doch die frühere Post-Mortem-Fotografie hat sich nicht so enorm verbreitet, wurde nicht plakatiert oder abgedruckt. Es waren Erinnerungsstücke für die Familie, für den Kaminsims oder das Album. Ist es nur ein Merkmal unserer Zeit, dass wir das Private über das Öffentliche stülpen?

© Tabea Borchardt
„Davor und Danach“ – es geht um Einschnitte. Einschnitte in Leben, die auf vielerlei Weise ein Ende finden können. Da es hier nicht nur um Krebs gehen soll, möchte ich zum Ende noch ein letztes Beispiel anbringen für die Fotografie eben solcher bewusster Einschnitte.
Die Frau von Seichii Furuya stürzte sich knapp vor dem Mauerfall aus dem Fenster. Suizid. Aus dem Leben gerissen. Ein abruptes Ende. Dies die knappe Zusammenfassung. Bereits zuvor hatte sie die Diagnose einer psychischen Krankheit bekommen. Es gibt viele, sehr viele Wege, aus dem Leben zu scheiden. Und somit auch mindestens genauso viele Wege, damit umzugehen. Nicht nur im fotografischen Sinne.
Furuya verarbeitete die gemeinsame Zeit vor und nach ihrem Tod in mehreren Büchern.
Dort sehen wir allerlei Bilder. Viele von Dingen, denen wir ohne das Wissen um ihre Geschichte gar keine so hohe Bedeutung beimessen würden. Alltagsgegenstände, gemeinsam besuchte Orte. Gemeinsam erlebte Momente. Bilder von ihr und dem gemeinsamen Sohn. Dabei, ganz zufällig entstand ein Dokument seiner Zeit, rund um die Mauer, aus der Ost-Sicht mit viel mehr politischem Hintergrund, als auf den ersten Blick auffällt.
Seine Bücher sind eine schöne Beschreibung dessen, was ich als das normale Leben neben dem gemeinsamen Alltag mit einer Krankheit beschreiben würde. Eine Beschreibung davon, wie Leben und Tod permanent koexistieren können, ohne dass wir daran zerbrechen. Denn uns bleibt keine Wahl. Es ist schon immer so gewesen und wird wahrscheinlich auch immer so bleiben. Doch vielleicht lernen wir dadurch ja, das Leben an sich mehr zu schätzen.
Dankenswerterweise darf ich hier noch kurz auf eine Ausstellung hinweisen.„Von Treibgut, Ebbe und Flut“ beschäftigt sich mit der Zeit, dem „davor“ und „danach“ in vielfältiger Hinsicht. Eröffnung ist am 26.09.2014 um 20:00 Uhr in der outofmymind Galerie in Bremen. Ausstellende sind Tabea Borchardt & Myriam Borchardt.
kwerfeldein – Fotografie Magazin | Fotocommunity
This past weekend I shot my first iPhone only concert ever — Keith Urban at The Cosmopolitan Hotel in Las Vegas with Brett Eldredge and Jerrod Neimann.
I was there with my wife mrsth for our 18th wedding anniversary. We’re both big Keith Urban and country music fans, so when I saw he was playing at the swanky Cosmopolitan (which is absolutely the best place to stay in Vegas these days), I booked us a room there for the weekend and we celebrated 18 years in style.
A great show was made even better thanks to Jessica Northey who put us in touch with Keith’s management (thank you so much Rachel!) who were able to arrange a special meet and greet ahead of the show. There’s nothing like impressing your woman on her special day!
I’ve shot a lot of live music over the years and always with a DSLR, but this time I went sans DSLR and shot only with my iPhone. You can check out what I was able to get with only an iPhone only here. iPhone shooting in low light can be tricky. I felt like I got some good shots though.
At Coachella earlier this year my friend Sam Levin gave me an olloclip. That really came in handy for this show. If you like shooting concert photography with your iPhone, you absolutely *HAVE* to get one of these. It’s basically a telephoto lens for your iPhone and makes a huge difference in terms of getting closer than you could otherwise.
Most shows I see I’m pretty much focused 100% on just shooting the show — so much that I don’t even really have the best time. This show though it was much more laid back without my DSLR and just hanging out as a normal fan with an iPhone. One of these days I would love to shoot Keith Urban with a DSLR, but the Vegas show was perfect just like it was with the iPhone.
And about that show — WOW! if you haven’t seen Keith Urban play live yet you really should. In fact he’s in the Bay Area Saturday night in Mountain View if you want to check him out for yourself. He puts on a really rocking show digging deep into his repertoire with so many of his greatest hits. Keith has a ton of energy and he and his whole band really put on a super fun and kick ass live show — that man can play guitar!
Both Brett Eldredge and Jerrod Niemann are great opening acts. My wife especially enjoyed the fact that in Vegas Brett played a bit of Sinatra’s Fly Me to the Moon, which was coincidently the first song that we danced to at our wedding 18 years ago.
Keith’s got other dates coming up in Oregon and Washington if you live there. You can check out the remaining dates of his Raise ‘Em Up tour here.
You can check out all of my live music concert photography here.
Thomas Hawk Digital Connection
[ By Steph in Design & Furniture & Decor. ]

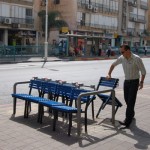
Packing down nearly as flat as they were before they were modified, six interlocking structures made of pallets unfold to reveal a variety of seating options with greenery poking out of the bench backs. Johannesburg artist r1 was asked to develop the public seating as part of a residence program in the city aiming to enliven public space and come up with innovative ways to contribute to the community.


All six units can be combined into one larger structure, grouped together in smaller configurations or used alone. Each one contains two fold-down benches that can be used back-to-back, side-to-side or on a diagonal.


Made of discarded pallets, each one is on wheels so it can be moved quickly and easily. In addition to providing comfortable places for locals to congregate, the seats bring a little greenery into the urban environment.


Other unconventional iterations of urban furniture have included UFO-inspired loungers, ‘stair squares’ and even seats that require strangers to interact with each other.
Breaking, bending, twisting and warping wood, this ongoing series of installations fosters new forms of interaction within cities, challenging that …
Click Here to Read More »»
The privatization of public spaces is a contentious issue – suburban malls have turned many main streets into ghost towns. At the same time, there is gray …
Click Here to Read More »»

A surging DIY movement is bringing wooden pallets out of obscurity and into people’s homes as popular do it yourself foundations.
Click Here to Read More »»
![]()
[ By Steph in Design & Furniture & Decor. ]
[ WebUrbanist | Archives | Galleries | Privacy | TOS ]
You must be logged in to post a comment.