RSS
 

Archive for September, 2014

Bath House: Abandoned Public Restroom Turned Private Home

08 Sep

[ By WebUrbanist in Architecture & Houses & Residential. ]

deserted loo pre conversion

The ultimate fixer-upper, real estate rarely looks so unpromising as this London dump did – thankfully, one architect saw potential beyond these potties, despite the place truly looking like shi… well, er, bad. In the end, the before-and-after shots speak for themselves – few buildings can boast such total turnarounds, converting crappy ruins into shining tur…, er, digs.

deserted public restroom uk

converted skylit underground condo

Located under the Crystal Palace Parade, these lavatories constitute just 600 square feet of space – not much by the standards of some cities but relative huge for England’s densely-packed capital.

deserted underground bathroom stalls

deserted london renovation project

Located by architect Laura Clark after just finishing up at the Glasgow School of Art, the strange site seemed a perfect challenge for an aspiring architectural designer wanting to take up residence in London.

converted home stairs ladder

deserted amazing subterranean home

At the intersection of various municipalities and built nearly a century ago, getting approvals turned out to be painfully difficult – even establishing who owned the property proved problematic. Eventually, though, it went up for sale and she was able to secure and start working to convert it.

converted house closet bathroom

deserted underground home skylights

The results of her efforts: a compelling home constructed for under 65,000 Pounds (around $ 100,000 USD), surprisingly open, spacious and light-filled compared to its cavernous original state. Along the way, the architect was able to reuse some old materials in the new construction and save some existing walls as well.

Share on Facebook


[ By WebUrbanist in Architecture & Houses & Residential. ]

[ WebUrbanist | Archives | Galleries | Privacy | TOS ]


WebUrbanist

 
Comments Off on Bath House: Abandoned Public Restroom Turned Private Home

Posted in Creativity


7 September, 2014 – Why Medium Format

08 Sep


Having been a medium format shooter for the last 13 years I don’t need a lot of arm twisting when it comes to medium format digital.  It’s always good to hear though from someones as they tell their story about making the switch to medium format.  Today we share Andy Biggs’s article Why Medium Format.  Andy, a well respected wildlife and landscape shooter takes us through his journey of adopting the medium format digital Phase One system.  Read about the ins and outs of making the switch and what he learned along the way.  Enjoy!

Have you wanted to travel to the bottom of the world and experience one of the most incredible photographic environments there is?  Well you can this January and February with the Fly Over The Drake – Antarctica Workshop.  Don’t hesitate register today.

The Ultimate Iceland Workshop.  See the Iceland others don’t.


The Luminous Landscape – What’s New

 
Comments Off on 7 September, 2014 – Why Medium Format

Posted in News


How to do Noise Reduction in Lightroom

08 Sep

Lightroom-noise-removal-before-after

When you capture images using a high ISO setting you will invariably end up with some noise in your photos. If the noise is distracting and if you want to remove it, then Lightroom can help.

A word of warning

Before start using any noise removal tool it will pay to understand that noise removal is generally achieved at the expense of losing some detail in the photo. This is because the noise removal process involves smoothing the image pixels, and this in turn compromises fine detail. In addition, the main Lightroom noise removal tool applies the fix to the entire image not just the areas where it is most visible, meaning that you can’t mask the result and limit it to only those areas you want to apply it.

Because of this, if you are a purist and noise reduction is an ongoing and significant need, then you may consider a dedicated and specialist noise reduction program such as Topaz DeNoise, Neat Image or Photo Ninja a worthwhile investment. However, for most photographers, the tools in Lightroom judiciously applied will suffice.

Identifying noise

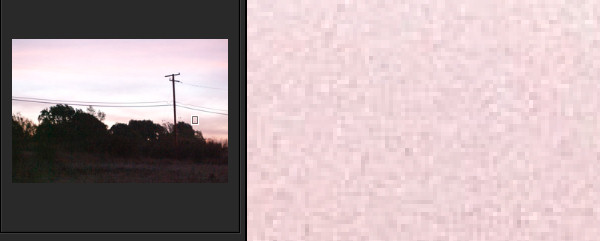
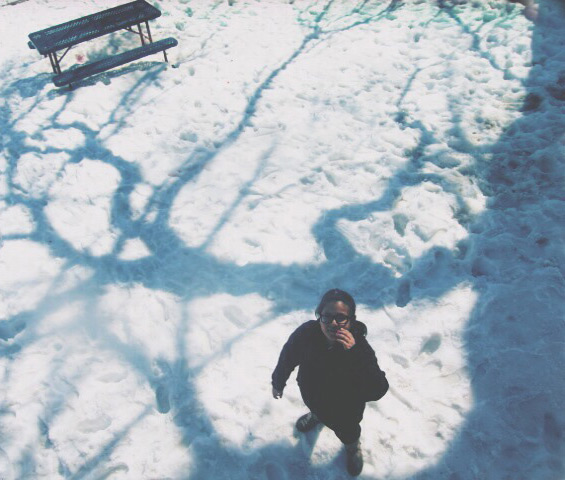
Noise in photos comes in two types; color noise and luminance noise. Color noise is evidenced by multicolored pixels in an area of the photo that should show as a flat color. In the image below you can see that there are multicolor pixels in an area which should be solid blue.

Lightroom-noise-removal-step1

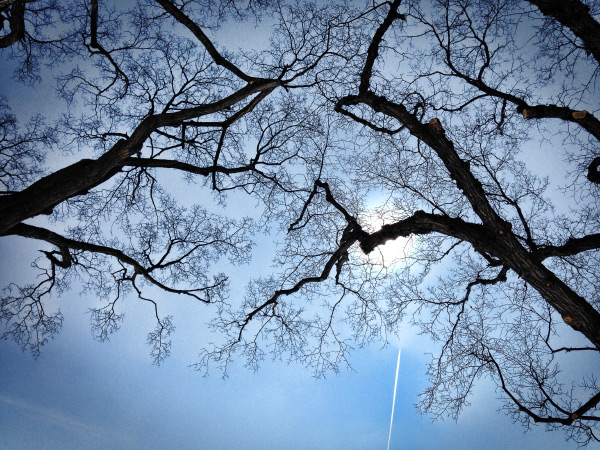
Luminance noise is monochromic so it will be less colorful and more like grain. Here is luminance noise in the sky of a photo captured at an ISO of 6400 in early morning light:

Lightroom-noise-removal-step2

Process versions

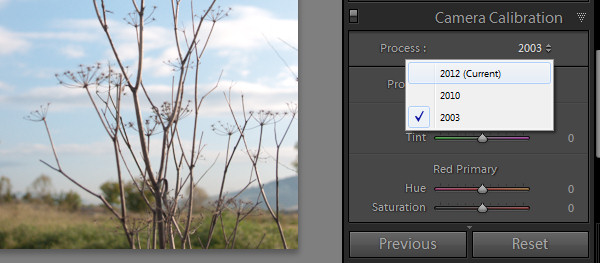
Whenever you import an image into Lightroom some noise removal will be performed automatically by the process version which is the camera raw technology Lightroom uses to adjust and render your photos. In each process version the technology has improved over that of the earlier versions. So each will render your photos differently and, in particular, Process Version 2010 included better noise reduction technology than the earlier 2003 version. This was carried forward to the 2012 version.

The current process version for Lightroom 4 and 5 users is 2012 so, if you have images in your catalog that you imported using an earlier version of Lightroom (versions 1, 2 or 3) which are still set to process version 2003 then you can achieve some immediate benefits in noise reduction by simply updating those images to the new process version. To do this select the images and in the Develop module from the Camera Calibration panel select 2012 (Current) as the process version (use the Sync option to copy the setting to all selected images).

Lightroom-noise-removal-step3

Removing noise

To remove noise from a photo, open the Detail Panel in the Develop module to display the noise reduction sliders. There you will find sliders for Luminance noise and for Color noise.

noise-default-LRFor raw images Lightroom automatically applies color noise reduction in the import process. So the Color Noise Reduction slider will be set, by default, to 25 with Detail and Smoothness set at 50 for all raw images. The Luminance noise slider will be set at 0, with Detail at 50 (see screenshot on the right)

Adjust the slider for the type of noise you are seeing in the image, either color or luminance. If you are unsure what type of noise you have, adjust each slider in turn to the maximum value to see which removes the noise. In some cases you may have both types of noise, in other cases one type may predominate.

Once you know what type of noise you are trying to remove, adjust the slider for that type of noise by dragging it to the right. Aim to reduce the noise to an acceptable level, but avoid going beyond that point because, in doing so, you will lose some detail in the image.

Once you have adjusted the Luminance Noise slider you can then adjust its Detail and Contrast sliders. The Detail slider controls the luminance noise threshold – the higher the value the more detail in the image but, as a result, you may experience some residual noise. If you use a lower value you will get a smoother result but with less detail.

Lightroom-noise-removal-step4

The Contrast slider controls luminance contrast so high values will retain more contrast but you may also see more noise and mottling in the image. Lower values will give you a smoother result but again at the expense of reducing contrast.

For Color Noise there are two additional sliders: Detail and Smoothness (the latter was added in Lightroom 5.2). The Detail slider controls the color noise threshold, so adjusting this to a higher value will protect detail in thin colored edges but often at the expense of removing speckled color. Lower values will give you some added smoothing of the color noise but, as a result, you may notice that colors bleed into each other. Adjust the Smoothness slider to help reduce low-frequency color mottling artifacts.

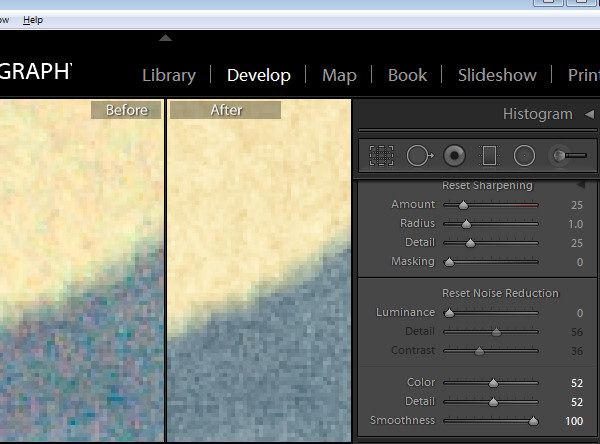
In this image, removing Color noise leaves some Luminance noise apparent:

Lightroom-noise-removal-step5

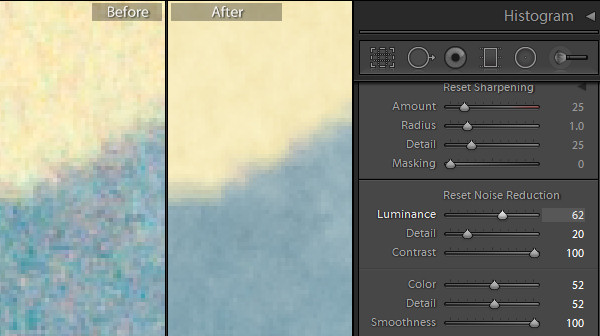
Once the color noise is removed, the Luminance slider will remove the remaining Luminance noise:

Lightroom-noise-removal-step6

When you are removing noise from an image it helps to be viewing the image at a 1:1 size ratio so you see clearly what is happening. Periodically zoom out to check the result.

Local Noise Reduction

If your image has luminance noise you can remove this from selected areas of the image using any of the three local adjustment tools: the Adjustment Brush, the Radial Filter or the Graduated Filter. These tools let you limit noise reduction to only those areas you want to affect, leaving other areas of the image unchanged. The downside to this feature is that there is no additional Detail or Contrast slider to fine tune the result, and it only works to remove luminance noise (not color noise).

Lightroom-noise-removal-step7

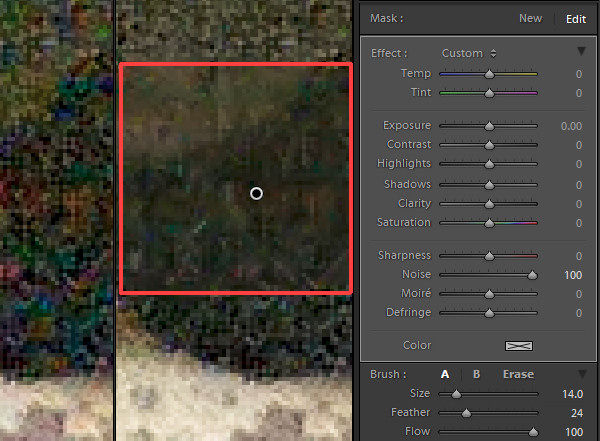
Using any of these tools select the area from which to remove noise, and then adjust the Noise adjustment slider. Drag to the right to remove luminance noise from the image. If you drag to the left then you will add noise to the image.

When you go to sharpen an image that you have removed noise from, pay attention to the Masking slider in the Detail panel. Using this you can apply sharpening to only the edges in the image and avoid sharpening areas of flat color where the noise was most apparent.

Here is a video tutorial showing how to reduce noise in photos in Lightroom:

If you have questions or comments please leave them in the space below. Hope this helps you with removing some of the noise in your images.

The post How to do Noise Reduction in Lightroom by Helen Bradley appeared first on Digital Photography School.


Digital Photography School

 
Comments Off on How to do Noise Reduction in Lightroom

Posted in Photography


Fine Tuning Autofocus on your DSLR

08 Sep

Have you ever used a nice big aperture and got home only to find out the focus isn’t on the part you wanted? Or done a portrait and their ears are nice and sharp not their eyes?

If so, you might have a lens focusing issue. There are ways to test for that and depending on your camera model you may be able to adjust it.

I found a video where the host walks you through the process of fine tuning autofocus for your DSLR. I think her accent is great and I love knowing that people around the world have the same issues and there are great photographers and educators everywhere.

Hopefully that solved your issues and everything is tack sharp now, exactly where you want it.

The post Fine Tuning Autofocus on your DSLR by Darlene Hildebrandt appeared first on Digital Photography School.


Digital Photography School

 
Comments Off on Fine Tuning Autofocus on your DSLR

Posted in Photography


Big Miss Steak: 10 Eerie Abandoned Meat Packing Plants

08 Sep

[ By Steve in Abandoned Places & Architecture. ]

abandoned Swifts meat packing plant Fort Worth Texas 1
As the disconnect between the meat we eat and the places it’s processed grows, so does the number of urban and suburban abandoned meat packing plants.

abandoned Swifts meat packing plant Fort Worth Texas 2

abandoned Swifts meat packing plant Fort Worth Texas 3

Take the former Swift and Company meat packing plant in Fort Worth, Texas. The plant first opened in March of 1904 but by the 1950s, the consequences of local droughts and the reduced importance of the historic Fort Worth Stockyards saw the Swifts plant enter a long period of decline – it finally closed in 1971.

abandoned Swifts meat packing plant Fort Worth Texas 4

Even closure and abandonment couldn’t reverse the Fort Worth Swifts meat packing plant‘s spiral into decay. In the 1970s, two major fires reduced most of the plant’s buildings to ruins leaving only the firm’s administrative offices still salvageable: in the 1980s the building housed an Old Spaghetti Warehouse restaurant. More recently, one of the plant’s buildings acted as a very believable prison in the TV series Prison Break. Kudos to Flickr user Noel Kerns for capturing the Swift plant’s eerie afterlife in 2008 and 2009.

Forst To Close

abandoned Old Forst meat packing plant Kingston NY 1

abandoned Old Forst meat packing plant Kingston NY 2

abandoned Old Forst meat packing plant Kingston NY 3

Flickr user richie 59 fired up the wayback machine to post these two images of the decrepit red brick Old Forst meat packing plant in Kingston, New York. The first two photos date from early 1982 while the third was snapped in 1985. As for Old Forst, it was demolished in 2006 when developers planned to build a 7-story hotel (which ended up not being built).

Hello, Neuhoff

abandoned Neuhoff meat packing plant Nashville TN 1

abandoned Neuhoff meat packing plant Nashville TN 2

abandoned Neuhoff meat packing plant Nashville TN 3

The former Neuhoff Meat Packing plant is located in northern Nashville, Tennessee, just six blocks from the State Capitol building… one imagines summer legislative sessions must have been unbearable when the wind rose. The plant closed in 1979 after decades of operation on a site that hosted a slaughterhouse for some time before the Neuhoffs even arrived. The abandoned meat packing plant is at long last being cleaned up, however, as the main buildings are being re-purposed as a mixed-use development focused on arts and ecology. A tip of the hat to Flickr user Eva Wood who snapped these striking scenes of neglect and decay in October of 2008.

Next Page – Click Below to Read More:
Big Miss Steak 10 Eerie Abandoned Meat Packing Plants

Share on Facebook


[ By Steve in Abandoned Places & Architecture. ]

[ WebUrbanist | Archives | Galleries | Privacy | TOS ]


WebUrbanist

 
Comments Off on Big Miss Steak: 10 Eerie Abandoned Meat Packing Plants

Posted in Creativity


6 Ways to Take WOW Photos in Less Than an Hour

08 Sep

If you’re like most photographers, nothing gets you more excited than a new tip or trick that can help you make your photographs more awe inspiring. The problem is that a lot of these processes can take some time to learn and execute correctly. Pretty quickly you realize that it may take you more than a few tries to master the new technique to become a better photographer.

IMG_6179

A mundane parking lot light stand can become something wondrous.

You’re also busy with more than just photography to take care of, and with instant gratification pervading all aspects of our lives, who wouldn’t appreciate a few SIMPLE photo strategies that provide immediate results?

Forget about aperture and shutter speed, focal length, ISO, and all the technical stuff for now. If you use the techniques in this article, alone, or mix and match, I guarantee you’ll learn how to take WOW photos in less than an hour. I use my “Snapshots to WOW Shots” process with many of my photography classes, from grade one kids who’ve never seen a camera before, to seasoned professionals who need to inject a quick fix into their  photographic repertoire. It works for everyone, guaranteed. Give it a try!

Method One: Bird’s Eye View

In our day to day lives we see the world from a height of about five to six feet. To create a WOW shot you need to alter that perspective. Show your viewers a point of view they don’t normally see. Just about any subject can be transformed into a WOW if you shoot it with your camera pointing straight down. This is what is called the bird’s eye view.

IMG_3957.Wjpg

Looking straight down on antique silverware – a different point of view.

IMG_4813W

Shot by one of my grade 4 students – atop the play structure, pointing the camera straight down. 

Picture-197W

A crazy abstract shot looking down at colored pages in a binder.

Picture-366

An herbal still life shot through a glass coffee table, straight down.

Method Two: Worms Eye View

Similarly, not too many of us spend our days down on the ground. So shoot from a very low angle, and point your camera up, or just explore the world from the point of view of a worm (down on your belly!) and mundane things look a whole lot more interesting. Instant WOW shots, from the worm’s eye view.

These shots usually have the added benefit of helping to eliminate distracting backgrounds such as buildings, tree,s or other objects that you don’t want in your image. Bonus!

_DSC7921W

Feeling so small…the worm’s eye view.

DSC04831-eyes

One of my school students shot this one – taking the worm’s eye view literally, but it’s a very freaky WOW Shot.

nat_fieldW

nat_hamlton-bank-copy5W

Taken lying on the floor of the lobby looking up at the top of the staircase. 

Method Three: Shoot at an Angle

Just as our five foot world gives us a consistently average perspective, it also provides us with horizontal lines and vertical angles. We see the world this way 90% of the time, and there’s nothing particularly WOW in that. But give your camera a twist; a 45 degree angle can add dynamism and drama, instantly!  Just make sure that it’s a big enough angle that it’s clear you did it on purpose, and not by mistake.

Buildings, trees, large objects, and even people look great with a bit of angular rotation when you want to make a point or add impact.

A bit of an angle - on purpose, give the image a more dynamic feel.

A bit of an angle – on purpose, gives the image a more dynamic feel.

A little "off kilter" makes us pay more attention.

A little “off kilter” makes us pay more attention.

Method Four: Get the Sun Behind Your Subject

There are all sorts of fabulously detailed techniques for shooting silhouettes, rim lighting, and other back-lighting effects. But really all you need to get an instant WOW Shot is to either place your subject so that the sun or light source is directly behind them, with their head or body blocking the main point of light. Shoot in manual mode and be sure your flash is off.  Point and expose for the sun, then recompose with the sun directly behind your subject.  Whether it’s an animal or a person or an object, use that subject to block the sun, and you’ll have a winner.

Picture-053W

Drama abounds in this simple shot – just a quick iPhone grab during a school photo class.

Picture-388W

Method Five: Use Shadows

Nothing tells a story more than shadows – they are ethereal, transient, and mystical. Incorporate shadows into your image, or shoot only the shadows. They always tell an intriguing story, and create a captivating image.

Picture-955

Abstract or editorial, the shadow knows.

IMG_6203W

Do you know what’s happening here – the shadows are a riddle and the answer.

photo-1

The Ultimate WOW Shots

The ultimate WOW shots are created when you use one of more of these techniques by combining elements, angles, and points of view.

_2DS2507W

Combining the worm’s eye view AND the sun behind the subject.

A simple street scene is so much more dynamic with long shadows.

Combine shadows with the sun behind the subject. A simple street scene is so much more dynamic with long shadows.

Combine a bird's eye view with shadows. It adds interest and drama.

Combine a bird’s eye view with shadows. It adds interest and drama.

A worm's eye view and the sun behind the subject. Simple. Wow!

A worm’s eye view and the sun behind the subject. Simple. Wow!

Apply what you have learned

To wrap it all up, these five easy methods will give you dramatic results, and if you’re already proficient with a camera and have a bit of knowledge about composition, color theory, and light, you’ll be shooting like a rock-star photographer in less than an hour –  including the time it took to read this article.  If you’re already a skilled shooter, give these a try and it will help simplify your photographic life while adding more finesse to your portfolio.

Show me your WOW shots, I’d love to see how you put this into action! Share in the comments below.

The post 6 Ways to Take WOW Photos in Less Than an Hour by Alex Morrison appeared first on Digital Photography School.


Digital Photography School

 
Comments Off on 6 Ways to Take WOW Photos in Less Than an Hour

Posted in Photography


browserFruits September, Ausgabe 1

07 Sep

Wie gewohnt und wie jeden Sonntag gibt es auch heute wieder unsere browserFruits. Dabei läuft es eigentlich hinter den Kulissen gar nicht immer so ruhig und alltäglich. Immer wieder planen wir Neues, versuchen Altes zu verbessern und fragen uns, wie wir Euch noch Gutes tun können. Falls Ihr dafür konkrete Anregungen habt, sind diese bei uns immer willkommen. Schreibt uns.


Fotospecial: Verlassene Kirchen

Flickr

500px


Deutschsprachig

• Etwas Physik zum Sonntagmorgen? Eine kleine Erklärung zum Thema Brennweite haben wir hier entdeckt.

• Ren Hang fotografiert Akt und noch dazu keinen klassischen. In China kämpft er dabei mit der Zensur und hat es damit nicht immer leicht.

• Vor 90 Jahren wurde der argentinische Badeort Villa Epecuén bei einem Dammbruch überflutet. Mittlerweile sind die Ruinen wieder aufgetaucht – und inzwischen ein Abenteuerspielplatz für Fotografen.

• „Identities“ heißt die neue Serie des türkischen Fotografen Can Dagarslani und wird auf Ignant vorgestellt.

• Oktoberfest mal ganz anders zeigt der Münchner Fotograf Franz Sussbauer in seiner Serie „Schlafende Wiesn“.

• Unsere Redakteurin Laura Zalenga hat einen Tag ihrer Kanadareise fotografisch festgehalten.


International

• Beinahe 3 Millionen historische Bilder hat Kalev Leetaru auf Flickr hochgeladen. Sie stammen aus Bibliotheksbüchern, welche die „Internet Archive Organisation“ momentan scannt.

• Same same, but different. Der spanische Fotograf Alberto Salva?n Zulueta hat mithilfe von Google Street View die Orte aus Stephen Shores „Uncommon Places“ aufgesucht und dann vom Bildschirm neu analog abfotografiert.

• Frauen haben während des zweiten Weltkrieges oft die Arbeit der Männer übernommen. Diese Bilder sind ein Zeitdokument und gleichzeitig dank des wunderbaren Kodachrome-Filmes auch sehr schön anzusehen.

• Die erste Kamera von Canon hieß Kwanon und gefällt uns besonders des Namens wegen. 80 Jahre ist sie jetzt alt.

• Der Vulkan Bárðarbunga bricht gerade in Island aus und hier gibt es spektakuläre Aufnahmen davon.

• Das Zitat „You’re only given a little spark of madness. You mustn´t lose it.“ von Robin Williams hat drei Fotografen für ihre Bilder inspiriert.

• Wußtet Ihr, dass die Bilder im Ikea Katalog zum Großteil gar keine Fotos sind?

• Ein interessantes Interview mit Chad Moore haben wir auf dem Leica-Blog entdeckt.


Neuerscheinungen und Tipps vom Foto-Büchermarkt

Buchtipps

• Die Fotografin Victoria Sambunaris erzählt im Interview von ihren Reisen durch die USA, die sie aus der Sicht einer Geologin und Kartographin dokumentiert hat. Aus diesen Reisen entstand der Bildband „Taxonomy of a Landscape“*. Das Buch ist 196 Seiten stark und ist schon für etwa 40 Euro zu haben.

• „Life Below: The New York City Subway“* zeigt Aufnahmen des französischen Fotografen Christophe Agou, der seit den frühen 90ern New York und die U-Bahnen der Mega-City dokumentiert. Das Buch kostet 15,61 Euro und erschien bereits 2004.


Zitat der Woche

Pick a theme and work it to exhaustion. The subject must be something you truly love or truly hate.

Dorothea Lange –

Mehr Zitate


Videos

Fünf Fehler die Fotografie Anfänger häufig machen.


* Das ist ein Affiliate-Link zu Amazon. Wenn Ihr darüber etwas bestellt, erhält kwerfeldein eine kleine Provision, Ihr bezahlt aber keinen Cent mehr.


kwerfeldein – Fotografie Magazin | Fotocommunity

 
Comments Off on browserFruits September, Ausgabe 1

Posted in Equipment


7. September 2014

07 Sep

Ein Beitrag von: Camlilar

Eine Frau mit nassem Gesicht.


kwerfeldein – Fotografie Magazin | Fotocommunity

 
Comments Off on 7. September 2014

Posted in Equipment


Week in review: Photokina is in the air…

07 Sep

Daylight hours may be getting shorter as we enter September but the days are just packed. Photokina is a little over a week away and as expected, the announcements are beginning to ramp up. Last week, Sony’s new QX cameras drummed up a lot of attention, IFA in Berlin produced a number of promising smartphone announcements, Canon’s lenses got cheaper (sort of) and the bird was the word when the 2014 British Wildlife Photography Awards were announced. See what you may have missed in our look back at the last seven days

Articles: Digital Photography Review (dpreview.com)

 
Comments Off on Week in review: Photokina is in the air…

Posted in Uncategorized


Cold War camera: 1950s Berlin in color (part 2)

07 Sep

Ten years after the end of WWII, Germany was rebuilding. Cities like Berlin, which had been severely damaged during the war were emerging from the rubble as the ‘Wirtschaftswunder’ or ‘economic miracle’ transformed West Germany. In the immediate post-war period hundreds of thousands of allied troops were stationed in the divided country, many of them with cameras. Found recently at a flea market, the images in this article date from 1956-7 and were taken by a US Serviceman in Berlin. Click through to take a look at part 2.

Articles: Digital Photography Review (dpreview.com)

 
Comments Off on Cold War camera: 1950s Berlin in color (part 2)

Posted in Uncategorized