Zeiss has announced its new Distagon T* 35mm F1.4 ZM portrait lens for Leica M-mount bodies.
Articles: Digital Photography Review (dpreview.com)
Zeiss has announced its new Distagon T* 35mm F1.4 ZM portrait lens for Leica M-mount bodies.
Articles: Digital Photography Review (dpreview.com)
Phase One has announced the release of Capture One Pro 8, the latest version of its Raw conversion and photo editing software. Capture One Pro 8 highlights include new adjustment tools such as local white balance, clone and heal repair layers to remove unwanted objects, and a film grain tool to mimic film stocks and add realistic grain to images.
Articles: Digital Photography Review (dpreview.com)
Andrew’s ebook Mastering Lightroom: Book Four – The Photos is available now at a special price of 40% off for a limited time from Snapndeals. It’s an advanced guide to processing photos in Lightroom’s Develop module, explaining how to use Lightroom’s powerful processing engine plus Develop Presets and plug-ins to create beautiful images.
A few years ago I passed through Bolivia, South America’s poorest and, in some ways, least developed country. I spent a few days in Potosí, a small, largely forgotten city whose history had a central role in shaping the modern world. Built at the foot of the Cerro Rico (Rich Hill), the silver mined in Potosí flowed across the continent, through the cities of Cartagena and Havana, and across the ocean to Sevilla and Madrid in Spain, where it powered the rise of European nations as the wealthiest and most developed of the era.
The silver no longer flows from Potosí, although the mines are still open. The city seems to exist on a mixture of mining output and tourism. It’s one of the world’s highest cities, sitting a little over 4,000 metres above sea level in the Bolivian Andes. It’s a cold place, even in the summer. Sleet or snow can strike at any time of the year.
I liked wandering the streets as dusk fell, watching the local people as they went about their daily activities. It was a busy time, with kids out of school, shops closing and people leaving work. Potosí is a city of contrasts: the poverty of some of the local inhabitants against the relative affluence of foreign travellers; the fading grandeur of the magnificent old colonial architecture against the newer mud brick houses at the edges of the city; the tragedy and scope of the city’s history against the snippets of modern daily life. The feeling that, even after hundreds of years, this is still a place where the traditions of the people who lived here before the Spanish came intersect with the ways of modern, European descended South Americans.
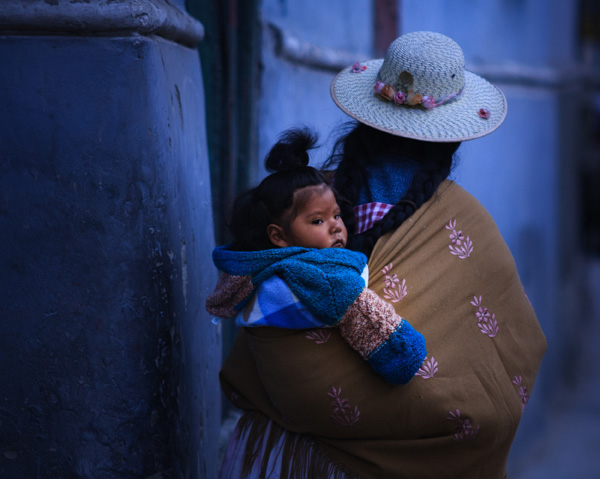
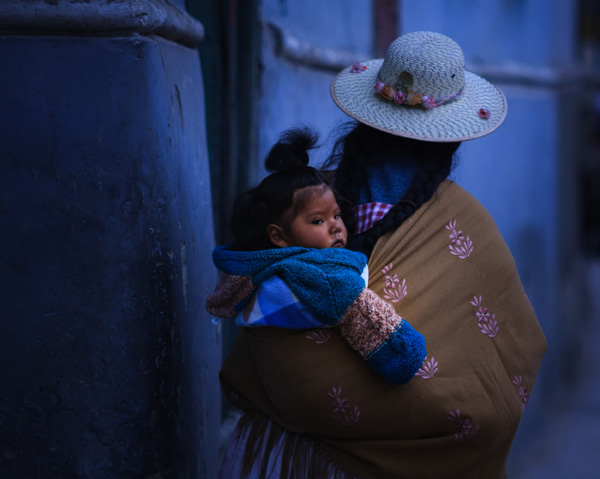
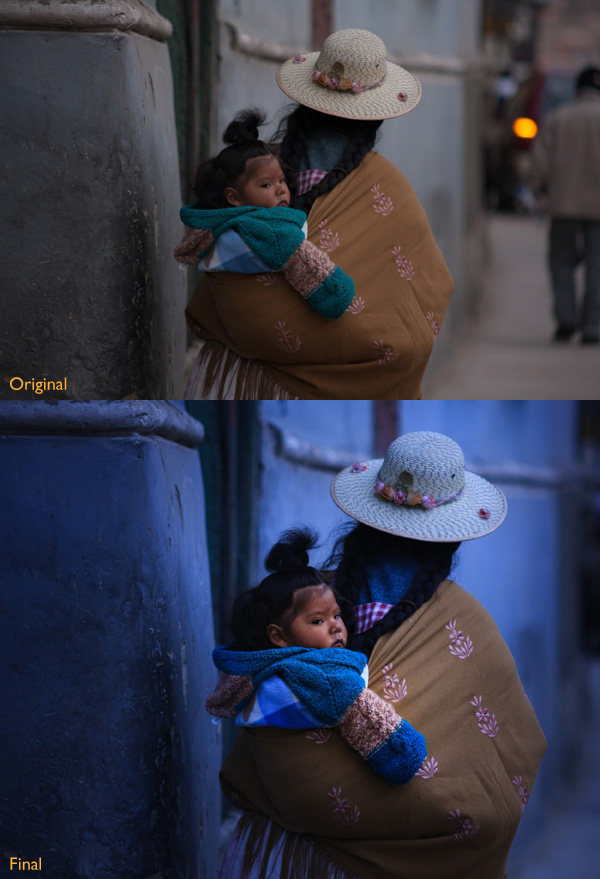
As I wandered around the streets, dusk falling, a Bolivian lady walked around the corner. She had tied her hair in two long plaits, and wore a Bolivian style sun hat on her head. There was a blanket slung around her shoulders, inside which sat a baby, hair styled in a topknot, looking behind it as his mother walked onwards. I had time to raise the camera and take a single photo before a second child walked around the corner and blocked my view.
This photo isn’t perfect. The baby’s face is slightly out of focus. The photo was underexposed (the moment happened so fast I didn’t have time to dial in exposure compensation). The rear light of a car and the out of focus man in the background are distractions (see the original version below). Yet that’s not important. Photography is about evoking emotion, and sometimes things happen too fast for technical perfection.
What matters is the moment. In this photo it’s the juxtaposition between the mother walking one way and her baby looking another. The atmosphere created by the fading light of another cold night in Potosí. The age of the building she is walking past. The intersection of ancient ways with the present day.
This is a photo I come back to again and again, reprocessing as my skills improve. Each time my approach is driven by my memory of that moment and how it felt. Ask yourself the same question when processing images. How did the moment feel? And how can you express that feeling with colour, light and shadow?
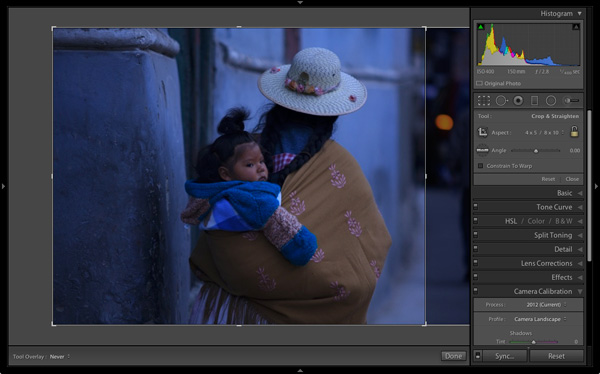
There are plenty of things wrong with the original photo (below). It’s underexposed, and needs brightening (although not too much as I want to retain the atmosphere created by the fading light). The background is distracting. The colours are muddy.

The baby is the natural focal point of the photo, and I wanted to emphasize it. I also wanted a lot of blue, the natural colour of light during dusk, in the photo. To start, I set Profile in the Camera Calibration panel to Camera Landscape. This setting is intended for use with landscape photos, but you can use it whenever you want to emphasize the colours blue or green. I also went to the Lens Corrections panel and enabled both Profile Corrections (with Vignetting set to zero) and Chromatic Aberration removal.
I went to the Basic panel and kept Exposure where it was, even though the photo was underexposed, because I liked the gloomy atmosphere. I set White Balance to auto, which gave a neutral colour, then reduced it (to 3639 Kelvin) to create a blue colour cast. This gave me a good starting point.
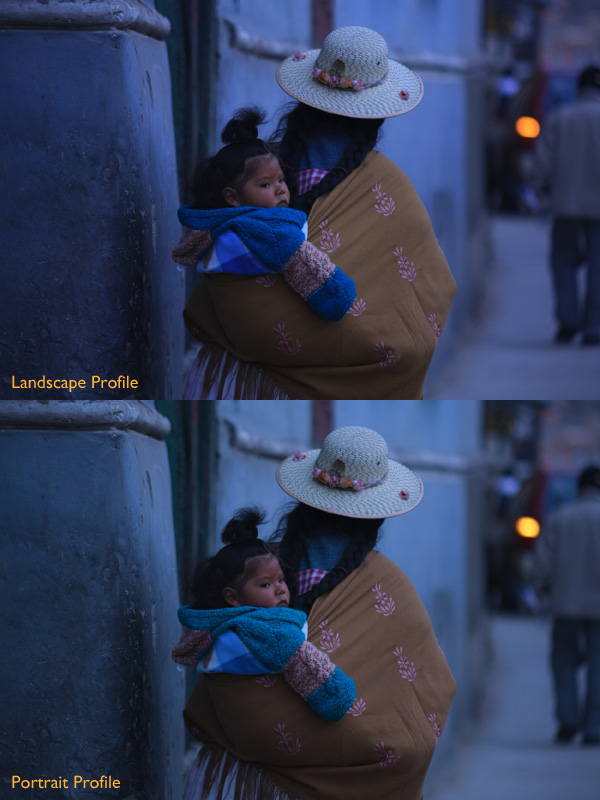
Two versions of the photo after the completion of step one. One has the Camera Landscape profile and the other the Camera Portrait profile. Even though it may seem logical to use the Camera Portrait profile on a photo containing people, Camera Landscape is the better option given my intention, as it gives the most appropriate colours.
My aim now is to continue the processing in a way that minimises distractions and places the emphasis on the baby.
I used the Crop tool to cut the right-hand side of the photo, eliminating the distracting background. This makes a big difference as the eye is no longer being pulled away from the people by the blurred light.
I added a Radial Filter and moved the Exposure slider left to make the background darker. The Radial Filter is new to Lightroom 5, but if you have an earlier version of Lightroom, you can do something similar with the Adjustment Brush (by painting in the area you want to darken).
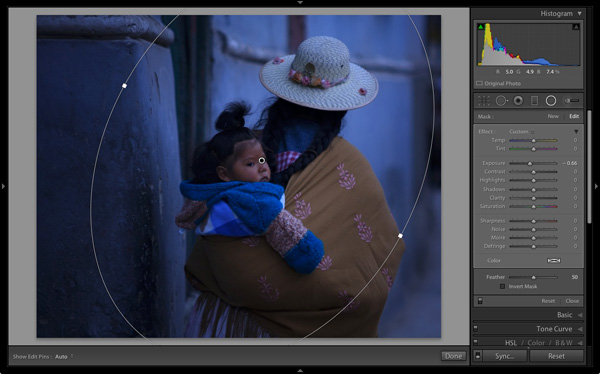
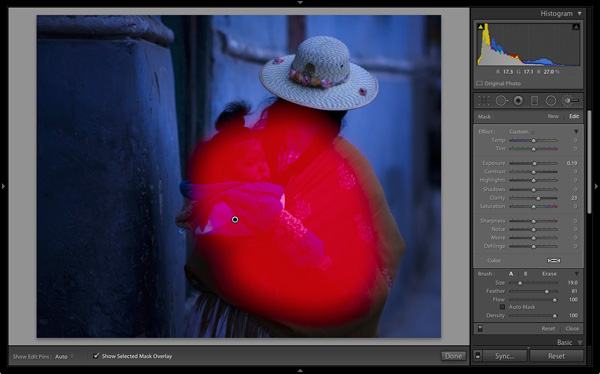
The photo was quite flat so I returned to the Basic panel and increased Contrast. Then I used the Adjustment Brush to make a selection over the woman’s back and the child, and increased Clarity and Exposure. The aim was to make the baby sharper, and a little brighter, than the rest of the image, encouraging the eye to go to that part of the photo.
This screen shot shows the mask created by the Adjustment Brush.
Next I used the Adjustment Brush again to select a smaller area and moved the Temp slider right, making that area warmer. The idea here is to work on the natural colour contrast between the colours of orange and blue.
This image below shows the result of these adjustments. The key was to make them subtle so the image looked natural and not over-processed.
Throughout the processing I imagined that I had taken the photo on slide film and that the scene really did look like that. The fact that the scene would have come out differently than my version is incidental. The idea was just a guide to the approach I should take.
Next I created two Graduated Filters, one on either side of the frame. I reduced the Contrast in each one. A side effect of reducing Contrast is that the area affected also becomes lighter, so I adjusted Exposure to make them darker again.
These are subtle adjustments that reduce contrast at the edges to emphasise the area around the baby in the centre of the image, where I increased Clarity earlier.

Finally I decided the image was too dark and increased Exposure to compensate. Here’s the original and final versions together so you can compare them.
What do you think of these processing techniques and the style in which the photo was processed? Do you have any suggestions for an alternative interpretation of the original Raw file? Please let us know in the comments.
 Andrew’s ebook Mastering Lightroom: Book Four – The Photos is available now at a special price of 40% off for a limited time from Snapndeals. It’s an advanced guide to processing photos in Lightroom’s Develop module, explaining how to use Lightroom’s powerful processing engine plus Develop Presets and plug-ins to create beautiful images.
The post Before and After: How This Photo was Processed in Lightroom by Andrew S. Gibson appeared first on Digital Photography School.
The Panasonic Lumix DMC-GM5 borrows the styling of the fashion conscious GM1, but adds enough additional control to give it broader appeal. So while it’s still a smart, diminutive thing, Panasonic has found room for a viewfinder, control dial and hotshoe. We look at the two cameras side by side and examine the changes that’ve been made at the petite end of the Micro Four Thirds range.
Articles: Digital Photography Review (dpreview.com)
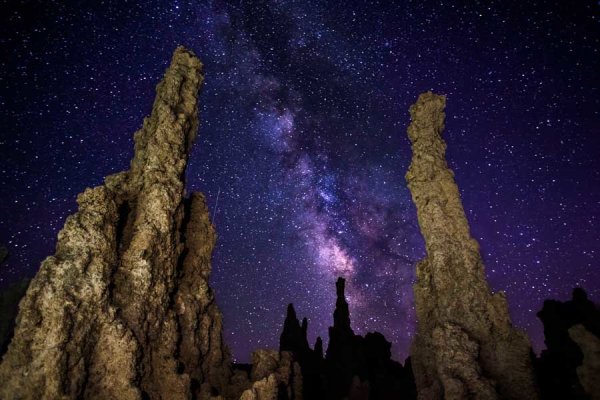
Milky Way Over Mono Lake | James Brandon
Seeing the Milky Way with your own eyes is a life-changing, mind-blowing experience. It will put your place within the universe in to perspective and remind you just how small and insignificant we all are. The sad part is that most people have never seen it. Over half of our planet’s population lives in cities where seeing the Milky Way is all but impossible.
Even when people get out of the city and have a good view of the stars, they usually don’t focus on them long enough to find the Milky Way. It’s something that you either stumble onto by accident, or something that you have to plan ahead of time. Here’s a few quick tips for getting the Milky Way in your viewfinder and exposing it properly – your guide to Milky Way photography.
Benjamin Franklin said so brilliantly that, “By failing to prepare, you are preparing to fail”. And it was Antoine de Saint-Exupéry that said, “A goal without a plan is just a wish”. So it goes with Milky Way photography. Sure, you can make a point to go out at night and see what you can find, but chances are you will be wasting your time.
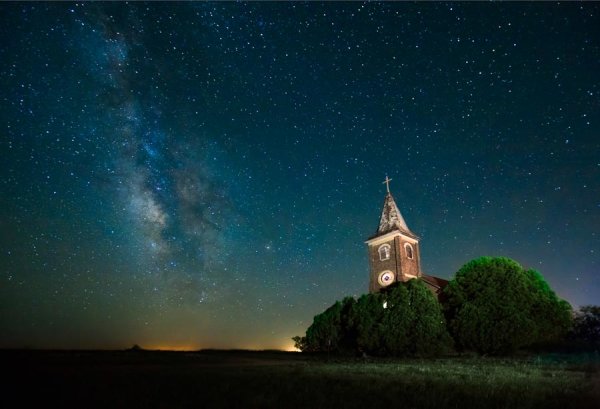
The Milky Way is only visible in your respective hemisphere during certain months of the year. If you’re in the northern hemisphere your best time to photograph the Milky Way is in the summer, with July being the peak month. Unfortunately, the summer months aren’t typically the best times for clear skies because of the heat and the clouds from all the storm systems. Summer nights are also short, therefore limiting access further to the night sky. Folks in the southern hemisphere have it better, with the winter months being the best time.
The moon can make or break your Milky Way shots. This is why planning is so important! Don’t make the mistake of finding a perfect subject, waiting for the Milky Way to line up, and then discovering that the moon is right in the middle of the celestial center. Having the moon obstructing the view of the Milky Way will, quite simply, ruin your shot.
There are two ways the moon can help your shot. One is by its total (or nearly total) absence in the sky. The other is by having the moon behind you, with the Milky Way in front of you (thereby providing a light source for your foreground).
Oh no! The moon is in the way!
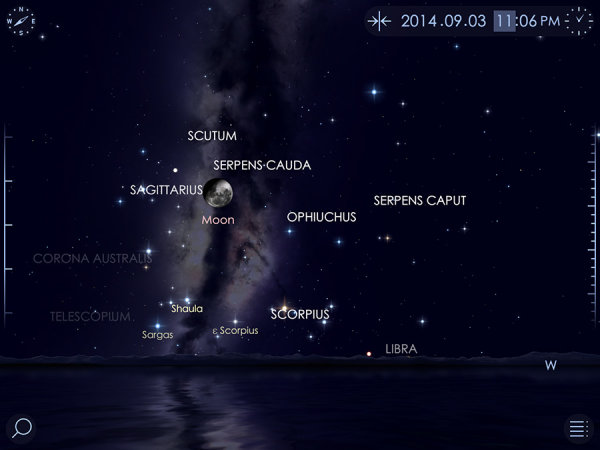
All you need to do to plan a perfect night of Milky Way photography is a beautifully designed app called StarWalk 2 (sorry Android users, you’re simply out of luck here. I have an Android phone and I absolutely hate that I don’t have access to this). Luckily I have an iPad and it works beautifully on there.
StarWalk lets you interactively view the night sky from either your position, or any other position on earth, at whatever time of day you choose. As you change the time of day, the entire sky will magically begin to revolve around your position, revealing or concealing the Milky Way, the constellations and the moon.
So let’s say you decide to photograph Delicate Arch in Arches National Park. You discover through research that from beneath the arch looking toward it you will be facing east. All you really need to do now is choose a location in that general area, make the app point east and then scroll through the hours in the day to find when the Milky Way will rise above the horizon.
One of the jaw-dropping cool features of this app is that you can actually use it in the field with an image overlay. You can hold your iPad or iPhone out and the app will turn the camera on and look at what you’re seeing. It will then overlay the night sky onto your image so you can see what that view will look like at a certain time of day or night! How cool is that!?
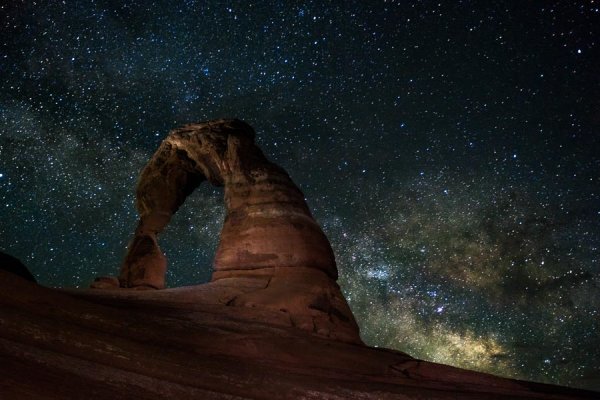
The Milky Way Over Delicate Arch | James Brandon
While it’s not impossible to photograph the Milky Way in light polluted areas, it’s certainly not ideal. I live in the heard of the Dallas – Fort Worth metroplex and to really get a great view of the Milky Way I have to drive about three to four hours west. A great resource for locating extremely dark skies is the International Dark-Sky Association. They’ve got a list of locations that host some of the darkest skies in the world. Planning a trip to any of these places during the right time of the year will give you some of the clearest views of the Milky Way you will find anywhere. Trust me, you haven’t lived until you’ve stood beneath a Milky Way so bright that it lights the landscape in front of you. It’s truly a spiritual thing to witness.
Photographing the Milky Way is quite different from any other subject you will attempt to capture. Like I said before, it really is a magical experience. Seeing the Milky Way with your own eyes is one thing, but wait until you see it appear on your camera’s LCD screen! You will quite possibly, literally jump for joy the first time you see it.
ISO is the first thing we’ll cover. In short, it needs to be set as high as possible while still maintaining a useable image quality. While this doesn’t mean that you need a pro level SLR, having one that performs exceedingly well in low light will certainly help. If your camera can produce quality images at ISO 1600 or even ISO 3200 you are going to be in great shape. If ISO 6400 or ISO 12800 is still workable, then you are going to knock it out of the park. Having your ISO set high means that your cameras sensor will be as sensitive as possible so that the maximum amount of light can be collected (which is very important at night).
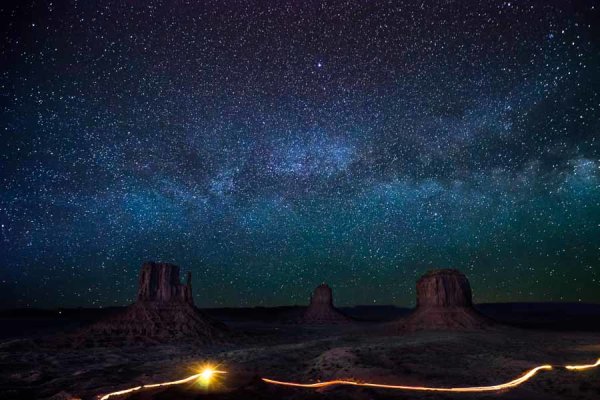
Milky Way Over Monument Valley | James Brandon
Next, select a shutter speed. Anywhere between 20-30 seconds is ideal. If you can get away with super high ISO levels, then go with 20 seconds. If you’re around ISO 1600-3200 then you may want to stick with 30 seconds. The only downside to 30 seconds is that you will have just the slightest hint of trails in your stars from the rotation of the earth. Not really a big deal though.
Finally, you need to set your aperture to be wide open, or very close to it. This is where having a lens that can open up to f/2.8, or larger, is really helpful.
All of these settings combined have one goal – to bring as much light as possible back to the cameras sensor.
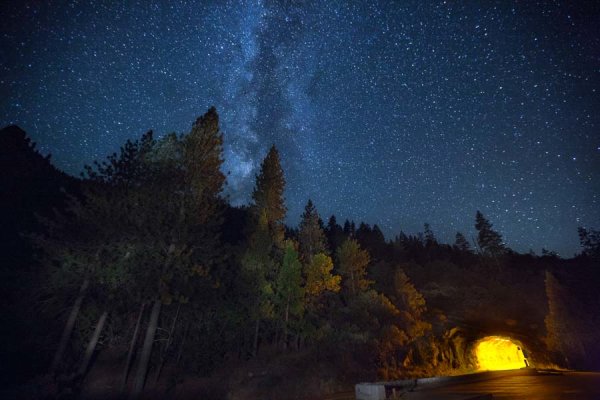
The Milky Way At Tunnel View In Yosemite
A good and sturdy tripod is worth its weight in gold. That is almost a literal statement if you go with something like a Really Right Stuff tripod, hehe. I got mine about a year ago (after saving up for quite a while) and will never consider another one. Having a good tripod means that your camera will be steady throughout the entire long exposure. If your tripod is cheap and made from plastic, or just a very flimsy aluminum or carbon fiber tripod, you will definitely have a hard time with long exposures. If your tripod has a hook underneath the center column, be sure to utilize it by hanging your camera bag there to weigh the whole thing down!
You’ll also want to set either a two second timer or use a cable release (remote trigger). Both of these methods get your hands off the camera for the entire duration of the exposure. If you try and press the shutter button down for a 30 second exposure, you will not be happy with the results.
The Milky Way is one of the most challenging and rewarding things you can get out and photograph. Doing it well requires planning and more planning. Don’t leave anything to chance. If you have more tips to add, questions or thoughts about the article, let me know in the comments below.
The post Down and Dirty Guide to Milky Way Photography by James Brandon appeared first on Digital Photography School.
For the last two years, the only enthusiast compact with a large sensor you could buy says ‘Sony’ on the front. Finally, at Photokina 2014, we get some competition from Canon. The PowerShot G7 X uses what is likely the same 20MP sensor as the Sony RX100 III but offers a longer lens, flip-up touchscreen LCD, and arguably better controls. For all the details on this exciting new camera, head on over to our First Impressions Review.
Articles: Digital Photography Review (dpreview.com)
Panasonic’s LX-series of compact cameras have been favorites of both customers and reviewers alike for many years. Photographers who have been waiting for a more enthusiast-slanted LX can finally get out their wallets, because the Lumix DMC-LX100 is here. Find out what we thought about what sounds like the ultimate enthusiast compact camera in our First Impressions Review. Read on.
Articles: Digital Photography Review (dpreview.com)
[ By Steph in Technology & Vehicles & Mods. ]

Japanese tea houses spring from the roofs of ordinary-looking trucks, ornate handcrafted cabins are tacked onto school buses and fire trucks are converted into monster off-road RVs when industrious and determined DIYers decide to take on building their own mobile homes. One tiny house on wheels even has a back deck with a full-sized hot tub, and an incredibly fun two-story Victorian house on wheels makes its way around the desert.


RVs rarely get more ornate than this – a two-story Victorian house on wheels, designed, naturally, for Burning Man. The Neverwas Haul was built over six months in 2006 and is made almost entirely of recycled materials. Designer and builder Shannon O’Hare used the skills and experience he gained creating theme park structures around the country to come up with this amazing vehicle, which is built upon the base of a fifth wheel travel trailer.


You can even tack a generously sized wooden hot tub – powered by wood, if you like! – onto the back of your very own custom-built tiny house. UK-based Tiny Wood Homes builds both hot tubs and little houses on wheels, making this combo a natural fit. The whole setup is small enough to be towed around via truck and sells for about $ 57,000.


Architect Matthew Hofmann purchases old Airstream trailers and renovates them into beautiful and modern mobile spaces, custom-creating everything from backyard offices to tiny roaming homes. The project began when Hofmann decided to downsize from a large house to an Airstream of his own. People took notice and soon enough, demand turned into a business opportunity.


Sound out the name of this creation phonetically – that’s basically the reaction of everyone who sees it. Australian photographer Rob Gray wanted a home base while adventuring in the Australian wilderness, so he created his very own monster RV complete with a viewing deck, hydraulically operated roof and a bedroom over the cab. It’s got all the amenities of a standard camper, but can go off-road.

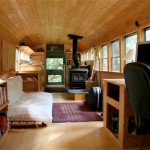
What looks like no more than a narrow cabin from the back is revealed to be an incredibly intricate hand-crafted mobile home, built right onto the back of an old Dodge bus. Featured in the 1979 book Rolling Homes by Jane Lidz, ‘Al’s Housetruck‘ has a sleeping loft over the cab, a wood stove, stained glass windows and decorative porch railings.
As the population expands and more of us look for affordable and available housing, architects and designers are making the move toward cheaper, greener, …
Click Here to Read More »»

Tiny houses are growing in popularity because of increasing environmental consciousness and a desire to reject unnecessary material goods.
Click Here to Read More »»
Flimsy, factory-made RVs have nothing on these totally customized, cozy buses converted into compact rolling homes. Dusty, run-down clunkers of school buses …
Click Here to Read More »»
![]()


[ By Steph in Technology & Vehicles & Mods. ]
[ WebUrbanist | Archives | Galleries | Privacy | TOS ]


You must be logged in to post a comment.