RSS
 

Archive for September, 2014

6 Things You Can Do With Your Old iPhone

18 Sep
Extra photos for bloggers: 1, 2, 3

It’s Apple season everybody! The newest iPhone’s are ripe for the picking.

This is the biggest (literally) iPhone update since the beginning of iPhones.The iPhone 6 and 6 Plus have made their debut, and will be available in stores tomorrow!

If you’re getting ready to part ways with your current iPhone, we’ve rounded up some ideas of what you can do with them instead of tossing them in a desk drawer!

What Do I Do With My Old iPhone?

p.s. Not getting a new iPhone? Cheer yourself up with a chuckle over at whatshouldidowithmyoldphone.com. You might not need that advice, but honestly, it’s not very good. hehe.

(…)
Read the rest of 6 Things You Can Do With Your Old iPhone (599 words)


© Lauren for Photojojo, 2014. |
Permalink |
No comment |
Add to
del.icio.us

Post tags:


Photojojo

 
Comments Off on 6 Things You Can Do With Your Old iPhone

Posted in Equipment


Nach dem Horizont greifen

18 Sep

Ein Beitrag von: Tanner Stewart

Das „Shoot The Skies“-Projekt startete 2012 mit einer einfachen Idee: Ein 365-Tage-Projekt durchführen und daraus ein Buch machen, um das öffentliche Bewusstsein für Menschenhandel zu steigern. Die Profite aus dem Projekt wollte ich zu diesem Zweck komplett spenden.

Eine Schneelandschaft mit beeindruckenden Wolken

Nach drei Monaten hatte ich einige Vorstellungsgespräche und musste das Projekt leider aus finanziellen Gründen aufgeben. Einen Monat später ergab sich die Gelegenheit, kostenlos nach Bulgarien zu fliegen, um Freiwilligenarbeit für die NGO „The A21 Campaign“ zu leisten. Diese NGO war der Grund, warum ich mich ursprünglich erst entschieden hatte, Geld sammeln zu wollen.

Da ich das Projekt stoppen musste, entschied ich mich dazu, stattdessen mit Arbeit und Zeit zu helfen. Einfach die eigene Zeit investieren und so einen Beitrag leisten. Als ich in Bulgarien war, warf mich allerdings ein Ereignis wieder aus der Bahn: Während ich in einem Dorf Fotos machte, versuchte ein Zigeuner, mir sein sechs Monate altes Baby für 50 Dollar zu verkaufen.

Ein gigantischer roter Fels

In diesem Moment habe ich verstanden, dass ich gegen das Problem Menschenhandel einen größeren Beitrag zu leisten hatte und dass es immer noch die Gelegenheit gab, mit eigenen Bildern einen Unterschied zu machen. Das Baby war die Inspiration und sein Gesicht, das ich nie vergessen werde, half mir, das „Shoot The Skies“-Projekt doch noch durchzuziehen.

Eine Schlucht in Schwarzweiß

Also begann ich das Projekt am 1. Januar 2013 neu. Ich war die ersten Monate an der nordwestlichen Pazifikküste in Amerika unterwegs, aber ich wusste, dass ich so viel mehr reisen musste, um die besten Fotos zu machen. Deswegen habe ich mein Appartement in Seattle gekündigt, alles außer meiner Kamera verkauft und mein Leben in einen Koffer und ein altes Auto von 1988 gepackt.

Von April bis Dezember reiste ich durch die USA und durch Europa. Ich fuhr 12.000 Meilen, besuchte 20 Nationparks, elf Staaten, fünf Länder. Ich habe im Auto geschlafen, auf Couches und auf dem Boden bei Freunden und in ein paar Fällen auch bei Fremden übernachtet. Einmal, in der Wüste von Arizona, fing mein Auto Feuer und ein völlig Fremder bezahlte mir drei Tage Aufenthalt im Hotel, während es repariert wurde.

Blitze über einem Berg und einem Kornfeld

Die Reise war das Abenteuer meines Lebens und ich war in der Lage, in einem Jahr mehr Orte zu besuchen, als viele Menschen in ihrem ganzen Leben. Und ich habe es geschafft, alles zu fotografieren. Ich bezahlte die Reisen aus meiner eigenen Tasche und fotografiere unterwegs Hochzeiten und Portraits, um die Rechnungen zu bezahlen, die allerdings gering waren: Ich musste nur mein Telefon, Flugtickets und mein Essen bezahlen.

Die Milchstraße über einem Berggipfel

Fertig wurde ich mit „Shoot The Skies“ genau am 31. Dezember 2013 gegen 12 Uhr und fing sofort an, ein Video für die Crowdfunding-Kampagne zu drehen, um das Buch in Eigenregie veröffentlichen zu können. Am 1. Februar startete ich eine 60-Tage-Kampagne, um zu versuchen, 1.000 Exemplare des Buches mit 400 Seiten für jeweils 45 Dollar zu verkaufen.

In jedem Buch sollten alle 365 Bilder und die Geschichten dazu enthalten sein, jedes Exemplar signiert. Das Ziel waren 45.000 Dollar – alles oder nichts. Der Druck auf mich war damals extrem hoch. Ich verbrachte in der Zeit acht bis zwölf Stunden am Tag damit, Medien zu kontaktieren, Blogs, Fotografen, Bekannte und Familie. Am Ende hatte ich fast 1.800 Vorbestellungen und konnte 79.000 Dollar einsammeln.

Ein Canyon aus rotem Stein

Das Beste daran ist, dass ich über 50.000 Dollar von dem Geld direkt für die A21-Kampagne gesammelt habe. Dieses Geld wird dazu verwendet, Opfern von Menschenhandel überall auf der Welt zu helfen. Aber das ist noch nicht die ganze Geschichte.

Ich hörte damit auf, das Buch weiter zu verkaufen und verbrachte zwei Monate mit Design und Schreiben. Ein Video über das Buchprojekt wurde gemacht, das ich auf Reddit postete und die Huffington Post wurde darauf aufmerksam. Sie schrieben einen Artikel über „Shoot The Skies“, veröffentlichten das Video und es bekam noch einmal mehr als 1 Million Views in vier Tagen.

Ich bekam so viele E-Mails zu dem Projekt, dass ich die Kampagne wieder aufmachen musste und weitere 20.000 Dollar in vier Tagen einnehmen konnte. Momentan stehe ich bei 98.000 Dollar, um das Buch zu publizieren – das Doppelte meines ursprünglichen Ziels. Jetzt kann ich 65.000 Dollar für die A21-Kampagne spenden und habe 2.200 Bücher in 30 Länder verkauft. Das Buch erscheint diesen Herbst.

Die Milchstraße über einem Gipfel

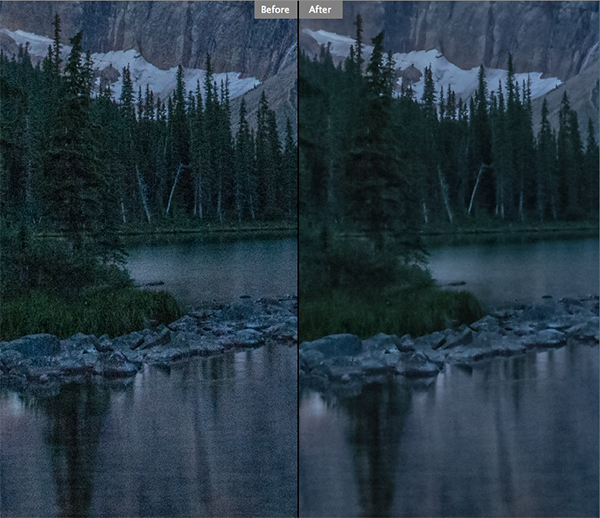
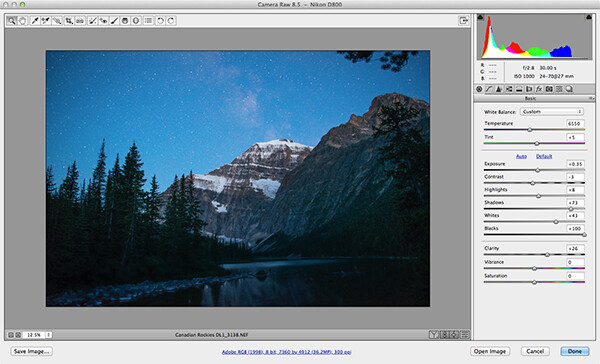
Meine Bilder wurden alle mit der Fotostitching-Technik gemacht und in jedem Foto sind ungefähr 15 Bilder zusammengestitcht. Ich fotografierte alle Bilder in dem Projekt mit einer Nikon D300S (mit bereits 350k Auslösungen) und einer Sammlung von Nikon-Objektiven. Mein Equipment war minimalistisch, ich wartete einfach auf das beste Licht und reiste viel.

Fast jedes Foto wurde mit Blende f/8 oder mehr geschossen (außer die Sternenbilder) und ich fing mit „Photomerge“ in Photoshop an und merkte erst nach der Hälfte des Projektes, dass ich über 1000 Stunden Arbeit hätte sparen können, wenn ich sofort Auto Pano verwendet hätte. Vorher dauerte es vier bis sechs Stunden, jedes Bild fertigzustellen, aber mit Auto Pano konnte ich die Zeit auf ein bis zwei Stunden reduzieren. Nach der Fertigstellung des Stitchens benutzte ich Lightroom mit verschiedenen Plugins wie VSCO und Alien Skin Exposure.

Eine Bergkette über einem See

Außer den großen Fotostitches ist es vor allem der Blickwinkel, der die Fotos auszeichnet. Ich kletterte oder versuchte, dorthin zu gehen, wo noch niemand war, ich kletterte die Aurora Brücke in Seattle in der Mitte runter und machte daraus ein 40-Bilder-Panorama (180° in beide Richtungen).

Ich stand am Rand der Yosemite Falls in 2.500 Feet Höhe, bin auf den Buzludzha in Bulgarien geklettert, war die ganze Nacht draußen in den Bergen, fand die versteckten Wälder der Titanen in den Redwoods, kletterte über Zäune und Bäume und begab mich zu oft in Gefahr, um es zu zählen.

Ich mag das Adrenalin, aber was ich herausfand, war, dass ich ein Foto manchmal zu sehr mochte wegen der Arbeit und nicht wegen des Ergebnisses. Einige Bilder hätte ich vielleicht nicht veröffentlichen sollen, aber ich mochte die Entstehungsgeschichte – eine schwierige Gratwanderung. Das ist einer der Kämpfe, den jeder Fotograf mit sich austragen muss, aber es gehört mit zum Abenteuer Fotografie. Und ich mag das Abenteuer!

Ein verscheiter Berggipfel

Ein 365-Tage-Projekt ist schon eine Herausforderung, aber Bilder zu machen, auf die man stolz sein kann und die auch zu einem Buch werden können, das erhöht noch mal die Schwierigkeit. Jedenfalls war die Herausforderung sehr motivierend und sorgte dafür, dass ich mich noch mehr in Fotografie generell verliebte, weil mir klar wurde, das etwas so Einfaches wie ein Foto extrem viel erreichen kann.

Die Bilder in „Shoot The Skies“ repräsentieren etwas, das wir alle tun können, um die Welt besser zu machen. Wir haben alle eine Stimme und meine ist die Fotografie. Ich will kein Schulterklopfen, aber ich will Menschen inspirieren, etwas zurückzugeben, egal, wie viel man hat. Das Projekt startete mit nichts, ich war ein obdachloser Fotograf, der in seinem Auto lebte, mit einer alten und abgenutzten Kamera fotografierte und der eine verrückte Idee hatte.

Steilküsten in Irland

Jetzt, zwei Jahre später, habe ich fast 100.000 Dollar gesammelt und ein Buch mit meinen Bildern trägt ein Stückchen dazu bei, moderne Sklaverei zu bekämpfen. Jetzt seid Ihr dran: Geht raus und macht die Welt zu einem besseren Ort mit einer Leidenschaft, die Ihr habt.

Anmerkung der Redaktion: Das Buch zum Projekt „Shoot the Skies“ kann auf der Projektwebseite zum Preis von 50 USD via Paypal weiterhin vorbestellt werden.

Dieser Artikel wurde für Euch von Sebastian Baumer aus dem Englischen ins Deutsche übersetzt.


kwerfeldein – Fotografie Magazin | Fotocommunity

 
Comments Off on Nach dem Horizont greifen

Posted in Equipment


Dancing Traffic Signal Makes Crossing the Street More Fun

18 Sep

[ By Steph in Art & Installation & Sound. ]

dancing-traffic-signals

Impatient pedestrians eager to get across the street stop, point and laugh when they realize that the usually-static human figure in the crosswalk signal is dancing maniacally, waving its arms and legs. Not only is the figure dancing, it’s mimicking the real-time movements of passersby in a nearby booth.

Dancing-traffic-signals-5

Dancing-traffic-signals-4

The ‘WhatAreYouFOR’ campaign by Smart aims to make intersections safer by providing some attention-getting entertainment.


The people waiting to cross often can’t help dancing right along with the little figure, unaware that a real person is busting moves in an adjacent plaza, their dancing captured on camera and translated into the red pixelated silhouette.

Dancing-traffic-signals-2

Dancing-traffic-signals-3

dancing-traffic-signals

As a result, according to the creators, 81% more people stopped at the red light, increasing safety all around. “And they even had more fun doing so.”

Share on Facebook


[ By Steph in Art & Installation & Sound. ]

[ WebUrbanist | Archives | Galleries | Privacy | TOS ]


WebUrbanist

 
Comments Off on Dancing Traffic Signal Makes Crossing the Street More Fun

Posted in Creativity


Relonch brings APS-C image sensor to the iPhone

18 Sep

The Relonch camera combines an APS-C sensor with an extremely simple UI and attaches to your iPhone, using your phone for display, image processing, storage, and sharing. A bright F2.0 lens ensures low-light performance. At an output resolution of only 1MP, it’s a niche product, but the concept is exciting. Click through to learn more.

Articles: Digital Photography Review (dpreview.com)

 
Comments Off on Relonch brings APS-C image sensor to the iPhone

Posted in Uncategorized


Size matters: Hands-on with Canon PowerShot G7 X

18 Sep

Canon has been busy – its latest high-end compact, the PowerShot G7 X slots in beneath the G1 X Mark II, and offers a 20MP 1′-type sensor, 24-100mm equivalent F1.8-2.8 zoom lens and a host of other enthusiast-friendly features. We spoke to Canon recently and got access to a pre-production G7 X. Click through for a hands-on tour of the new camera. 

Articles: Digital Photography Review (dpreview.com)

 
Comments Off on Size matters: Hands-on with Canon PowerShot G7 X

Posted in Uncategorized


Interview: Canon’s Chuck Westfall Discusses the 7D Mark II

18 Sep

Join us for a video interview with Canon’s Chuck Westfall, Technical Advisor at Canon U.S.A.’s Professional Engineering and Solutions Division, in which he talks us through some of the features of the new EOS 7D Mark II DSLR, introduced this week at Photokina. 

Articles: Digital Photography Review (dpreview.com)

 
Comments Off on Interview: Canon’s Chuck Westfall Discusses the 7D Mark II

Posted in Uncategorized


Canon EOS 7D Mark II beta image samples

18 Sep

We got a chance to shoot with a pre-release beta of Canon’s EOS 7D Mark II, so we grabbed it. We have prepared a 23 image gallery from a Canon event running at the Photokina show in Cologne. Although the image quality hasn’t been entirely finalized, this should give some first impressions of what that camera can do. We’ve included a sequence of 10fps shooting. Click through for more details.

Articles: Digital Photography Review (dpreview.com)

 
Comments Off on Canon EOS 7D Mark II beta image samples

Posted in Uncategorized


Couple Photography: Telling Their Love Story

18 Sep

228

A while ago, I went to the funeral for my husband’s dear Grandpa Wes, and I looked through old photos of him and his beautiful sweetheart, Daphene, who passed away just 6 months before (they couldn’t live without each other for very long). They had photos when they were young snuggled up together, holding hands, and even kissing, and it struck me how rare that was. Old photos usually are much more formal, and don’t show a lot of emotion or candid feelings. They also had more recent photos that showed the same affection, and that’s rare as well, to be married for decades and still have that connection. It made me realize even more how much I love what I do, and how much I especially love capturing those real moments, the ones that the grandkids will look back on later and say, wow, Grandpa and Grandma REALLY loved each other!

I’ve found some great ways to get couples to really connect for me, and hopefully these tips will help you capture a love story for every couple you photograph too.

196

Be Invisible

I tell couples many times during a session to pretend that I am not there. It usually works to bring their focus on each other, and some of the focus off of me. You want your subjects to act naturally towards each other, and interact how they normally would on a daily basis. You don’t want them to be so worried about you taking their photo, that they forget that they even love each other.

I like to tell them to look at each other, and say everything they feel about the other person with their eyes only. Some couples actually have deep, meaningful connections when I ask them to do this. Others laugh at the corniness, but it doesn’t matter. They are laughing with each other, and the connection is there. Either way, have your camera ready, and capture it.

Another good interaction builder is to ask them to whisper something in the other’s ear. I tell them that I do not want to know what they said to each other under any circumstances! This usually helps them to relax, and gives them permission to whisper all sorts of things to each other that will either ignite sparks, or laughter. It doesn’t matter, as long as they are pretending I’m not there, pretending the camera isn’t there, and making a connection.

187

Get Them Closer

Most of us have a distance comfort zone that we like to keep around ourselves. We don’t usually like people to be too close, especially when a photographer is watching us. Your job is to get them closer to each other. It may feel a little uncomfortable to them at first, but remind them that in a photo it doesn’t look as close as it feels, it just looks like they love each other.

173

You want to have a physical connection somewhere. Ask them to bring their foreheads or noses together (depending on height difference). Ask him to put his hand on her cheek, or on her back. She could put her hands on his chest, or on the back of his head. A good old fashioned kiss can work great too. A physical connection could be as simple as a hand hold, but just make sure they are connected. You don’t have to direct every hand placement, and pose them into uncomfortableness. Sometimes it’s enough just to ask them to hug lightly. Little cues go a long way – you want them to be natural with each other, and connect in a way that feels comfortable to them.

157

Give Them Something to Do

People that aren’t particularly comfortable with the camera can get even more uncomfortable if there isn’t anything for them to do. Couples sessions can be easier than a solo session in that regard, because at least they have someone to hold on to, but sometimes that isn’t enough to get them comfortable with the situation. If you just expect them to stand there and make beautiful images for you, you might be disappointed.

Tell them to take a walk together, or look at each other and laugh. Corny? Yes. Effective? Most of the time. Use vehicles to sit on, sit in, or lean on. Let him push her gently on a swing. Have them bring a puppy to interact with together, or a horse to hold onto, or a blanket to sit on. Even a wall or tree to lean on can help them feel a little more comfortable.

186

Faces Aren’t Mandatory

It’s great to get a few photos of the couple looking at you, although I still try to get them to have that physical connection with each other (cheeks together, but facing you; her head on his chest, both facing you, arms around each other, etc.). However, you can show even more connection sometimes without showing their faces at all. Intertwined fingers are a favorite thing of mine to photograph. A head on a shoulder, their backs as they walk away, or holding hands can show a lot too. Find those little details that can tell their love story in a subtle way.

195

Be Invisible – Again

You’ve already told them to pretend you aren’t there, but you can really remove yourself by peeking your camera through branches, leaves, or curtains. Not only does it kind of remove you and the camera from the sight of your subjects, but it gives you a great perspective for your photo. It lets the viewer feel like they are peeking into something that they shouldn’t be seeing, and makes the emotions feel even more genuine.

199

Who doesn’t like a good love story? If a picture is worth a thousand words, then a whole photo session with a loving couple is a romance novel. Your job as the photographer is to make it a good one.

The post Couple Photography: Telling Their Love Story by Melinda Smith appeared first on Digital Photography School.


Digital Photography School

 
Comments Off on Couple Photography: Telling Their Love Story

Posted in Photography


Occupy Parking Spots: 15 Projects Reclaiming the Streets

18 Sep

[ By Steph in Art & Installation & Sound. ]

Parking Spot Hacks Bikes 3
In the asphalt-covered space that would normally be occupied by a single vehicle could be a bike rack, a dance floor, an outdoor cafe, a kiddie pool or a beautifully landscaped public park. Sometimes guerrilla and sometimes officially city-sanctioned, these 15 projects occupy urban parking spots for uses that are undoubtedly a lot more fun.

Bike Parking = Superior Efficiency

Parking Spot Hacks Bike 2

Ten bicycles can easily fit within a single parking spot, and many cities have started to take advantage of this fact with specially-sized bike racks. Buenos Aires installed a few car-shaped racks in parking spots throughout the city, an idea that caught the attention of Washington DC’s transit authority, and San Francisco’s 40th street parklet (seen top) was created by adjacent business Manifesto & Subrosa. They’re also occasionally unsanctioned, with citizens taking it upon themselves to occupy a spot with bikes for a day.

Car-Shaped Tents for Urban Camping
Parking Spot Hacks Car Shaped Tent

Designer Michael Rakowitz created a car-shaped tent made just for parking spaces, making it possible to camp in urban locations while (kind of) blending in. A similar tent used a car-shaped frame and a standard car cover for an even more convincing effect, offering affordable housing virtually anywhere in the city.

Sao Paulo’s Permanent Parklets
Parking Spot Hacks Sao Paulo 2

Parking Spot Hacks Sao Paulo 1

The city of Sao Paulo, Brazil has some of the world’s prettiest and most colorful parklets, which are parking spots transformed into mini public parks. While many parklets are temporary, this one is permanent, with the spot fully paved and heavy-duty urban furniture in a bright shade of red.

Noriega Street Parklet, San Francisco
Parking Spot Hacks Noriega 2

Parking Spot Hacks Noriega 1

Diagonal wooden benches with built-in greenery take up three parking spots in San Francisco in this design by Matarozzi Pelsinger Design + Build. The seating was designed around the awkward shape of the available space, and the rule that it had to be at least three feet away from adjacent parking spots. Says the firm, “The acute corners are embraced as areas for planting and “chaise lounge” seating, where tight plan geometry becomes an excuse to put your feet up.”

Next Page – Click Below to Read More:
Occupy Parking Spots 15 Projects Reclaiming The Streets

Share on Facebook


[ By Steph in Art & Installation & Sound. ]

[ WebUrbanist | Archives | Galleries | Privacy | TOS ]


WebUrbanist

 
Comments Off on Occupy Parking Spots: 15 Projects Reclaiming the Streets

Posted in Creativity


How to Avoid and Reduce Noise in Your Images

18 Sep
Reducing noise in your images can make a huge difference to their quality

Reducing noise in your images can make a huge difference to their quality

We have all seen it in our images, that uneven grainy look that makes our images look a little unappealing. In the days of film, noise was called grain and it looked better (even the word grain sounded better) but the digital equivalent of noise can often make a good image look bad. The first question we need to answer is:

What is noise?

Generally speaking, noise is defined as aberrant pixels. That means pixels that are not representing the colour, or the exposure of the scene correctly. The next question is:

When does noise happen?

Noise is introduced into your images when you shoot a long exposure image or shoot at a high ISO setting. Does mean you should never go over ISO 100 or do long exposures? No, there are times that you may need, or even want, to shoot in those conditions. Landscape photographers shoot in low light all the time. The important things to know are; how to avoid getting too much noise in your image and, how to deal with it in your post-production.

Let’s deal with how you can get less noise in your images first.

1. Reduce noise in-camera:

Shoot at lower ISO settings

If your camera is three years old or newer, the ISO functionality will be great. You shouldn’t see too much noise creeping into your images, even up to ISO 1000. However, there might still be some noise at the higher ISO numbers, so be aware of your exposure. Shooting at a lower ISO means you will have less noise in your image. Higher ISO settings tell your camera’s sensor to group pixels together to capture more light. This grouping effect can make your image look gritty and noisy.

So, how do you avoid shooting at a high ISO? If possible, open your aperture to its widest setting i.e. f/2.8. If you are shooting in low light, use a tripod if possible, or you could use a flash. If none of these options give you the correct exposure, then you will need to push the ISO up higher. Also, do some test shots to find out at what level the ISO settings on your camera start to degrade image quality. For many years I shot on a Nikon D80 and I knew that anything above ISO 500 was really difficult to use afterwards. This was because the noise became difficult to remove, even in third party software, and if it was removed, the image looked like a watercolour painting as a result of over processing of the noise. So I got to know the limits of my camera and worked within those constraints.

Shoot in RAW format

I know you may feel daunted by shooting in RAW, but you don’t need to be. RAW is a great way to get the best out of your images, so be sure to use it. You don’t have to shoot RAW all the time, but when you notice that the light is becoming a little too dark, switch over to RAW. The reason is that JPEG images already have compression applied to them. This means that there is already some noise, and what is known as JPEG artefacts, in the image. If you are using a high ISO with JPEG files, the noise can become even worse. Also, in post-production, you have much more flexibility removing noise, and increasing exposure, with a RAW file than a JPEG.

Adobe Photoshop Camera Raw has some powerful noise reduction tools

Adobe Photoshop Camera Raw has some powerful noise reduction tools

Check your exposure

When digital cameras first hit the market, they were really bad at rendering highlights correctly. Many photographers (myself included) would slightly underexpose the images in order to retain detail in the highlights. This meant that the shadow areas were really dark and when you tried to pull them up in Photoshop, the noise would become evident.  This has been largely sorted out now and the new generation of digital sensors does a great job of handling highlights and shadows. As a result, you can expose correctly without fear of having noise in the shadows, or problems in the highlights. In fact, you can now overexpose slightly so that the shadows are a little brighter than normal and then you can pull the highlights down in Photoshop. I have been doing this for a while now and it is amazing how much detail the new sensors can capture in the highlights. Be careful not to overexpose too much, watch that you don’t clip the highlights as the details may then be lost for good.

Be careful when doing long exposures

Long exposures make some of the most dramatic images, but if the exposure is too long, the sensor of the camera can begin to heat up and the pixels will render incorrect colours and exposure. You can still do long exposures, but again, be aware of how you camera handles the long exposure time. Does the image look too grainy? Test it out and experiment to see where your camera begins to struggle. Then make sure that you don’t shoot a long exposure for longer than whatever works on your camera. The key point here is to know the limits of your gear and shoot within those limits. This will ensure great images and easy image editing.

Long exposure images can accentuate noise in a scene

Long exposure images can accentuate noise in a scene

Use in-camera noise reduction

In most cameras there will be a function called High ISO Noise Reduction or Long Exposure Noise Reduction. It’s a good idea to turn this on if you are shooting at a high ISO or doing long exposures. The reason is that after the image has been shot, the camera will analyse the image and look for any pixels that are incorrectly rendered. It will then fix the pixels that are not properly rendered. This takes some time, usually as long as the exposure time. So if you shot an image that was 30 seconds long, the camera will do an analysis and correction that will take up to 30 seconds. This may become impractical if you are doing 10 minute exposures, but it is worth doing on shorter exposures. If you have the time, do it on the very long exposures too, as it can improve the image quality.

Use in camera noise reduction for long exposures and lowlight images

Use in camera noise reduction for long exposures and lowlight images

2. Fixing noise in Lightroom or Photoshop:

Once you have captured your image, you will want to open it up in Lightroom or Photoshop to see how it looks. It is a good idea to zoom your image to 100% to see the actual details of the noise in the image. When you make any adjustments, be sure to zoom in to 100% (1:1 in Lightroom), but also zoom out to see the full image to make sure that the whole thing looks good.

Noise reduction workflow in Lightroom and Photoshop Camera Raw

The controls in Lightroom and Photoshop Camera Raw are pretty much the same, so below is a quick overview of what each slider does and how to use them. In Lightroom you will find the Noise reduction tools in the Develop module and in Camera Raw you will find it as the third tab on right hand side of the screen, it is the Detail tab.

The sliders do the following:

The noise reduction sliders in Photoshop Camera Raw, are identical in Lightroom

The noise reduction sliders in Photoshop Camera Raw, are identical in Lightroom

Luminance

Reduces luminance noise which is noise coming from over or underexposed pixels, this can be quite prevalent in long exposures.

Luminance Detail

Controls the luminance noise threshold. This is good for noisy photos. Higher values preserve more detail but can produce noisier results. Lower values produce cleaner results but also remove some detail.

Luminance Contrast

Controls the luminance contrast; useful for noisy photos. Higher values preserve contrast but can produce noisy blotches or mottling. Lower values produce smoother results but can also have less contrast.

Colour

Reduces color noise. This is often noticed in the underexposed shadow areas of an image.

Colour Detail

Controls the colour noise threshold. Higher values protect thin, detailed color edges but can result in color specking. Lower values remove color speckles but can result in colour bleeding.

Colour Smoothness

This slider controls the smoothness of the colours in the image. This is useful if you still have some unusual colour noise in your image after you have made all your adjustments above. Use this to finish off the noise reduction workflow.

Conclusion

There are no standard settings here that will work for every image. You will need to slide each adjustment around until you find the desired result and see how the changes interact with each other. I tend to slide Luminance and Colour to about 50 and then work from there, I slide each slider up and down, carefully watching how this is affecting the image. Once I am happy with the adjustment, I then move onto the next slider until I am done. I do this while I am zoomed into the image at 100% and after each change, I zoom out to see the effect it is having on the overall image. This may sound a little tedious, but if this is done properly, you will be able to eliminate most of the unsightly noise in just about any image. Practice is also important here, try this on as many images as you can and pretty soon you will be able to predict the effect of each changes.

Do you have any other experiences or tips for noise avoidance and removal? Please share in the comments below.

The post How to Avoid and Reduce Noise in Your Images by Barry J Brady appeared first on Digital Photography School.


Digital Photography School

 
Comments Off on How to Avoid and Reduce Noise in Your Images

Posted in Photography