Ein Beitrag von: Taylor Chan

kwerfeldein – Fotografie Magazin | Fotocommunity
[ By Steph in Art & Installation & Sound. ]

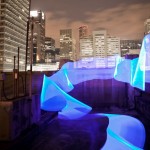
Translated into glowing orbs of light with a rainbow of colors representing signal strength, these visualizations of wi-fi signals are like Victorian spirit photography for the modern age. Luis Hernan of Newcastle University makes the invisible not only visible but also vaguely eerie with his project, Digital Ethereal.


Hernan developed a homemade gadget called a Kirlian Device that, appropriately enough, looks like a piece of ghost hunting equipment. The instrument “scans continuously for wireless networks, and transforms the signal strength to colour LEDs.”


The effect is captured in a series of long-exposure photographs akin to light painting, the results a mass of swirling colored light showing the movement of the signals across a space.


In another segment of the Digital Ethereal project, a gallery demonstration of a ‘chandelier’ running on the accompanying Kirlian Device Android App, which “explores the interaction of visitors with Hertzian Space.” Visitors interact with the electromagnetic waves around dangling cell phones, producing different lighting effects on the screens.

Incredible design is not just about looking good (which this does) or working well (which this does), but weaving these solutions neatly together.
Click Here to Read More »»

The rings displaying a tree’s age in a cross-section of its trunk are translated into somber piano music by a record player and music software.
Click Here to Read More »»
Luminous graffiti, eerie drawings, streaks of light, raining sparks – all of these effects and more are possible by moving a light source around in a scene.
Click Here to Read More »»
![]()


[ By Steph in Art & Installation & Sound. ]
[ WebUrbanist | Archives | Galleries | Privacy | TOS ]
Ein Beitrag von: Tilman Haerdle
Neben der Fotografie nimmt Musik einen großen Teil meines Lebens ein. Ohne Musik zu leben wäre für mich nur schwer vorstellbar. Konzerte habe ich daher immer gern besucht, schon weil live gespielte Musik noch einmal anders „lebt“ als Studioaufnahmen.
Zu beobachten, wie Musiker sich darstellen, sowohl als Akteure auf der Bühne als auch durch ihre Show, fasziniert mich. Fotografisch habe ich diese Erlebnisse bisher nur auf dem Smartphone festhalten können, meist aus weiter Entfernung von der Bühne, seltener aus einer der vorderen Reihen. Auch das kann durchaus zu guten Ergebnissen führen, wenn man die Möglichkeit hat, die Belichtungsmessung und den Fokus getrennt voneinander einzustellen und wenn der Winkel zur Bühne nicht zu ungünstig ist.

Als ich vor ein paar Tagen morgens einen Anruf erhielt, ob ich nicht einspringen wolle, um Max Herre und sein Kahedi Radio Orchestra vom Fotografengraben aus zu fotografieren, zögerte ich nicht lange. Unsicherheit kam nur auf hinsichtlich der Kameras und Objektive, die ich verwenden wollte. Nach kurzer Recherche entschied ich mich, zwei DSLR-Bodies mitzunehmen. Auf dem einen ein Weitwinkel-Zoom 18 – 105 mm für die Totalen, auf der anderen Kamera auch ein Kit-Objektiv, 55 – 200 mm, für die Nahaufnahmen.

Am Veranstaltungsort angekommen, konnte ich noch Fetsum, der als Support auftrat, fotografieren, dabei gleich ausprobieren, mit welchen Brennweiten welche Resultate zu erzielen waren und wie ich ISO und Blende einzustellen hatte. Ungewöhnlich für eine „Vorband“ war, dass Fetsum mit seinem Gitarristen vom Publikum frenetisch gefeiert wurde, was mich immer freut, weil der Support oftmals keine schlechtere Vorstellung abliefert, aber vom Publikum in der Regel stiefmütterlich behandelt wird.

Die übliche Regel bei Konzertfotografie limitiert die Dauer für Fotografie auf drei Songs, normalerweise ohne Blitz, so auch hier. Nachdem sich mit mir insgesamt vier Fotografen am vereinbarten Treffpunkt neben der Bühne gefunden hatten, standen wir mit dem Fotografenbetreuer des Veranstalters seitlich von der Bühne.
Faszinierend war es, das Publikum von vorn zu sehen, erst die gespannte Erwartung und dann die ausbrechende Begeisterung in den Gesichtern zu sehen, als die Musiker die Bühne betraten und die Musik einsetzte.
Dieser Moment, wenn dem Publikum klar wird, dass es losgeht, ist für mich in jedem Konzert ganz speziell, mir erscheint das Publikum wie ein Organismus, der von einem kollektiven Rausch ergriffen wird. Die Tatsache, dass es sich hier um ein Zusatzkonzert handelte und die Musikarena dennoch brechend voll war, sagt viel über die Beliebtheit von Max Herre aus.

Nach dem Intro wurde ich mit den anderen Fotografen vor die Bühne gelassen – dank der Gitter auf einer Seite und der blutroten Illumination der Bühne, die bis auf die vorderen Reihen abstrahlte, kam kurz die Analogie zu den Löwen auf, die in die Arena gejagt werden.
Welche Songs gesungen wurden und was Max Herre eventuell zur Begrüßung sagte, entzieht sich meiner Erinnerung. Ein Blick auf die Aufnahmezeiten der Bilder zeigt mir jedoch, dass wir genau elf Minuten Zeit zum Fotografieren hatten. Obwohl es mein erstes Konzert war, das sich so fotografieren durfte, konnte ich vermeintlich ruhig arbeiten.
Da ich oft auf der Straße fotografiere und dabei auch auf fremde Menschen zugehe, war die Situation, in der es offiziell erlaubt war, alles zu fotografieren, was auf der Bühne passiert, mit wenig Stress verbunden. Wie sehr ich jedoch von der Situation gefangen war, merkte ich erst, als wir Fotografen dann signalisiert bekamen, den Graben wieder zu verlassen und im Dunkel neben der Bühne die schlagartige Nüchternheit einsetzte.
Im Nachhinein ist die Wahrnehmung eines Konzerts so nah an der Bühne derart intensiv, dass ich mich danach im Publikumsbereich sehr weit weg vom Konzert fühlte. Da ich allein unterwegs war, hielt mich dann, obwohl ich Max Herre sehr mag, auch nichts mehr vor Ort.

Ich hatte mir vorgenommen, Solisten und Band aus unterschiedlichen Blickwinkeln zu fotografieren, auch in die Totale zu gehen und nicht nur Close-Ups zu machen. Außerdem wollte ich jeden Musiker auch isoliert in ansprechender Haltung erwischen. Mit fortschreitender Dauer stellte sich heraus, dass ich das nicht alles unter einen Hut bekommen konnte und fokussierte mich nach Max Herre auf die im dritten Song auftretende Joy Denalane, deren Emotionen ich in einigen extremen Nahaufnahmen gut einfangen konnte.

Da die Aufnahmen nicht von einer Tageszeitung oder einem Musikmagazin speziell beauftragt waren, konnte ich hier meine persönlichen Vorstellungen gut umsetzen. Ich werde demnächst die Gelegenheit haben, weitere Konzerte zu fotografieren und freue mich darauf – es ist eine ganz eigene Art des Fotografierens, sehr instinktgesteuert und die Musik, die man mehr spürt als hört, macht das Ganze zu einem besonderen Erlebnis.
Nun bin gespannt, ob ich mit den Erfahrungen, die ich hier sammeln konnte, meinen Prozess soweit stabilisieren kann, dass ich unter den gegebenen Rahmenbedingungen zu reproduzierbar guten Ergebnissen komme. Gerade die stark variierende Beleuchtungssituation führte immer wieder dazu, dass Bilder komplett schwarz wurden. Dank Raw-Format waren viele Unterbelichtungen jedoch noch gut zu retten.
Glücklicherweise bewegten sich die Akteure eher verhalten, so dass Bewegungsunschärfe auf praktisch keinem Bild ein Thema war. Zumindest mit dem Smartphone hatte ich bei Musikern wie Adam Green in der Vergangenheit große Schwierigkeiten, auch nur ein scharfes Bild zu bekommen.

Mein Dank geht an Stephan Rescher vom Newsportal Nachrichten München, der mir die Gelegenheit verschaffte, dieses Konzert zu fotografieren.
kwerfeldein – Fotografie Magazin | Fotocommunity
A PBS profile of Dorothea Lange, the photographer behind iconic images of the Great Depression and Dust Bowl, is set to air later this month. American Masters – Dorothea Lange: Grab a Hunk of Lightning will premiere on PBS stations Friday August 29th from 9-11pm. The documentary, directed and narrated by Lange’s granddaughter Dyanna Taylor, features newly discovered interviews with the photographer, remembrances from family and friends, as well as a look into her career retrospective at New York’s Museum of Modern Art. Read more
Articles: Digital Photography Review (dpreview.com)
Lenovo has just announced what looks like one of the most interesting smartphones of the year, from a camera perspective. According to the announcement the Vibe Z2 Pro captures images with a 16MP camera that features an optical image stabilization system. Camera functions include a Pro Mode, which allows for manual control over a range of shooting parameters. The new device is also capable of 4K video recording. Read more
Articles: Digital Photography Review (dpreview.com)
[ By Steph in Design & Products & Packaging. ]
Plug-and-play accessories, bendable frames, built-in tents and totally unexpected redesigns transform the classic century-old bicycle design for the modern era. These 12 clever and sometimes weird cycling innovations range from simple flat-pack construction that can be assembled with a single allen wrench to bikes that incorporate a range of the latest gadgetry.
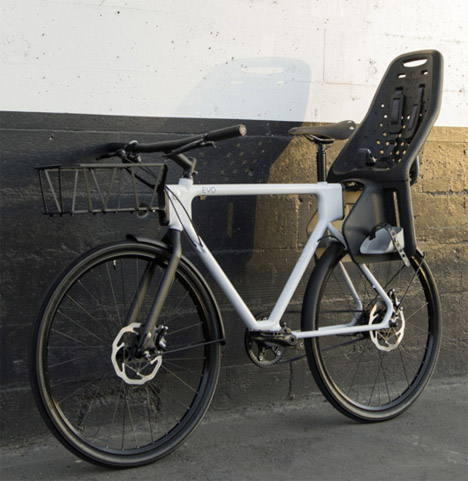
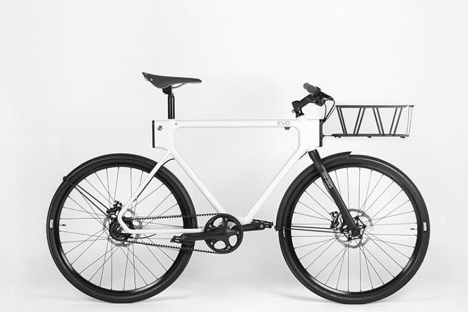
Billed ‘the ultimate urban utility bike,’ the EVO by HUGE Design features quick-connect mounts on both the front and back for attaching a range of accessories including child seats and a variety of racks. Inspired by San Francisco’s famous towers and bridges, the symmetrical frame was designed to support cargo loads on both ends.
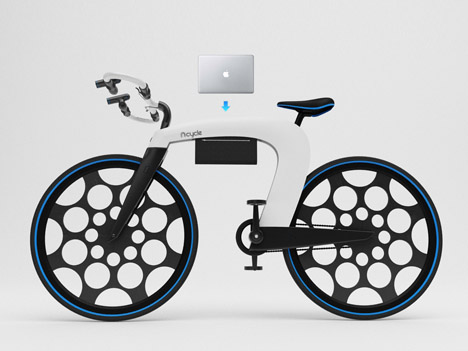

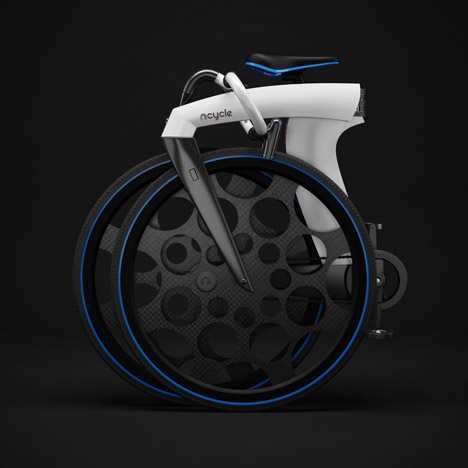
The designer of the nCycle questions whether it makes sense to simply add electrical components to a design that’s over a century old, choosing instead to completely re-invent the bike for this new purpose. Gone are the ‘odd mix of tubes and wires,’ replaced by a pair of side panels that conceal a battery, storage compartment and optional folding mechanism. It’s got a built-in lock, lights and a sound system, and a holographic display on the handlebars linked to a smartphone.
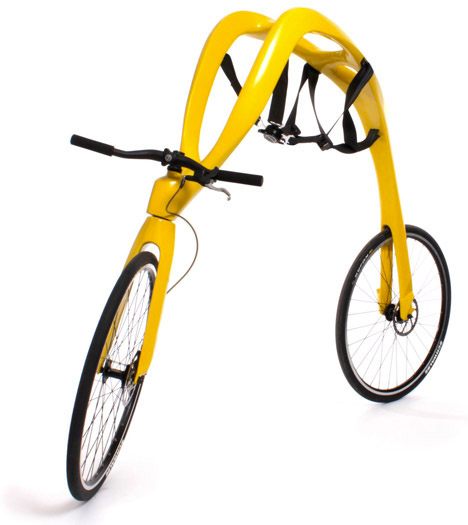
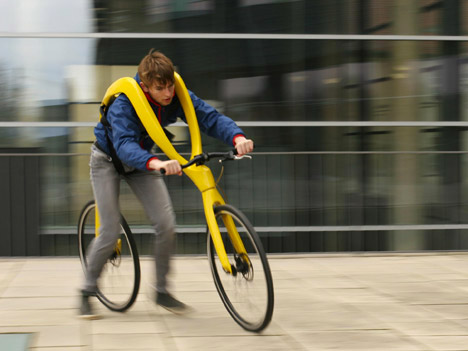
This isn’t exactly the sort of bike you can ride around on – the FLIZ is basically a means to propel yourself faster than you could ever run otherwise. The rider clips into a 5-point harness and gets a running start, the belt replacing the saddle.
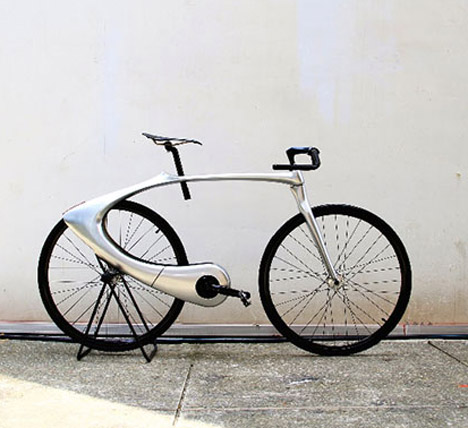

This fixed-gear bike design is anything but the same old conventional style, with an ultra-streamlined design inspired by liquid metal. It’s made of super lightweight materials to make it an extra-zippy ride.

This highly unusual bicycle has no pedals or seat; it straps over you like a harness to help you run faster than you ever could on your own.
Click Here to Read More »»

Few folding bikes can boast such compact proportions (even when fully collapsed) as this umbrella-sized wonder you can sling at your side or slide into your …
Click Here to Read More »»

Rough around the edges, we rarely notice the unique landscape that evolves from regular wear and tear on our bicycle tire – even our ordinary ones.
Click Here to Read More »»
![]()
[ By Steph in Design & Products & Packaging. ]
[ WebUrbanist | Archives | Galleries | Privacy | TOS ]
“I swear, the walls were white!” you exclaim as you look through indoor photos taken from an earlier shoot, that now appear to have an annoying yellow tint over everything. Sound familiar? Don’t worry, you’re not crazy. This is a common frustration, photographers of all experience levels face due to what’s referred to as “color casting”. Color casting is simply the effect of light striking different surfaces and bouncing back other colors into your camera’s sensor. Though annoying, it’s also relatively unavoidable without careful calculation and additional equipment.
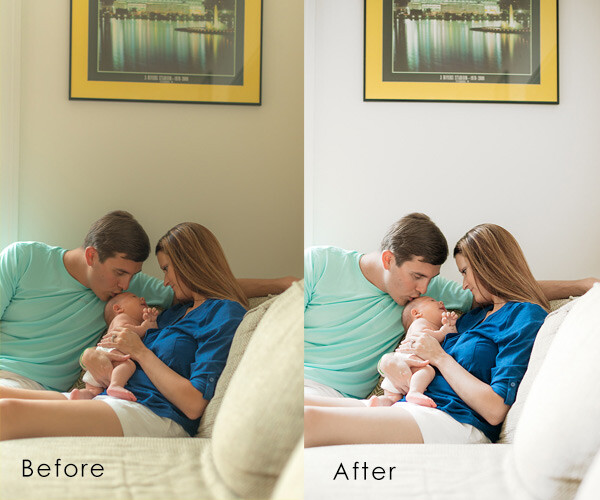
Powerful photographs are created before, during, and after the click of your camera. Sometimes, especially when it comes to photographing wiggly, unpredictable children, you don’t exactly have time to calibrate with a gray card, adjust your camera settings, or take a test shot. If you’re not already bored by the thought of it, by the time you actually work through this process, the moment has passed, and you’re still fiddling with a camera instead of chasing after your little subject.
Since some of the best natural shots occur in the comfort of your home, it’s important to make sure the walls surrounding you aren’t obstructing the emotion you could be catching with awkward color casts. Even though grasping skills like proper exposure, white balance settings, and other in-camera techniques are key to creating good photos, they are only pieces of the greater puzzle. Sometimes, it’s the things like communicating effectively with your subject, learning to naturally direct posing, and mastering basic post-processing tricks that truly take that in-camera image and reveal the emotion behind it. Luckily, correcting dingy-wall syndrome is a quick and easy way to improve your indoor shots. With just a few quick steps in Photoshop, you can restore brightness to your walls and subjects and drastically improve your shot.

Above is the image I started with. The walls were white and the couch was tan, but the color cast over the image makes everything appear dingy. This is what we’re working towards:

Operating on a new layer, navigate to the ‘Replace Color’ tool by clicking on Image > Adjustments > Replace Color

A dialog box will pop up. Make sure the ‘Localized Colors’ box is checked and the ‘Eyedropper’ tool is selected. Sample a section of the wall from the original image you want to adjust. With the ‘selection’ option active, your preview shows what color will be affected by with adjustment in white. Play with the fuzziness slider until your preview shows the best selection. It’s okay if it picks up some colors from other parts of the image you don’t want to adjust; we’ll go back and fix that later.
Option: You can also select just the portion of the image you want to change by using the Quick Select tool.
Slide the saturation bar to the left to decrease the color tones, but not too far that it creates noise (grain) from the contrast. Slide the ‘lightness’ bar to the right to adjust the brightness of your white, but again, not so much that it creates unusual contrast. Use your judgment based your particular photo to determine the levels that achieve the best result. Click ‘Ok”.

If your fuzziness picked up any samples from areas that you did not wish to change, like faces for example, simply select the ‘Eraser’ tool and paint over those areas to restore the original color. You can adjust the opacity of your eraser to control the amount of color you wish to restore as well. (You can also use a layer mask to do this)
That’s it! Now you can make any other changes or adjustments to the image. This one simple fix makes a huge difference in the impact of your images and takes less than a minute to complete once you get the hang of it. Normally, “I’ll fix it in post-processing” is not a great motto to adopt as a photographer and of course, you should aim to do as much in camera as possible. But hey, life is spontaneous! This quick little trick is an easy way for you to truly enhance the natural beauty of your indoor images and you’ll never have to worry about missing the shot again because of your in-camera white balance.

The post Step by Step how to Brighten the Walls in Your Indoor Photos by Leah O’Connell appeared first on Digital Photography School.
PocketWizard has announced the latest ControlTL firmware upgrade to its line of ‘Control the Light’ wireless flash transceivers and receivers, updating the MiniTT1 Transmitter and FlexTT5 transceiver and receiver units to work with all available Canon and Nikon DSLR systems. The company has also added resources to achieve a much faster turnaround on updates, as evidenced by new support for the Nikon D810, which was just announced in late June. Read more
Articles: Digital Photography Review (dpreview.com)
You don’t need to take expensive and exotic trips to make good images. So if staying at home is more your thing then a few simple ideas can help you create beautiful images. What you might view as commonplace and bland can still be photographed in an imaginative and skillful way to produce an image that shows a far more striking aspect of the subject or scene. I am not suggesting you get all creative with software manipulation either. I am suggesting explore your imagination and creativity; perhaps push your technical boundaries a little and this will further enhance your photographic skill.
The ability to take an everyday scene and construct from it a superb image will require your application of some or all of the following:
This skill of making the mundane magnificent is not dependent on the type of camera and lens you use, it works with anything. My particular interest is nature and wildlife, but the skill can readily be applied to most of your chosen genres of photography.
To start you should be looking for a spark or catalyst to kick off the mental process. This can be anything that takes your fancy such as color, shape, pattern or motion.
Once you have selected your particular environment, and isolated some elements for a composition, then take some time to arrange and rearrange them in your mind. Walk around, kneel, lie down and test different perspectives. Work the opportunity and let the image evolve, don’t rush it. You may get a few strange looks in certain circumstances, but that is the price you pay.
Something simple like a field of rapeseed (or field of other flowers or crops depending on where you live) is a common, beautiful, bright yellow sight which also heralds the arrival of summer. The endless fields of yellow can be monotonous, but they can provide you with a colorful subject in their own right, or a backdrop for a smaller subject. You can use the color, the size of the field and the detail of individual flowers. Look about for a subject, choose a perspective and include other elements such as: blue sky, clouds, a tree, a car, a sunrise or sunset, or all of the above. Let the image unfold.
The images here are all taken this year, with this article in mind, all within a couple of miles of my house. This is to demonstrate that there is much on our doorsteps that might keep our photographic needs satisfied, well some of them at least.
Choose any patch of grass on a dewy morning and have a look for a good collection of dew drops and try a backlit shot. The sparkles and perfect shapes of the droplets make an intriguing subject. Here I have turned the image into a black and white just to emphasize the shape and patterns, but often you’ll want to keep the lovely green of the grass.

Garden birds are probably the most accessible wildlife for you budding nature photographers. With some simple skills you can go beyond just taking a record shot, but can create lovely images. Place a bird feeder in a good position, with a decent background, and a thoughtfully placed perch and sit back and wait. Change the perch and change the background at will and you have a whole suite of different images available to you.

A sunrise over a meadow may be a regular occurrence in your home patch, but to make it a little different get down low in the vegetation. Here I have obstructed the sun with a tree at the edge of the meadow, and thus broken the sunlight up into many light sources coming through the foliage. The background is formed by selecting an aperture that provides sizeable circles of confusion (out of focus light sources) behind the subject. The subject is just a few seeding grass heads, but you can turn the simple into the stunning by constructing an image.

Vast fields of cultivated crops can provide you with a wonderful opportunity. A bright yellow rapeseed field for example. Look for something to isolate within the vast swathe of yellow that provides a point of interest in an image full of color. Sometimes it is simply a color that can spark your thinking, but spotting a dewy web provides a focus for the image. Prowling the edge of the fields on a bright and sunny day will also yield a lot of insect life, which could become your whole new world.

You can choose a different day and different weather to change your image. On a foggy day dewdrops collect on spider webs and can give you an abstract view of the rapeseed field. The spark here was the pattern effect of the drops and then the gorgeous yellow background.

This image was created by using a long lens that can accommodate a lot of foreground (has a lot of reach and you can stay back from the subject) and can throw the background and foreground out of focus with a shallow depth of field, while filling the frame. If you shoot into the sun, then the sunlight passing through the green foliage will bring out the bright, and almost luminous, green of the leaf with which you can compose the foreground and background. The spark was the beautiful color of the backlit green foliage, completely different from the front-lit color.

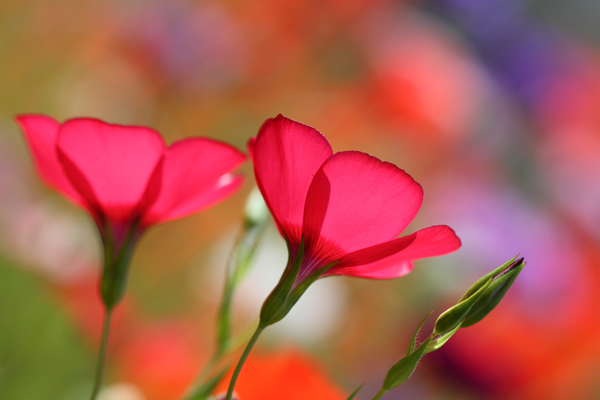
Sometimes simplicity is the only catchword you need to remember. Find a patch of wildflowers, pick the most concentrated spot and shoot away, picking various subjects. The color and the profusion will give you all you need to create an intriguing and colorful image.

Spring and summer are obviously the prime times for encountering wildlife, and therefore photographic subjects for your nature images are abundant. Unless you live in the tropics, the winter season can be a lot more mundane, so you are probably going to have to work harder. Colorful weeds and insects are always a feature of summer. Putting them together works a treat, although it may take some patience.

It is not all about your hands and knees or the hedgehog perspective, so a few leading lines and an old barn will give you a far superior image to a snapshot of endless cultivated fields. Throw in a few colorful wildflowers in the foreground, a dark stormy sky and the farm fields you drive past routinely may take on a new perspective.

A very sparse little patch of flowers, with color being their only redeeming quality, can still provide you with a good opportunity. This technique is purely an in-camera one and utilizes controlled motion of the lens. Slow the shutter speed (low light, low ISO, dull weather or a combination) and zoom in or out by hand while the shutter is open gives the resulting motion blur. This can be used in a variety of ways and once you start your imagination may take hold. If you don’t have a zoom do the same with your prime lens but twist the camera in your hands.

So just to show you that you can make great images close to home with a little effort.
Do you have any other tips or tricks for finding ordinary things and making great photos? Please share in the comments below.
The post Finding Great Subjects to Photograph Close to Home by Richard Taylor appeared first on Digital Photography School.

You must be logged in to post a comment.