RSS
 

Archive for July, 2014

Living in a Bubble: 15 Privacy-Free Transparent Houses

08 Jul

[ By Steph in Architecture & Houses & Residential. ]

Glass Houses Main

Sometimes, beautiful views of your surroundings simply trump the need for privacy. Living in a bubble isn’t so bad when you’re in a remote location gazing at the sea or the forest, but some people take it one step further, living in almost entirely transparent spaces even in busy urban locations.

Cylindrical Glass House Containing a Tree

Glass Houses Cylindrical 2 Glass Houses Cylindrical 1

If you’re living in a secluded forest, does it matter whether the walls of your home are entirely transparent? Perhaps you wouldn’t mind if you lived inside ‘Tree in the House,’ a four-story modern treehouse encapsulating a beautiful tree. A white spiral staircase winds around the tree, taking you from one room to the next.

Transparent Floating Vacation Home

Glass Houses Floating 2 Glass Houses Floating 1

The term ‘floating house’ would typically indicate a house boat or other structure on the water, but in this case, it’s all about the visuals. Designed by Jarmund/Vigsnaes Arkitekter, this home features a gabled black upper floor on top of an entirely transparent lower floor so that from a distance, the home appears to be levitating.

Farnsworth House by Mies van der Rohe

Glass Houses Farnsworth 1 Glass Houses Farnsworth 2

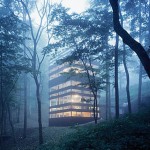
The classic Farnsworth House is one of the most well-known works by architect Mies van der Rohe. Built for Dr. Edith Farnsworth between 1945 and 1951 in Plano, Illinois, the glass home is located on a secluded 10-acre site. The design seeks to unite the occupants with the natural world just outside, using the adjacent trees for shading and privacy.

Glass Cube House by Carlo Santambrogio

Glass House Santambrogio 1 Glass House Santambrogio 2

Glass House Santambrogio 3

These two entirely see-through houses redefine what it means to put your life on display. Italian architecture firm Santambrogio sought the clearest glass to maintain transparency even through a series of walls, built-in shelves and staircases. ‘Snow House,’ the three-story structure pictured, is one of a series of glass houses created by the firm, and this one has glass thick enough to withstand heavy loads of snow. Special glass panels instantly turn matte for privacy at the touch of a button. The single-story version, ‘Cliff House,’ uses thinner, lighter glass elements.

House NA by Sou Fujimoto Architects

Clear Houses Fujimoto 1 Clear Houses Fujimoto 2

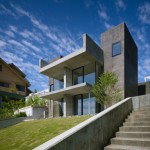
Rather than trying to cut individual inhabitants off from their neighbors, as is typical in densely populated settings, Japanese architect Sou Fujimoto decided to create a home that would unite them. House NA has an almost entirely transparent street-front facade, and instead of enclosed rooms, the interior is filled with small platforms at various heights for free movement and clear lines of sight.

Next Page – Click Below to Read More:
Living In A Bubble 15 Privacy Free Transparent Houses

Share on Facebook


[ By Steph in Architecture & Houses & Residential. ]

[ WebUrbanist | Archives | Galleries | Privacy | TOS ]


WebUrbanist

 
Comments Off on Living in a Bubble: 15 Privacy-Free Transparent Houses

Posted in Creativity


Stairs to Nowhere: Half-Finished Fire Escape Inside a Church

08 Jul

[ By Steph in Art & Installation & Sound. ]

Fire Escape Church Sambre 1

A mass of reclaimed, weathered wood of all shapes and sizes rises up to the cathedral ceiling of the Church of St. Peter the Puellier in Mairie d’Orleans – but don’t expect these stairs to go anywhere. Built by French artist Sambre, ‘Escalier de Secours’ (Fire Escape) brings a sense of chaos and disproportion into a space typically considered sacred.

Fire Escape Church Sambre 2

Fire Escape Church Sambre 3

Installed in the heart of the church, the staircase consists of a framework covered in randomly applied wooden slats, nailed on with no apparent rhyme or reason. Intentionally oversized, the stairs are much to large for any human to walk up, requiring a hands-and-knees climb to ascend.

Fire Escape Church Sambre 6

Fire Escape Church Sambre 9

The work invites visitors to discover the twelfth-century church, which is the oldest remaining intact in Orleans, in an entirely new and self-guided way. Looking up through the nest-like wooden mass from the ground floor, you catch only glimpses of the church’s vaults. Visitors can choose from a variety of paths to make their way through the space, metaphorically exploring the many options available in life.

Fire Escape Church Sambre 8

Fire Escape Church Sambre 7

Sambre is known for large-scale, seemingly haphazard sculptures and architectural installations made of reclaimed wood, including spheres and labyrinths built inside gallery spaces and warehouses.


Share on Facebook


[ By Steph in Art & Installation & Sound. ]

[ WebUrbanist | Archives | Galleries | Privacy | TOS ]


WebUrbanist

 
Comments Off on Stairs to Nowhere: Half-Finished Fire Escape Inside a Church

Posted in Creativity


Nikon 1 V3 stock shortage prompts official apology

08 Jul

The Nikon 1 V3 has been out of stock with many retailers online and elsewhere, making the mirrorless camera hard to come by. The duration of the stock shortage has prompted an apology from Nikon Japan, which it recently posted on its website. Read more

related news: Digital Photography Review (dpreview.com)

 
Comments Off on Nikon 1 V3 stock shortage prompts official apology

Posted in Uncategorized


The Inverse Square Law & Color Temperature

08 Jul

Image by Alana Tyler Slutsky from her Surrealia series as featured on Fashion Photography Blog (FashionPhotographyBlog.com)

LIGHT: THE INVERSE SQUARE LAW & COLOR TEMPERATURE


Hey FashionPhotographyBlog.com readers,

Welcome back and hang tight! Last time we are talked about the science behind lighting.

Today’s topic gets a little confusing.

The “Inverse Square Law” shapes EVERYTHING in photography.

What does that even mean?! When opening up a stop, the light doubles. When closing down a stop, the light halves. This is applicable to light as well as all aspects of your camera: aperture, shutter, ISO.

*DISCLAIMER* Before we get into this:

LEARN YOUR APERTURE AND SHUTTER VALUES! It’s the only way any of this will make sense.

Aperture and Shutter Values Chart as featured on Fashion Photography Blog (FashionPhotographyBlog.com)

As far as light goes, if you move a light x2 as close, it appears x4 larger. If a light is moved x2 away, it appears 1/4 of the original size. Surface Area = Distance ²

As far as the Inverse Square Law goes according to your camera (All numbers here are purely for example purposes)… If you have an aperture of f/11 and open up to f/8, the amount of light coming into your camera will double (same can be said of you change from ISO of 400 to 800 or a shutter speed of 1/60 to 1/30). If you have an aperture of f/11 and stop down to f/16 the amount of light coming into your camera will be cut in half (same can be said of you change from ISO of 400 to 200 or a shutter speed of 1/60 to 1/125.)

Real life example:

A light at 5′ with a meter reading of f/8 gives 100% (correct exposure)

A light at 10′ with a meter reading of f/4 gives 25% (2 stop difference. Your image is now underexposed.)

Basically… As you move away, the cone of light gets wider but weaker. Using the outer cone of light for weaker light output is called feathering and gives you a more diffused light.

Light Intensity to Light Source Chart as featured on Fashion Photography Blog (FashionPhotographyBlog.com)

Color Temperature

All lights have a different and specific color temperature, which is measured in Kelvins. The lower the number, the warmer the color is, the higher the number, the cooler the color the light gives off.

Color Temperature Chart as featured on Fashion Photography Blog (FashionPhotographyBlog.com)

Be certain to set your own white balance based on the type of light you’re shooting in. White balance in camera makes up for changes in color based on the type of light you’re shooting with. Color shifts will occur when color temperature is not balanced correctly. If you don’t know what type of light you’re in, you can always use Auto White Balance (AWB)- when using AWB the camera figures out (approximately) what the color temperature is of the light source you’re shooting in and shifts colors in camera accordingly.

White Balance examples as featured on Fashion Photography Blog (FashionPhotographyBlog.com)

The most common types of light used in photography are continuous lights and flash.

Continuous lighting, such as hot lights, are.. You guessed it… A continuous form of light.  This type of light, with incandescent bulbs, are tungsten balanced.  There are special bulbs and special lights referred to as “HMI’s.” These lights have bulbs which are balanced to day-light. HMI’s are commonly used in the film industry.

Flashes (Strobes) are short bursts of light and are balanced to daylight. Types of flash include but are not limited to speed lights, mono-lights (single flash units), pack lights (generator and flash head units), ring lights, etc.

Now that you have dealt with all of the boring stuff, check in tomorrow to see how everything from the past two days applies to real life and shooting.

See you tomorrow –

Alana


IMAGE SOURCE:

Feature image & image 1: photography by Alana Tyler Slutsky from her Surrealia series. To view the rest of the photos from this series visit her website.

Image 2, 3, 4 & 5: Alana Tyler Slutsky


Fashion Photography Blog

 
Comments Off on The Inverse Square Law & Color Temperature

Posted in Uncategorized


Avoid These 10 Mistakes That Can Ruin Your Image Quality

08 Jul
Central Park South.

Central Park South.

How many times have you captured an amazing image only to view it on your computer, or as a print, and realize that you screwed something up along the way.

Unfortunately, the only way to stop doing a lot of these easy-to-make mistakes is to have an image ruined by them.  Once you screw up an image you’ll quickly learn not to make the same mistake again.

Here are the most frequent ways I see photographers ruining their images. Avoid these 10 mistakes that can ruin your images

1. Leaving Image Stabilization on when using a tripod

Everyone learns this tip too late. Image stabilizers (in your lens) usually make your images sharper by reducing camera shake. However, when your camera is on a tripod and perfectly still, the motor can actually cause shake! I know a few of you are shaking your head right now as I did when I learned this. If you couldn’t figure out why your tripod images weren’t perfectly sharp, this is usually the reason, although a strong wind or touching the tripod or camera while shooting can do this as well.

2. Not using a fast enough shutter speed

Lego Girl, SoHo.

Lego Girl, SoHo.

Unless you are on a tripod, to achieve a sharp shot your shutter speed needs to be at least 1 over your focal length.  So if you are shooting at 50mm your shutter speed needs to be at least 1/50th of a second (and I like to add a little leeway to that to be safe).  If you are on a cropped sensor, remember that a 50mm lens might be the equivalent of an 80mm or 100mm view, so make sure to adjust for that.

For moving subjects, 1/320th of a second is my ideal speed to freeze motion.  For fast moving objects such as cars or sports, I prefer an even faster shutter speed.

Be especially careful when shooting on Aperture Priority mode or in the auto settings, because it is easy for the camera to set the shutter speed to a setting that will introduce blur into your image without you noticing.  For this reason I frequently like to shoot in Shutter Priority mode.

3.  Not focusing exactly on the most important object, especially when shooting with a large aperture

If you are shooting with a small aperture, such as f/8 and above, you will often have leeway, but especially when shooting with a large aperture (like f/2), you need to make sure that the most important element in the image is the sharpest.  If this is not the case, it might not always be noticeable on the monitor, but it will show up when you make a print.

This is especially important when doing portraiture. Missing the sharpness on the eyes often means ruining the image.

Be especially careful when the element you are focusing on is small, because it will be very easy for the camera to focus on the area behind it instead. This is a mistake that is frequently made by newer photographers. In these tricky situations you need to pay attention to whether the autofocus is picking up the small element.

4. Not raising your ISO up higher when needed

In situations where the light is not strong and you need a fast shutter speed and a large aperture, don’t be afraid to raise your ISO. I see too many people afraid to go above ISO 200.  I use ISOs of 800, 1600 and even 3200 a significant amount. Many digital cameras, especially ones made within the last four years, can handle these ISOs.  Yes it will add noise to your photos, but in many cases you will notice that despite the noise, the technical quality of your images will be better. Noise can look very pleasing, especially on the newer digital cameras.

Mobile Office, Midtown.

Mobile Office, Midtown. ISO 3200

5. Moving while you shoot

This is my biggest pet peeve, by far.  I am normally a very calm person, but when I see this it makes me want to grab the photographer and shake them silly.  I see so many people that take photos without breaking their stride.  Stop your motion every time you take a shot, if even for a second!  Keep your hands still!  It’s not difficult.  Respect every image that you take enough to stop and think about it for a second, and your images will ultimately respect you when they turn out well in print.  Sorry, that is the end of my rant for the day.

6. Over-sharpening

Be careful of over-sharpening your photos. I see this happen all too often. Particularly with high resolution cameras with the right settings, your images often will only need a minimal amount of sharpness. If you overdo the sharpness it will actually have the reverse effect, making your image look fake or as if it was blown up to a larger size.

Couple in Snowstorm, Central Park

Couple in Snowstorm, Central Park

7. Resizing your images after you sharpen them

Sharpening should be the last step after you have sized the image to your final print size. If you sharpen your image and then resize them it will negatively affect the quality of your photo.

8. Not using the correct color space: ProPhoto RGB > Adobe RGB > sRGB

You should always keep your digital photo in the largest colorspace possible. While digital printers cannot yet print all of the colors in ProPhoto RGB, and many printing services prefer you to send them your files in Adobe RGB. When processing my RAW images to Tiff files I always convert them to the ProPhoto colorspace because it is the largest. Why not save your files with the most amount of color information possible?  Many cameras will allow you to set this in the settings.

However, did you know the sRGB is the best colorspace to show your images on the web? Yes, when printing your images it is best to keep them in ProPhoto or Adobe RGB, but when rendering them for viewing over the web, convert them to sRGB.

When you convert an image to a different colorspace, always make sure to do it as a copy of the original image. If you convert a ProPhoto image to sRGB and save it, you will not be able to retrieve that color information if you then convert it back to ProPhoto.

Bow Bridge in Fall, sRGB

Bow Bridge in Fall, sRGB.

Bow Bridge in Fall, Adobe RGB

Bow Bridge in Fall, Adobe RGB. A subtle but noticeable difference.

9. Not using exposure compensation (+/-)

When shooting in overly light or dark situations in Aperture Priority or Shutter Priority mode, the light will fool the camera’s sensor.  For instance, if you photograph in a dark alleyway, your camera’s sensor will try to overly brighten the scene, while if you capture an image with a lot of bright sky or white snow, the camera will try to overly darken the scene.

This is where your exposure compensation comes in.  It is a vital tool for any photographer, especially in tricky lighting situations.

10. Not resetting your camera

Take a look at your camera settings at the beginning of the day and frequently throughout a day of shooting. Some of the most common settings to forget to reset are a high ISO from the night before, your exposure compensation, your white balance setting, and checking your autofocus switch.

Final thoughts

A few final notes that must be mentioned.  With digital images, you can always fix many problems later in post-production. However, there is still no substitute for getting the image perfect in camera.  Processing is necessary in some way for every digital image, but the more extreme, the more you can damage the quality of your images.

It is tough to notice the effects of many of these mistakes when viewing the images on the web or on a monitor, but when you zoom in close to the details or make a print, especially a print of a decent size, these effects with be very noticeable.

The post Avoid These 10 Mistakes That Can Ruin Your Image Quality by James Maher appeared first on Digital Photography School.


Digital Photography School

 
Comments Off on Avoid These 10 Mistakes That Can Ruin Your Image Quality

Posted in Photography


Canon introduces mobile print solution for Android 4.4.2 and HP Slate

08 Jul

Canon’s printer division has announced Canon Print Service, a software plug-in for your mobile device that allows you to print to compatible Canon printers via a Wi-Fi connection. The service is available for Android devices running version 4.4.2 or newer and select HP Slate devices. Read more

related news: Digital Photography Review (dpreview.com)

 
Comments Off on Canon introduces mobile print solution for Android 4.4.2 and HP Slate

Posted in Uncategorized


7. Juli 2014

07 Jul

Ein Beitrag von: Manuel Tanner

Eine Frau nimmt den Hörer eines alten Telefons ab.


kwerfeldein – Fotografie Magazin | Fotocommunity

 
Comments Off on 7. Juli 2014

Posted in Equipment


Leica T Typ 701 real-world samples gallery updated

07 Jul

We’ve updated our already healthy-sized gallery of real-world Leica T samples, bringing the grand total up to 97 images. The T (Typ 701) is a mirrorless interchangeable lens camera with autofocus, the first in the T-system. It offers a 16MP APS-C sensor and features a large touch screen complemented by two command dials. See how it performs in the real world. See gallery

related news: Digital Photography Review (dpreview.com)

 
Comments Off on Leica T Typ 701 real-world samples gallery updated

Posted in Uncategorized


Do This: Sara Lando in US for Workshops in August

07 Jul

Whatcha doing in mid/late August? If you are within striking distance of Baltimore or Atlanta, you have a one-off chance to do something cool and fun that will change the way you approach your photography: spend a day (or two) with Italian conceptual portrait photographer Sara Lando.

After spending a couple years convincing her to come to the US, Zack Arias and I are this summer hosting Sara for two weekends of seminars and workshops in Atlanta and Baltimore. We are doing this because A) it's an awesome experience (trust us on that) and B) it's a lot easier than getting all you guys over to Dubai for Gulf Photo Plus.

Read more »
Strobist

 
Comments Off on Do This: Sara Lando in US for Workshops in August

Posted in Photography


Wilderness Protection – Only As Strong As The Wilderness Act

07 Jul
Caribou Pass, Arctic National Wildlife Refuge

View of the Kongakut River Valley, looking south towards the Brooks Mountain Range over Caribou Pass at midnight

This weekend an interesting OpEd hit the New York Times titled Rethinking the Wild,  The Wilderness Act Is Facing a Midlife Crisis. If you haven’t read it I highly recommend you do, as you’ll hear much of this narrative in the coming months and years as various forces continue to try to chip away at it to weaken it if not undo it.

The Wilderness Act of 1964 did something amazing, it protected 9.1 million acres of federal land and now protects 109.5 million acres. This act oversees the protection of national parks, national forests, U.S. fish and wildlife services and the bureau of land management. What this piece of legislation defined as wilderness is such:

DEFINITION OF WILDERNESS 
(c) A wilderness, in contrast with those areas where man and his own works dominate the landscape, is hereby recognized as an area where the earth and its community of life are untrammeled by man, where man himself is a visitor who does not remain. An area of wilderness is further defined to mean in this Act an area of undeveloped Federal land retaining its primeval character and influence, without permanent improvements or human habitation, which is protected and managed so as to preserve its natural conditions and which (1) generally appears to have been affected primarily by the forces of nature, with the imprint of man’s work substantially unnoticeable; (2) has outstanding opportunities for solitude or a primitive and unconfined type of recreation; (3) has at least five thousand acres of land or is of sufficient size as to make practicable its preservation and use in an unimpaired condition; and (4) may also contain ecological, geological, or other features of scientific, educational, scenic, or historical value.

The Rethinking the Wilderness Act OpEd” in short argues “we need to accept our role as reluctant gardeners.” Unfortunately this argument assumes that we have a full understanding of our environment and opens the doors to the organizations and people the act was put in place to protect the land from. Who will the “gardeners” be and what will their motivation be? Yes climate change is real, but it is also a very convenient excuse and lever for foes of the Wilderness act to weak its strict protections.

The OpEd had one incredibly relevant quote that still holds true from Frank Egler:

“Ecosystems are not only more complex than we think, they are more complex than we can think.”

Humanity suffers from a good deal of well intentioned ignorance when it comes to our environment.  While we’ve made great strides technologically advancing our civilization, but we’ve done a very bad job managing and fully understanding the impact we make on our environment. Just because we can make changes, even well intentioned changes, it doesn’t mean that we fully understand environmental systems let alone the ramifications of counter efforts.   Case in point, as a teenager in the 80′s & 90′s they had signs up in Yosemite stating that Mirror Lake was drying up and was due to disappear in a decade or two. Now they know its a seasonal lake that ebbs and flows with snow melt. It’s a good thing they didn’t build a dam to try and preserve the lake.

Climate change certainly is happening, but nature is resilient. It will only remain resilient and in a wild state when left alone and protected as it has been, strictly as wilderness, free from natural resource hungry companies (oil, mineral, developers, etc.) To experience true wilderness you should make every effort to visit a U.S. National Wildlife Refuge. They’re not as easily accessible as National Parks, but you’ll quickly get an idea of how strictly these lands are protected. My favorite National Wildlife Refuge is the Arctic National Wildlife Refuge (pictured above), but many smaller refuges are near major urban centers. If you’re a nature or wildlife enthusiast then pay close attention to up coming discussions on revising the Wilderness Act as what you know and love may be irrevocably changed.

Copyright Jim M. Goldstein, All Rights Reserved

Wilderness Protection – Only As Strong As The Wilderness Act

The post Wilderness Protection – Only As Strong As The Wilderness Act appeared first on JMG-Galleries – Landscape, Nature & Travel Photography.


Related Stories

  • Exhibit & Book Not To Miss – Carleton Watkins: The Stanford Albums
  • Exhibit & Book Not To Miss – Carleton Watkins: The Stanford Albums – Enclosure
  • Return of Film: Snowy Sunrise at Gates of the Valley
Feed Ads by FeedBlitz
powered by ad choices


JMG-Galleries

 
Comments Off on Wilderness Protection – Only As Strong As The Wilderness Act

Posted in Equipment