RSS
 

Archive for July, 2014

ZTE announces Nubia Z7 with 5.5-inch QHD display

09 Jul

Chinese smartphone manufacturer ZTE has launched its latest high-end model and looking at the Nubia Z7’s specifications it’s clear the new model aims to compete at the very top of the market. The Nubia comes with a 13MP imaging sensor in its camera module, its lens boasts an F2.0 maximum aperture and an optical image stabilization system is available for keeping things steady in low light. Click through to read more at connect.dpreview.com

Articles: Digital Photography Review (dpreview.com)

 
Comments Off on ZTE announces Nubia Z7 with 5.5-inch QHD display

Posted in Uncategorized


Shooting Experience: Panasonic Lumix DMC-FZ1000

09 Jul

Panasonic’s latest superzoom camera, the Lumix DMC-FZ1000 offers a highly attractive feature set. Based around a 25-400mm equivalent zoom and a large 1″-type CMOS sensor the FZ1000 combines a very useful zoom range with excellent image quality in stills and video mode. We’re working our way through a full review right now, and we’ve just added a shooting experience page to our detailed first-impressions review. Read more

Articles: Digital Photography Review (dpreview.com)

 
Comments Off on Shooting Experience: Panasonic Lumix DMC-FZ1000

Posted in Uncategorized


8. Juli 2014

09 Jul

Ein Beitrag von: Mazell

Frau vor Plakat mit Auge


kwerfeldein – Fotografie Magazin | Fotocommunity

 
Comments Off on 8. Juli 2014

Posted in Equipment


4 Ways Self-Critique Can Improve Your Photography

09 Jul

Self-Critique-PhotoLearning how to analyze and judge your own artistic work correctly is a valuable skill that can be a bit tricky to learn properly. I’m sure you’ve heard the saying “I’m my own worst critic” thrown about, you may have even said it yourself in reference to your own photography. However, there are ways that you can harness this self-criticism and learn from it rather than allowing it to consume you and destroy your self-confidence.

Learning how to constructively critique your own photography can not only help you make better photographs each time you pick up a camera, but it will also build your confidence as a photographer, and prepare you for the inevitable critiques from your peers and colleagues.

This article is a bit different in the sense that the images that I’ve used to illustrate the post showcase one particular case of how I used self-critique to iterate a photograph over the course of a shoot. I will cover the benefits of self-critique and how it can help you become a more confident photographer – so read both the article and the captions of each photograph as you continue along.

#1 Reinforces your knowledge of the craft

improve-photography-self-critic-2

After looking at what I’d captured here on the LCD of my camera I decided that the prominent features of this landscape wasn’t the sky or the foreground, but the large boulder along the right side of the frame.

You read eBooks and tutorials to learn all the technical skill required to make stunning photographs, but in the heat of the moment technique will often slip, especially when you’re just learning. That’s okay, but it’s important to learn how to notice when this is happening and correct for it along the way.

Providing yourself with a thoughtful self-critique from time to time can really help you locate the most common faults in your photography. After performing a few of these critiques you may notice that you commonly forget to double check your settings leading to poorly exposed photographs or improper Depth of Field, or you may notice that you commonly struggle to compose a photograph with purpose resulting in a photograph that doesn’t capture the emotion that you had intended.

#2 Teaches you how to look at a photograph critically

improve-photography-self-critic-3

A second setup left me with a feeling that I was on the right track, but now the scene felt too cluttered and confined.

The ability to articulate what it is about a photograph that makes it special and what needs improvement, as specifically as possible, can drastically improve your photography. This is something that is learned over time and can be difficult at first, especially when looking at your own work.

Eventually, you’ll get to the point where this sort of critical analysis will come naturally. You’ll find yourself fine-tuning your composition and settings in the field, as I’ve done with the photographs that illustrate this point. You probably won’t even be consciously aware of the fact that you’re doing this.

#3 Helps build your confidence

improve-photography-self-critic-4

Now, I had the composition that I wanted. Something that featured the boulder prominently, yet allowed there to be enough room to breath in the foreground., but the water just wasn’t right. Time to adjust the settings to allow for a longer shutter speed.

No one enjoys being told what’s ‘wrong’ with something that they’ve created, but it’s going to happen, whether you ask for it or not. Even the best photographers have their critics so it’s not a matter of skill, it’s simply the way the world works.

By finding the ability to critique your own photography you’ll have an idea of what people might say when they are viewing your work, and as a result, you’ll be more prepared to defend the choices you made to create the image.

#4 You’ll become better at offering advice to others

While this might not directly affect your skill as a photographer, it does help to reinforce the other three points listed above. When you are able to offer constructive feedback to someone who’s just starting out you’ll not only feel great by helping them improve, but you’ll be more confident going forward with your own work at the same time.

improve-photography-self-critic-5

The longer exposure sealed the deal for me creating that milky water effect around the base of the boulder that I was featuring in the shot.

The post 4 Ways Self-Critique Can Improve Your Photography by John Davenport appeared first on Digital Photography School.


Digital Photography School

 
Comments Off on 4 Ways Self-Critique Can Improve Your Photography

Posted in Photography


Flip for Fun: 4 Clever Pool Tables that Convert & Transform

08 Jul

[ By Delana in Design & Furniture & Decor. ]

rollover pool dining table

Pool is one of those great American hobbies that never seems to get old. As much as we might want to play every day, not everyone has the space to fit an entire pool table into their home. These three brilliant solutions (plus a bonus pool table that wouldn’t save any space, but would definitely be a conversation piece) might finally be enough to convince you to save your quarters and play at home instead.

Disappearing Pool Table

There’s honestly no better solution for hiding something than having it pop out of the floor only when you need it. The Disappearing Pool Table from Stage Engineering does just that: when it’s hidden away, the only clue that it’s there is a huge rectangular cutout in the floor. When you activate some sort of mechanism, the cutout floor drops down and slides away, exposing a full-size pool table that then rises up on a platform to floor level. There isn’t much information available other than this video, but the video is enough to convince us: we want one.

Dining Table Conversion Kit

fusion pool dining table

elegant fusion pool table converts to dining table

Pool table covers are nothing new – you unfold a foam mat or plop a piece of wood down onto the pool table and it becomes a place for dining or playing ping-pong. But the Fusion collection of tables offers a slightly more high-class approach to the idea. The high-quality pool tables come with wooden leaves that slide on securely to stay put for the purposes of eating at the table. The resulting dining table is quite elegant and not at all what you might expect of covered-over pool table.

Rotating Table

dolphin flip over pool dining table

rotating dining pool table

The Bentley Dolphin Rollover Pool Dining Table might be a mouthful, but it’s a fun piece of furniture that leads a double life. On one side it’s a standard-size pool, snooker, or billiards table. Undo the security latches and spin the tabletop upside-down in the frame and it becomes a dining table with a solid wood top or a beautiful inlaid pattern top. The makers suggest that the flat top can also be used as a conference table, but we suspect there wouldn’t be much business going on when there are clearly games of pool to be played.

Converted VW Bus

volkswagen pool table

vw bus pool table conversion

The VW Bus pool table is different from the others here because its transformation was one-way and permanent, but it did once serve a very different purpose so deserves a mention. It is made from the real chassis of an old Volkswagen that was then fitted with a wood and felt top. It’s probably not regulation size and it definitely won’t be level, but those are small details. What really matters is that someone took the time and care to craft this seriously awesome one-of-a-kind Volkswagen/pool table mashup, which is an undeniably beautiful thing.

Share on Facebook


[ By Delana in Design & Furniture & Decor. ]

[ WebUrbanist | Archives | Galleries | Privacy | TOS ]


WebUrbanist

 
Comments Off on Flip for Fun: 4 Clever Pool Tables that Convert & Transform

Posted in Creativity


Photography Hunting – Play the Waiting Game with Kids

08 Jul

What is photography hunting?

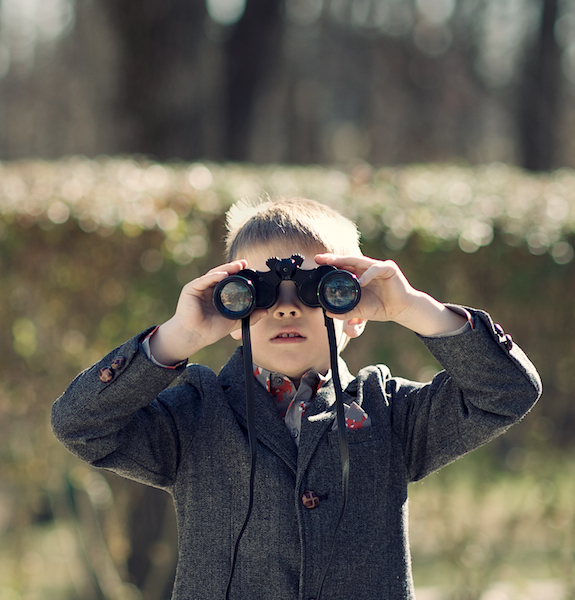
I am a hunter. My prey, however, does not scurry through the woods, fly through the sky or swim in the streams. My trophies are instead moments, which I stalk, camera at the ready. When the time is right, the target is placed squarely in my sights. Click.

I’m constantly on the hunt for that fraction-of-a-second gesture, facial expression or scene that takes an ordinary photograph to the next level. Hunting can be tiring and a little like war, in that there are long periods of boredom interspersed with brief moments of excitement. But those moments of excitement and the superior images they provide are well worth this mental approach to photography.

Halloween

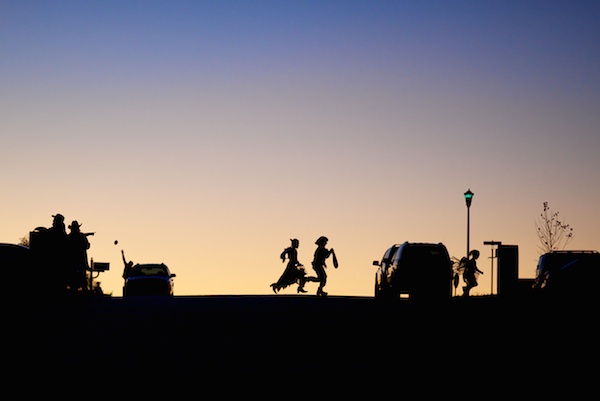
Seeing the potential for a nice Halloween silhouette, I waited at the bottom of the hill for several minutes until the perfect moment presented itself.

When I first began the journey of documenting my children’s lives, my methods for doing so were ineffective. Whether the scene was ‘created’ for the purpose of the photograph, or I caught my children in a natural setting, I would go after the end-result with a rapid-fire intensity, hoping one of the many images captured would result in success. Sometimes I would get lucky and catch the optimal moment with one of my stray shots. Other times, I would realize immediately before, or after, I’d pressed the shutter that the best frame had evaded capture. What an awful feeling it is to have your prize slip through your fingers, never to be seen again.

I would also try to control my subjects, in the hope they would appeal to reason and take requests from the man behind the camera. Sensing dad’s genuine desire to capture the moment, the little darlings would naturally do everything in their power to ensure I was unsuccessful.

Hat & Tie

Over time, my approach to photography evolved. Instead of aggressively spraying bullets into the woods, I now calmly sit back and monitor the scene. Rather than attempting to control the scene and my subjects, I now try to take the best photos the situation will naturally allow, without my overt intervention.

3

As with real estate values, photograph hunting hinges on location, location, location. Make sure to set up shop in the ideal location, so that when the moment arises, you’re not scrambling to get into position.

Know your subject

The first rule of photograph hunting is to know your subject. My subjects are two energy-filled kids, interested in anything but sitting stationary and smiling for dad. They have other things on their to-do lists and, if I ever hope to make decent photographs, my approach has to be the yin to their yang. If they are constantly moving and unpredictable, I have to be patient and watchful. If they refuse to pose, I have to fabricate poses using their natural movements and expressions. Essentially, I have to become a hunter, constantly focused on the situation.

Lower quantity – higher quality

Getting used to this alternative strategy may take time, but the transition can be relatively pleasant. Eventually, you won’t get as frustrated when that perfect moment slips away. But more importantly, because you’re strategically lying in wait for the right moment, fewer moments will slip by you in the first place. The days of rapid-fire documentation will gone, which means lower quantity, but higher quality. This reduction in the number of images produced has secondary benefits, in terms of processing time and data storage. Simply grab your camera, get into position, and wait patiently with the camera to your eye for that special moment when the stars align and the shutter goes click.

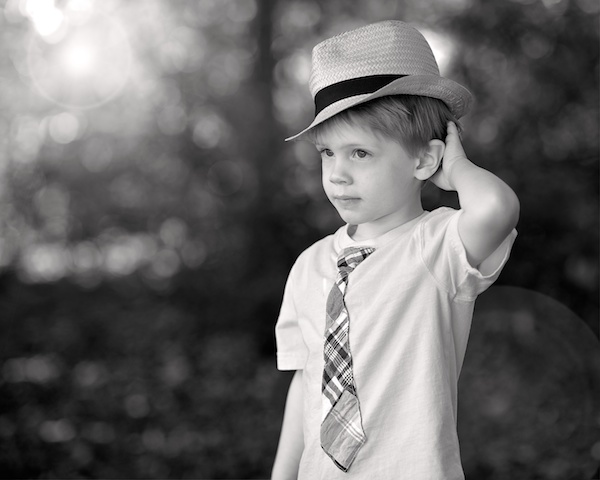
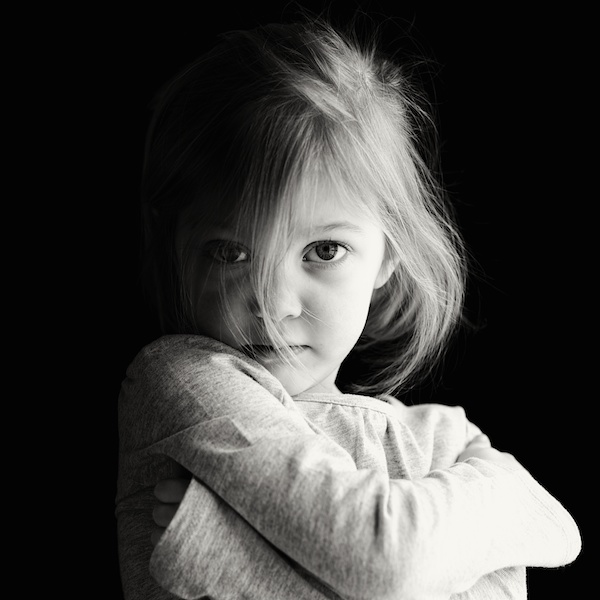
When the subject has no awareness of the photographer’s presence, the results tend to be more intimate.

A few photography hunting tips:

Camouflage

Become the wallpaper, so as to not influence your subjects’ movements and actions. You want them to be immersed in their own little worlds, as once they become aware of your presence and intentions, the entire situation can quickly unravel. Remaining an observer of the scene, as opposed to a participant within it, results in a more relaxed shooting environment, which fosters superior results.

Know your weapon

Know your camera and know the basics of photography so that you can quickly adapt to new light, positions and situations – without having to take the camera down from your eye. Too often, you will find that it is during those few seconds when you are not ready to take a photo, that the best photo opportunity will come and go.

The Hunter

Don’t fall asleep in your tree stand

Always maintain your mental focus. If you’re personally invested in the opportunity, and if the chance for a trophy photo exists, be ready. It’s amazing that such fleeting moments, which last mere fractions of a second, can have such long-term impact when viewed again and again. Stay focused on the subject so that when that split-second gesture, facial expression or scene presents itself, you’re there ready to capture it.

RMP_3336 - Version 2 (2)

Don’t spray and pray

Take fewer shots, with more precise aim. Put down the fully automatic in exchange for a nice, simple single-shot. Taking fewer photographs, that are each precisely timed and focused to hit the target, will result in more trophies hanging proudly on your wall, and will remove some of the post-process burden associated with sorting, editing and storing images.

Newsie

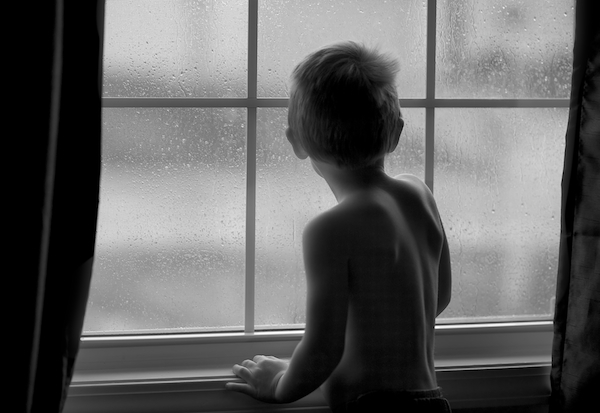
Photos don’t have to be 100% natural to employ the hunting technique. If I notice a scene with nice light, I’ll place my kids in the right position and watch them play until I see the ideal look or gesture.

Do you have any other tips for photography kids? Please share in the comments below, and show us your images as well.

Happy hunting!

The post Photography Hunting – Play the Waiting Game with Kids by Ryan Pendleton appeared first on Digital Photography School.


Digital Photography School

 
Comments Off on Photography Hunting – Play the Waiting Game with Kids

Posted in Photography


Create Better Black and White Photos Using Local Adjustments in Lightroom 5

08 Jul

Local adjustments in Lightroom

I showed you how to convert your photos to black and white in Lightroom in an earlier article. But, considering it dealt purely with global adjustments, the piece only gives you half the story. Global adjustments get you started, but in order to get the best black and white conversion possible you need to make local adjustments as well. This article will show you how to do this.

First, a couple of definitions:

Global adjustments: Any adjustments (to brightness, contrast etc.) that affect the entire image.

Local adjustments: Adjustments that affect only part of the photo.

Before I show you how to make local adjustments, let’s think about why you would do so. Certain things pull the eye more than others. For example, when you look at a photo with people in it, your eye will go straight to them, even if they are small in the frame. This is probably down to human curiosity more than anything, but it works.

Two other things that pull the eye are highlights and contrast. The idea behind making local adjustments is that you can alter the brightness or contrast of certain areas in the frame to influence where the eye goes. This creates a better, more beautiful photo.

Dodging and burning

Here’s the photo we’re going to work with in today’s article. I’ve already converted it to black and white using global adjustments.

Local adjustments in Lightroom

As you can see, it lacks a focal point. It also contains lots of beautiful textures which will look great in black and white if we can bring them out.

In order to make effective local adjustments you need to decide what you want to achieve before you start. Here, I decided to make the central watermelon the focal point of the composition. Decision made, it’s just a question of how to achieve it.

Dodging and burning

Although Lightroom itself doesn’t use these terms, you will find them referred to time and again in post-processing. Dodging is the act of making part of the photo lighter, and burning is the act of making it darker. They originated in the chemical darkroom and are also done in photo editing programs like Photoshop.

The first step to achieving my aim of making the central watermelon the focal point, is to make the rest of the photo darker. I did that by placing a Radial Filter over the central watermelon and moving the Exposure slider left.

Local adjustments in Lightroom

Note: The Radial Filter is new to Lightroom 5. If you have an earlier version of Lightroom, you can use either Post-crop Vignetting or the Adjustment Brush instead.

The two watermelons either side of the central one are a little too bright. So I used the Adjustment Brush to select (mask) them and moved the Exposure slider left to make them darker. The screenshot below shows the area covered by the mask. Note how I only painted the top parts of the watermelons as the bottom part was already dark.

Local adjustments in Lightroom

This is the result of the local adjustment.

Local adjustments in Lightroom

Contrast and Clarity

The next step is to improve the appearance of the central watermelon. I can do that by increasing contrast to bring out the beautiful textures of its skin.

I placed another Radial Filter over the watermelon (you could also use the Adjustment Brush) and ticked the Invert Mask box so the adjustment was applied inside, rather than outside, the filter. Then I increased Contrast and Clarity, and moved the Highlights slider right and the Shadows slider left. The result is a big increase in contrast, bringing out the texture of the watermelon’s skin. Here’s the result.

Local adjustments in Lightroom

Here are the before and after views so you can see the difference, which is entirely down to the local adjustments.

Local adjustments in Lightroom

That completes my overview of using local adjustments in Lightroom. As you can see, the local adjustments turned an average photo into a much stronger one. There is nothing overly complicated about it, it’s more a matter of training your eye to see in black and white and then deciding how to use the tools that Lightroom gives you to realize your vision.

I’m curious to hear how you use local adjustment when you convert your photos to black and white. Please let us know in the comments.


Mastering Lightroom: Book Three – Black & White

Masterlng Lightroom: Book Three – Black & White by Andrew S GibsonMy ebook Mastering Lightroom: Book Three – Black & White goes into the topic of black and white in depth. It explains everything you need to know to make dramatic and beautiful monochrome conversions in Lightroom, including how to use the most popular black and white plug-ins. Click the link to visit my website and learn more.

The post Create Better Black and White Photos Using Local Adjustments in Lightroom 5 by Andrew S. Gibson appeared first on Digital Photography School.


Digital Photography School

 
Comments Off on Create Better Black and White Photos Using Local Adjustments in Lightroom 5

Posted in Photography


Träume

08 Jul

Landschaften, die nicht von dieser Welt sind. Sie kommen aus einem verborgenen Reich, in das man sich begibt, wenn man vor Erschöpfung langsam in den Schlaf gleitet. Vassilis Tangoulis hält diese Traumwelten fest, bei denen es sich eigentlich um reale Landschaften Griechenlands handelt. In seiner Serie „Dreams“ entstehen dank Langzeitbelichtung, Schwarzweiß-Umwandlung und nachträglicher Bearbeitung einzigartige, unwirkliche Welten.

Für mich sind es die Orte, an die ich mich noch kurz nach dem Wachwerden erinnere. Die Erinnerungen leicht verschwommen und nur vage, entfernen sich nach und nach immer weiter von mir. Ich sehe sie gerade noch verschwinden, über ein weites Meer hinweg wird die Brücke zu ihnen jedoch immer länger, bis die Traumbilder samt Steg komplett verschwunden sind.

Meine fotografische Vision lässt sich besser beschreiben als ein Festhalten der Zeit in einer Welt, in der die „Gegenwart“ nur ein unendlich kleiner Teil der Zeit ist, eine flüchtige Illusion, die die beinahe unendliche Vergangenheit und Zukunft voneinander trennt.

Ein Steg führt über das Wasser zu einem Haus.

Ein Schiff liegt schräg auf dem Meer.

Ein Steg führt ins Meer. Am Horizont ist unscharf ein Schiff zu sehen.

Eine Insel im Meer, darüber der Sternenhimmel.

Ein Steg führt ins Meer. Am Horizont ein Haus.

Eine Insel im Meer. Darüber Gewitterwolken und ein Blitz.

An einem Steg steht ein kleines Boot.

Vassilis Tangoulis lebt und arbeitet in Griechenland. Seine Arbeiten könnt Ihr auf seiner Webseite oder auf Facebook verfolgen.


kwerfeldein – Fotografie Magazin | Fotocommunity

 
Comments Off on Träume

Posted in Equipment


How To Apply Lighting In The Real World

08 Jul

Image from Alana Tyler Slutsky's Surrealia series featured on Fashion Photography Blog (FashionPhotographyBlog.com)

LIGHT: REAL WORLD APPLICATIONS


Hey FashionPhotographyBlog.com readers! So, you have sucked it up and battled your way through the past two days learning about the science behind lighting as well as the Inverse Square Law and color temperature.  You’re probably sitting there thinking “GREAT. HOW DOES ALL THIS MUMBO JUMBO HELP ME IN THE REAL WORLD?”  I’m glad you asked.

Additive Primaries (RGB)/Subtractive Primaries (CMY)

Knowledge of these actually become very helpful in post-production.  Is your image looking a little red?  Throw in a tiny bit of it’s compliment (cyan) in the areas that are too red and it will balance out the colors, making the image more neutral.

Qualities of Light


Direction & Contrast

Want a very contrasty image? Don’t place the light directly in front of your subject, it will create a “flat” image (low contrast lighting).  Want a more dramatic image?  Try placing the light more to the side, this will create a higher ratio between the light/shadow relationship – aka the image will have more contrast.

Shot With Dramatic Lighting High Contrast
Dramatic Lighting (High Contrast)

Source

Shot With Flat Lighting Low Contrast
Flat Lighting (Low Contrast)

Source

Diffused & Specular

How do you want to light your image? What is the image for? What is your subject? If you’re going to be taking head shots for an actor, you’re going to want to use a more diffused light source to compliment their features. Using a specular light source for a head shot wouldn’t end with a very pretty result. There would be ugly harsh shadows which would distract the viewer.

Inverse Square Law

I know this one is confusing. Know this: the Inverse Square Law has to deal with fall off of light. Need a black background but you only have a white wall? The farther you get from the wall, the more your light source will fall of, creating a darker and darker background as you move your light and your model farther from the wall. Granted, depending on how big/bright your light source is, you may have to move far away from the wall in order to get your background completely black.

Color Temperature

Want your image to have a blue color cast but you’re shooting in daylight? Set your white balance to “Tungsten.” Since tungsten light is orange in color, your camera knows to add more blue to the image to balance the colors. If you’re already shooting with a blue light source (Daylight/Daylight balanced Flash) and set your white balance to “Tungsten,” you camera is going to over compensate and the result will be a cooler, blue image.

Play around with white balances and color temperatures! You can get some cool results.

Shot With Daylight White Balance Setting
Originally shot with white balance set to “Daylight”

Shot With Tungsten White Balance Setting
White balance changed to “Tungsten” to give the image a blue color cast

Made it through? Good! I know it was a bit rough but it’s over now. I promise next post on light will be the information that everyone wants to know – how to shape and modify it! Thanks for sticking it through and hopefully you learned something.

As always, if you have any questions, feel free to shoot over an email! alana@alanatylerslutsky.com

– Alana

IMAGE SOURCE:

Feature image & image 1: photography by Alana Tyler Slutsky from her Surrealia series. To view the rest of the photos from this series visit her website.

Image 2: Adorama

Image 3: DPS

Image 4 & 5: Alana Tyler Slutsky


Fashion Photography Blog

 
Comments Off on How To Apply Lighting In The Real World

Posted in Uncategorized


UPDATED: Sony’s curved sensors may allow for simpler lenses and better images

08 Jul

UPDATE: Sony has released an image taken with its curved sensor, and provided more details on what we might expect from its curved sensor technology. We’ve updated our previous story with this image and details. Read more

related news: Digital Photography Review (dpreview.com)

 
Comments Off on UPDATED: Sony’s curved sensors may allow for simpler lenses and better images

Posted in Uncategorized