Ein Beitrag von: Aliza Razell

kwerfeldein – Fotografie Magazin | Fotocommunity
Blackmagic Design, maker of a range of high-end compact cinema cameras, has announced a firmware update for all of their models. Available today, the new firmware provides an entirely new code base for the Blackmagic cameras and will enable the company to roll out new features to their devices. The new update claims to provide improved performance and introduces a new user interface. Learn more
related news: Digital Photography Review (dpreview.com)
Nikon has announced its latest midrange FX-format digital SLR: the D810. The camera replaces both the D800 and D800E, and features a 36.3MP CMOS sensor with no low-pass filter. The EXPEED 4 engine from the D4s has been incorporated, allowing for a wider ISO range, improved image quality and metering as well as faster burst shooting. Nikon has also redesigned the mirror mechanism and introduced an electronic first-curtain shutter option to reduce the risk of ‘shutter shake’ reducing resolution. Click through to read more
related news: Digital Photography Review (dpreview.com)
Tamron has announced the addition of profiles for two of its lenses to Adobe Camera Raw. The Tamron SP 150-600mm F/5-6.3 Di VC USD for Nikon mount and the 16-300mm F/3.5-6.3 Di II VC PZD Macro for both Canon and Nikon mount have been profiled for use with Adobe’s tools for lens aberration correction for users of Adobe Photoshop CC, Adobe Photoshop CS6, Adobe Camera Raw and Lightroom 5.
related news: Digital Photography Review (dpreview.com)
Establishing your own photography business is a full time job, if not more. It’s a great gig, don’t get me wrong, but running this or any other business will instantly make you the wearer of many hats. The best way to make it work and avoid headaches along the way is to have a plan, even if it is a Continue Reading
The post Tips to Establish a Smart Photography Business appeared first on Photodoto.
Nikon’s new D810 replaces two models, the D800 and D800E. It brings a number of refinements, some of which are minor, but some that are potentially very significant. The D810’s specification sheet is enormous and it’s easy to miss things – in this article we’re cutting through the PR jargon and breaking out the D810’s main selling points. Click through to read more
related news: Digital Photography Review (dpreview.com)

Good morning, Fashion Photography Blog readers! Welcome back to our brief intro to photography. Last post we talked about the camera basics. In this post we are going to going to talk about how to set up your exposure correctly. So let’s jump right in.
There are three main settings to be aware of prior to taking a photograph. Those settings are ISO, Aperture and Shutter Speed.
ISO – ISO, back in the days of film, was the measure of a film’s sensitivity to light. This system has been adopted by digital cameras and essentially works the same way it did with film. “Less sensitive” films require more light to make an exposure – The higher the ISO number, the more sensitive the film. So, what exactly does this mean?
Let’s say you want to shoot someone outside on a bright, sunny day. You would use a film (or set your digital camera) with an ISO of about 100. Because of the large quantities of light available to you, it’s not necessary to use a sensitive film.
If you’re trying to shoot someone in a room solely illuminated by candle light, you’re going to need film that is much more sensitive. For this situation I would suggest using something closer to ISO 1600. Films that are more sensitive are referred to as “fast films” whereas films that are less sensitive are referred to as “slow films.”
In the case of film, the more sensitive it is, the more grain you will see in the final image (this has to do with the chemistry of the film and something called “silver halides.”). With digital cameras, the higher the ISO, the more noise you will see in your final images. This has to do with the image sensor and how much heat it is giving off while capturing your image, among other things.

ISO Comparison – Same camera settings, only difference is the ISO
Aperture (f/stop) – Aperture is the size of the hole in the lens that controls the amount of light let in. The larger the f/stop # the smaller the opening in the lens.

Shutter Speed – Shutter speed is the other setting which controls how much light is let into the camera. This one is kind of self-explanatory, time works in fractions of a second.
You must understand the relationship between shutter speed and aperture in order to precisely control your exposure. The wider open your aperture, the faster your shutter speed to prevent overexposing your image. The smaller your aperture, the slower your shutter speed to prevent underexposing your image.
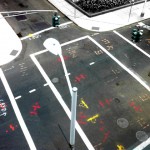
Think of it this way… Let’s pretend that your camera is a bucket and light is water. In order to fill your bucket with water, you have to control how much pours in at a time. The larger the opening (the wider open your lens is, i.e. f/2.0) the more water (light) will pour in. Therefore you must shut off the water relatively quickly (use a faster shutter speed, i.e. 1/250th) in order to prevent it from “overflowing” or overexposing your image. It works in the reverse as well… If you have a smaller opening (smaller aperture, i.e. f/22) you must let the light in for longer (use a longer shutter speed, ie 1/15th) in order to prevent an underexposed image.

(The numbers in this image have nothing to do with the number in the paragraph above)
Everything in photography is measured in stops. You should memorize these stops because you will need to recall them at a moments notice. Cameras and light meters often measure things in thirds of a stop for more precision, but this can be turned off.
The main stops for ISO:
(Least sensitive) 100, 200, 400, 800, 1600, 3200 (Most sensitive)
The main stops for aperture (f/stops):
(Largest opening) f/1.4, f/2.0, f/2.8, f/4, f/5.6, f/8, f/11, f/16, f/22, f/32, f/64 (Smallest opening)
The main stops for shutter speed:
(Longest) 2s, 1s, 1/2, 1/4, 1/8, 1/15, 1/30, 1/60, 1/125, 1/250, 1/500, 1/1000 (Shortest)
Stops either double or halve when opening up or stopping down. This is blatantly obvious with shutter speeds; it works the same with ISO and f/stops. F/8 allows in 1/2 the amount of light that f/5.6 allows in.
Stops work in relation to each other. If you have the combination for a perfect exposure but decide you want to use a more shallow depth of field or want a longer shutter speed for motion blur, you can easily achieve your desired effect without having to re-meter or anything.
This is something called equivalent exposures.

Count the number of stops between your actual exposure and your desired exposure to figure out what is the new f/stop – shutter speed combination would be. I know this sounds confusing but I promise it’s quite simple.
Let’s say you are shooting at ISO 100 @ f/16 with a shutter of 1/15th of a second.. But you want a shallow depth of field and would rather shoot at f/4. Count the number of stops between the two and adjust your shutter speed accordingly.
The difference between f/4 and f/16 is 4 stops. In this scenario, you’re opening up your aperture, therefore letting in more light. So you must stop down (close) your shutter 4 stops to keep an equivalent exposure. 4 stops difference from 1/15 would be 1/250.
Your new, but equivalent exposure would be ISO 100 @ f/4 with a shutter speed of 1/250th of a second.

I know this part gets a bit confusing. Just stick it through and I promise we’ll get to the fun stuff soon.
Check back in tomorrow for Day 3 – Lenses. (Or if you missed it, catch up on yesterday’s post, Part 1 – Cameras.)
In the meantime if you have any questions, just ask! Shoot me an email at alana@alanatylerslutsky.com.
Happy shooting!
Alana
The image sharing platform and marketplace EyeEm has released an update to its mobile app for Android devices. The new version includes some modifications under the hood to improve performance and make future upgrades easier, but it’s the cleaner, redesigned interface that most users will notice first. Read more
related news: Digital Photography Review (dpreview.com)
[ By WebUrbanist in Destinations & Sights & Travel. ]

Notoriously restrictive of the media, the North Korean government surprisingly granted the request of an outsider seeking to shoot a virtually unprecedented video: a continuous car tour of the nation’s largest and capital city.
Aran Pan of Singapore is a photographer and cinematographer given unique permission to document this secretive country, boasting, among other accomplishments, the first series of 3D panoramas shot within its borders and visible to the outside world.


While the film itself is uncut and uncensored, its filming meant traveling with a state-appointed driver, translator, photographer and overseeing official.


The mission of this project, titled DPRK 360, is not to reveal any hidden agenda (or architecture) but simply to convey a sense of place. If anything, the filmmaker hopes his viewers will come away with the idea that there is beauty in North Korea.


Indeed, the streets seem almost unnaturally serene – quiet and nearly empty – and the path traveled (though potentially by design) is quite clean and relatively unremarkable in itself. The buildings, too, are bland if anything, with hints of Asian architectural styles as well as Neoclassical influences.

Canada’s abandoned wonders include greying neoclassical banks in downtown Toronto, forgotten asylums, beautiful Beaux Arts hydro power stations and a …
Click Here to Read More »»

In America we have a seemingly endless succession of near-identical cemeteries, filled with orderly rows of bland stones that tell us nearly nothing about the …
Click Here to Read More »»
Somewhere between city signs and street graffiti lies a surprisingly rich and colorful language of secret messages, all hidden in plain sight on roads and …
Click Here to Read More »»
![]()


[ By WebUrbanist in Destinations & Sights & Travel. ]
[ WebUrbanist | Archives | Galleries | Privacy | TOS ]

You must be logged in to post a comment.