RSS
 

Archive for June, 2014

How To Shoot Unique Travel Photos Like You Wouldn’t Believe

06 Jun

In our world of digital photography, it’s tough to take one-of-a-kind travel photos. For example, let’s say you’re visiting the Leaning Tower of Pisa in Tuscany, Italy. With your camera around your neck, you stroll into the Piazza dei Miracoli and are struck by the strange bell tower’s architectural beauty. But you also notice the crowds of tourists snapping pictures like the paparazzi at Continue Reading

The post How To Shoot Unique Travel Photos Like You Wouldn’t Believe appeared first on Photodoto.


Photodoto

 
Comments Off on How To Shoot Unique Travel Photos Like You Wouldn’t Believe

Posted in Photography


Royal Air Force commemorates 70 years since D-Day with recreated photos

06 Jun

A_II__AC__Squadron_Mustang_in_flight.jpg

Seventy years after the D-Day landings in Normandy, the Royal Air Force remembers June 6, 1944 by recreating some historic images from the day – though not the kind you might expect. As naval forces made landfall on D-Day, a II (AC) Squadron Mustang took to the sky above, bringing back some of the first images of the landings. The reconnaissance mission was recently mimicked by two Tornado GR4s carrying more sophisticated imaging equipment. Compare the photos and fly along with the modern jets in a behind-the-scenes video. See more

News: Digital Photography Review (dpreview.com)

 
Comments Off on Royal Air Force commemorates 70 years since D-Day with recreated photos

Posted in Uncategorized


Michaels Equipment für Landschaftsfotos

06 Jun

Ich fotografiere nun schon seit über fünf Jahren Landschaften und mit der Zeit hat sich einiges an Equipment angesammelt. Um meine Fotoideen so wie im Titelbild umzusetzten, sind für mich neben Kamera und Objektiven einige weitere Dinge essentiell.

Doch fangen wir mit der Kamera an: Seit zwei Jahren fotografiere ich mit einer Canon EOS 5D Mark II*. Obwohl schon etwas in die Jahre gekommen, macht sie immer noch tolle Fotos, die ich locker auf 150 x 100 cm Fineart-Papier entwickeln lassen kann, wenn ich sauber arbeite. Außerdem mag ich die Bedienung. Alle mir wichtigen Einstellungen lassen sich in Sekunden erledigen.

Foto von Michael Breitung und seinem Equipment auf Korsika

Um vom Weitwinkel bis Telebereich alles abzudeken, trage ich drei Objektive auf Fototouren ständig bei mir: Das Canon EF 16-35mm 1:2,8L II*, das ich vor allem wegen der einzigartigen Sonnensterne, die es fabriziert, so liebe. Von Tamron das 24-70mm 1:2.8 Objektiv*, das eine sehr gute Schärfe liefert. Und wiederum von Canon das 70-200mm 1:4 L IS*, das ich für Detailarbeit nutze.

Mindestens genauso wichtig wie Kamera und Objektive ist für mich das Stativ geworden. Für 95 % meiner Fotos nutze ich ein Stativ. Da ich fast all meine Fotos in irgendeiner Form überblende, fotografiere ich selbst bei Sonnenschein mit Stativ, auch wenn die Belichtungszeiten Aufnahmen freihand zulassen würden.

Bewärt hat sich als Stativ das Benro C-298 M8, das ich drei Jahre in Verwendung hatte. Mittlerweile ist es auf der Ersatzbank, weil ich etwas Kompakteres wollte. Das Induro CT114* habe ich seit einem halben Jahr im Einsatz. Ebenfalls von Induro stammt der Stativkopf, den ich verwende. Da ich Kugelköpfe zu fummelig finde, nutze ich den PHQ-1 5-Wege-Neiger*. Damit lassen sich Landschaftsfotos präzise komponieren und zusammen mit einer Kirk LRP-1 Schiene auch einreihige Panoramen anfertigen.

Was ich auch nicht mehr missen möchte, ist das L-Winkel von RRS. So kann ich blitzschnell zwischen Quer- und Hochformat wechseln.

Obwohl ich viel mit Belichtungsreihen arbeite, sind für mich Verlaufsfilter unverzichtbar geworden. Von Lee nutze ich einen 0.6 hard GND und einen 0.6 soft GND, die ich einzeln oder in Kombination vors Objektiv schiebe. Wenn ich am Meer fotografiere oder einen ebenen Horizont habe, verwende ich gelegentlich einen Singh-Ray 2-Stop Reverse Grad.

Aber wie schon angesprochen, reichen mir Filter allein nicht aus. Ich nutze Verlaufsfilter immer in Kombination mit Belichtungsreihen, um alle Details einzufangen. Durch die Filter erhalte ich ein gutes Ausgangsfoto, in dem ich dann nur noch kleine Bereiche aus den anderen Belichtungen einblenden muss.

Wo wir gerade bei Filtern sind, darf ich den Polfilter natürlich nicht vergessen. Besonders im Wald oder am Wasser nutze ich einen Hoya HD Polfilter*, um Reflexionen zu minimieren.

Am Wasser und vor allem am Meer wäre ich außerdem ohne Objektivreinigungstücher aufgeschmissen. Diese gibt es in unzähligen Ausführungen von zahlreichen Herstellern. Ich setzte seit einiger Zeit auf Bambus-Tücher* in verschiedenen Größen. Damit bekomme ich selbst die salzhaltige Gischt am Meer wieder schlierenfrei von meinen Filtern. Die Reinigungstücher zu vergessen, wäre für mich eine Katastrophe.

Die Liste an Zubehör geht noch weiter. Jedoch habe ich die wichtigsten Bestandteile meiner Aurüstung genannt. Bleibt noch die Frage nach der richtigen Verpackung. Der perfekte Kamerarucksack ist für mich der F-Stop Satori. Er ist bequem, öffnet am Rücken, hat viele Fächer, ist gut konfigurierbar und passt ins Handgepäck.

Damit habe ich, denke ich, genug über Equipment geredet. In meinen nächsten Artikeln liegt dann der Fokus wieder darauf, was ich damit mache.

* Das ist ein Affiliate-Link zu Amazon. Wenn Ihr darüber etwas kauft, erhält kwerfeldein eine kleine Provision, Ihr zahlt aber keinen Cent mehr.


kwerfeldein – Fotografie Magazin | Fotocommunity

 
Comments Off on Michaels Equipment für Landschaftsfotos

Posted in Equipment


Gedanken zur Unschärfe

06 Jun

Ein Beitrag von: Anne Henning

Seit jeher existiert die Vorstellung, Unschärfe habe etwas mit Fehlerhaftigkeit zu tun. Einerseits geben doch zahlreiche Handbücher standardmäßig Tipps, wie man Unschärfe vermeiden kann, andererseits sind es gerade unscharfe Fotos, die den Betrachter besonders in ihren Bann ziehen. Gibt es also gute und schlechte Unschärfe?

Ich bescha?ftige mich gern historisch und kunstwissenschaftlich mit verschiedensten Dingen, die mir in der Fotografie begegnen und u?ber die ich dann la?nger nachdenken muss. Unscha?rfe ist eines davon. Es ist spannend, wie sich eine vermeintliche Fehlerhaftigkeit, na?mlich, dass einzelne Bildteile nicht zu erkennen sind, in der Kunst etabliert hat, und das in erstaunlich vielen Formen. Und hier daru?ber zu schreiben, ermo?glicht es mir erneut, einige meiner liebsten Unscha?rfefotos anderer Fotografen vorzustellen.

Schon in der fru?hen Landschaftsmalerei war Unscha?rfe ein beliebtes Stilmittel, eine romantische Grundstimmung zu schaffen. Man denke nur an Caspar David Friedrichs abendliche Naturlandschaften, in denen Himmel und Erde scheinbar nahtlos ineinander u?bergehen.

Konturenscha?rfe zeugt von Kontrolle u?ber das Gesehene, ein scharfer Blick impliziert Pra?zision und Unbestechlichkeit, Unscha?rfe hingegen ermo?glicht es dem menschlichen Auge, Dinge miteinander sanft verschmolzen zu sehen, wo sonst vielleicht nur harte Kanten oder schroffe Gegensa?tze zu finden wa?ren.

Ob bei Landschaft oder Architektur, so ko?nnen Gegensa?tze besa?nftigt und malerisch weich gemacht werden. Unscha?rfe hat also eine Funktion und ist nicht nur ein zufa?llig gewa?hlter Pinselstrich oder eben in der Fotografie ein falsch eingestellter Fokus. Im U?brigen sind heutzutage Scha?rfe und Unscha?rfe feste Termini der Fotografie, wa?hrend bei gemalten Bilden eher von Sfumato oder Verblauung gesprochen wird.

Fotograf: Ludwig West

Fotograf: Ludwig West

Fotografin: Snjezana Josipovic

Fotografin: Snjezana Josipovic

Seit der Erfindung der Daguerrotypie und somit der Mo?glichkeit, Fotografien dauerhaft zu fixieren, diente das Foto als Wiedergabe der Wirklichkeit in all ihren Details. Erst 1859, also 20 Jahre nach ihrer Erfindung, wurde die Gleichung Fotografie = Scha?rfe auf einer internationalen Konferenz in London erstmals in Frage gestellt.

Plo?tzlich wurde empfohlen, statt gleichma?ßiger Scha?rfe mal den Hintergrund verschwimmen zu lassen, doch erst gegen Ende des 19. Jahrhunderts war die „unscharfe Richtung“ auch Mode im deutschsprachigen Raum. Es wurden in Fachzeitschriften sogar regelma?ßig Tipps gegeben, wie man durch Gelatinefolien, Tu?llschichten oder sogar Damenstru?mpfe zwischen Kamera und Objektiv gespannt, feine Unscha?rfen erzeugen konnte.

Es galt vor allem als schick, gerade Frauen nicht gnadenlos vollscharf abzubilden, sondern sie dezent weichzuzeichnen, um eventuelle kleine Makel so vertuschen zu ko?nnen. Auch heute gibt es eine Tendenz, weibliche Modelle eher unscharf abzulichten, um ihnen eine Zartheit zu verleihen. Doch auch hier variiert der Grad der Unscha?rfe natu?rlich erheblich.

Portrait einer nackten Frau in kalten Farben

Fotograf: Hasse Linden

Portrait einer blonden Frau im BH, vor einem Heizkörper.

Fotografin: Orphin

Ob es nun darum geht, etwas zu vertuschen oder bestimmte Dinge in den Fokus zu ru?cken, um die unscharfen Aspekte zu u?berlagern und somit den Blick des Betrachters gezielt zu lenken, ist letztendlich eine Frage des Wahrheitsanspruches an das Foto und welche Geschichte es erza?hlen soll.

Scharfe Details haben eine besonders blickfangende Wirkung, wenn der Rest des Bildes in partieller Unscha?rfe verschwimmt. Dabei ist es spannend, wie manchmal Vordergrund und manchmal Hintergrund als Blickfa?nger dienen, allein durch die Entscheidung zu Scha?rfe und Unscha?rfe.

Fotografin: Marit Beer

Fotografin: Marit Beer

Fotografin: Nastya Kaletkina

Fotografin: Nastya Kaletkina

Der Fotograf Heinrich Ku?hn war 1897 der Meinung, es sei Aufgabe der Unscha?rfe, innere Bilder sichtbar zu machen. Vorstellungs- und Erinnerungsbilder waren fu?r ihn so fotografisch umsetzbar, denn auch unser echtes Erinnerungsvermo?gen gibt uns keine detaillierte Aufschlu?sselung, wie eine vergangene Szene genau ausgesehen hat.

Farbe und Muster einer Tapete, die Form eines Mo?belstu?cks oder Details der Kleidung, an Einzelheiten ko?nnen wir uns oft nur unscharf erinnern. Verblasste Erinnerung hat A?hnlichkeiten mit unscharfen Fotografien, auch wenn Wissenschaftler bestreiten, dass es u?berhaupt so etwas wie ein „inneres Bild“ gebe und dieses Denken lediglich inspiriert sei durch Filme.1

Und wirklich: Unscha?rfe fungiert in Filmen gleichsam als Code, denn man hat gelernt, dass es sich entweder um eine Ru?ckblende oder einen Traum handeln muss, wenn die Bilder verschwimmen oder weichgezeichnet sind. Denkt mal dru?ber nach, es ist faszinierend, wie stark wir filmisch gepra?gt sind!

Dennoch ist es spannend, wie ein unscharfes Foto uns Verschwinden suggeriert, einen U?bergang zwischen Realita?t und Nichts, ein indefinites vertra?umtes Dazwischen und der Betrachter zwischen Sichtbarkeit und Unsichtbarkeit hin- und hergeschoben wird.

Fotografin: Snjezana Josipovic

Fotografin: Snjezana Josipovic

Fotografin: Celeste Ortiz

Fotografin: Celeste Ortiz

Im Bildjournalismus hingegen haben unscharfe Fotos eine genau entgegengesetzte Wirkung auf den Betrachter: Sie zeugen von Authentizita?t. Selbst ein verwackeltes Foto hat einen Sensationscharakter, man vermutet den ehrlichen Schnappschuss eines Fotografen, der frei von Kalku?l oder Verwertungsinteresse zufa?llig Zeuge einer bestimmten Szene wurde.

Ob Geisterfotografie oder andere mystische Begebenheiten – je unglaubwu?rdiger eine Begebenheit, desto ho?her die Wahrscheinlichkeit, dass das Beweisfoto unscharf ist. Dass auch hier der Betrachter geschickt manipuliert wird, ist offensichtlich.

Fotograf: Moune Drah

Fotograf: Moune Drah

1907 heißt es in einer Rezension zu einer Fotoausstellung dann liebevoll ausgedru?ckt:

Der Apparat nimmt die Gegensta?nde nicht mehr wie fru?her mechanisch auf, sondern sieht sie durch ein Temperament. Er kann blinzeln und fixieren, kann u?ber Kleinigkeiten hinwegsehen und bei Bedeutendem verweilen, kann auch verzeichnen und schrullenhaft sein, mit einem Wort: Er hat eine Seele bekommen.2

Und auch ich habe bei manchen Fotografien genau dieses Gefu?hl, dass die alte Kamera eine Seele hat und unscharfe Bilder erzeugen in mir oft die Illusion, mit meinem Blick alles und doch nichts greifen und begreifen zu ko?nnen. Fu?r mich ist es manchmal befreiend, den Blick nicht auf vorgegebene scharfe Punkte fixieren zu mu?ssen, sondern den Gedanken freien Lauf zu lassen. Eine Nassplatte auf sich wirken lassen, mit all ihren Unscha?rfen dank — aus heutiger Sicht — la?ngst u?berholter Technik.

Fotograf: Jan Eric Euler

Fotograf: Jan Eric Euler

Ein Bild, das seinem Betrachter Details vorentha?lt, gibt sich auch selbst nicht preis. Viel mehr zelebriert es eine gewisse Distanz und Ra?tselhaftigkeit, was wiederum unser Interesse weckt.

Oder: „Das Bild besitzt auf einmal die Autorita?t, auch schweigen zu du?rfen und sich nicht verho?ren lassen zu mu?ssen“, wie es Wolfgang Ullrich in seiner „Geschichte der Unscha?rfe“ sehr passend ausdru?ckt.3 Atmospha?re, Stimmung und die eigene Fantasie des Betrachters ru?cken in den Mittelpunkt und er muss selbst die Leerstellen fu?llen, die das Foto ihm vorgibt.

Fotografin: Marina Jerkovic / Zimmer117

Fotografin: Marina Jerkovic / Zimmer117

Ich bin ein großer Bewunderer von Unscha?rfe, ist sie auch manchmal Mittel zum Zweck, uns auf etwas aufmerksam zu machen oder etwas vor unserem Auge verschwimmen zu lassen. Trotzdem glaube ich, ist es oft genug Zufall, dass genau im Moment des Abdru?ckens der Fokus falsch justiert war. Und gerade diese Fotos sind es, die zeigen, dass es keine unpassende oder falsche Unscha?rfe geben kann, wenn das Foto eine eigene Poesie, A?sthetik und Geschichte besitzt.

Fotografin: Anne Henning

Fotografin: Anne Henning

Fotograf: Rüdiger Beckmann

Fotograf: Rüdiger Beckmann

Oder, wie es die großartige britische Fotografin Julia Margaret Cameron, die im 19. Jahrhundert fu?r ihre unscharfen Portraits beru?hmt war, aber auch vielerorts kritisiert wurde, schon 1864 ausgedru?ckt hat:

What is focus – and who has a right to say what focus is the legitimate focus?


Quellen und Literatur

1 Wolfgang Ullrich, Die Geschichte der Unschärfe, S. 75
2 Fritz Matthies-Masuren, Künstlerische Photographie, S. 94
3 Wolfgang Ullrich, Die Geschichte der Unschärfe, S. 15


kwerfeldein – Fotografie Magazin | Fotocommunity

 
Comments Off on Gedanken zur Unschärfe

Posted in Equipment


16 Cap Redesigns Give 2nd Lives to 40,000 Used Cola Bottles

06 Jun

[ By WebUrbanist in Design & Guerilla Ads & Marketing. ]

coke bottle cap reuse

Aimed at promoting the creative reuse of plastic bottles, Coca-Cola has launched a project to give away caps that convert discarded drink containers to fun and practical alternative functions.

These so-called Second Lives adapters can turn waste vessels into everything from bubble blowers and squirt guns to night lights, shampoo dispensers, pencil sharpeners, paintbrushes and water-filled weights.

coke cap guerrilla marketing

The plan, hatched by Ogilvy & Mather China, is to distribute these caps for free in Thailand, Indonesia and Vietnam, with the company encouraging people to take off the Coke labels to avoid confusion. The larger idea is to inspire alternative uses for old plastic bottles, getting people to think outside of the box about what is disposable and what could, in fact, have some sort of second life waiting within it.

coke cap alternative examples

“We are always looking for better solutions to reduce the use of plastic and increase recycling around the world,” said Leonardo O’Grady, ASEAN Director Integrated Marketing Communications, Coca-Cola. “The variety of our ‘2nd Lives’ caps shows that there are many creative ways to re-use plastic simply and practically, and also supports our global sustainability program.” 

second lives cola project

The project was piloted in Ho Chi Minh City, Vietnam in March, with an expected 40,000 bottle caps to be gifted throughout the country this year. The campaign is set to launch in Thailand and Indonesia at a later date. Still, it is worth wondering whether adding more plastic to the world is worthwhile. As neat as some of these designs are, will they ultimately reduce waste or contribute to it?

Share on Facebook


[ By WebUrbanist in Design & Guerilla Ads & Marketing. ]

[ WebUrbanist | Archives | Galleries | Privacy | TOS ]


WebUrbanist

 
Comments Off on 16 Cap Redesigns Give 2nd Lives to 40,000 Used Cola Bottles

Posted in Creativity


Olympus patent describes Google-Glass-like device

06 Jun

olyglass1.png

It seems that Olympus might be planning to jump on the wearable camera bandwagon with a device that looks similar to Google’s ‘Glass’. A newly published Oly patent (JP2013/075623) describes a wearable device that comes with either one or two transparent screens in front of the wearer’s eye. Click through for more information on connect.dpreview.com.

News: Digital Photography Review (dpreview.com)

 
Comments Off on Olympus patent describes Google-Glass-like device

Posted in Uncategorized


Amazon launch planned for June 18, rumors point to 3D eye-tracking phone

06 Jun

amazon_device.jpg

Amazon has scheduled a product launch for later this month at its headquarters in Seattle, WA. We are not being told what type of device we should expect but Amazon has started to tease the new model with a picture of one of its corners and a video showing users looking down at a device and reacting with statements like “It moved with me”. The teaser seems to support rumors from late last year that Amazon could be planning a smartphone with a 3D eye-tracking user interface using multiple cameras. Click through for more information at connect.dpreview.com.

News: Digital Photography Review (dpreview.com)

 
Comments Off on Amazon launch planned for June 18, rumors point to 3D eye-tracking phone

Posted in Uncategorized


Adorama Flashpoint Budget Studio Monolight Review

06 Jun

Flashpoint-Budget-2.jpg

Offered in 160W ($ 70) or 300W ($ 100) power intensities, Adorama’s Budget Studio Monolights are geared toward studio photographers who are just starting out and are constrained by modest budgets. At a fraction of the price of professional heads, can the Flashpoint Budget Studio lights do the job? Find out in our review

News: Digital Photography Review (dpreview.com)

 
Comments Off on Adorama Flashpoint Budget Studio Monolight Review

Posted in Uncategorized


10 Great Photography Lessons You Can Learn From a 2 Year Old

06 Jun

Child

Nowadays, fancy shmancy cameras can blast you with gazillion frames per second, but non of these can beat the time honored tradition of observation.

If there is one skill that has safeguarded my butt many times it’s the simple act of observing. If you don’t believe me, ask my wife. Observation is not only good when making images, it’s also good for insights. Well I’ve observed my son since day one, literally, and now that he is 2 years old, he is the one who is offering me great insights into photography.

I’ll make sure he never sees this article. Imagine when he’s 10 and says “You’ve learned so much from me at two, imagine how much more you can learn now that I am 10″. I’ll never hear the end of it. Anyway, here are:

10 great photography tips I’ve learned (and you can too) from my 2 year old, nicknamed Yoki

1) Be amazed at everything

Bathroom window

I was outside a restaurant waiting for the rest of the family, it was raining. Laplwie! (“Rain” in french) Laplwie! Yelled my son. A woman walked in with an umbrella, my son bent his feet and pointed all exited “Bwella!!! Bwella!!!”

An oh-so-cute scene. But it got me wondering. I’ve probably seen a million and a half umbrellas yet look at this kid jumping up and down because of an umbrella. Both of our eyes saw the same thing but our mindset was different.

Humans are by nature creatures that get used to things. When it comes to photography, the location is only interesting after a few days, beyond that it’s boring. If you go out and shoot the same area over and over again, you know what I mean. To freshen things up, the solution is to either seek new locations or things to do – or see things in a new way.

In the first case the transformation is external, in the second case it’s internal. I keep the scene of my son and the umbrella in my mind to remind me to always see things in a new way. Every location eventually gets boring, shooting the same kind of pictures over and over again can get boring, so the solution is to see things in a different way.

There’s the true story of an old woman, she was going completely blind but had an operation that restored her sight. She talks about how much she loves doing dishes and looking at the beautiful colors of the bubbles that get formed when she puts in the soap. How many times do we loathe doing our dishes? What is to be learned from this lady?

If you feel your photography is boring, see things in a new way, always tell your mind to see things as if you see them for the first and last time. Yoki does so, and so does that woman who regained her sight. Light and life is beautiful everyday, but to appreciate it takes a conscious effort. There’s a nice saying I like “Everyday is a new day to a wise man”.

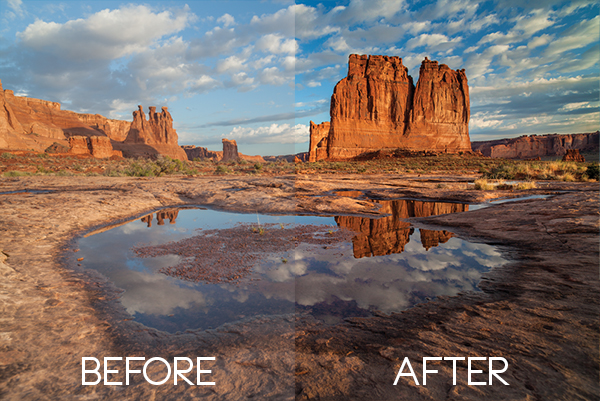
Every time I find myself saying Photography is boring (not often but it happens), I remind myself of my son and the rain. Speaking of which, do you notice how rain can transform a scene? The lower contrast between the sky and the rest of the earth? How reflections of the puddles create interesting shots? Or how the rain hitting the ground makes interesting shapes? Or how a window in a bathroom can be a symbol of being locked in? Or how…

2) Kids enjoy themselves because they are in the present

Dark man

I like watching Yoki play, especially with his blocks. He looks so happy. This got me wondering, why don’t photographers have this sort of joy? Isn’t it as simple as enjoying what you do? I observed him even more and looked for what he was doing that photographers were not doing.

The main thing is that kids enjoy what they are doing, all that they care about for the time being is playing with the toy. I’ve been out on the street thinking about what to do the next week, I’ve been on assignment while doing mental financial calculation – exactly what Yoki isn’t doing.

Can you walk a mile? How much less enjoyable would it be if I gave you two nice pieces of luggage to drag while you walk that mile? Unfortunately we do the same thing mentally when it comes to photography. We bring our “stuff” along when shooting and just like dragging real life luggage around, it diminishes the enjoyment of photography.

When shooting, be like a kid with a toy; focus on what you are doing and nothing else. Minor White was adamant about clearing the mind before the act of photography. I listen to music and zone out to zoom into photography. Find what works for you, the important thing is to be lost in what you are doing.

3) Kids enjoy themselves because they don’t care about being the best

Haiti boat

From time to time Yoki comes in with something he’s done. Bravos, hugs and all around congrats are thrown his way. But you know what? I’ll continue doing so until he is older.

I remember doing my best for grades as a kid and all I could feel from my mom was how short I fell from top of the class. When kids are kids it’s all about doing their best, but as they grow older it’s all about how short they fall of being THE best. How can Yoki enjoy himself doing crafts if all that he thinks about is being better than somebody else?

What matters for kids is to do the best they can and enjoy what they do. That is also valid about photography, all that matters is that you do their best and enjoy making pictures. To enjoy your photography it’s all about enjoying what you are doing, as simple as it sounds. The moment you start ranking yourself is the moment you stop being content, because being in first place will be only thing that will matter at that point. Plus there’s always someone better than you, and someone better than them ad infinitum.

4) Kids enjoy themselves because they don’t care about comparisons

New york woman

I was watching my son finger painting. What came to mind was the fact that compared to how I can draw, his drawings are absolutely bad. But does he care that his dad can outdo him in drawing? No.

He’s too happy with his own stuff to even bother to compare with others. Take any photographer you respect, that person has another photographer they feel jealous of. But very few of them are genuine enough to admit that. When you tend to compare yourself with others, the answer to all this is do like children do – stop it, and focus on your own stuff.

When your work is your focus, everything others do might be better, but it sure won’t affect you. Photography is all about enjoying what you do and not about comparing to others all the while doing your best. Actually, I’ve found that the more you focus on your stuff the better you get. But, the more you compare the worst you get, because it sucks the life and joy out of photography. It’s all about loving what you do, and doing what you love.

5) Don’t get sidetracked

Penn station

One of the parenting tricks I have is to distract my son when I don’t want him to have something. If I don’t want him to use the computer, I pick up his alphabet phone toy and start playing with it. He never fails to forget about the computer. That taught me how easy it is to get sidetracked in photography.

One of the easiest traps of photography is the camera. So many get sidetracked by the camera that photography gets completely lost. I’ve been there, and lost 1000s of $ $ $ . I was addicted to the gear. But that’s a story for another time. If you find yourself googling for accessories instead of going out and making images, you might have a problem.

The second way to get sidetracked is by focusing on other’s photography, and that includes the Masters. I know a few folks that have such powerful photographs, yet instead of developing their own voice they continue copying another photographer’s work. Such a waste – they are distracted from their own photography by copying someone else.

You can also get sidetracked by being too much into the masters. Do you want to be known for knowing the masters, or known for actually making images? One thing that is rarely stated is that no matter how great the masters were, doing your work is more important because it’s your own work.

To recap: photography is not about having the most cameras, that only shows you’ve got plenty to spend. Photography is not about collecting photobooks, that only shows you appreciate art. Photography is about making photographs, that’s when you are a photographer.

If anything has a bigger place in your life than your own photography, you’ve been sidetracked.

6) Pattern recognition

Man surreal

When Yoki was born, I resolved to always observe him, and more importantly to observe how he learns. I was fascinated by my son playing with a particular toy, this one called a shape sorter (see image right)

Shape sorter

How did his little brain work to put the shapes in the appropriate holes? The answer is patterns. The brain is wired to recognize patterns, so when Yoki took the star shape, his brain said “seek star shape” and ordered the eye to look around for that shape. When Yoki is out and starts saying letters and numbers, his brain is not really actively searching for the letters and numbers, the brain compares what he sees with the brain’s database of shapes and alerts itself that it’s a recognized pattern.

The first example is called the top-down mode (Where the brain actively seeks a pattern) and the second the bottom-up (where the brain is in a more receptive mode).

I was struck when I realized that photography on the compositional level was a huge, glorified “shape sorter” toy in real life. Here’s an illustration:

Top down

In my son’s mind the request was “seek star shape”. In my photographer’s mind, the request might be “seek vanishing point“. In the illustration above, I was on the street, but my brain only alerted me when it recognized the pattern I asked for (vanishing point). That is the top-down mode. It’s the process that happens when you are seeking a particular type of image. Here’s another illustration:

Bottom up

At the base of the brain there’s something called the Reticular Activation System (RAS), or as I like to call it the Really Awesome Secretary. A secretary’s role is to cut the fluff and only alert you when something is important, and that is what the RAS does. What’s important is relative and defined by each person.

What is important to my son Yoki? Letters and numbers, he’s going to see them everywhere, at least it’s going to appear to him that way. For me as a photographer what is important is what I want to see in my photographs. So I was in the streets not looking for anything in particular, but more than once my brain processed what my eye saw and it alerted me when it recognized a pattern (in the case above texture and portrait). That’s called the bottom-up mode.

It’s a frighteningly beautiful system that allows my son to play with his shape toys and me to recognize stuff when I am shooting.

7) You can’t recognize what you don’t know

Man haiti standing

Pattern recognition has it’s limits though, you can’t recognize patterns that you don’t know. Take my son for example, he will cry out “Circle! Oval! Sqwawe.”, but it will be quite a while before I hear him say “Hexagon! Trapezoid! Pentagon.”.

His palette of patterns are limited: square, circle, oval, square, star, heart. My palette is much more expanded to include a bunch more. So in a scene where there is a square and a pentagon shape, he will see the square only, but I will see the square and the pentagon. It’s the same principle at work when two photographers see different things in the same location.

When people who don’t know photography see the kind of pictures that can be produced out of a regular scene, they immediately credit the camera. But fact is that the photographer recognized a good picture (trained to look for certain patterns) whereas the non-photographer (not trained to look for certain patterns) could not see anything. So what’s a pattern? It can be anything from certain compositional types (Golden ratio, etc.), shapes, color, types of pictures (landscape, portrait, etc.), themes that interest you (people, animals, etc.) and more.

8) Everything is basic shapes

Under bridge

I was on my bed when the kiddo starts saying “S!” “S!” “The wetter S!” Hoho… I was sure he was seeing things because I never saw a prominent S in my room. But the kiddo was right, there was an S in the room, here it was:

By Mathew Bajoras

It was the light bulb. That reminded me how the world is like a glorified “shape sorter” toy. Absolutely everything visual can be broken down into line, shapes, space, color and texture.

It’s something that painters and artists understand at a fundamental level; everything can be broken down into basic elements. As a graphic designer I also understand this at a basic level because you can break down designs into simple elements. Here’s an example with a shot I made:

Simple elements

All of a sudden a window is a trapezoid, and people’s heads are ovals. This is due to the Gestalt law of perception called “Pragnanz”. Simply stated it says that we perceive complex shapes as simple ones (a face as an oval for example). Yoki recognizing the “S” out of the light bulb always reminds me of that, so I look for basic, broad shapes in my photographs, and more importantly how to arrange them.

9) People are aware of the camera

Lady power

My kid is not even five and he already knows to pose. It’s nuts. How does he know when the camera is up to strike a pose? Are we spoiling our genuineness by asking kids to say “Cheese”? I think so because it teaches kids to stop what they are doing to say cheese and look at the camera. But whatever the case, very early in life kids are aware of the camera. The result? Absolutely everybody in today’s world is aware of the camera.

That pretty much means no one is genuine when a camera is present. For pros this means you have to learn to relax your clients. For everybody else it means you have to be quick to get a genuine pose. The best moment is the split second before the person realize you are photographing them.

One interesting tidbit about the genuineness of the subject when faced with a camera, is that it is proportional to the type of camera. Pull out a point-and-shoot camera in the streets and people won’t care much, you’re probably a tourist in their minds. Pull out a double battery DSLR with 55-200 zoom and people will start acting differently. Pull out a Polaroid camera and people will react as if you are an “Artiste”.

People are conscious of the camera because they are conscious of their image, it’s ingrained since the start. If you can make people believe all you want is a snapshot, they won’t give you a second look. That, my friend is why I can only recommend a point-and-shoot lookalike for the streets.

10) Complacency hinders growth

Older lady

What’s that? I asked pointing to a square in a book. “Square!!!” “Carré” (Square in French) my son said. Good I said, now what’s that? I was pointing a rectangle, he looked at it and then pointed to the square “Square!! Carré!!”. Yes but what’s that? I asked pointing at the rectangle once more. He pointed at the square once more and named it again. Instead of taking a risk at trying to name the rectangle he pointed at what he already knew.

I was quite surprised at what happened, not because of how my son reacted but because I saw myself in it. It’s easy to get complacent in photography, I sure did. It happens when you do something over and over again and don’t challenge yourself. I largely abandoned longer than 35mm focal lengths because of that. The best thing I ever did photographically is to get a 28mm because it’s much harder to deal with.

I could go out with a longer lens and not challenge myself, but I would not grow and I would become complacent. When Yoki did this with his shapes, it taught me to never become complacent and always challenge myself. I’ve grown so much when I decided to go wide angle. Try it, it will not let you make an image without a fight.

To each his comfort zone, for me it was always sticking to fast apertures at 50mm, for you it might be something else. Find where you are too comfortable photographically, then challenge yourself. It’s the trick that pole jumpers use, they put the bar higher every time.

Finals comments

I love my kid, and I love watching him. I love to see how he works and how he thinks. He’s learning from me hHopefully a good thing) but I am also learning a lot from him, as you can see from the 10 tips above. But that stays between me and you, ok?

Be yourself, stay focused and keep on shooting.

Have you learned any photography lessons from your kids? Please share any additional tips in the comments below.

The post 10 Great Photography Lessons You Can Learn From a 2 Year Old by Olivier Duong appeared first on Digital Photography School.


Digital Photography School

 
Comments Off on 10 Great Photography Lessons You Can Learn From a 2 Year Old

Posted in Photography


3 Easy Steps Using Photoshop to Making your Images POP

06 Jun

Image Post Processing Techniques

Having taught in-depth image post-processing workshops for Photoshop users, I’ve found that three of the simplest techniques are the ones that people love the most. These are quick and easy tricks that work for most image processing situations.

If you’ve got your exposure, aperture, focus and white balance all correct during shooting, you’ve got all that you need for a great image, but with these three easy steps using Photoshop we’ll add some serious POP to the colour, contrast and sharpness of your images.

I’m going to assume that you’ve already corrected your image in Adobe Camera Raw to fix any blown out highlights and shadow detail. This can sometimes leave you with a low contrast image that lacks lustre. HDR users will often find that a full HDR image lacks some punch once it has all the dynamic range fixed for highlights and shadows. Here’s how to add some pizazz to images.

I’ll start with a RAW file from last year’s trip to Moab, Utah.

Unprocessed RAW file

I was more than happy to get this shot of Courthouse Towers in Moab, Utah but the RAW file was total Blandsville.

Step 1 – Make Those Colours POP

Open the image in Adobe Photoshop. With the image on the background layer of Photoshop, right click on the layer (in the layer window) and choose ‘Duplicate Layer’ (see screenshot below left).

Duplicate Layer Multiply Layer

Now click on the newly duplicated layer and change the blend mode to ‘Multiply’ (see screenshot above right).

Multiply Blend Mode

Right away you’ll notice that all of the colours are more striking and the contrast is extreme. It’s also way too dark so we’ll fix that next.

Next go to Image > Adjustments > Shadows/Highlights and drag the shadows slider all the way to right then hit OK (see screenshot below left).

Photoshop Shadows / Highlights Photoshop Layer Opacity

By doing this, you’ll reduce the darker parts of the image ONLY in the duplicated layer. It’s still a little too dark, so in the layers window reduce the opacity of the duplicated layer until it’s at about 58% (see screenshot above right). This percentage will be different for all of your images so use your judgement and don’t overdo it. Usually I find that a setting of 28% works best in most cases.

Step 2 – Selectively Boost Colours and Brighten

I think that some of the colors need a little encouragement. For this example you want to boost the blue sky so combine the two layers that you’ve been working on so that you can make changes to that. You can do this ‘none destructively’ by pressing ctrl+alt+shift+e which will now combine the two layers you have selected, and create a new layer from those. The original layers are still intact underneath this new one.

Next, go to Image > Adjustments > Color Balance > and bring up the RGB sliders. As I mentioned earlier, you’re going to be boosting the blues in my sky so click on ‘mid-tones’ and then pull the blue slider up to about +42.

Photoshop Color Balance

Boosted Blue Midtones

Ooooh, now that sky is looking vibrant but I’m not too sure about boosting the blues in the land area. Let’s fix that by erasing the land in this blue layer so that the layer underneath is revealed, where the blue mid-tones have not been boosted. You can also do this with ‘layer masks’ but this method is much easier to understand.

Do this with the eraser tool and select a brush size that fits inside the land area of the image. In the layer with the boosted blue mid-tones, erase a large area of land at first and then choose a smaller brush size for tighter control. To do this, simply click inside the layer you want to erase. The settings below show a brush size of 1053 pixels and a hardness of 0% which gives a soft, feathered edge.

Photoshop Easer Tool

Erase Bruash Tool

Click in the area you’d like to erase to reveal the layer beneath. In this case the layer beneath won’t have the boosted blue mid-tones that you want only in the sky.

Now you’ve managed to selectively boost the blue colour in the sky without ruining other parts of the image that didn’t need that blue boost. Here is an image of how the ‘sky’ layer looks after the land has been erased out, and below you can see how it looks in the layers panel.

Erased Land

This is what’s left of the ‘boosted blues’ layer. The layers under it are temporarily switched off so that you can see the isolated sky.

Photoshop Layers Palette

Layers panel showing the partially erased boosted blue sky layer

Notice that the opacity of the sky layer has been reduced to 49% so the effect is more subtle when laid over the top of the lower two layers. Again, you’ll need to use your own judgement for your own images as they won’t all be the same. Maybe you have red clouds and would like to boost the red highlights? You can do this procedure multiple times with multiple layers to tweak the colours selectively. There are more accurate ways to do this but if you’re new to Photoshop, this is the easiest method to understand and has hardly any learning curve.

Lastly, all this tweaking has made the image a little too dark so a boost the overall brightness by 36 has been done.

Photoshop Brightness

Step 3 – Let’s Resize and Get Sharp

Sharpening is often something that I leave to the end of my image processing, depending on the medium I’m using to display the image. I’ll use different sharpening settings for a high resolution print than I will for the web, so it’s always a good idea to save an ‘unsharpened’ version of your processed image for safe keeping.

Assuming that you wish to display your images online, here are some fairly universal sharpening settings that I use for sharing my images online. Before we sharpen, let’s flatten and resize our image for the web. You can decide how large your image should display on screens but for the purposes of this tutorial let’s go with 1200 pixels wide.

Go to Layer > Flatten Image so that you’re now just dealing with one complete layer that has all of the changes. Next go to Image > Image Size and tell Photoshop that you’d like your image to have a resolution of 72 dpi which is standard for web images. Next, specify the width by entering 1200 pixels in the ‘width’ window. The height should auto adjust if you have ‘constrain proportions’ checked by default (the little chain icon).

Photoshop Image Resize

Next open the Filter > Sharpen> Unsharp Mask tool.

Use some fairly safe sharpen settings for web so that you don’t over it. It’s worth noting that ‘sharpening’ deserves an article as a separate topic but for now these basic settings should get you going. Try: Amount > 128%, Radius > 1.7 pixels and Threshold > 58 Levels.

Photoshop Unsharp Mask

The Final Result

POP! There you go, three easy steps an you’ve now got an image with plenty of punch. There are many different ways to achieve the same results, but for this tutorial, I wanted to give you an easy to understand process to introduce you to some of Photoshops most powerful tools. Try these three simple techniques for your image post-processing and let me know it works out for you.

After Processing

IMPORTANT NOTE: Backup your files before editing or saving your edits.

The post 3 Easy Steps Using Photoshop to Making your Images POP by Gavin Hardcastle appeared first on Digital Photography School.


Digital Photography School

 
Comments Off on 3 Easy Steps Using Photoshop to Making your Images POP

Posted in Photography