RSS
 

Archive for June, 2014

2014 iPhone Photography Awards winners announced

16 Jun

01-JULIO-LUCAS-1stPOTY.jpg

The iPhone Photography Awards (IPPAWARDS) has announced the winners of its 7th annual Photographers of the Year contest, along with top photos in many individual categories. Entries to the 2014 competition came from photographers in in seventeen countries, and naturally, all were taken with an Apple iPhone, iPod or iPad. Click through to take a look at the winning photos. See gallery

News: Digital Photography Review (dpreview.com)

 
Comments Off on 2014 iPhone Photography Awards winners announced

Posted in Uncategorized


Two Videos on How to Take Care of Your Camera Gear

16 Jun

This week I found two different videos on how to take good care of your camera gear from two different perspectives (serious and more tongue in cheek). It’s important to take care of your equipment to make sure it keeps functioning properly and takes nice clean images with no dust spots.

The first video by photographer Gregory Cazillo is the serious one. He goes through a list of a few things you can do to protect, clean and maintain your gear in good condition.

He recommends jotting down all your serial numbers so when you are are travelling out of the country you don’t have any issues with customs coming back home. I suggest taking it one step further and actually register your gear with customs before you leave. Most airports have a customs area, just take your equipment in there and get a customs registration card from them. Make sure to arrive early to have time to do that.

The second video is from DigitalRevTV (The most subscribed and viewed photography show on the interweb, presented by an asian dude with British accent – as they describe on their YouTube channel) and guest host Ultrasonic Dragon 88 (aka Ian Wong). Obviously this one is a little “cheeky” and is meant to be humorous. Take it with a grain of salt and have a little fun.

Here are some links to other articles here on dPS about taking care of, and protecting your camera equipment:

  • Do you Clean your Own Sensor?
  • Tips to Protect your Gear in Harsh Weather Conditions
  • How to Protect your Camera in Extreme Conditions
  • Embrace the Weather with Your Photography
  • So You Want to Keep your Camera Safe? Here’s How
  • Readers: Lens Filters: To Use or Not To Use? Your 2 cents, if you please!

The post Two Videos on How to Take Care of Your Camera Gear by Darlene Hildebrandt appeared first on Digital Photography School.


Digital Photography School

 
Comments Off on Two Videos on How to Take Care of Your Camera Gear

Posted in Photography


15. Juni 2014

16 Jun

Ein Beitrag von: Normen Gadiel

© Normen Gadiel


kwerfeldein – Fotografie Magazin | Fotocommunity

 
Comments Off on 15. Juni 2014

Posted in Equipment


Bucket List: 12 Battered & Abandoned KFC Stores

16 Jun

[ By Steve in Abandoned Places & Architecture. ]

abandoned KFC
There are nearly 20,000 KFCs worldwide but success isn’t guaranteed. Here are 12 that kicked the bucket when the financial chickens came home to roost.

The Bucket Stops Here

abandoned KFC bucket sign(images via: OldOhioSchools and The Morning News/Brian Ulrich)

No one symbol captures the essence of KFC like the spinning bucket sign, and likewise a discarded and decrepit bucket sign perfectly illustrates the downfall of a fast food fried chicken icon. The bucket above, which looks supernaturally spooky by night, merely appears sad when spied by day in a line of other such signs. You’ll find it outside the American Sign Museum in Cincinnati, Ohio.

Slippery Slope

abandoned KFC Park Slope Brooklyn NYC(image via: Here’s Park Slope)

According to its Wikipedia entry, “Park Slope is an affluent neighborhood in northwest Brooklyn, New York City.” Looks like this affluent area just caught a case of affluenza, however, with graffiti taggers moving quickly to blight the abandoned KFC outlet at the corner of 4th Avenue and Warren. Conveniently, the closed store posts an official sign directing curious (and hungry) taggers to their next nearest location.

Double-Down For The Count

abandoned KFC Hayes VA(images via: RetailByRyan95)

Is Flickr user RetailByRyan95 psychic or something? The intrepid photojournalist must have had a premonition when he visited a now-abandoned KFC restaurant in Hayes, VA in April of 2009. Just over three years later, Ryan was back to record the forlorn state of the abandoned outlet at 2413 George Washington Memorial Highway in the York River Crossing shopping center. Hope he packed a lunch on his return visit. According to Ryan, this KFC closed on October 21st of 2011 and the entire building was demolished in early November of 2013.

Chicken Rundown

abandoned KFC bucket Youngwood PA(image via: paper or plastic)

Somehow this old-style KFC big bucket escaped the fate of its store on Route 30 by the Westmoreland Mall and ended up outside the Antique Co-op store over on Rt. 119, according to Flickr user paper or plastic. KFC chicken buckets can run but they can’t hide, however, and after spending some time in this incongruous location it was hit by a car and completely destroyed. Police are seeking an elderly man dressed in a white suit and black string-tie, last seen licking his fingers and cackling gleefully.

Next Page – Click Below to Read More:
Bucket List 12 Battered Abandoned Kfc Stores

Share on Facebook


[ By Steve in Abandoned Places & Architecture. ]

[ WebUrbanist | Archives | Galleries | Privacy | TOS ]


WebUrbanist

 
Comments Off on Bucket List: 12 Battered & Abandoned KFC Stores

Posted in Creativity


15 June, 2014 – Sony A7s First Impressions Review

15 Jun

What happens when you put a 12 Megapixel sensor inside the world’s smallest full-frame 35mm camera body? You end up with Sony’s new A7s camera. It offers incredible high ISO capability, and 4K video. This report, by Michael Reichmann, is one of the first reviews of a production-level A7s to appear anywhere in the world.


The Luminous Landscape – What’s New

 
Comments Off on 15 June, 2014 – Sony A7s First Impressions Review

Posted in News


DPReview Reader Showcase: Underwater photography

15 Jun

TS1600x1600~2538732.jpg

With our yearly waterproof compact group test nearing completion, and we put out a call on our new underwater photography forum asking readers to showcase their best photos from the deep. The responses were impressive – take a look at a few of our favorites. And if you’re inspired to dive in and take some photos of your own, rest assured our waterproof group test is just around the corner. See gallery

News: Digital Photography Review (dpreview.com)

 
Comments Off on DPReview Reader Showcase: Underwater photography

Posted in Uncategorized


browserFruits Juni, Ausgabe 3

15 Jun

Die Themen der Fotospecials in den browserFruits sind zugegebenermaßen nicht immer furchtbar innovativ. Aber es macht Spaß, die Bilder dazu zu suchen und es ist manchmal auch wirlich erstaunlich, wie verschieden diese dann sind. Bei Spaghetti dachte ich vorrangig an lecker angerichtete Speisen, fand aber Portraits, Lustiges, Abstraktes und sogar eine Doppelbelichtung. Habt Ihr eine Idee für das nächste Fotospecial? Dann schreibt sie doch in die Kommentare, vielleicht finden wir dazu ja auch so tolle verschiedene Sachen.


Fotospecial: Spaghetti

Flickr

500px


Deutschsprachig

• Auf dem flickr-Blog werden immer wieder Fotografen vorgestellt. Auch auf Deutsch, wie zum Beispiel Normen Gadiel.

• Zhenya Aerohockey mag es mit Ecken und Kanten. Zumindest in ihren Bildern. Die Künstlerin aus St. Petersburg nennt ihr Projekt „Catching corners“ und zeigt es auf Instagram. Langweiledich.net stellt es vor.

• Ursula Sprecher und Andi Cortellini haben ausfindig gemacht, was verschiedenste Gruppen so in ihrer Freizeit machen. Vom Pudelclub über den Verein Freunde der Metzgerschaft bis hin zum BDSM-Stammstisch ist alles dabei.


International

• Warum ein „Selbstportrait“ kein schnödes „Selfie“ ist. Marie McGrory von National Geographic reflektiert das aktuelle Modewort, nachdem das Magazin Selbstportraits gesammelt und ausgewählt hat.

• Eric Kim hat die Fujifilm x100s für den Gebrauch in der Straßenfotografie getestet (und mit der XT-1 verglichen). Für alle, die sich nicht sicher sind, ob sie der x100s zutrauen, dass sie hält, was sie verspricht, sei der Artikel wärmstens empfohlen.

• Arko Datto hat bezaubernde Luftbilder der arabischen Wüste fotografiert. Sie zeigen filigrane menschengemachte geometrische Strukturen in einem scheinbar lebensfeindlichen Umfeld.

• Noch einmal unglaubliche Bilder von oben: 29 Satellitenfotos, die einen schönen neuen Blick auf unsere Welt offenbaren.

• Zehn dumme Dinge, die Fotografen viel zu oft hören müssen.

• Island ist wunderschön. Falls es wirklich noch einen Beweis braucht, dann liefern ihn diese 37 Fotos aus diesem unglaublichen Land.

• Ein kleines Interview mit dem Berliner Straßenfotografen Tom Palluch mit sehr vielen Bildern.

• Zum Abschluss noch eine traurige, sehr rührende Geschichte: Briony Campbell erzählt vom Verlust ihres Vaters in Worten und Bildern.


Neuerscheinungen und Tipps vom Foto-Büchermarkt

Buchtipp

• Architekturfotograf Filip Dujardin erschafft mittels digitaler Collagetechnik aus Aufnahmen von real existierenden Gebäuden seiner Geburtsstadt Gent und ihrer Umgebung in die Landschaft eingebettete Bauwerke, deren reale Errichtung unmöglich wäre. Der Bildband „Fictions“* ist bei Hatje Cantz erschienen und kostet 39,80 €.

• Ann-Christine Woehrl hat die Überlebenden von Säure- und Brandanschlägen in Pakistan, Indien, Bangladesch, Nepal, Kambodscha und Uganda besucht. Sie wollte jede einzelne der überlebenden Frauen als Persönlichkeit darstellen, fernab des kollektiven Stigmas der Gebrandmarkten und ihnen damit wieder ein Gesicht geben, sie wieder sichtbar machen. Neben einem einleitenden Essay gibt es auch sechs Interviews mit Frauen. „IN/VISIBLE: UN/SICHTBAR“* heißt das Buch und kostet 49,90 €.


Wettbewerbe

• Der Monochrom Award ist – wie der Name schon sagt – ein Wettbewerb für Schwarzweiß-Fotografie. Ihr könnt Eure Bilder in 12 Kategorien einreichen. Es gibt Teilnamekosten von 10$ , für professionelle Fotografen 15$ . Einsendeschluss ist der 28. November 2014.


Zitat der Woche

Photograph because you love doing it, because you absolutely have to do it, because the chief reward is going to be the process of doing it.

Alex Webb –

Mehr Zitate


Videos

Ryan McGinleys Festrede an der Parsons School of Design, wo er einst studierte. (via)


* Das ist ein Affiliate-Link zu Amazon. Wenn Ihr darüber etwas bestellt, erhält kwerfeldein eine kleine Provision, Ihr bezahlt aber keinen Cent mehr.


kwerfeldein – Fotografie Magazin | Fotocommunity

 
Comments Off on browserFruits Juni, Ausgabe 3

Posted in Equipment


14. Juni 2014

15 Jun

Ein Beitrag von: look-book

© Look Book


kwerfeldein – Fotografie Magazin | Fotocommunity

 
Comments Off on 14. Juni 2014

Posted in Equipment


Bricksy: 20 Classic Banksy Street Artworks Recreated in LEGO

15 Jun

[ By WebUrbanist in Art & Sculpture & Craft. ]

Banksy maid Lego Diorama

Selecting from Banksy favorites and classics, this series of brick-based fan art both replicates and expands on familiar two-dimensional works.

LEGO Banksy royal guard graffitti

Banksy Balloon Girl

Fridge Kite

Professional photographer Jeff Friesen is known for staging LEGO creations around Canadian provinces and American states, the latter having since been compiled into a book: 50 States of LEGO.

Lego Banksy "Kissing Coppers".

Lego Banksy bouquet thrower

The Bricksy series includes some degree of whimsical interpretation, often putting existing Banksy art into an expanded physical context. The photographer is selling prints of these pieces for $ 20 each.

Bricksy Lego diorama of Banksy's brick cowboy.

Banksy monkey: "Laugh Now But We're In Charge."

A bit more about the artist: “Jeff Friesen’s photography has gathered worldwide recognition for an uniquely diverse collection of work. His awards include the most prestigious in the photography world, including an Award Of Excellence from Communication Arts and a winning image in the PDN Photo Annual. In 2009 Jeff’s work was among the most repeatedly honored by the International Photography Awards”

Share on Facebook


[ By WebUrbanist in Art & Sculpture & Craft. ]

[ WebUrbanist | Archives | Galleries | Privacy | TOS ]


WebUrbanist

 
Comments Off on Bricksy: 20 Classic Banksy Street Artworks Recreated in LEGO

Posted in Creativity


Macphun Intensify Pro Software Review

15 Jun

MacPhun Intensify Pro review

Intensify Pro (currently on 20% off for dPS readers here) is a Mac only image editing program from MacPhun. With apologies to Windows users (I really wish this software was available for PCs as well) let’s dive in and see what this software can do.

One of the reasons that you buy plug-ins is to take advantage of the ways you can use them to increase mid-tone contrast and enhance detail. Indeed, this is the main reason to buy Intensify Pro because it allows you to do this quickly and easily and with far more functionality than is offered by Photoshop or Lightroom.

Process in Lightroom first

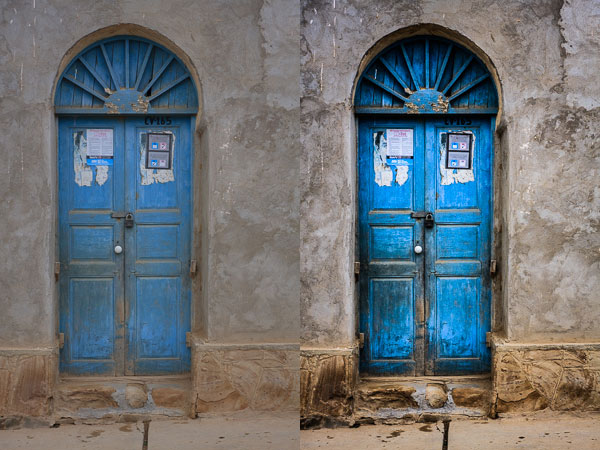
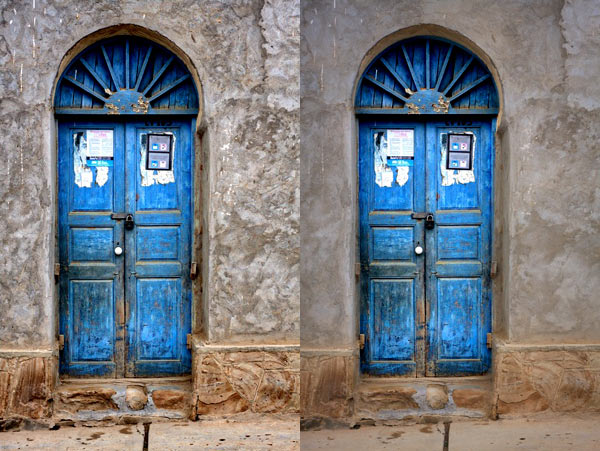
To demonstrate the power of Intensify Pro I’ve selected an image that is very flat but has a lot of texture in the image to work with. You can see it below. The version on the left is more or less straight out of the camera. The version on the right was created by increasing Exposure, Contrast and Clarity in Lightroom’s Basic panel, and adding a slight vignette in the Effects panel.

MacPhun Intensify Pro review

Here’s a close-up so you can see the effect that increasing Contrast and Clarity has had on the texture and detail.

MacPhun Intensify Pro review

Bring it over to Intensify Pro

Now let’s open the photo in Intensify Pro and see what we can do with it in comparison to what is possible in Lightroom.

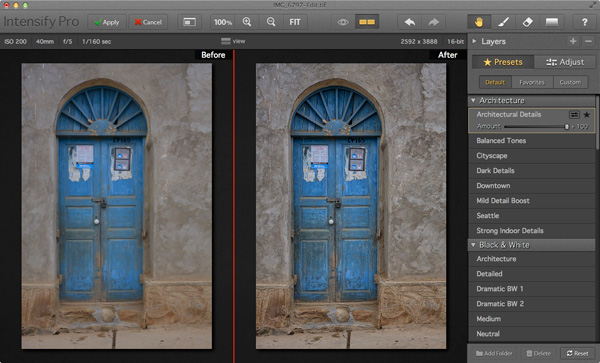
First, the layout. Your photo is displayed in the centre, there are various tool buttons along the top, and the controls for working with Presets and making adjustments are on the right.

MacPhun Intensify Pro review

Presets

There are 68 presets in total (yes, I counted them) and you can select any one of them to use as a starting point or click the Adjust button to go straight to Adjust mode.

One of the problems with presets, and indeed with any program that lets you make adjustments to contrast and detail like Intensify Pro, is that it is very easy to create an image that looks over-processed.

MacPhun Intensify Pro review
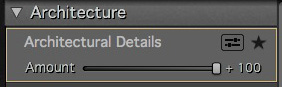
Intensify Pro provides a simple solution to this. Each preset comes with an Amount slider that lets you adjust the strength of the preset on a scale from zero to 100, much like the Opacity slider in Photoshop layers. So if you like a preset, but feel the effect is too strong, you can adjust the strength until you are happy with the result.

Here are some of the presets in action. All of them were applied to the original photo at full strength without any further adjustments.

MacPhun Intensify Pro review

Adjust

After selecting (or perhaps not selecting) a preset you can move to Adjust mode. This is where you take control and use sliders to apply adjustments and enhancements to your photo.MacPhun Intensify Pro review

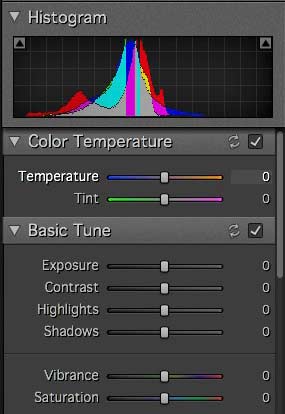
The first three Adjust panels echo the sliders found in Lightroom and Adobe Camera Raw. There’s nothing new here, these are for making adjustments to the photo before you get to the sliders that are unique to Intensify Pro.

You’ll notice the absence of a Clarity slider. It is replaced by the Pro Contrast, Structure and Detail panels. These allow you to much the same thing, but with far more control and versatility.
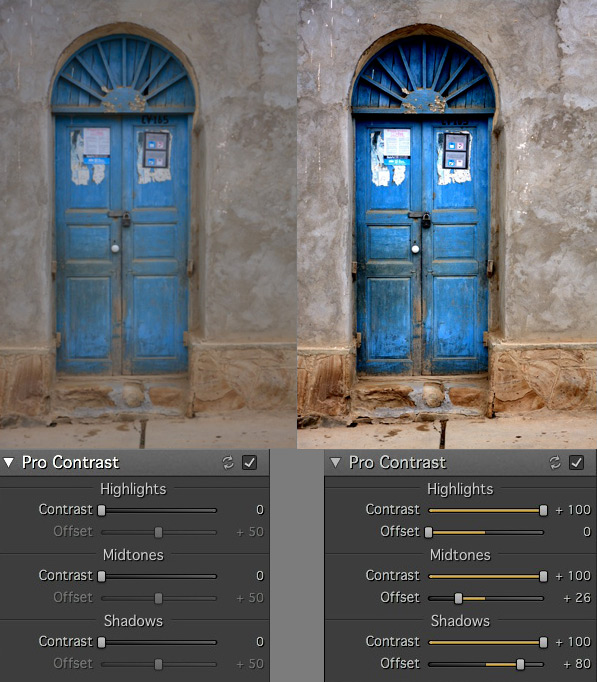
Pro Contrast

The Pro Contrast panel is where Intensify Pro starts to get interesting. Pro Contrast increases contrast without losing detail, and there are three sliders so you can apply it to the highlights, mid-tones and shadows individually. Under each of these is an Offset slider, which works in tandem with Pro Contrast sliders to control the brightness of the image. So, for example, if you increase Pro Contrast in the shadows and find that the image becomes too light, you can increase the Offset to make it darker.

MacPhun Intensify Pro review

Structure

The Structure sliders are for enhancing areas of low contrast, revealing texture and details. There are two levels: Global (targeting small areas) and Micro (targeting really small areas).MacPhun Intensify Pro review

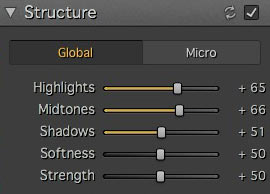
There are three sliders, enabling you to target the highlights, mid-tones and shadows respectively. The Strength slider gives you control over the strength of the effect and Softness slider control over the crispness.

It is really easy to overdo the effect and create something that looks completely unnatural, similar to some of the presets I showed you at the beginning of the article. Care is required, and I found that the Structure sliders worked best when I used the Pro Contrast sliders first.

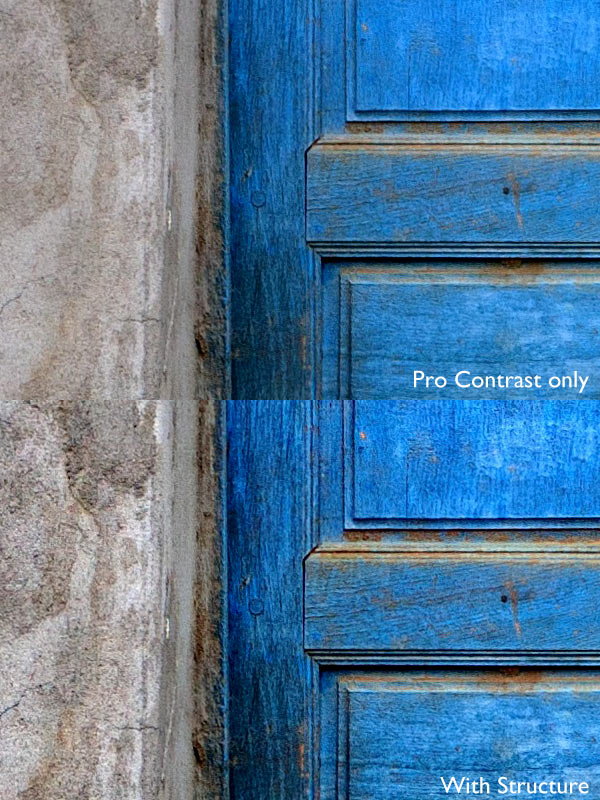
These enlargements show you the effect of the Structure sliders.

MacPhun Intensify Pro review

Detail

MacPhun Intensify Pro review
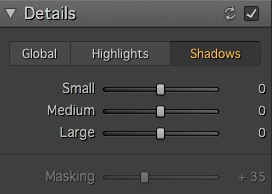
The Detail sliders are for enhancing detail. The three sliders (Small, Medium and Large) control the size of the details affected. The Large slider has the greatest effect on the image and the Small slider the least. The tabs at the top let you apply it as a global adjustment, or to the shadows or highlights.

Like Structure, the Detail sliders require care as it is easy to overdo the effect. There is an additional Masking slider to help keep it under control. If the effect is too strong, you can move the Masking slider right to limit the areas affected.

Micro Sharpness, Vignette and Opacity

MacPhun Intensify Pro review
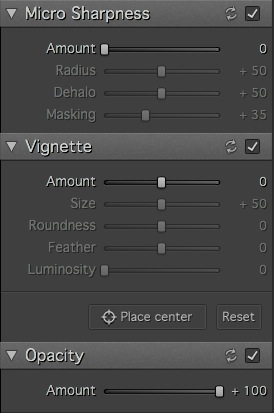
The final three sets of sliders let you make other adjustments, such as sharpening or adding a vignette. The Opacity slider lets you reduce the strength of the effect you’ve created. This does the same job as the Amount slider in the Presets panels. Use it if you realize that you’ve overdone the processing.

Local adjustments and Layers

So far I’ve looked at all the sliders in the context of global adjustments (adjustments that affect the entire image). But Intensity Pro also lets you create masks to apply the effects to a smaller area (local adjustments).

Local adjustments are important because most of the time you will want to emphasize texture and detail in certain parts of the image, but not others. A subtle touch is often key to effective post-processing, and local adjustments help you achieve that.

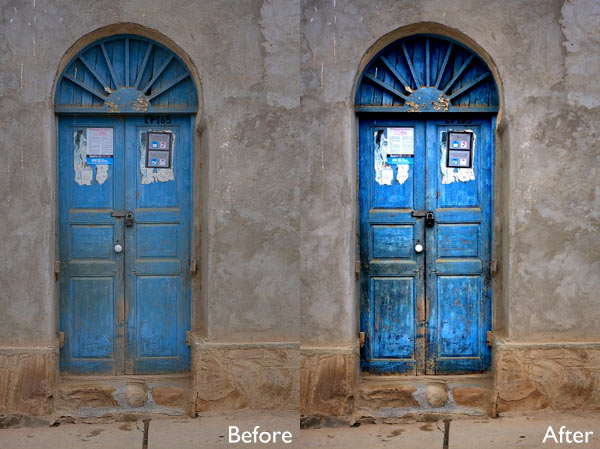
Here’s the final example (below). The image on the left shows the result of a series of global adjustments. I like the effect on the door, but the effect on the surrounding wall is overdone.

The image on the right was created using masks and layers. I used the mask to limit the adjustments made in the first image to the door. Then I created another layer and applied a softer level of adjustment to the wall. Finally I added a vignette to make the sides of the image darker. The result is a more subtle increase in contrast and detail that emphasizes the texture and detail of the wooden door.

MacPhun Intensify Pro review

Conclusion

Intensify Pro is an excellent program, and I’m looking forward to working with it more. I feel I’ve only touched upon its capabilities in this short review, as like all plug-ins it takes time to explore the features and learn how to get the best from it. Hopefully I’ve given you a good idea of what it can do. The best way to see for yourself is to go to the MacPhun website and download a trial of the program (look for the grey Try for Free button above the menu).

There are two versions of the program. Intensify is a standalone app aimed at casual photographers. Intensify Pro also works as a plug-in with Photoshop, Photoshop Elements, Lightroom and Aperture and contains a few more advanced features aimed at professional photographers. The details are on the MacPhun website.

New features

For those of you who are interested, Intensify Pro was recently upgraded by MacPhun and contains the following new features. If you already own the software, go to Intensify Pro > Check for Updates to download the update. This list is from the press release:

Macphun Print Lab – Intensify photos can now with a few clicks be turned into personalized products like postcards and notecards, delivered direct to recipients. Affordable, high quality gallery frames and canvas prints can also be ordered, perfect for gifts to friends and family. The Macphun Print Lab is powered by MILK Books.

Integration with SmugMug – SmugMug is one of the world’s leading photography communities with millions of users worldwide. Images can be exported directly from Intensify to SmugMug portfolios for viewing, sharing and printing.

RAW Updates – Intensify now supports RAW formats from all the most popular cameras. The native RAW processor supports 16-bit images and opens files faster than in any other app.

Mavericks Support – Intensify is now taking advantage of all the powerful features of Apple’s latest OS, Mavericks. Support for the new Notifications feature will enable more timely communications with customers about updates, new features, free presets and more.

UI improvements – Additional shortcuts to the user interface provide quick access to the most important tools and features.

The post Macphun Intensify Pro Software Review by Andrew S. Gibson appeared first on Digital Photography School.


Digital Photography School

 
Comments Off on Macphun Intensify Pro Software Review

Posted in Photography