RSS
 

Archive for May, 2014

NightCap Pro enables ultra long exposures on the iPhone

09 May

NightCap-Pro-5-iPhone-5-B.png

While the latest generation of smartphones can in many ways rival traditional compact cameras, the lack of true long exposure functionality on most phones is a limitation. However, now there’s an app for that with NightCap Pro. It has two unlimited exposure time modes. Learn more

News: Digital Photography Review (dpreview.com)

 
Comments Off on NightCap Pro enables ultra long exposures on the iPhone

Posted in Uncategorized


Samsung announces NX3000 mirrorless camera

08 May

NX3000_015_Front-Filp-Up_Black.png

The NX3000 is Samsung’s latest addition to its NX mirrorless camera line. Along with the 3″ flip-up display for self-portraits, it has a 20MP APS-C CMOS sensor and can shoot at 5fps. The NX3000 also comes with Wi-Fi and NFC ‘Tag & Go’ connectivity options. The NX3000 will ship with Samsung’s new compact 16-50mm F3.5-5.6 power zoom ED OIS lens. The camera will be available in black, white or brown. Learn more

News: Digital Photography Review (dpreview.com)

 
Comments Off on Samsung announces NX3000 mirrorless camera

Posted in Uncategorized


Alter

08 May

„Alte Menschen sind so geil.“ Wenn es einen Satz gibt, den ich meinen Freunden im Büro sehr, sehr oft gesagt habe, dann ist es dieser.

Irgendwann Mitte zwanzig muss es angefangen haben. Oder war es später? Ich kann mich nicht richtig daran erinnern, aber irgendwann habe ich damit begonnen, mich für alte Menschen zu interessieren.

Vielleicht liegt es auch an meiner grundsätzlichen Zuneigung Menschen gegenüber. Ja ja, ich weiß, das klingt dermaßen kitschig. Hipster sind ja eher die, die sagen, dass alle Menschen scheiße sind und sie am liebsten allein in der Natur leben würden.

Und das schreiben sie dann den lieben langen Tag ins Internet. Ist das nicht irgendwie süß?

Eine Frau winkt einer anderen in der Stadt.

Süß, genau, das Wort hat mir gefehlt. Alte Menschen sind süß. Wie sie mit ihrem Rollator durch die Innenstadt trippseln, ab und zu halten und in aller Ruhe Fensterläden anschauen, ach, das ist doch nur der Anfang!

Ich fucking liebe es, wie Senioren die Hände hinter dem Rücken verschränken. Das machen nur die. Nur die! Kein Jungspund würde auf die Idee kommen, so herumzulaufen! Ist das nicht toll?

Ihre herrliche Gleichgültigkeit allem gegenüber, was mit Etikette zu tun hat. Es ist ihnen egal, wer wer ist.

Ein älterer Herr guckt in die Kamera.

Und dann ihre Launen. Alte Menschen können so schön scheiße drauf sein. Motzen. Weil ihnen irgendwas quer liegt. Die Dinge nicht so laufen, wie sie bisher gelaufen sind.

Und ihr Style! Hüte! Rosenblusen! Weiße Sandalen! Cordhosen! Stoffhosen mit Bügelfalte! Hornbrillen! Ja verdammt, eine Dauerwelle!

Es tut mir leid, aber ich finde das gut. Ich finde das großartig.

Zwei alte Menschen, einander eingehakt.

Was ist das Allertollste? Wenn alte Paare Händchen haltend durch die Fußgängerzone galoppieren. Das ist – meiner Meinung nach – nicht zu toppen. Das spricht so viel.

Von Treue.

Von Liebe.

Von Zweisamkeit.

Nein, ich finde alte Menschen nicht perfekt. Sie haben ihre Schattenseiten. Klar. Sie haben vielleicht Dinge erlebt, die sie niemandem erzählen würden.

Ich möchte gar nicht den Verdacht aufkommen lassen, ich würde alte Menschen idealisieren. Auch sie haben Charakterschwächen, oh ja, das haben sie. Wer hat das nicht?

Da hat es jemand eilig.

Doch ihre Eigenheiten, die haben es mir einfach angetan. Noch ein Beispiel? Ihr Dialekt. Viele alte Menschen sprechen Dialekt. Sie haben das Hochdeutsch abgelegt und unterhalten sich oft im allerderbsten Dialekt.

Und dann die Phrasen! „Na, wie?“

„Na, wie?“

Eine ältere Frau läuft nach Hause.

Zwei Worte! Mit zwei Worten beginnen sie eine Unterhaltung mit allen Menschen, die ihnen begegnen! Na, wie?

Antwort, wieder zwei Worte: „Es muss.“ Das höchste der Gefühle ist dann ein „Und selber?“

Manche Konversation besteht nur aus diesen Zwei-Wort-Phrasen. Das ist zum einen trist, traurig und fühlt sich oft leer an. Aber es ist eine Strategie. Eine Strategie, die immer funktioniert. Damit umzugehen, schon über alles gesprochen zu haben. Never change a running system.

Eine ältere Frau wirft ein Taschentuch in den Mülleimer

Ich kann mit ihnen. Ich kenne die Floskeln und ich mag es, darauf einzusteigen. Ich mag diesen Trashtalk. Small-Talk. Yeah.

Schon wieder so etwas, was man ja eigentlich nicht mag, oder? So als tiefgründiger Emo, da steht man auf tiefgründige Gespräche. Ja ja. Tief.

Das kann aber auch nerven. Und ja, ab und zu ein Small-Talk mit Augenzwinkern? Sehr gut. Das Beste.

Eine Frau in der Bahn.

Und dann gibt es die, die nicht bei C&A einkaufen, sondern sich mit Geschmack sehr individuell anziehen. Sie stellen einfach jeden Achtzehnjährigen mit Pseudo-Iro, Karottenhosen und Alibikamera (aber Bushido hören) in den Schatten.

Sie legen immer noch Wert auf ihr Äußeres. Sie haben nicht aufgehört, sich fein zu kleiden und wenn es nur für einen kurzen Einkauf in der Stadt ist.

Sie tragen feine Halstücher, hübsche Hüte und achten darauf, dass alles farblich zusammenpasst. Sie tragen feine Schuhe, nicht diese „neumodischen Dinger“, und oft müssen sie schlimme Schuhe wegen der Gesundheit tragen.

Aber was andere davon halten, ist ihnen mittlerweile völlig Banane.

Eine Frau mit Hut.

Die meisten älteren Damen und Herren entschuldigen sich bei mir, wenn sie mir – ihrer Meinung nach – ins Bild gelaufen sind. Wenn ich Ihnen dann sage, dass ich genau auf sie gewartet habe, können viele es gar nicht glauben.

Viele raten mir, doch junge Menschen zu fotografieren. „Die sind doch schöner!“ Doch ihre Augen beginnen, leuchtend aufzuflackern, wenn ich ihnen sage, dass die jungen mich nicht interessieren und ich lieber alte Menschen fotografiere.

Hand einer älteren Frau.

Wenn ich ihnen dann das gemachte Foto zeige, müssen sie schmunzeln. „Ja, doch! Das bin ich!“ Was sie nicht wissen: Ich bin es, der diese Momente am meisten genießt.

Alte Menschen. <3


kwerfeldein – Fotografie Magazin | Fotocommunity

 
Comments Off on Alter

Posted in Equipment


Bounce Flash Secrets – Bouncing Your Way to Better Photography

08 May

If you have ever seen a professional photographer using flashgun on top of their camera, and wondering why the flash is not pointing directly at the subject, that’s because they are bouncing the flash. In this article I will reveal to you the secrets of bounce flash, which I have learned over the years working as a professional wedding photographer. I will unveil my killer techniques that will allow you to bounce your way to better photography.

If you are new to photography you may be apprehensive about using flash. I understand. A lot of it has to do with when you first buy a point-and-shoot camera the flash on it just creates a horrible direct flash look and that is what you associate with flash photography. Once you master the art of bouncing however, I promise you will never look back.

Garry Chung Photography 100

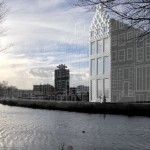
The image above is lit by bouncing flash off the wall on the right side, just out of frame. Notice how it doesn’t look obviously flashed.

What is bounce flash?

Bounce flash is when, rather than firing your flashgun pointing directly at your subject, you point it elsewhere typically up or at an angle, bouncing off a wall or ceiling. The objective is to “bounce” light to soften it before it hits your subject.

Why bounce it and not point directly at my subject?

Because generally speaking direct bare flash, pointing at your subject, is terrible for two reasons:

  1. The light is “hard” and can cash horrible shadows on your subject. It just generally is not very nice light for portraits. The definition of hard and soft light if you are confused is simply the transition the light makes between shadow and highlights. A gradual transition is called soft light and a sudden transition where you have a strong shadow edge is called hard light. Portrait photographers talk a lot about nice soft quality light and that is why they use light modifiers such as soft boxes and umbrellas.
  2. Direct flash produces “flat lighting” which gives that deer in the headlights look and also does not give a 3-dimensional quality to the photo

It is probably easier to show you in pictures so here are a few images of my friend Theresa, that I took just to illustrate the point. Just to set the scene, below is the area where I took these photos. This is a shopping center in Hong Kong and I have chosen the area because of the white walls.

Bounce flash 100

This was shot with the flash pointed directly at the subject. Because there were a lot of white walls surrounding Theresa, there was a lot of wrapping light and it didn’t turn out too bad. But, there is a hard shadow in the neck area and the lighting is flat.

Bounce flash 101

Manual Mode, 50mm lens, f/4, 1/80th, ISO 800, flash in ETTL Mode

This was shot with the flash tilted upwards towards ceiling. The light is much softer and you can see that the shadow on her neck is softened. It’s OK but could be better.

Bounce flash 102

Manual Mode, 50mm lens, f/4, 1/80th, ISO 800, flash in ETTL Mode

This is the way I would light this portrait. The flash is tilted, in this case aimed to bounce off the wall to the left, and bounce back. The result is a nice soft light, and also notice the eyes have better catch lights.

Bounce flash 103

Manual Mode, 50mm lens, f/4, 1/80th, ISO 800, flash in ETTL Mode

But wait, I think I can do one better. I want a more dramatic and contrasty image so I cut out the ambient light by setting a faster shutter speed and stopping down to f/8. Still with the flash pointed to the left I now have my nice professional high key headshot, one flash on camera, no light modifier shot in a shopping mall.

Bounce flash 104

Manual Mode, 50mm lens, f/4, 1/200th, ISO 800, flash in ETTL Mode

When do I bounce my flash?

Indoors when there is ceiling or wall, preferably a white wall so there is no colour cast in the light, or outdoors if there is a surface nearby to bounce off. I see so many “professional photographers” have their flash pointing upwards when shooting outdoors when there is nothing to bounce off and I assure that does nothing other than sap power from you flash as it requires more power to light your subject.

How do I bounce my flash?

Firstly you will need a hotshoe flashgun (speedlight) that allows you to both tilt and swivel the head such as a Canon 600EX-RT, Phottix Mitros+ or if you are a Nikon user a SB900. Some flashes allow only tilt such as the Canon 430EX. This is not ideal as I like to bounce the flash in all directions.

Bounce flash 105

Phottix Mitros+ with swivel head

Which direction to bounce the flash?

Most people just point the flash upwards, which is fine, but I actually seldom do this because I always want to light a portrait using directional light if possible. So most of the time I am pointing the flash to the side, or tilted behind me to one side to give that nice slimming shadow on the face.

There is a simple formula to achieve this look that I learned from Jerry Ghionis – just point your flash head in the same direction as the nose of the subject so you are bouncing. So you are normally pointing the flash away from your subject, to one side. This is of course assuming that you have something to bounce off within a reasonable distance. The other way is to think of your walls as the light source itself, position your subject, frame your shot and then adjust your flash to target the walls.

Remember if you ware shooting events and weddings to readjust your flash direction when shooting from portrait to landscape. For me I am always looking at ways to bounce my flash. One final tip is to crop out the wall or ceiling that you are photographing, that way you don’t end up with a distracting bright wall in your photo.

Camera settings

In terms of camera settings I rely heavily on the Auto TTL system which works for me, so all I do is set the camera in manual mode so something like 1/60th of a second, ISO 1000 and let TTL do the rest. If you have a light subject and dark background, you can bring in more ambient light by:

  • Increasing ISO
  • Have wider aperture, lower F number
  • Slowing down the shutter speed

The more ambient light you drag in, the less “obvious” the flash effect. When it is a really dark scene, and most of the light is actually coming from your flash, I will drag the shutter down to 1/20th which sounds crazy because you could never handhold a shot at 1/20th in daylight. But, as you know the flash helps freeze the frame and hence helps get rid of camera shake. You want to be dragging in as much ambient light as possible if you don’t want your subject to be lit and the background very dark.

One method I use to see what Manual settings to dial into camera is to just take a picture with no flash and if it is totally black then I will increase ISO or switch to a faster lens. One I have the camera dialed-in with my Manual settings for the scene, I will use the flash exposure compensation to properly expose my subject.

You can see from the below image taken of the best man at a wedding reception, there is no obvious harsh shadow behind him, there is nice light falloff and modelling on his face which adds to 3 dimensional quality of the picture, and the surrounding area is properly exposed. I was kneeling down at the time shooting at 1/30th, 1600 ISO, f/4, 50mm lens with the flash pointed camera left tilted upward behind me about 45 degrees.

Bounce flash 106

Some people put a plastic diffuser on top of their flash what is that for?

I should mention this, many photographers use diffusers on top of their flash to spread the light out in all directions, below are the two most popular products on the market, the Gary Fong Lightsphere and the Stofen Onmi Bounce. There are many more cheaper products, and copies, that essentially do the same thing.

Bounce flash 2

Gary Fong Lightsphere

Bounce flash 3

Stofen Onmi Bounce

I have actually owned, and tried, most of the diffuser products and I have nothing against them but I don’t use any of these any more. I prefer more bare bulb bouncing for more directional light and what the diffusers do is the opposite because they spread light in all directions.

Conclusion

Practice makes perfect and I have photographed many wedding receptions in the UK in the winter where it can be pitch black by 5 p.m. Mastering bounce flash technique really improved the quality of my work. Now when I know that there is not enough light and I have to use flash the first thing I do is look for surfaces to bounce off. Remember you have to be adjusting the direction of the bounce dependent on each frame if you are recomposing. So go ahead get a flashgun if you haven’t already and start experimenting with bouncing flash.

The post Bounce Flash Secrets – Bouncing Your Way to Better Photography by Garry Chung appeared first on Digital Photography School.


Digital Photography School

 
Comments Off on Bounce Flash Secrets – Bouncing Your Way to Better Photography

Posted in Photography


Juxtaposer: The Best Layering App Ever

08 May
Extra photos for bloggers: 1, 2, 3

Want to be a game piece in Candyland? Want to ride a roller coaster down the Rocky Mountains?

Now you can do it all! … Well, you can make it look like you did it all.

Juxtaposer is the best app for creating fun photomontages. Cut out a piece of one photo and stick it onto another. We can’t stop playing with it!

We’re going to show you the ins and outs of this app and turn you into a pro user. Because everyone needs to know how to make a photo of themselves swimming in a tub of ice cream.

Create Fun Photomontages Using Juxtaposer

(…)
Read the rest of Juxtaposer: The Best Layering App Ever (654 words)


© Lauren for Photojojo, 2014. |
Permalink |
No comment |
Add to
del.icio.us

Post tags:


Photojojo

 
Comments Off on Juxtaposer: The Best Layering App Ever

Posted in Equipment


Seven photographic hacks, one short video

08 May

Screen_Shot_2014-05-07_at_10.08.35_AM.png

Photographers love simple solutions to challenging problems. How many of us have saved a shoot with a strip of duct tape and a piece of cardboard? This three-minute video shows seven clever photographic ‘hacks’ – from using an egg timer and GoPro for a panorama to creating a Gary-Fong style diffuser with a Tupperware container to creating a neutral-density filter out of welder glass and rubber bands. Learn more

News: Digital Photography Review (dpreview.com)

 
Comments Off on Seven photographic hacks, one short video

Posted in Uncategorized


Maidan

08 May

Im Jahr 2008 trafen sich Vertreter der Ukraine und der EU, um eine Vereinbarung über ein gemeinsames Assoziierungsabkommen zu treffen. Im vergangenen Jahr machte der damalige ukrainische Präsident Wiktor Janukowytsch dann unvermittelt einen Schritt in die entgegengesetzte Richtung. Er setzte das Assoziierungsabkommen aus und unterzeichnete Verträge, die die Ukraine näher an Russland anknüpfen sollten.

Dagegen formierte sich im November 2013 massiver Widerstand. Nachdem am 30. November 2013 eine friedliche Demonstration von einer Spezialeinheit der Polizei mit teilweise extremer Gewalt auseinandergetrieben wurde, versammelten sich hunderttausende Menschen, um auf dem Unabhängigkeitsplatz im Zentrum der ukrainischen Hauptstadt Kiew zu protestieren.

Maidan © Markus Heine

Maidan © Markus Heine

Maidan © Markus Heine

Um die regierungskritischen Proteste schnell zu beenden, begann die Regierung, mit Einschränkung der Versammlungs- und Meinungsfreiheit, Einschüchterung und gewaltsamen Übergriffen auf Demonstranten und das Protestcamp zu reagieren.

Als dann im Dezember Demonstranten und Ordnungskräfte gewaltsam aufeinandertrafen, entschied sich Markus Heine, zusammen mit zwei Fotografenkollegen nach Kiew zu fahren und sich ein eigenes Bild von der Lage, den Menschen und der Situation dort zu machen.

Maidan © Markus Heine

Maidan © Markus Heine

Maidan © Markus Heine

Maidan © Markus Heine

Maidan © Markus Heine

Maidan © Markus Heine

Maidan © Markus Heine

Maidan © Markus Heine

Maidan © Markus Heine

Maidan © Markus Heine

Maidan © Markus Heine

Maidan © Markus Heine

Wichtig bei dieser Arbeit war mir, mit meinen Bildern die Distanz zwischen mir, dem Fotografen, und den portraitierten Personen zu überbrücken und ein möglichst unverfälschtes Bild der Lage, der Gefühle und der Stimmung dem Betrachter zu übermitteln.

Markus Heine fotografiert mit Wissbegier und Ehrgeiz die zwischenmenschlichen und politischen Beziehungen unserer Zeit. Seine Arbeiten präsentiert er sowohl in Ausstellungen als auch in Zeitungen, Magazinen und Online-Magazinen. Er lebt und arbeitet als freier Fotojournalist in Berlin.


kwerfeldein – Fotografie Magazin | Fotocommunity

 
Comments Off on Maidan

Posted in Equipment


Found film: Keep a lookout for photographic treasures

08 May

untitled-scanned-19-900.jpg

The next time you’re in a thrift shop or antique store, keep a lookout for photographic treasures. While old cameras are always eye-catching, the images captured with those cameras are often more intriguing as Mike Ames and Derek Wong discovered. Ames came across some tins of developed Kodak Panatomic film and Wong bought a roll of developed Kodak Super XX film. They both discovered an unexpected look back at history. Learn more

News: Digital Photography Review (dpreview.com)

 
Comments Off on Found film: Keep a lookout for photographic treasures

Posted in Uncategorized


Bio-Mobile: 3D-Printed Car Body Inspired by Turtle Shell

08 May

[ By Steph in Technology & Vehicles & Mods. ]

3D Printed Turtle Shell Car 1

3D printing enables the body of a car to be more complex than ever, yet fairly quick and economical to produce. EDAG, the world’s largest engineering consultant to the automobile industry, has revealed an incredibly intricate model inspired by the biomechanics of a turtle shell. The Genesis represents the possibilities that the world of 3D printing is opening up for the future of the industry.

3D Printed Turtle Shell Car 2

Automotive panels and parts are currently cut, punched, molded and tooled out of sheets of metal, fiberglass or composite materials. Additive 3D printing changes the game, with shapes built one tiny particle at a time, enabling an unprecedented level of precision.

3D Printed Turtle Shell Car 3

3D Printed Turtle Shell Car 4

The Genesis is made from thermoplastic carbon fiber, laid down layer-by-layer by computer-controlled robots for a result that’s extremely flexible and strong, yet lightweight. This process also cuts down on material waste. EDAG produced a 3D printed scale model to give us an idea of what it would look like full size.

3D Printed Turtle Shell Car 5

As of yet, the Genesis is still a concept, really just intended to demonstrate the capabilities of 3D printing in the automotive industry. But the Urbee 2 is an example of a 3D-printed vehicle that’s actually road-tested and nearly ready for mass production. This compact, lightweight 3-wheel design gets 290 miles per gallon fuel efficiency thanks to its incredibly aerodynamic chassis.

Share on Facebook


[ By Steph in Technology & Vehicles & Mods. ]

[ WebUrbanist | Archives | Galleries | Privacy | TOS ]


WebUrbanist

 
Comments Off on Bio-Mobile: 3D-Printed Car Body Inspired by Turtle Shell

Posted in Creativity


Sign up for the DPReview newsletter today!

08 May

DPRlogo.png

Just a reminder – you can get a weekly update of all that’s new in the digital photography world by subscribing to the Digital Photography Review Newsletter! As well as updates on what we’ve published, we’ll also be sharing sneak peeks at what we’ve got in the pipeline, as well as a weekly cartoon strip, and occasionally also readers’ polls, (bad) jokes and more. Click through for more details. 

News: Digital Photography Review (dpreview.com)

 
Comments Off on Sign up for the DPReview newsletter today!

Posted in Uncategorized