Ein Beitrag von: Tilman Haerdle

kwerfeldein – Fotografie Magazin | Fotocommunity

A little more than a week after C&A Marketing Inc. announced its Calumet Photographic acquisition, the company is reopening its first Calumet store this Sunday in Oak Brook, Illinois. One of the newer stores in the chain and, according to C&A, one of the most successful, the company promises the Oak Brook location will have the inventory that professionals expect. Learn more
News: Digital Photography Review (dpreview.com)

According to a report by Engadget, Apple has hired Nokia’s head of Lumia imaging, Ari Partinen. Partinen sent out a tweet saying today was his last day at Nokia and that in June he’ll be starting ‘a new chapter in Cupertino’. In a later tweet he confirmed the company he’ll be working for in Cupertino is indeed Apple. Learn more
News: Digital Photography Review (dpreview.com)
Behance is an awesome place to find creative photography portfolios and to draw inspiration from. But with so many of them to browse through, it’s really hard to find a place to start. That’s why I’ve collected 20 awe-inspiring photographers to follow on Behance. Here you’ll find fabulous fashion photography and breathtaking landscape shots. Scroll down to enjoy these brilliant Continue Reading
The post 20 Awe-Inspiring Photographers to Follow on Behance appeared first on Photodoto.
All of us are on a journey. When it comes to our photography we are constantly evolving and growing with our craft and our images that we create grow and evolve with us. I am in the fortunate position that I see a lot of photographers work and have watched a number of these photographers evolve their art to incredible levels. For years I have followed Eleanor Brown and watched her photography evolve. Today, Luminous-Landscape is proud to publish Eleanor’s essay Photography As Art, A Lifelong Passion. I hope you enjoy her work and article, make sure to click though to her website as she has a lot of other amazing images. And, by the way this series of images and why she did them fits i very well with a previous article we recently published; Why Photography Projects Are Important by Alain Briot.
This July Luminous-Landscape hosts a workshop to the Northern Polar regions – Svalbard – Land Of The Polar Bear. We have only 2 berths left on the first cruise. The second cruise is Sold Out. If you’d like a very special small boat experience to this region then register today. You can find out more information HERE.
…
The Luminous Landscape – What’s New

Cystic Fibrosis is an incurable, life-shortening genetic disease which affects roughly 70,000 people around the globe. Commonly thought of as a childhood disease, photographer Ian Pettigrew was diagnosed with Cystic Fibrosis at the age of 37. He is currently trying to raise money to support a project entitled ‘Just Breath’, which will feature portraits of adults living with CF. Get more details and make a contribution
News: Digital Photography Review (dpreview.com)
Ein Beitrag von: Timo Nowack
Seit rund drei Monaten reise ich mit dem Rucksack durch Chile und Argentinien. Mein Ziel, die Panamericana von Patagonien bis Alaska zu bezwingen, werde ich bei meinem aktuellen Tempo wohl kaum in einem Anlauf schaffen. Dafür habe ich schon einiges gelernt, was Kameras und Fotografie auf so einer Reise angeht. Das sind meine fünf wichtigsten Erkenntnisse und Tipps:

Denn wenn Du Dein ganzes Gepäck jeden zweiten oder dritten Tag durch die Gegend schleppst, wirst du dieses Schwergewicht füher oder später loswerden wollen. Wenn Du mit Zelt, Essen und Ausrüstung tagelang durch Nationalparks wanderst, sowieso. Ich habe hier in Südamerika schon mehrere Leute getroffen, die ihre DSLR – genervt von Größe und Gewicht – mit Freunden oder Verwandten nach Hause geschickt haben.
Kleinere und leichterer Alternativen gibt es zu genüge. Und dass diese den „Großen“ etwa in Sachen Bildqualität nicht ganz das Wasser reichen können, ist zu verkraften. Denn machen wir uns nichts vor: National Geographic wird unsere Fotos eh nicht kaufen – egal mit welcher Kamera wir sie schießen.

Und das unabhängig von der Frage nach Bildqualität und fotografischen Möglichkeiten. Das große Manko ist für mich der Akku, auch wenn es Powerpacks und Solarzellen gibt. Denn ich surfe mit dem Telefon in Hostels viel im Internet, bewege mich mithilfe einer Kartendienst-App durch Städte, höre trotz meines MP3-Players gelegentlich Musik damit.
All das saugt Energie. Und als Reisender habe ich deutlich weniger Gelegenheiten als daheim, das Smartphone sicher abzulegen und aufzuladen. Daher mein Tipp: Überleg Dir gut, ob Du ganz auf eine reine Kamera verzichten willst. Für mich kommt es nicht in Frage.

Kamera und Objektive können ins Meer fallen, verkratzen, geklaut werden – und dazu haben sie auf einer langen Reise viel mehr Gelegenheit als in einem Kurzurlaub oder daheim. Du kannst Dich vorbereiten, etwa indem Du statt einer großen Speicherkarte mehrere kleine verwendest. Oder indem Du Dich für eine unauffällige Tasche entscheidest und nicht für eine, die schon aus hundert Metern Entfernung als Kameratasche erkennbar ist.
Doch auch alle Vorsicht schützt vor Schaden nicht. Als ich bei den Aufräumarbeiten im Katastrophengebiet von Valparaiso geholfen und nebenbei fotografiert habe, habe ich mir zum Beispiel einen Kratzer auf meinem nicht wechselbaren Objektiv zugelegt. Wer schon bei dem Gedanken daran einen Nervenzusammenbruch erleidet, sollte eine Kamera mit auf die Reise nehmen – und bei Bedarf günstig kaufen – bei der notfalls auch ein Totalschaden okay ist.

Wenn Du vor dem Eiffelturm stehst, willst Du ihn womöglich fotografieren, weil das ein ganz geiles Ding ist. Auf der anderen Seite vielleicht auch nicht, weil es schon Millionen Fotos davon gibt, in allen möglichen Varianten. Und viele davon haben ein besseres Licht als das, mit dem Du gerade Vorlieb nehmen musst. Mir geht es oft so, ich bin hin- und hergerissen. Wenn Du also nicht nur langweilige Fließbandbilder von touristischen Highlights produzieren willst, lass Dir etwas einfallen.
Ich mache es mir gerade einfach: Ich habe in meiner Kamera eine Art Tilt-Shift-Modus mit sehr kleinem Schärfebereich und knalligen Farben entdeckt. Viele Leute finden die Bilder furchtbar, aber für mich werden ausgelutschte Motive dadurch wieder interessant. Du kannst auch wie in „Die fabelhafte Welt der Amelie“ einen Gartenzwerg vor die Sehenswürigkeiten stellen oder jedesmal lustige Japaner fotografieren, die das eigentliche Motiv ablichten. Sei kreativ.

Alleine oder mit anderen. Lade sie bei Facebook, Flickr oder sonstwo hoch oder verschicke sie per Mail. Viele FotografInnen halten sich ja gern aus den Bildern heraus. Doch auf langen Reisen gilt: Ein Bild mit dem Partner oder der Partnerin im Arm vor dem Taj Mahal ist zwar irgendwie furchtbar, aber Deine Eltern werden sich freuen. Und Deine Freundinnen und Freunde auch, wenn Ihr Euch ein halbes Jahr lang nicht mehr gesehen habt. Und das ist doch eigentlich das Wichtigste.
kwerfeldein – Fotografie Magazin | Fotocommunity
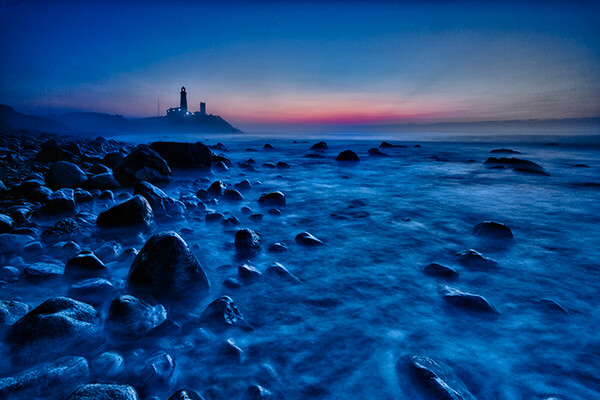
Montauk Point, NY. EOS 5D Mark II with EF 17-40 f/4L. 15 seconds at f/11, ISO 800.
There is a period of time each day, just before sunrise and just after sunset, when the sun is below the horizon, when the light is known as “sweet light.” This period of time is known as “The Blue Hour.” This is a period of time each morning and evening when there is neither full daylight, nor full darkness. The light is almost ethereal, with a soft blue glow bathing the scene. The Blue Hour happens in tandem with the Golden Hour, making the beginning and end of the day exceptional for photography, providing two very different types of light within a single time span.
The Blue Hour is a prime time for landscape photography. Subjects that have their own lighting, such as city buildings or lighthouses, tend to look especially good, as the yellow glow of their lights cuts through the blue. A tripod will be necessary to capture these scenes, unless you’re willing to raise your ISO to the point you can hand hold your exposures. Setting a proper white balance is one of the keys to Blue Hour photography. When set to AWB (auto white balance), the camera will try to correct for the blue tone the light has, which can result in flattening your image. If you shoot RAW, you can correct for this in pos- processing, to get just the right white balance for your taste. If you’re a JPEG shooter, you may want to try setting a custom white balance, or you can use your camera’s Live View setting to preview what different white balance settings will do to the scene.
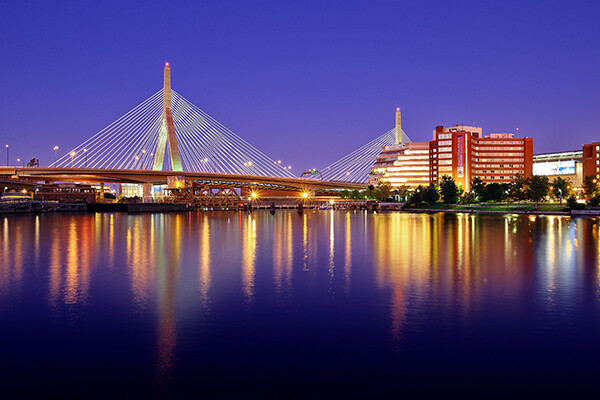
Boston’s Zakim Bridge. EOS-1D Mark III with EF 24-105 f/4L IS. 30 seconds, f/11, ISO 100.
I prefer the time during the Blue Hour when the sun is close enough to the horizon that there is a soft orange glow along the horizon. This adds an extra quality to the image, especially when you consider that orange is blue’s complementary color. You may want to bracket your exposures, as this will vary the intensity of any light in the image, be it the orange glow remaining from the sun, or artificial lighting on buildings. Blending exposures for HDR images may not be necessary, but it will be possible if you use a tripod and decide to try some HDR.
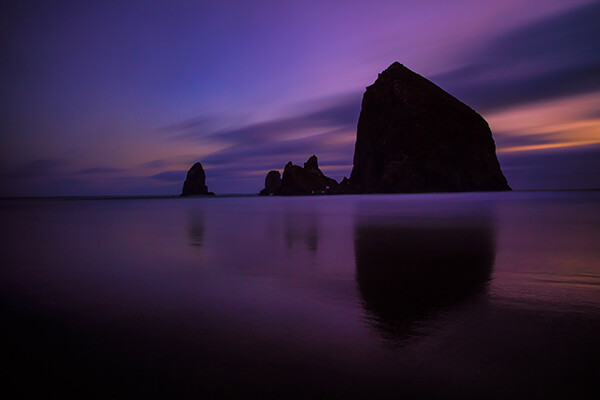
Cannon Beach, Oregon. EOS 5D Mark III with EF 24-70 f/2.8L II. !20 seconds, f/11, ISO 640.
The window of opportunity for Blue Hour shooting is small, and probably much shorter than during the Golden Hour. You’ll want to be at your spot ready to go well in advance of the Blue Hour. To plan your time, you can visit The Blue Hour Site to find out when the Blue Hour starts and ends at your location. If you don’t have access to the internet, a good rule of thumb is that the Blue Hour starts about 15 minutes after sunset, and ends around an hour after sunset. For sunrise, it will start roughly an hour before sunrise and end 15 minutes before sunrise. When I plan to shoot landscapes, be it at sunrise or sunset, I always plan to shoot both the Golden Hour and the Blue Hour. I tend to get a lot of variety due to the change in light, and it makes the time spent that much more worthwhile.
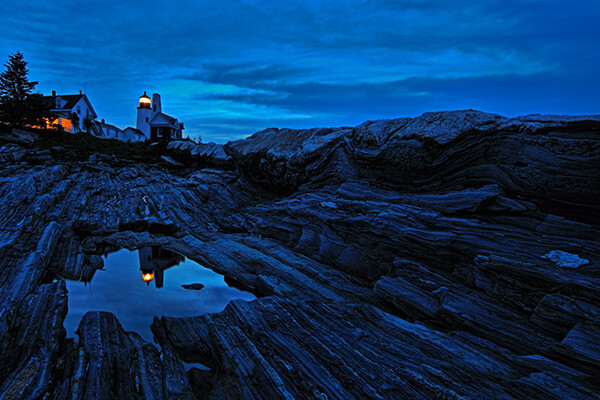
Pemaquid Point, Maine. EOS 5D Mark II with TS-E 17mm f/4L. 8 seconds, f/11, ISO 400.
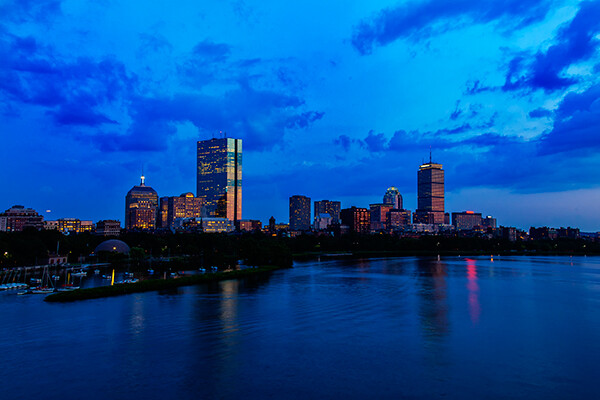
Boston Skyline. EOS 5D Mark II with EF 24-105 f/4L IS. 1 second, f/11, ISO 100.
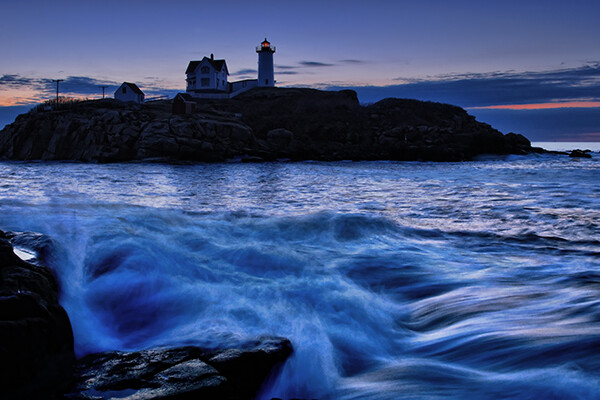
Cape Neddick, Maine. EOS-1D Mark III with EF 17-40 f/4L. 0.4 seconds, f/8, ISO 400.
Please share your Blue Hour photos and comments below.
The post Sweeten Your Photos by Shooting During the Blue Hour by Rick Berk appeared first on Digital Photography School.
[ By WebUrbanist in Design & Products & Packaging. ]

Each sheet from this life-saving tome can provide 30 days of drinkable water – all together, the entire volume is able make a total of 5,000 liters fit for human consumption (enough for four years).

The project, a collaboration between scientists, engineers and typographer Brian Gartside, was created for the non-profit WaterIsLife as both an educational tool and vital resource.


Coated in silver nanoparticles and written on with food-grade inks, the pages are able to actively kill off deadly diseases found in the water supply of developing countries. Straining out particles and reducing bacteria counts by over 99.99%, their filtering capabilities leave safe-to-consume potable liquid on par with American tap water.


Co-engineered by creators from Carnegie Mellon and the University of Virginia, the sheets are made to be torn out easily and inserted into a filter box, which doubles ingeniously as a storage and shipping container for the books as well.


Best of all, the book is cheap to produce and thus practical to manufacture and distribute in bulk to those in need. Including various tips teaching proper sanitation techniques and the dangers of dirty water, its messages of awareness are also translated into numerous languages to make it globally legible.

Characters from iconic stories like Treasure Island and Bambi leap out of the pages of open books in whimsical book paper sculptures by Jodi Harvey-Brown.
Click Here to Read More »»

The writing is on the walls, but only when they get wet – that is when the secret messages or hidden designs appear in these seemingly innocuous concrete …
Click Here to Read More »»
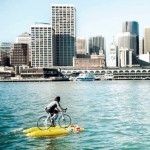
Both the first person to bike across the San Francisco Bay and over the Hudson River is great, but being able to skip traffic jams and cycle to work over the …
Click Here to Read More »»
![]()


[ By WebUrbanist in Design & Products & Packaging. ]
[ WebUrbanist | Archives | Galleries | Privacy | TOS ]
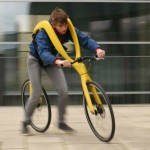
[ By WebUrbanist in Technology & Vintage & Retro. ]

Few folding bikes can boast such compact proportions (even when fully collapsed) as this umbrella-sized wonder you can sling at your side or slide into your shoulder bag.

The Sada Bike bends the basic assumptions of bicycle design, but not in the same fashion as small-bike solutions. Instead of reducing the size of essential elements, which creates an awkward riding experience, Sada trades a rigid chassis and support-providing spokes for a jointed lightweight frame and reinforced rims that require less material.

Experienced engineers will note their solution is not without its own unsolved questions, including the impact of putting weight along the edges of empty (even if rigid) wheel frames.

Still, it is a start – while their may be balance and durability issues yet to address, the concept calls into question the premises behind existing standard, miniature and foldable bikes and pushes the potential limits of urban portability.

In critique of other existing approaches, Sada’s creators note: “They have a small frame and wheels at the expense of stability, for the sake of compactness and portability during transport. The minimum size of the frame, in fact, penalizes the rider position while driving and the small size of the wheels significantly are affected by variations in terrain. On the other hand, the traditional bicycles, avoid these problems, but the rigid chassis makes them inflexible during transport on public transport.”

Rough around the edges, we rarely notice the unique landscape that evolves from regular wear and tear on our bicycle tire – even our ordinary ones.
Click Here to Read More »»
Soon, you’ll be able to charge your iPhone at strategic locations around New York City – but you’ll have to put in a little leg work.
Click Here to Read More »»
This highly unusual bicycle has no pedals or seat; it straps over you like a harness to help you run faster than you ever could on your own.
Click Here to Read More »»
![]()
[ By WebUrbanist in Technology & Vintage & Retro. ]
[ WebUrbanist | Archives | Galleries | Privacy | TOS ]
You must be logged in to post a comment.