Ein Beitrag von: macsoapy

kwerfeldein – Fotografie Magazin | Fotocommunity

Update: Fujifilm UK has officially announced a service allowing certain X-series cameras to be customized with a range of different colors and body textures. The company showed customized cameras at The Photography Show earlier this week in Birmingham, UK, and partially functional pages for an ‘X Signature’ went up on its website, but the service is now live. Click through for more information.
News: Digital Photography Review (dpreview.com)
Photographs from a fisheye lens look different, which can be a good or not-so-good thing. This uber-wide angle lens let’s you get super close to your subject, yet still see the background. It’s an unusual perspective you can’t get with any other lens. But there are challenges, too. The edges are distorted, which makes some shots look weird, but below, Continue Reading
The post Fisheye Photography: 9 Shots That Work Amazingly Well appeared first on Photodoto.
Ein Beitrag von: Petra Holländer
Wenn ich im Internet durch Abertausende Fotos stöbere, kommen mir oft Bilder unter, die durch aufwändige und ungewöhnliche Requisiten auffallen. Es kann aber auch genau das Gegenteil der Fall sein: Einfache Alltagsgegenstände werden gekonnt in Szene gesetzt oder so verfremdet, dass sie besonders interessant wirken.
Genau diesen Gedanken finde ich toll und daher versuche ich, ihn auch in meinen Fotos umzusetzen. Einerseits habe ich nicht das nötige Kleingeld, um mir teure Requisiten für meine Bilder anzuschaffen, anderseits fasziniert mich auch, wie man mit einfachen Mitteln schöne Fotos machen kann.

Für meine Fotos verwende ich am liebsten Gegenstände, die entweder sehr schlicht sind, wie zum Beispiel Papier, oder Dinge, die noch einen gewissen Raum für Kreativität lassen. Darunter fällt etwa eine Glühbirne, die man, wie Ihr im Folgenden sehen werdet, zum Beispiel mit Wasser füllen kann, was wiederum einen interessanten Effekt hat.
Natürlich finden sich auch Gegenstände in meinen Bildern wieder, die einfach nur ihren Zweck erfüllen, wie beispielsweise ein Koffer. Viel spannender finde ich es aber, wenn Gegenstände zweckentfremdet werden, wenn aus Papier eine Art Riesenschal wird oder ein Vorhang als Kleidungsstück fungiert.

Wie aber findet man am besten solche Gegenstände? In meinem Fall gibt es eigentlich nur zwei Möglichkeiten: Entweder ich suche explizit nach ihnen oder sie finden mich!
Wenn ich auf der Suche nach Requisiten bin, laufe ich meist mit dem Gedanken, was ich denn nur fotografieren soll, durch meine Wohnung. Ich stöbere in Kisten und reiße Schranktüren auf, mit der Hoffnung, endlich eine zündende Idee und die passenden Gegenstände zu finden.
Oft lasse ich mich dann einfach von den gefundenen Dingen inspirieren oder denke krampfhaft nach, was sich wohl damit anstellen lässt. Als besonders hilfreich empfinde ich meine Fotokiste, in der ich Sachen sammle, die ich vielleicht einmal für Fotos verwenden könnte.
Findet jedoch umgekehrt ein Gegenstand mich, dann läuft das so ab: Mir fällt etwas in die Hand oder ich sehe ein Ding, das in mir sofort ein Bild erzeugt, das mir eine genaue Idee für ein Foto liefert oder ich sehe es schon fix und fertig vor meinem inneren Auge. Dabei bin ich meist ziemlich aufgeregt vor Freude und kann es gar nicht erwarten, das Foto zu realisieren!

Das Foto mit den weißen seltsamen Ballons ist so entstanden, dass ich Geld sparen wollte und die billigsten Müllsäcke gekauft habe, die sich finden ließen. Im Endeffekt waren sie zu klein und zerrissen sehr leicht. Es war mir aber auch zu schade darum, sie einfach zu entsorgen. Was sollte ich also damit tun? Natürlich ein Foto machen!
So entschloss ich mich, die Säcke aufzublasen, an Schnüren zu befestigen und sie als so eine Art Luftballons zu verwenden. Im endgültigen Foto erinnern sie mich jedoch eher an flauschige Wolken, die auch das Konzept, sich selbst zu täuschen und zu behaupten, alles sei okay, untermauern, indem sie optisch ein weiches, himmlisches Umfeld erzeugen.
Wie die folgenden Fotos zeigen, kann man mit einfachen Dinge auch tolle Effekte erzielen, die das Bild ergänzen, anstatt die Gegenstände in den Vordergrund zu rücken.

Dieses Foto war eher ein Versuch, der schlussendlich besser geworden ist, als anfangs gedacht. Dabei habe ich durch eine Glasscheibe fotografiert, an der ich zuvor schwarze Farbe hinablaufen ließ. Zusätzlich habe ich auch etwas Mehl darüber verteilt, das dann einen interessanten Effekt im rechten oberen Bereich ergab. Die bemalte Glasplatte selbst sah eigentlich nicht sonderlich spektakulär aus, weshalb ich über das Ergebnis besonders überrascht war.

Das Foto mit der weißen Rose ist ein eher simples Portrait, das ich durch Alufolie ein wenig aufzupeppen versuchte. Die Alufolie erkennt man auf den ersten Blick wohl nicht, da ich sie ein wenig zweckentfremdete.
Ich habe nämlich aus einem quadratischen Stück Folie einen Kreis ausgeschnitten, durch den ich dann hindurch fotografierte. Die etwas zerknüllte Alufolie lag außerhalb des Schärfebereichs und reflektierte das Licht, sodass sie eine schönes Bokeh erzeugte, das das Bild umrahmt.
Für mich sind Alltagsgegenstände als Fotorequisiten nicht nur eine preisgünstige Möglichkeit, sondern fordern mich auch auf, meine Kreativität zu nutzen, um Neues zu erschaffen. Es gibt so viele tolle Dinge, die nur darauf warten, fotografiert zu werden und ich kann es gar nicht erwarten, sie alle in Bildern zu verwenden!
kwerfeldein – Fotografie Magazin | Fotocommunity

The Pentax O-FC1 FluCard offers quite a bit more than just Wi-Fi image sharing and transfers, but not quite as much as some wired tethering applications. This makes it a mixed bag as a general camera tool, but one that has been entirely out of reach for Pentax for quite some time.. In light of this, is it worth the $ 99 price tag? Find out in our review
News: Digital Photography Review (dpreview.com)
[ By WebUrbanist in Design & Products & Packaging. ]

Remembering to take your medicine can be hard if you have lots of pills to pop on a daily basis, but this one-stop, custom-printed packaging solution promises to help you get and stay on schedule once and for all.

Another ingenious example of mass-customization, the PillPack system provides a rolled-up and ready-to-go answer to an everyday problem that many people face. Each box is tailored to the individual schedule and dosage of a particular person.
Aside from solving issues like reminders and refills, this chronologically-arranged roll design addresses an issue inherent in pill bottles themselves: the difficulty of seeing how many you have left and thus determining whether you have taken (or forgotten) today’s dose. Extending its goal of pill-taking simplicity, PillPack also offers vitamin pills and supplements alongside prescription meds.

The system itself is not a new idea – retirement homes and other long-term-care facilities have been using similar patient-specific rolls to dispense drugs for some time. PillPack, however, brings that functionality to the masses, adding useful designer touches for customers and delivering it all right to the door of their own home.

The packs are semi-transparent so the consumer can see what they are taking before opening them. They are also stamped directly with dosing information and a list of the medications contained within. Each pack tears off easily from the roll, but retains its individually-stamped date – a useful featured in case you pull it off and set it down next to your nightstand to remember the next morning. The additional possibility are myriad – presumably having all of your vitamin, supplement and prescription pills in the same system could help people (and doctors) analyze interactions and avoid dangerous combinations as well.

Happy Birthday, Viagra! Approved by the FDA on this day in 1998, the Little Blue Pill is now officially a teenager. Here’s its sexy story in words and pictures.
Click Here to Read More »»
Doorknobs to die for? These dozen daring twists on a traditionally utilitarian theme will unlock your perceptions of what room decor could and should be.
Click Here to Read More »»

If you are thinking that modern door design is a matter of boring, open-and-shut conventional thinking, these 14 examples should put you in the right frame of …
Click Here to Read More »»
![]()


[ By WebUrbanist in Design & Products & Packaging. ]
[ WebUrbanist | Archives | Galleries | Privacy | TOS ]

This week saw the successful launch of a new photography trade show in the UK. Called simply ‘The Photography Show’ and run by Future Publishing, the event ran from 1st to 4th March at the NEC in Birmingham. We spent a day there, talking to exhibitors and getting hands-on with the latest products. Click through for a selection of things we saw.
News: Digital Photography Review (dpreview.com)

Two weeks ago the makers of the photo app EyeEm, together with Soundcloud and Wunderlist, started sending out email invitations to their users, offering to pre-register for the EyeEm Market in order to sell user images. Today EyeEm has announced on its blog that it will run the EyeEm Market in partnership with stock image giant Getty Images. Click through for more details.
News: Digital Photography Review (dpreview.com)

Adobe has released an Android version of its Revel app. Previously the service had only been available on mobile devices running Apple’s iOS operating system. Revel is a cloud-based image and video management service that allows you to set up group libraries that are shared between friends or family members. Revel focuses on privacy, and you have full control over who can see the contents of your library. Learn more on connect.dpreview.com
News: Digital Photography Review (dpreview.com)

The SensorKlear Loupe Kit from LensPen.
A couple of years ago, I decided it was time to face my fears head-on. Since the day I had unboxed my first DSLR I’d fallen victim to all of the various doomsday warnings about the horrors that could befall me if something went wrong while cleaning my sensor. Don’t get me wrong– those warnings are all valid. Messing this up could scratch the sensor, push it out of alignment, or even break it, just to name a few. I’d always figured that if something was going to go wrong, I wanted it to be someone else’s fault– someone who would have to pay to replace the camera or repair the damage. Luckily, I have a great local camera shop that offers sensor cleaning twice a month and does a great job, but I finally got to that “how-hard-can-it-be?” point and decided it was time to learn.
DOOMSDAY WARNING: I would be totally remiss if I didn’t offer my own caution flag. If any part of cleaning your own sensor makes you the slightest bit uncomfortable, you should absolutely not do it. The consequences I mentioned above are only a few of the things that can happen if this delicate task is done incorrectly. There are a lot of products out there to help you clean your sensor, some better than others. You should thoroughly research any product before sticking it into your camera. Also make sure that it comes with clear, easy-to-follow instructions.
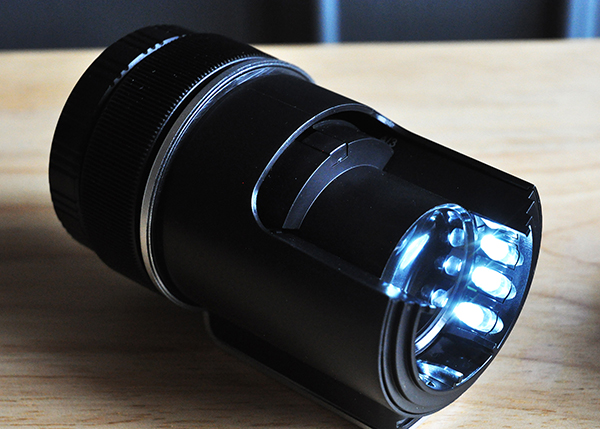
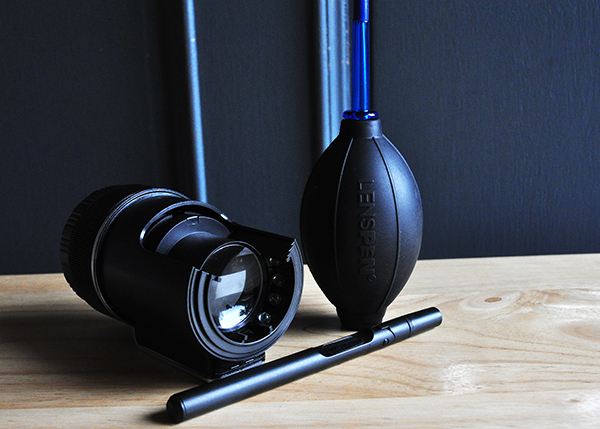
The SensorKlear Loupe Kit comes from the same company that manufactures the LensPen–one of my favourite lens-cleaning tools. The sensor-cleaning kit contains three components. The SensorKlear Loupe, the LensPen Hurricane Blower, and the SensorKlear II Pen.
For me, the biggest drawback to most sensor-cleaning products is that you really can’t see what you’re doing. The SensorKlear Loupe changes that, providing an illuminated, magnified view of the sensor. Being able to quickly and easily detect sensor dust not only makes the task of cleaning it easier, but also tells you whether your sensor even needs cleaning at all. There’s no sense sticking anything in your camera unnecessarily. The loupe is also designed with an opening on the side, allowing access for the cleaning tools while maintaining your view of the sensor. The loupe uses two AAA batteries (included) and fits perfectly over the camera opening. Be sure to check your camera’s owner’s manual for instructions on locking the mirror in the “up” position for sensor cleaning.
Chances are you probably already have a similar blower in your gear bag, so I’m not going to take up a lot of your time describing this one. It’s a blower–plain and simple. By now I’m sure you know to not let canned air anywhere near your sensor. The velocity of the air can blow the sensor out of alignment and the chemical propellant can permanently damage its surface. The hand blower is the most basic solution–and perfectly suited to the task–for removing dry dust particles from your sensor.
Sometimes, though, you’re battling more than just dry dust. Every once in a while, sticky particles decide to make your sensor their new home. For those situations, the SensorKlear Pen has worked flawlessly each time I’ve used it. The tip is a smaller version of the LensPen tip and is impregnated with a patented carbon cleaning compound that removes and absorbs the more stubborn dust and other particulates that find their way into cameras and onto sensors. The adjustable angle of the pen works perfectly in conjunction with the loupe, allowing you to use it an angle that doesn’t block your view of the sensor.
As with anything, there is no one perfect solution to the challenge of maintaining a dust-free sensor. For me, though, the quality of the tools, their ease of use, as well as their results, make this kit a great choice if you are ready to start cleaning your own sensor. If you’re already one of the brave ones, share your recommendations in the comments.
The SensorKlear Loupe Kit is available on Amazon.
The post SensorKlear Loupe Kit Review by Jeff Guyer appeared first on Digital Photography School.
You must be logged in to post a comment.