When photographing landscapes, it can sometimes be difficult to produce a an image that is focused in its content, that leads the viewer’s eye exactly where you as the artist want it to go. Sometimes, even though you may be presented with a beautiful vista, an image may not present itself and you have to work to find it. Here are five basic steps to help you take better landscape photos. I follow these any time I’m looking to create a landscape image.
#1 Find your subject
Sometimes it’s easy. You choose a building, or a rock formation, or a tree, and it all just comes together. Other times, it becomes more difficult. Sometimes nothing in particular stands out. Look around the scene, find something that draws your eye. Look through your viewfinder, and see how things frame up through your camera’s eye. Once you have found your subject, you have more decisions to make.
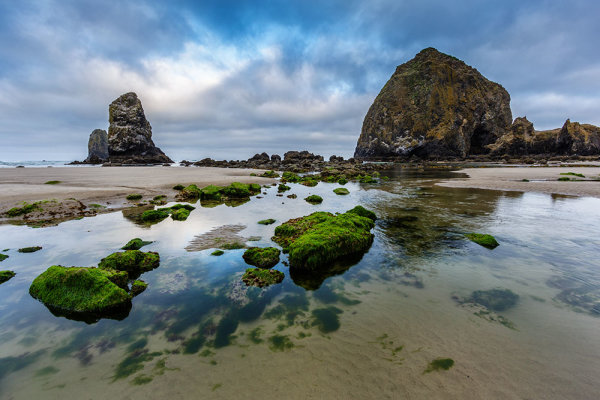
Haystack Rock is a fairly obvious subject. But there are a myriad options when it comes to photographing it. For this image, I decided to use a tidal pool and some rocks in the foreground, but also wanted to include plenty of sky since there was so much interest in the clouds. The rocks and water create some nice lines leading right to Haystack Rock. EOS 5D Mark III with EF 14mm f/2.8L II, at f/16, ISO 100.
#2 Where is your subject in the composition?
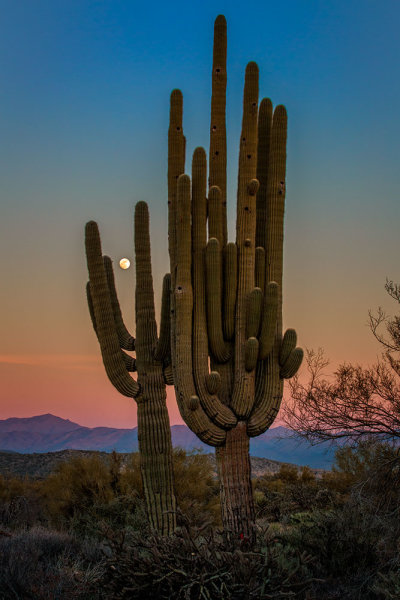
There was no real foreground to speak of here. Just a lot of sand and some uninteresting brush. What I did see was the way the moon was rising between the arms of the saguaro (cacti), and the soft gradation from orange to blue as the sun set behind me. Taken with EOS 5D Mark III, EF 70-200 f/2.8L IS II, 1/20 @ f/22, ISO 1000.
This will partly be dictated by its location in relation to you, but also by what else is in your scene. Look for interest in relation to what you’ve chosen as the subject. Is there an interesting object or pattern in the foreground, which could lead the viewer’s eye to the subject? Is there something in the foreground that frames your subject or otherwise adds interest without being distracting? I will often use water or rocks in the foreground if I can. If it’s water, can you get a reflection of your subject in it? Sometimes it’s leaves, sometimes trees or a fence.
If there is nothing in the foreground, try minimizing it by putting the subject as the foreground, and looking for background interest. Interesting clouds or sky, buildings, or trees, can all create a backdrop for the landscape. Sometimes, you’re lucky enough to get both an interesting background AND foreground. These are the times to play with your composition and vary the amounts of foreground and background to see what works best, or what doesn’t work at all. Generally speaking, if the sky is flat and lacks interest, I will place it in the top third of the frame, using the rule of thirds. If the foreground lacks interest, I place that in the bottom third.
#3 Tie it together
Once you decide where your subject goes in the frame, what’s in the foreground and what your background will be, it’s time to find a way to tie it all together. Are there leading lines that will lead your viewer from foreground to background? Leading lines are an easy way to tie your composition together. Framing is another way, which I included in my discussion of choosing your foreground. Without tying your composition together, it can often seem like you have two separate images in one. Creating a composition that pulls the viewer through it and leads them where you want them to look is the best way to create an effective landscape image.

EOS 5D Mark III with EF 16-35mm f/2.8L II. I was zoomed into 35mm on this one. Exposure was 1.6″ at f/20, ISO 100.
For this image of Kaaterskill Creek (above), I knew the small cascade was my main subject. There were some rocks to create interest in the foreground, and the water creates a nice leading line back to the cascade in the middle ground, and then to the foliage in the background.
#4 Read the light
Are you at your location at an optimal time? Some locations are better in the early morning, some in late afternoon. Some are good no matter what time you are there. The difference in the light at these times can mean the difference between a dramatic landscape image, or a snapshot of a pretty place. To find out where the sun will be in a given location at a given time, use an app such as The Photographer’s Ephemerus, or Sunseeker Pro, which will show you the sun’s exact location. This will enable you to plan when to be a location for optimal light.
Side lighting will create dramatic shadows and show off textures. Backlighting will help create silhouettes, which can be very effective for dramatic images with prominent features breaking the horizon. Front lighting will reveal detail everywhere. Often, I will photograph the same location at different times, as different light will create a variety of images from the same location.

EOS 5D Mark II, EF 17-40 f/4L. Exposure was 15 seconds, f/11, ISO 800.
Montauk Point (above) is a great location with lots of photo opportunities, but it’s a much better location at sunrise, than later in the afternoon or at sunset, due to the shadows created by high cliffs. At sunrise, it can be magical.
#5 Choose your shutter speed
Finally, think about what your shutter speed will do to the image. If you’re shooting water, shutter speed has a lot to do with the water’s appearance in your image. If there are trees, and it’s a breezy day, a faster shutter speed will be necessary to freeze the leaves and avoid motion blur. These are things to be aware of when composing your image. Learning to visualize these effects in your mind before pressing the shutter button will go a long way toward making you a better photographer.

EOS 5D Mark II with EF 24-105 f/4L IS. Exposure was 10 seconds at f/11, ISO 400.
The Minneapolis skyline was an obvious choice for subject here. But the sky was flat for a background, so I pushed the skyline to the top of the frame. Thankfully, I caught the Mississippi River on an uncharacteristically calm day and was able to get a nice reflection for foreground interest. I used a slow shutter speed (or long exposure) to smooth the waters even more.
Do you have some great landscape tips you’d add to this list? Please share in the comments below.
The post 5 Steps to Help you Take Better Landscape Photos by Rick Berk appeared first on Digital Photography School.

Digital Photography School


You must be logged in to post a comment.