RSS
 

Archive for November, 2013

The 5 Stupidest Photography Errors You Don’t Even Know You’re Making

22 Nov

They can happen to anyone who thinks he’s a good photographer. They can even happen to a professional photographer who has had years and years of experience in the industry! What…is “they?” In this case, “they” is a reference to the absolutely worst photography errors that you don’t even know you’re making. No matter how good you are or think Continue Reading

The post The 5 Stupidest Photography Errors You Don’t Even Know You’re Making appeared first on Photodoto.


Photodoto

 
Comments Off on The 5 Stupidest Photography Errors You Don’t Even Know You’re Making

Posted in Photography


Augenschmaus: Tempeh im Nussmantel

22 Nov

Ein Beitrag von: Marcel Pommer

Was dem einen sein Käse, ist dem andern sein Tofu, sagten schon die alten Römer. Oder so ähnlich. Und was dem Käse sein Penicillium roqueforti, ist dem Soja sein Rhizopus oligosporus.

Klingt grausam, ist aber in Wirklichkeit sehr lecker und zum Glück nicht mehr nur in Indonesien zuhause: Tempeh – durch Edelpilze fermentierte Sojabohnen.

Schmeckt im Gegensatz zu Tofu total nach was, nämlich angenehm nussig, absolut nicht eklig wie Natto und sieht auch noch schön aus. Ist im Grunde direkt aus dem Kühlfach essbar, aber durch Grillen, Braten oder Frittieren wird mehr daraus. Das Tollste, was man bisher aus Soja machen kann.

Tempeh wird hier und heute frittiert, in Backteig und Cashew, und mit bunten Beilagen angerichtet.

Portionen: 4 Personen
Zeit: 90 Minuten

Tempeh © Marcel Pommer

Zutaten:

300 – 400 g Tempeh
1 1/2 Tassen Rundkornreis
250 g Zuckerschoten
8 Datteln
2 Orangen

Für die Tempehmarinade:

100 ml Sojasauce (Shoyu)
200 ml warmes Wasser
1 fein gehackte Knoblauchzehe

Für den Backteig:

80 g Mehl
100 g Cashews
40 g Maisstärke
100 ml Sake
1 EL Zucker
warmes Wasser
1 TL Salz
1 TL Backpulver
1 EL Apfelessig

Für die Erdnusssauce:

100 g blanchierte, geschälte Erdnüsse
150 g Erdnussmus
Saft von 2 Orangen
Saft einer Zitrone
2 fein gehackte Knoblauchzehen
fingerlanges Stück Ingwer, fein gehackt
1 EL Korianderpulver
1 rote Chili
Salz

Cashew & Ingwer © Marcel Pommer

Zubereitung

Die Form des Tempeh, die man ergattern kann, entscheidet über die Form der Stücke. Ein Block von 400 g sollte erst in zwei dünne, vollformatige Scheiben und diese dann in 32 Dreiecke zerlegt werden. Einen Zylinder zerteilt man in etwa 1,5 cm dicke Halbkreise.

Die Stücke sind so nicht zu groß und können gut mariniert werden. Ich mag’s én bloc – das Eckige muss später ins Runde, also in die Pfanne oder Fritteuse. Mit einer Gabel jedes Stück einstechen, in die Marinade geben, zur Seite stellen. Über Nacht im Kühlschrank wäre ideal, aber eine Stunde warm tut’s auch.

Tempeh in Marinade © Marcel Pommer

Backteig: Fließfähig, aber dick muss er werden. Cashews so zerkleinern, dass dabei nicht zu große Stücke entstehen, in etwa so wie handelsübliche gehackte Mandeln. Dabei fällt auch Feinpulveriges an, das man absieben und mit in den Teig geben kann.

Die Stückchen in einem tiefen Teller zur Seite stellen und die anderen festen Zutaten in der Schüssel kurz vermischen, den Sake dazugeben und mit dem Handrührgerät und gerade so viel Wasser gut verrühren, dass ein glatter Teig entsteht, der nur langsam vom Löffel tropft. Zur Seite stellen und eine gute halbe Stunde gehen lassen.

Den Reis mindestens vier Mal waschen und das stärkehaltige Wasser abgießen, bis es klar bleibt, denn wir wollen klebrigen Reis, nicht matschigen. Den Reis mit der 1,5-fachen Menge Wasser und 1 TL Salz 15 Minuten lang einweichen und nach Anleitung im Reiskocher oder laaangsam im geschlossenen Topf garen.

Zuckerschoten © Marcel Pommer

Derweil die Zuckerschoten in kaltem Wasser waschen, dann für 5 – 7 Minuten in kochendes Salzwasser geben, nach dem Abgießen für 10 Sekunden in kaltes Wasser tauchen, um das Weitergaren zu unterbinden. Auf einem Tuch ausbreiten und gut trocknen lassen.

Für die Sauce die Erdnüsse unter Rühren im Topf rösten, bis sie Farbe und Duft aufweisen. Herausnehmen, im selben Topf das Korianderpulver, den fein gehackten Ingwer und (kurz) den fein gehackten Knoblauch in 1 EL heißem Öl anschwitzen. Erdnüsse wieder dazugeben, einmal umrühren und sogleich das Ganze mit Orangen- und Zitronensaft ablöschen und zugedeckt auf kleiner Flamme köcheln lassen.

Bevor die Flüssigkeit zu sehr verdunstet ist, das Erdnussmus hineinrühren – wenn es zu dick wird, auch etwas heißes Wasser – und dann die Sauce mit dem Pürierstab zur gewünschten Konsistenz verarbeiten. Kleingeschnittene Chilischote hineingeben, auf kleinster Flamme weiterköcheln lassen, zum Schluss mit Salz abschmecken, warmhalten.

Zutaten © Marcel Pommer

Nun schlägt die Stunde der Fritteuse. Wer keine hat, nimmt eine kleine Pfanne mit senkrechter Wand; in eine 20cm-Pfanne passen 3/4 L Öl, vorzugsweise Erdnuss. Die Temperatur stimmt dann, wenn sich an einem Holzlöffel Blasen bilden, die Küche sich aber nicht mit Rauch füllt.

Die gut abgetropften Tempehstücke werden in Stärke gewendet, vielleicht mit Hilfe einer Fleischgabel durch den Teig gezogen und nach leichtem Abtropfen und wenden in Cashewstücken ins heiße Fett gegeben. Nach 5 Minuten ist jedes Stück ausgebacken. Goldgelb, nicht zu hell, nicht zu schwarz. Auf Küchenpapier abtropfen lassen.

Der Reis sollte mittlerweile fertig sein.

Die Zuckerschoten von jeder Seite eine halbe Minute in wenig heißem Öl anbraten, mit einer Prise Zucker bestreuen und nach einer Minute leichten Karamellisierens mit ein paar Tropfen Mirin (oder Sake oder anderem Kochwein) ablöschen, einmal schwenken, gleich herausnehmen.

Wenn man den Reis hübsch anrichten möchte, verhindern ein paar Tropfen Sesamöl nicht nur das Festklemmen im Förmchen, sondern geben auch noch eine Geschmacksnote. Den kann man natürlich auch mit gerösteten Sesamkörnern erzielen. Datteln, wenn man warmes Obst mag, in der Gemüsepfanne kurz erwärmen und mit kalten Orangenfilets paaren.

Sake und Ingwertee sind gute Getränke-Optionen oder halbtrockener Weißwein.

Essen ist fertig! © Marcel Pommer

Fotorezept

Für die Bilder kamen eine mittelgroße Softbox und ein silberner Aufheller zum Einsatz. Außerdem unser Lieblingstisch, ein grauer fester Stoff, Schüsseln in einem hübschen Steingrau oder Weiß, eine gusseiserne Pfanne und ein Teller, der wohl in vielen Haushalten anzutreffen ist.

~

Du hast auch ein leckeres Rezept und die passenden Food-Fotos dazu, die einem das Wasser im Munde zusammenlaufen lassen? Dann werde einfach selbst Teil von „Augenschmaus“!


kwerfeldein – Fotografie Magazin

 
Comments Off on Augenschmaus: Tempeh im Nussmantel

Posted in Equipment


Lens reviews update: test data for the Zeiss Otus 1.4/55

22 Nov

lensreview-thingsmall1.png

DxOMark has just reviewed the Zeiss Otus 1.4/55, a $ 4000 standard prime for full frame SLRs, and as part of our ongoing collaboration we’ve added the test data to our lens widget. We’ve also added test data for the Nikon mount version of Sigma’s exception 18-35mm F1.8 DC HSM. Click through for more details and analysis, including a comparison between the Zeiss 55mm and the Nikon 58mm f/1.4G, and a link to DxOMark’s own review.

News: Digital Photography Review (dpreview.com)

 
Comments Off on Lens reviews update: test data for the Zeiss Otus 1.4/55

Posted in Uncategorized


Schnauuuze!!!

22 Nov

Ein Beitrag von: Elke Vogelsang

Die Hundeschnauze – multifunktionales Präzisionswerkzeug, Meisterwerk der Natur, immer im Einsatz, Informationen aufnehmend, ein Mosaik aus Formen und Mustern, lustig anzuschauen, stupsend, schlabbernd, schmatzend.

Ja, ich habe so etwas wie eine Hundeschnauzenobsession. Und so wurde ich zu meiner Serie „Schnauze“ inspiriert, bei der ich Hundeschnauzen in Aktion und detailreicher Pracht abbilde.

Ich habe das große Glück, meine beiden Leidenschaften – Fotografie und Hunde – beruflich ausüben zu dürfen. Meine drei Hunde Noodles, Scout und Ioli sind meine Freude, Freizeit und Erholung. Natürlich müssen sie als Motive herhalten. Das machen sie auch nur zu gern, bedeutet dies doch auch immer Belohnung für sie.

Schnauze © Elke Vogelsang

Schnauze © Elke Vogelsang

Schnauze © Elke Vogelsang

Schnauze © Elke Vogelsang

Schnauze © Elke Vogelsang

Schnauze © Elke Vogelsang

Schnauze © Elke Vogelsang

Die Reihe „Schnauze“ ist entstanden, nachdem ich mir eine Kompaktkamera mit Makromodus zugelegt habe. Ich probierte einige Weitwinkelaufnahmen im Nahbereich aus und machte mir einen Spaß daraus, die Schnauzen meiner Hunde beim Kauen aufzunehmen.

Ein Leckerlie in die Schnüss, mit dem Weitwinkel-Supermakromodus ganz nah ran und abdrücken, wenn’s besonders skurril aussieht. Es dauert eine Weile, bis man den Dreh raus hat. So einige „Schnappschüsse“ werden da gemacht, bevor das Bild dabei herauskommt, das man gerne hätte.

Es hat auch etwas Meditatives. Man sollte nur aufpassen, dass die Modelle nicht zu moppelig werden.


kwerfeldein – Fotografie Magazin

 
Comments Off on Schnauuuze!!!

Posted in Equipment


Balancing Flash and Ambient Light Using an Incident Light Meter

22 Nov

Contribution by Shiv Verma

Balancing Exposure

Ambient underexposed by two stops by changing the shutter speed to 1/40th of a second

Why is an incident meter important for flash photography?

How often have you struggled trying to capture a well-exposed portrait in a dimly lit room or hall. All you have is the ambient light and your speedlight. With an understanding of exposure and flash techniques you can learn to successfully balance ambient and flash exposures to create exceptional photographs. Ones that look natural, without the harsh appearance of flash, and without detracting from the ambient light.

For the most part, your camera’s meter and exposure evaluation will be just fine when you are capturing images in even light situations.  However, the onboard system will usually fail when you are trying to properly expose a subject in a dimly lit room.  In these situations, you must be in a position to balance the ambient light that is in the room ,and the light from the flash that will light your subject.  The same concept applies to photographing subjects in low light situations outdoors.

The camera’s metering system is not capable of evaluating the two light sources and establish the correct exposure for the scene, or in other words, balancing flash and ambient light.  The camera’s meter when set to evaluative (Canon) , matrix (Nikon), centre-weighted, or spot metering works great for a balanced scene, but not when the exposure of the environment is vastly different than the exposure of the flash lit subject.

Two examples of how in-camera metering systems fail

Choose a camera capable of using a hot shoe or off-camera flash to follow along.  The pop-up flash is not suitable for this exercise. Keep the aperture value at f/4 and the ISO at 400 for each scenario.

In the first image, below, the flash is set to ETTL (electronic through the lens meter system).  The camera is set on aperture priority and evaluative metering mode.

Notice that the subject is reasonably well lit but the background is under exposed.

Notice that the subject is reasonably well lit but the background is under exposed

For this next example, set the meter to the spot metering mode and take the reading for the background. All other settings remain the same and the flash is still on ETTL. Notice the overall image is now underexposed.  The metering system is unable to properly evaluate the scene and the primary subject. (image below)

flash-photography-lighting-metering-02b

For the third image in the sequence turned off your flash, and set your camera evaluative/matrix metering.  The idea is to try and get the best exposure for the background. Make note of your shutter speed and exposure settings.

Shutter speed 1/13th second and the background is reasonably well exposed, though not perfect

Shutter speed 1/13th second and the background is reasonably well exposed, though not perfect

Using a hand-held incident light meter to solve the problem

Good hand-held meters have multiple modes: a spot metering mode which is a reflective reading (usually 2 degrees or less), an incident mode using the meter’s light dome, and one or more flash modes.  It is imperative you learn the proper use of these modes in order to be successful at flash photography.

You want all your images to be good, not the occasional 1%.  You need to stop struggling and juggling settings to produce the image you want.  Experiments are good only if you know what you are doing and what your tools are.  Realize that there are infinite ways to light your subject with strobes, as there are infinite scenarios that your subject can be in. So learn how to expose correctly, learn how to balance ambient light and flash, but most of all, learn how to read light.

Set up the ambient exposure first

Let’s go back to the scene as we had above.  Set your camera to manual exposure mode. As before, keep your aperture at f/4. Next, to properly expose the room you measure the ambient light using the spot meter function of the hand held meter pointed at an area that is mid tone (approximately the same as medium grey) in the scene.  In this test case the meter indicated 1/10 sec at f/4.  Set your camera to these settings. Take a test shot to ensure your exposure is correct for the ambient light. See below:

Test exposure using ambient light only

Test exposure using ambient light only

Next set the flash exposure for the primary subject

You can experiment with off-camera flash if you do not have remote triggering capability, using an off-camera remote flash cord (for Canon, or Nikon). On-camera hot shoe flash use is not recommended as it produces harsh, flat lighting. But in order to simplify this exercise, you can use the hot shoe flash mounted on you camera.  It will be just slightly off center when you have your camera oriented in portrait mode.

To read the flash exposure, set the hand held meter to “incident” mode, and the exposure on the “flash non-cord” setting (do not use the corded or triggered setting). This will read the light falling on the subject when the flash is fired.  If you are using a remote trigger, then the next step is easy.  If not, then have someone assist you for the next reading.  Position the meter such that the dome points to the camera and fire the flash.  At full power, in this test case, the reading was f/19.  See the image below:

How to point your meter and measure the flash

How to point your meter and measure the flash, this is obviously too much power

An f/19 reading indicates overexposure, as your camera is set at f/4 for the depth of field you want. To resolve this, you need to dial down the output of the flash by five stops (f4 > f5.6 > f8 > f11 > f16 > f19>.  Set the flash to 1/32 power which is five stops below full power. It is always good to take another test reading and adjust the distance of the flash to subject to compensate for a half stop variance (to f/19).  Now you should get a reading of f/4 and you are ready to shoot.

Flash and ambient balanced successfully

Flash and ambient balanced successfully. The exposure on the subject is perfect and the room is properly exposed too.

Adjust shutter speed to feature the subject more

Basically, the settings on camera indicate equal exposure and you can see that both the subject and the room are exposed correctly at an aperture of f/4.  This is good. But, if you want to emphasize the subject more, you want to underexpose the room. With the way you have your exposure already set up, this is really easy. All you need to do is increase the shutter speed by a stop, two stops, or more. This under exposes all the areas lit by the ambient light but the exposure on the subject remains the same and is always correctly exposed.

Ambient underexposed by one stop by changing the shutter speed to

Ambient underexposed by one stop by changing the shutter speed to 1/20th of a second

Ambient underexposed by two stops by changing the shutter speed to 1/40th of a second

Ambient underexposed by two stops by changing the shutter speed to 1/40th of a second

The reason for this is that the meter reading for the background is based on the ambient light. The subject however, is lit using the flash, an instantaneous light source. Your flash exposure is controlled by its power output, increasing or decreasing the flash’s distance from the subject and by the aperture setting on your camera. Typically, flash exposure is not affected by shutter speeds as long as your camera’s shutter speed is set to the flash sync speed or slower. As a result, changing the shutter speed affects the ambient light exposure (the exposure of the room) without affecting the flash exposure (the exposure of the subject).

Summary and action plan

In conclusion, relying on your camera’s metering system, be it evaluative, spot or centre-weighted, never gives you the kind of exposure control that you can achieve when using a good hand-held incident light meter.

If you have additional tips or tricks please share them in the comments below, and if you haven’t tried your flash off the camera yet why not give it a go!? Grab yourself a light meter and try it!


shiv-smShiv Verma, is a photographer, educator and technologist and lives in Wrentham Massachusetts. He is an avid wildlife and commercial photographer and conducts photo workshops and tours worldwide. You can check out more of his work on his website at: www.shivverma.com. Follow him on:  Google+, Facebook  and Twitter  

Post originally from: Digital Photography Tips.

Check out our more Photography Tips at Photography Tips for Beginners, Portrait Photography Tips and Wedding Photography Tips.

Balancing Flash and Ambient Light Using an Incident Light Meter

The post Balancing Flash and Ambient Light Using an Incident Light Meter by Guest Contributor appeared first on Digital Photography School.


Digital Photography School

 
Comments Off on Balancing Flash and Ambient Light Using an Incident Light Meter

Posted in Photography


Trade Secret Cards by Nice Industries – a Review

22 Nov

What’s the Most Important Part of Photography?

The Chase Jarvis Portraits set takes you behind the scenes on the lighting solutions for several national and international campaigns.

Trade Secret flash cards by Nice Industries – lighting tips on the go! 

If you talk to five different photographers, you’ll get five different answers to the question, “What’s the most important part of photography?” One might tell you proper exposure, while another might insist that it’s composition. Numbers three and four might debate the need to connect with the subject, but as the self-appointed fifth photographer in this roundtable, I’ll have to insist on lighting.

Obviously, there is no right answer. The truth is, they all play a vital role in successful photography. We can debate the meaning of “successful” another time, but for me it really does come down to knowing how to see the light and make it work for you.

Lighting is Key

As both photographer and photography teacher, I’ve reviewed a lot of books on lighting over the last several years. Some have been amazing and truly elevated my photography, becoming well-worn friends on the shelf. Others have been epic disappointments. Regardless of success or failure, though, I applaud them all for the effort. They all tried to bring something new to the conversation.

An unfortunate reality that all of these books share, however, is that you really can’t take them with you on a shoot. Think about it. The very last thing you need is to be standing there in front of a client, basically saying, “I’ll be with you in a minute. I just have to look something up.” Secondly, even if you’re experimenting on your own for future client work, dragging a lighting book along with you out on location is just plain cumbersome and inconvenient.

That’s why I love these Trade Secret Cards from Nice Industries.

trade-secret-cards-001These books we’ve been talking about are full of helpful lighting diagrams, set side-by-side with anecdotes and instruction from the photographers about how they set up the shots. But what if you could have all that great information in a more convenient, user-friendly package?
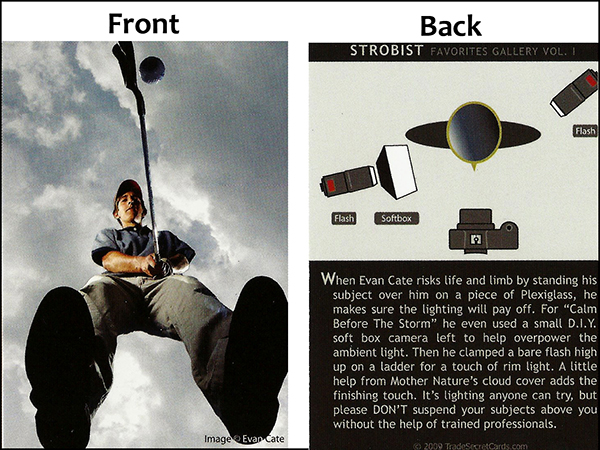
Trade Secret Cards provide just such a package and are available in two sets:  Strobist or Chase Jarvis Portrait Sessions. Each contains 24 high-gloss “trading cards” with a photo on one side, along with the lighting diagram and a “How-They-Got-the-Shot” story on the other.

The Strobist set runs the gamut from portraits to products to landscapes to light painting, and lots of cool stuff in between. Each of the 24 photographers’ lighting diagrams and tips were carefully selected to help take your lighting to the next level. The Chase Jarvis set gives you a front-row seat, as he walks you through a collection of portrait sessions he designed and shot for both his personal work, as well as several national ad campaigns, including the Hasselblad Masters Series.

trade-secret-cards-004

Each deck of 2.5″ x 3.5″ wallet-sized cards gives you instant access to quality tips and information aimed at a single goal– making you a better photographer. Printed on thick, semi-durable card stock, each image has been reproduced with a high-quality resolution and UV finish. With the photo on one side and all the info you need on the other, these easy-to-follow cards are also perfectly portable, making it easy to drop a card or two or ten in your bag and head out to tame the lighting beast.

If you’re a photographer who really knows your lighting, these trading card-sized refresher courses are a great way to stay sharp. If you’re still learning, these images will inspire you to experiment and see why lighting really is the most important element of photography.

Post originally from: Digital Photography Tips.

Check out our more Photography Tips at Photography Tips for Beginners, Portrait Photography Tips and Wedding Photography Tips.

Trade Secret Cards by Nice Industries – a Review

The post Trade Secret Cards by Nice Industries – a Review by Jeff Guyer appeared first on Digital Photography School.


Digital Photography School

 
Comments Off on Trade Secret Cards by Nice Industries – a Review

Posted in Photography


Night Graffiti: Shake-Powered LED Spray Paint Can Sleeve

22 Nov

[ By WebUrbanist in Design & Products & Packaging. ]

led spray can light

The nature of graffiti tends to result in nocturnal excursions, but painting completely in the dark can be a be problem and sometimes you just need a little bit of light.

led graffiti can sketches

led can sleeve model

LASH is a light attachment for spray cans designed by Subinay Malhotra of New Delhi, India to provide low-level illumination on demand to artists on the street.

led spray can design

The device slots onto the can and charges via a motion familiar to anyone who has sprayed paint, illicitly or otherwise: the shaking action one has to repeat to keep on painting.

led spray paint functions

The LEDs are intentionally dim and easy to turn both on and off at the push of a button, all so artists can see what they are doing on an as-needed basis but blend back into the shadows with a simple click.

Share on Facebook


[ By WebUrbanist in Design & Products & Packaging. ]

[ WebUrbanist | Archives | Galleries | Privacy | TOS ]


WebUrbanist

 
Comments Off on Night Graffiti: Shake-Powered LED Spray Paint Can Sleeve

Posted in Creativity


Sony Alpha 7 test scene samples added to first impressions review

22 Nov

shared:TestScene2.jpg

We’ve updated our first impressions review of the Sony Alpha 7 with our studio test scene showing image quality for both JPEG and Raw files, making it easier to see the differences between it and its sister model, the Alpha 7R. The new scene also offers downloadable Raw samples of both daylight and low light scenes. As always, you can compare the A7 to the increasing number of cameras in our test scene.

News: Digital Photography Review (dpreview.com)

 
Comments Off on Sony Alpha 7 test scene samples added to first impressions review

Posted in Uncategorized


Sigma fixes Nikon D5300 lens compatibility issues

22 Nov

Sigma_logo_new.png

Sigma has posted a firmware update of SIGMA Optimization Pro, the dedicated software for the SIGMA USB DOCK, that enables the D5300 to be fully functional with five lenses. Learn more

News: Digital Photography Review (dpreview.com)

 
Comments Off on Sigma fixes Nikon D5300 lens compatibility issues

Posted in Uncategorized


21. November 2013

22 Nov

Ein Beitrag von: Matthias Leberle

_-©-Matthias-Leberle


kwerfeldein – Fotografie Magazin

 
Comments Off on 21. November 2013

Posted in Equipment