RSS
 

Archive for November, 2013

Magic Cement: Hidden Concrete Patterns Appear with Water

27 Nov

[ By WebUrbanist in Design & Furniture & Decor. ]

water activated concrete decor

The writing is on the walls, but only when they get wet – that is when the secret messages or hidden designs appear in these seemingly innocuous concrete surfaces, like a durable and built-in version of Neverwet graffiti.

water time lapse reveal

The project is called Silent Poetry and its creators, Frederik Molenschot & Susanne Happle, have started with a high-contrast approach: organic forms hidden in strict geometric slabs, but any other patterns are equally compatible with the approach.

water applications cement design

water hidden cement pattern

The underlying magic-caliber, moisture-sparked trick works whether the material is drizzled on by the rain, doused in running water, touched by steam or impacted by condensation on a hot and humid day, making for innumerable creative possibilities both inside and outdoors.

water reveals secret patterns

Picture a public sidewalk, parking lot or city center on the one hand or a private walkway or concrete-tiled bathroom on the other. But also consider the range of applications from wayfinding in urban settings to domestic decorations on front decks or walkways that appear with the morning dew, using either modular precast tiles or larger poured-in-place slabs.

water pavement art design

water revealing floral repetitive

From the designers: “The possible applications of solid poetry are various: either at home in the bathroom, in the garden, in saunas and dance clubs, where the humidity is high or public spaces like bus stops or pavements. All forms of solid poetry have in common that they change the whole setting; they are surprising and have a life of their own.”

Share on Facebook


[ By WebUrbanist in Design & Furniture & Decor. ]

[ WebUrbanist | Archives | Galleries | Privacy | TOS ]


WebUrbanist

 
Comments Off on Magic Cement: Hidden Concrete Patterns Appear with Water

Posted in Creativity


DPReview Recommends: Best Waterproof Cameras

27 Nov

Screen_Shot_2013-11-26_at_5.16.51_PM.png

Most cameras are delicate objects, and the last thing you want to do is drop them or subject them to wet or freezing conditions. But there are cameras which are specifically designed to handle rough treatment. In this list, we’ve chosen our top five recommendations for tough cameras. Every model in this list can be dropped, soaked, frozen and, in some cases, crushed. Our recommendations cover the entire class, from stylish compacts that can handle the occasional accident to high-end rugged cameras capable of serious image quality.

News: Digital Photography Review (dpreview.com)

 
Comments Off on DPReview Recommends: Best Waterproof Cameras

Posted in Uncategorized


Nikon Coolpix P7800 Review

27 Nov

Nikon Coolpix P7800 digital camera review

It helps now and then to look around the market and see what’s out there. Occasionally, a downscale camera that has escaped your notice can precisely answer your needs. Successor to the COOLPIX P7700, reviewed only six months ago, the P7800 delivers full-scale manual shooting, with some functions normally available only in DSLRs.

Features of the Nikon Coolpix P7800
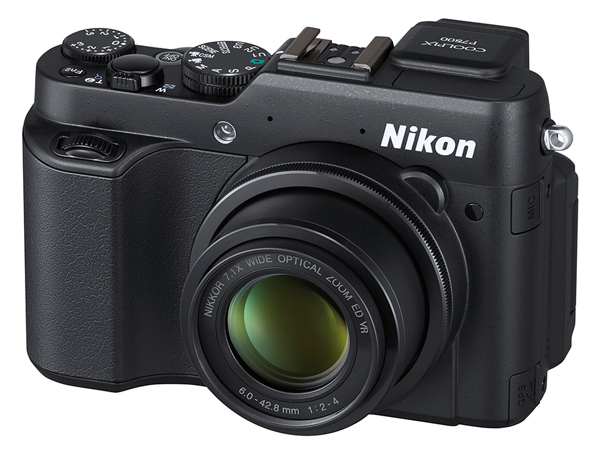
Zoom lens

It has a 7.1x optical zoom that runs a 35 SLR equivalent range of 28-100mm. Sure, it’s not in the same territory as Sony’s 30x zoom model, the DSC-HX50V, nor Canon’s SX50 HS with a 50x zoom lens. But, as many have found out, these maxi zoomers need a considerable amount of TLC to bring home the picture bacon: steady hands, a firm support for the camera and a shooting environment that does not cloud distant views with atmospheric haze.

Personally, I’ve found compact digital cameras with zooms up to 10x to be practical picture takers so, with a 7.1x zoom like the P7800, you’re well within handheld territory. Along with this is a pocketable size and manageable weight.

Maximum aperture

Another bonus is the lens’ fast maximum aperture at f/2.0. This drops to f/4 as you head towards maximum telephoto but becomes no smaller.

Nikon Coolpix P7800 digital camera review

Eye level viewfinder

Another plus is an eye level viewfinder, so you can aim at the view in full sunlight and not have to battle with a washed out LCD screen. You may not have noticed it, but there are fewer and fewer digital cameras coming to market with such a viewfinder. This situation, I figure, is one that tips many photographers into the arms of the DSLR type of camera and ensnares people who are bereft of the skills to drive such a complex camera. Sure, the view in daylight is much better but if the technology is above your talent … well!

Image size

The maximum image size is 4000×3000 pixels or 34×25.4cm (13×10″)as a print at roughly 300 dpi.

Video

The Nikon Coolpix P7800 can capture Full HD video at 1902×1080 pixel resolution. Here is a sample video taken with the P7800:

If you’re looking for the red button to record video … stop! There isn’t one. You must engage the video position on the mode dial and press the shutter button. This means you can’t shoot stills mid video recording. This absence of a red button to record, is rare amidst digital cameras.

Burst rate (frames per second)

For what it’s worth, the camera can fire off a burst of six full size images at a maximum rate of 8 fps.

Handling

As I said, the P7800 is an agreeable size and weight, made even more comfortable thanks to a prominent speed grip and good balance. The viewfinder is useable, although a little murky and lacking in definition – but it does frame your shot and confirm focus and level, plus such matters as; selected aperture, shutter speed, ISO setting, camera level, white balance etc.

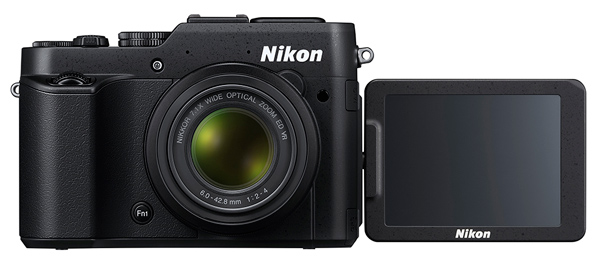
For more precise viewing (in ambient light less challenging than broad sunlight), you must use the rear LCD screen, which is variable in angle vertically and horizontally.

Top deck controls

Nikon Coolpix P7800 digital camera review

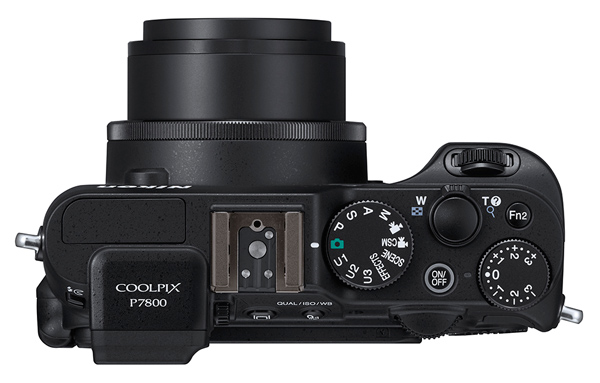
Top deck controls: at extreme left is the pop up flash and across to the right is the mode dial with settings for auto, P,A,S,M, scene mode (portrait, beach, sunset, panorama etc), special effects (mono, painting appearance, cross processing etc), three user settings, movie and movie custom setting modes.

Farther to the right are the power and shutter buttons, zoom lever, exposure compensation and the Function 1 button that switches the screen display options. Oh and I nearly missed this one: the Function 1 button is tucked away on the front panel, next to the lens. A bit puzzling and poorly explained in the manual, but I figured out that it can directly adjust the ISO setting, RAW, AWB amongst other matters.

But there’s a trap with this button: press it with your forefinger and your thumb naturally applies a back pressure that unfortunately may well cause you to accidentally press one of the rear panel buttons.

There are two command dials (one at front and rear) that can spin you through aperture and shutter speed options or roll through menu options.
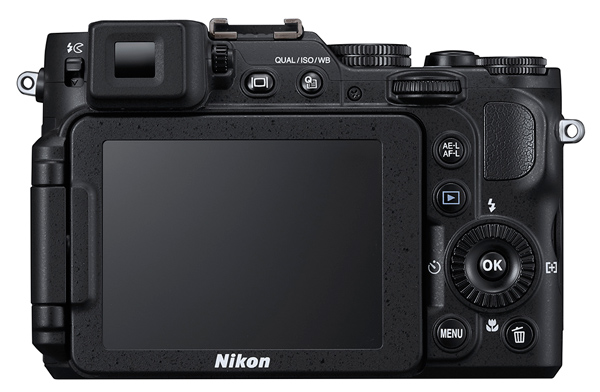
Nikon Coolpix P7800 digital camera review

Rear controls

On the top level of the rear are two buttons: one triggers the turret finder or LCD screen; the other takes you into a quick menu situation. Beneath these is the replay button. Lower still is the four position jog wheel that takes you to flash options, macro shooting, self timer and AF area choices. Beneath this are the menu and trash buttons. At the right edge are the access terminals for USB, HDMI mini and AV outputs.

Card slot and battery compartment are in the camera’s base.

By using the WU-1a Wireless Mobile Adapter, you can transmit images from the P7800 to a WiFi equipped device such as a smartphone or tablet. You can also shoot through your mobile device using the Live view function.
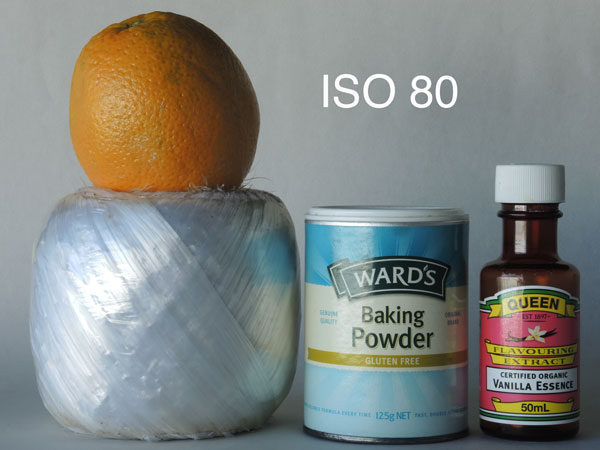
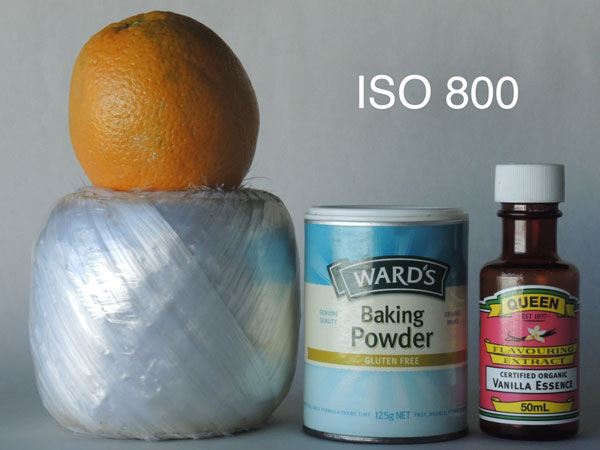
ISO tests

Nikon Coolpix P7800 digital camera review ISO test

Nikon Coolpix P7800 digital camera review ISO test

Nikon Coolpix P7800 digital camera review ISO test

Nikon Coolpix P7800 digital camera review ISO test

Nikon Coolpix P7800 digital camera review ISO test

Nikon Coolpix P7800 digital camera review ISO test

Nikon Coolpix P7800 digital camera review ISO test

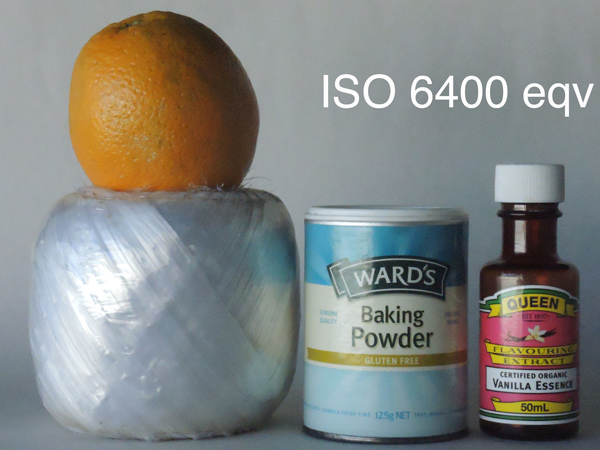
ISO 6400 cropped to actual pixel size

Noise rose slightly at ISO 1600. By ISO 3200 noise was up further and definition was suffering. Forget ISO 6400 equivalent.

Startup time

About a second after startup I could shoot the first shot, a little over a second per shot subsequently.

Distortion

No problems at either end of the zoom.

Sample images and settings

ISO 800, f/2, 1/50th of a second

ISO 800, f/2, 1/50th of a second

Nikon Coolpix P7800 digital camera review image sample

ISO 800, f/8, 1/4000th of a second, spot metering mode

Nikon Coolpix P7800 digital camera review image sample

ISO 800, f/5, 1/250th of a second, Matrix metering mode

Nikon Coolpix P7800 digital camera review image sample

ISO 800, f/4.5, 1/1250th of a second, Matrix metering mode

Nikon Coolpix P7800 digital camera review image sample

ISO 800, f/5.0, 1/1600th of a second, Matrix metering mode

Comments

Quality: above average, with accurate colour rendering.

Why you would buy it: you want a ‘proper’ viewfinder (like a DSLR); it’s pocketable.

Why you wouldn’t: buy it you want a maxi zoom.

FWIW I had a ball of fun with the P7800 shooting around the city; the zoom range was perfect for this, with the telephoto end of the 200m equivalent ideal for the longer reach. Mind you, it won’t suit sports photographers … not long enough (or fast enough).

Technical specs

  • Image Sensor: 12.2 million effective pixels
  • Metering: Matrix, centre-weighted and spot
  • Sensor: 15mm CMOS
  • Lens: f2-4/6-42.8mm (28-200mm as 35 SLR equivalent)
  • Exposure Modes: Program AE, shutter and aperture priority, manual
  • Shutter Speed: 60 to 1/4000 second
  • Continuous Speed: 8 fps
  • Memory: SD/SDHC/SDXC cards plus 86MB internal memory
  • Image Sizes (pixels): 4000×3000 to 640×480
  • Movies: 1920×1080, 1280×720, 640×480
  • Viewfinder: 0.5cm turret plus 7.5cm LCD (both 921,000 pixels)
  • File Formats: JPEG, NRW (RAW), MPO (3D), WAV, MPEG4
  • ISO Sensitivity: Auto, 80 to 6400
  • Interface: USB 2.0, AV, HDMI mini, mic input, accessory, WiFi, DC input
  • Power: Rechargeable lithium ion battery, AC adaptor
  • Dimensions: 118.5×77.5×50.4 WHDmm
  • Weight: 399g (including battery and SD card (just under 1 pound)

Price: approximately $ 550 US 

Web: Nikon Coolpix P7800

DPS Rating: 4


Post originally from: Digital Photography Tips.

Check out our more Photography Tips at Photography Tips for Beginners, Portrait Photography Tips and Wedding Photography Tips.

Nikon Coolpix P7800 Review

The post Nikon Coolpix P7800 Review by Barrie Smith appeared first on Digital Photography School.


Digital Photography School

 
Comments Off on Nikon Coolpix P7800 Review

Posted in Photography


26 November, 2013 – Miles Flint – My Photographic Journey

27 Nov

One of the benefits of leading workshops to various worldwide locations is you get a chance to meet exceptional people and photographers.  Miles Flint and I met in the fall of 2009 and over the last few years I have had the opportunity to see Miles at several PODAS workshops.  I had the chance to sit down with Miles on the Kimberley, Australia PODAS workshop and talk about his photographic growth over the years and to take a peek at his gear bag.  Luminous-Landscape will be doing more interviews and articles like this in the future.  Article and Video . . .


The Luminous Landscape – What’s New

 
Comments Off on 26 November, 2013 – Miles Flint – My Photographic Journey

Posted in News


26. November 2013

27 Nov

Ein Beitrag von: Michael

© Michael


kwerfeldein – Fotografie Magazin

 
Comments Off on 26. November 2013

Posted in Equipment


Google reworks Android to allow for Raw imaging

27 Nov

shared:google.png

Google has given its camera API a complete makeover in an attempt to make app development easier for programmers. When the new API rolls out, it will allow apps to save Raw files and will also enable burst shooting. Learn more on connect.dpreview.com.

News: Digital Photography Review (dpreview.com)

 
Comments Off on Google reworks Android to allow for Raw imaging

Posted in Uncategorized


Pointless Diagrams: Daily Architectural Nonsense Drawings

26 Nov

[ By WebUrbanist in Art & Drawing & Digital. ]

pointless set of pyramids

A quick doodle drawn in the heat of the moment on a napkin at an architectural cocktail party is more likely to be a concept diagram than a phone number. There is nothing architects love more than a sexy drawing with dotted lines, curvy arrows and a few key color accents.

pointless building paths

pointless chutes and ladders

Josh Lewandowski is a Minnesotan architect who is taking things to the extreme, producing a new diagrammatic sketch daily … with a catch: they do not represent anything and are ends unto themselves. The series is dubbed simply Pointless Diagrams.

pointless landscape model

pointless series of towers

Of his work, Josh writes: “I started this blog because for as long as I can remember I’ve always drawn and doodled 3d sketches that have an unapologetic dearth of meaning.” He draws his “inspiration from architecture, furniture, engineering, geometry, cereal boxes, Lego instructions, and Etch A Sketch memories. I always use pen and ink because erasing is for wimps.”

pointless pool diagram

pointless impossible tree spiral

The works are populated with walkways, bridges, staircases, pools, trees and more, yet a whole never really emerges from the parts except when the viewer’s imagination takes part. Thus the mysterious and subjective side of the equation.

Next Page – Click Below to Read More:
Pointless Diagrams Daily Architectural Nonsense Drawings

Share on Facebook


[ By WebUrbanist in Art & Drawing & Digital. ]

[ WebUrbanist | Archives | Galleries | Privacy | TOS ]


WebUrbanist

 
Comments Off on Pointless Diagrams: Daily Architectural Nonsense Drawings

Posted in Creativity


DPReview Recommends: Best Cameras for Beginners

26 Nov

Screen_Shot_2013-11-25_at_4.39.37_PM.png

It’s that time of year when thoughts turn to gift-giving, and photography is more popular than ever before. Choosing a first camera is extremely important. If you’ve got a friend or a family member who’s taking his or her first steps into the world of photography, we’ve prepared some recommendations for you, from best cameras for absolute novices, up to models more suitable for a student or budding enthusiast. This is the first in a series of articles giving our current recommendations for various different people and scenarios. Click through to read more.

News: Digital Photography Review (dpreview.com)

 
Comments Off on DPReview Recommends: Best Cameras for Beginners

Posted in Uncategorized


How Low Can you Go? An Illustration of Camera Angle for Wildlife Photography

26 Nov

This is a guest article by photographer Paul Burwell

Whenever I teach wildlife photography, I inevitably go on at some length about the necessity of trying to get your camera near the height of your subject’s eyes.  This concept doesn’t only apply to wildlife photography, it applies equally well to photography of people, pets or hobbits.  When I teach this concept to a group of students, their eyes tend to glaze over until I put some images in front of them that can really illustrate the point.

Safety first

It obviously isn’t always practical or safe to get into a lower shooting position. This is true if you’re dealing with larger animals and especially predators, getting low may trigger their prey response where they start to consider you a potential snack, or in my case a meal.  It isn’t just your health I’m concerned about, as it seems the regular response to some sort of animal attack is for the authorities to track down the offending critter and end its time on earth.  So, when I’m telling you that your pictures will improve if you can get lower and match your subject’s eye level, you do still need to THINK about what you’re doing and the sort of subject you’re dealing with.  No photograph is worth either your health, or the health of your subject.

How camera angle effects your images

I thought I’d use the following images, of the extremely dangerous and elusive Richardson’s ground squirrel, to illustrate how images improve as the angle of the camera to the subject changes in respect to the level of the subject’s eyes.  This is the perfect critter for this topic because, depending on the squirrel’s posture, its eyes are somewhere between one and six inches (2.5 to 15 cm) above the ground.  All of the images below were photographed with my full-frame Canon DSLR along with the Canon 500mm lens with a 2.0x teleconverter on it for an effective focal length of 1000mm.  All of the images were made at an aperture setting of f/9, the standard setting I use on this lens/teleconverter combination when I’m wanting as little depth-of-field as possible while at the same time stopping down a bit to compensate for the sharpness lost by using the teleconverter. 1000mm is roughly equivalent to about a 20x zoom, if you are using a point-and-shoot type camera, from what our bare eyes would normally see.

Examples

This first shot was taken from my vehicle with the lens resting just on top of the window opening.  The extreme focal length (or magnification factor) of images made with a super telephoto lens does help minimize the apparent difference in height (which ended up being about four feet or 1.2 metres) but you can still tell it was shot looking down at the squirrel.

Richardson's Ground Squirrel sitting on the grass - shot from four feet height

Richardson’s Ground Squirrel sitting on the grass – shot from four feet height (1.2 meters)

On this next photo below, using my tripod with the lens about 18 inches (45cm) above the ground, you can really see how the camera angle has changed and how nicely the background resolves into a whole bunch of nothingness (technically called bokeh), but there is still an element of peering down on the ground squirrel.

Richardson's Ground Squirrel sitting on the grass - shot from 18" camera height

Richardson’s Ground Squirrel eating a piece of grass – shot from 18″ camera height

 The effect of getting your lens closer to your subject’s eye level is that the viewer of your images is able to look at the subject without looking down at it and the innate connection between the viewer and the subject is a lot more intimate and compelling.  So what happens when you get even lower to the point where your lens is as close to the eye level of the subject as possible?

Richardson's Ground Squirrel giving a warning signal - 6 inch camera height

Richardson’s Ground Squirrel giving a warning signal – 6 inch camera height

Richardson's Ground Squirrel giving a warning signal - 6 inch camera height

Richardson’s Ground Squirrel giving a warning signal – 6 inch camera height

You can see the image becomes even more compelling with the lens and camera are now at the same level of the squirrel. I was laying in a prone position on the ground for these last two images, with the lens resting on a bean bag.  In the first of the two images above, shot at 6 inches camera height, you can really see the delineation line of what’s in focus and what isn’t (the DOF).  One could argue that the out of focus grass in front of the image is distracting, but, I’d argue that the dreamy effect created adds to the interest of the photo, and the squirrel’s head and eyes are nice and sharp.

Summary and your turn

I hope that these images, along with the accompanying text, help illustrate the point about getting to your subject’s eye-level whenever feasible. It’s not necessary to use a 500mm lens, you will have the same effect with whatever lens you have.

  • Have some feedback on these images?
  • Have questions about different situations?
  • This is the place to ask them or contribute your own thoughts.

Paul Burwell wildlife photographer
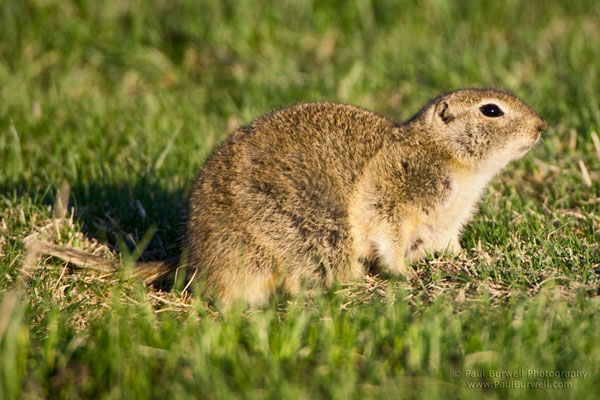
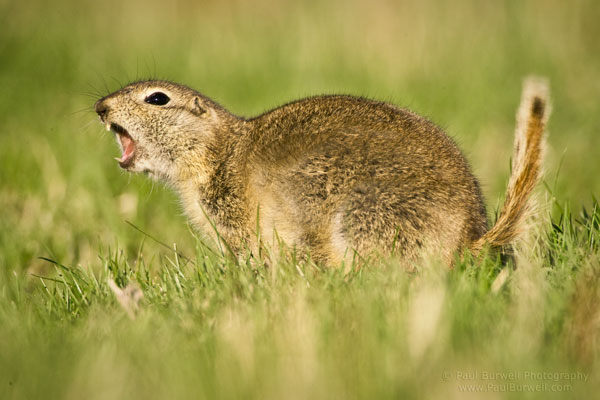
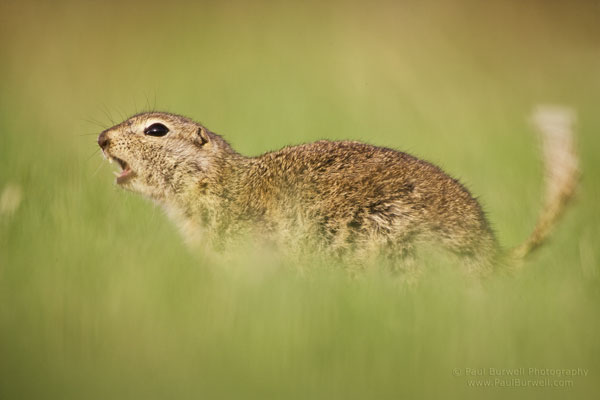
In addition to being the owner of the Burwell School of Photography, Paul Burwell is a professional photographer, writer, educator and enthusiastic naturalist with over twenty years experience working with and educating adults. He is a contributing editor and regular columnist with Outdoor Photography Canada Magazine. Paul has been a finalist in the Veolia ‘Wildlife Photographer of the Year’ worldwide competition both in 2009 and 2010 and was named a ‘Top Wildlife Shooter’ by Popular Photography Magazine in 2010. You can find Paul on Google Plus and Paul Burwell.com.

Post originally from: Digital Photography Tips.

Check out our more Photography Tips at Photography Tips for Beginners, Portrait Photography Tips and Wedding Photography Tips.

How Low Can you Go? An Illustration of Camera Angle for Wildlife Photography

The post How Low Can you Go? An Illustration of Camera Angle for Wildlife Photography by Guest Contributor appeared first on Digital Photography School.


Digital Photography School

 
Comments Off on How Low Can you Go? An Illustration of Camera Angle for Wildlife Photography

Posted in Photography


Comparing Images with Lightroom 5’s Survey View

26 Nov

Using Survey View

Andrew S. Gibson is the author of Mastering Lightroom Book One: The Library Module, on offer now at SnapnDeals for a limited time.

‘Working the subject’ is an expression often used in photography to describe the process of taking a series of photos of the same subject. The idea is to work your way closer to the ‘perfect’ photo (if there is such a thing) by varying the camera angle, focal length, point-of-view and other factors. As part of the editing process it’s the photographer’s job to select the best images to process. In the old days this meant poring over a lightbox or contact sheet with a loupe. Some people still do it this way, but most of us work with digital images. One of the benefits of this is that software like Lightroom makes it very easy to view images side-by-side and organize the keepers into a “Collection” for processing.

When I use Lightroom’s Library Module to cull my photos, I start off in Grid View and then use either Compare View or Survey View to compare similar images. The previous article in this series showed you how to use Compare View, and today I’m going to take a look at Survey View.

Compare or Survey View – which one to use?

What’s the difference between the two? The main difference is that you can only compare two images at one time in Compare View, but as many as you want in Survey View. Here’s an example:

Using Survey View

To arrive at this view I selected five images in Grid View and used the ‘N’ keyboard shortcut to go to Survey View. Lightroom arranges the images in the way that fits the screen space best so you can look at them all together. A little common sense is required here – Lightroom will try and squeeze as many photos as you select into the one screen, but the thumbnails will soon become too small to be of any practical use. The practical limit is probably somewhere between eight and 20 images, depending on your monitor size.

Using Survey View

The ‘most selected’ image is displayed with a white border, and if you have assigned a flag, star rating or colour label it is displayed underneath. These also appear in the Toolbar at the bottom of the screen (press ‘T’ to reveal the Toolbar if you don’t see it):

If you hover over one of the images you can assign a flag, star rating or colour label by clicking one of the icons displayed underneath (you can also do this in the Toolbar). You’ll also see a white X in a black square in the bottom right-hand corner of the image. Click this to remove the image from the selection. Lightroom removes it from the screen when you do so, and the remaining images rearrange themselves. If you click the X by mistake, press Ctrl-Z (PC) or Cmd-Z (Mac) to bring the de-selected photo back.

Using Survey View

What do you do once you’ve decided which images are keepers? I find the simplest approach is to flag each image that I want to process, and send them to a new Collection (see my article Use Lightroom Collections to Improve Your Workflow for more information on this).

Another useful feature of Survey View is that you can press the Space bar whenever you like to view the most selected image in Loupe View – useful if you want to see it in a larger size or zoom in to check for fine detail such as accurate focusing. Simple press the Esc key or use the ‘N’ key shortcut to return to Survey View.

Mastering Lightroom

Using Survey View

My latest ebook Mastering Lightroom Book One: The Library Module is a complete guide to using Lightroom’s Library module to import, organize and search your photo files. You’ll learn how to tame your growing photo collection using Collections and Collection Sets, and how to save time so you can spend more time in the Develop module processing your photos. It’s available now over at Snapndeals, for a special price for a limited period.

Post originally from: Digital Photography Tips.

Check out our more Photography Tips at Photography Tips for Beginners, Portrait Photography Tips and Wedding Photography Tips.

Comparing Images with Lightroom 5’s Survey View

The post Comparing Images with Lightroom 5’s Survey View by Andrew Gibson appeared first on Digital Photography School.


Digital Photography School

 
Comments Off on Comparing Images with Lightroom 5’s Survey View

Posted in Photography