Ein Beitrag von: Nico Babilon

kwerfeldein – Fotografie Magazin

Jean Albus mixes dresses into her Montana landscapes by letting them decay, sometimes for years, before photographing them. She hopes their weathered forms invoke emotions about aging, memory, transformation and more. Her final images sometimes feature a dress as she’s found it, sunken into the elements. She also often superimposes the worn dress over another image of the landscape, floating the decaying dress within “Big Sky Country.” A new video explains her process. Click through to see more.
News: Digital Photography Review (dpreview.com)
[ By Steve in Global & Travel & Places. ]

Call out “Abandon ship!” and what do you get? Abandoned ships. These 8 abandoned cruise ships and liners are all that’s left of what was left to Poseidon.
 (image via: Panoramio/Darcy O’Shea)
The German-built and Liberian-registered cruise ship MS World Discoverer enjoyed a 25-year-long, mainly trouble-free lifespan as a mid-sized (roughly 225 passengers and crew) passenger liner plying the South Pacific with occasional sorties into the frosty Arctic and Antarctic oceans.
 (images via: Sometimes Interesting)
On April 30th of 2000, the World Discoverer was sailing through the Sandfly Passage in the Solomon Islands when she struck an uncharted rock or reef. Captain Oliver Kruess heroically nursed the listing liner into shallow Roderick Bay in the Florida Islands, where all aboard were safely evacuated. The World Discoverer, however, remains where it was beached in 2000, stripped of anything valuable by local islanders.
 (images via: Sometimes Interesting and GCaptain)
Looking like an outtake from Life After People, the World Discoverer‘s exploring days are over for good and unlike most other coastal shipwrecks it will probably remain where it is, slowly rusting and moldering away in its sheltered cove, for some time to come. There’s only one thing that worries environmentalists: sometime in the future the World Discoverer’s metal fuel tanks will finally rust through, releasing unknown amounts of poisonous toxins into the sea and onto the beaches.
 (images via: Seabreezes, Barcroft Media and Wikipedia/Dashers)
The jewel in the crown of Britain’s venerable Cunard Line, the ocean liner QE2 sailed the seven seas as both a transatlantic ocean liner and as a premium cruise ship from 1969 until her retirement on November 27th, 2008. Subsequently, the liner was purchased by Istithmar, the private equity arm of Dubai World, whose stated intention was to convert the vessel into a 500-room floating hotel to be moored at the Palm Jumeirah offshore resort in Dubai.
Due to the world financial crisis and its lingering effects on business in Dubai, virtually no work has been carried out on the ship and rumors have persisted the virtually abandoned QE2 would either be sent to Asia, either to be scrapped in China or converted into a floating luxury hotel, shopping mall and museum… and so it goes.
 (images via: HHV Ferry, Urban Montage and Associated Newspapers Ltd/Metro)
Launched in 1956, the TSS Duke of Lancaster was built at the Belfast shipyards of Harland & Wolff where the RMS Titanic was constructed almost a half-century earlier. The 4,450 ton, 1,800 passenger steamer operated as a passenger ferry on the Heysham-Belfast route and as a cruise ship calling at a variety of European ports from Spain to Norway for the better part of two decades. In November of 1978, the venerable Duke was retired from service on the seas… a new, landlocked career was about to begin.
 (images via: Wirral and Daily Post)
In August of 1979, the ship was moved to Llanerch-y-Mor near Mostyn, Wales to become a static leisure center known as “The Fun Ship”. Legal issues and turf tussles with the local council crippled the ownership group’s business model, however, and the Duke’s slab sides were gradually covered by rust and unauthorized graffiti. The latter must have given somebody an idea because surprisingly, there’s life in the old Duke yet: as the largest open air art gallery in the UK.
 (image via: Mike (pentlandpirate))
Beginning in August of 2012, a commission was offered to Latvian graffiti artist Kiwie who spray-painted a large-scale artwork on the ship’s side. Kiwie’s work was augmented and complemented by a wealth of “bright and surreal” graffiti by acclaimed artists including Dale Grimshaw, Dan Kitchener, Snub23, Spacehop, and Fin DAC. The latter’s eye-popping “Mauricamai” covers most the Duke’s stern and has been breathtakingly captured above by Flickr user Mike.
![]()


[ WebUrbanist | Archives | Galleries | Privacy | TOS ]
![]()
     |
The Following is an excerpt from the SLR Lounge Lightroom Preset System v5 and accompanying workshop from the Lightroom Workshop Collection v5. The Lightroom Preset System is designed to take you from Ordinary to Extraordinary photos in just a few seconds and clicks.
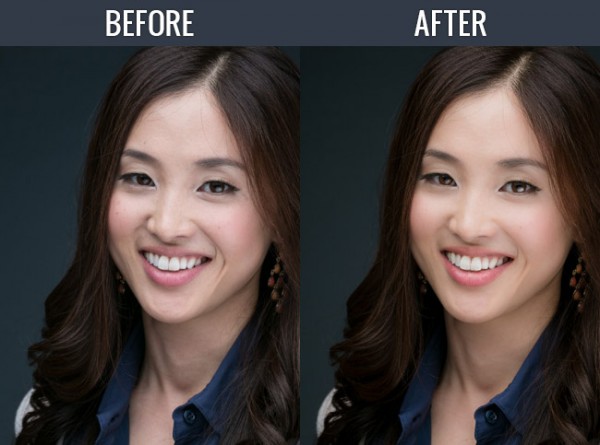
In this article we’re going to do a headshot retouch to show how capable Lightroom is. Of course for a professional headshot retouch Photoshop is necessary, but Lightroom is also surprisingly capable. We’re going to utilize one of our “Soft Portrait” presets, similar to the one we used in our Color Portraiture with Retouch and Enhancement Tutorial, and then we’re going to utilize our brush presets to make our retouches. The complete written tutorial is below, and you can also watched the video tutorial at the end of this article.
Here’s a sneak peak at what our image will look like before and after the retouch.
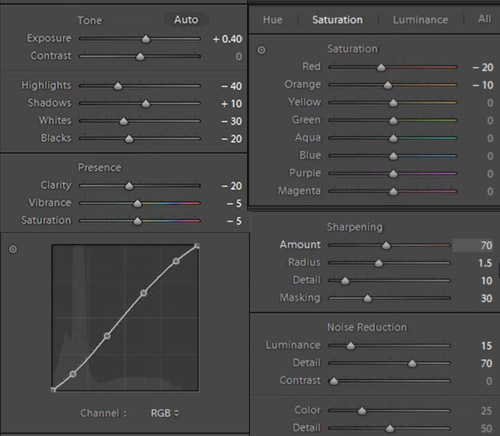
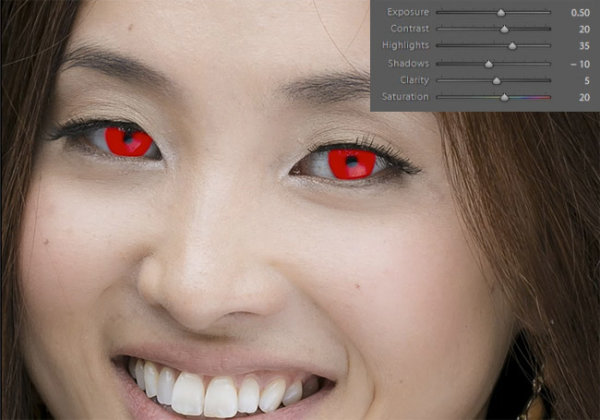
The first thing we’re going to do is select our “01-10 BASE – SOFT: 11a. Extra Soft – Skin Desat” which will soften the skin by decreasing the Clarity and adjusting the Noise Reduction settings. The preset also adjusted the Red and Orange in our HSL, lowering them slightly so we get desaturated skin tones. We also added a little bit of contrast using the “03-40 ADJUST – SHADOW BLACKS: 43 Darken – Light (+10,-20)” preset. The Tone Curve is set in s subtle “S” shape, giving us a slight contrast boost, and we have our standard amount of Sharpening applied to this photo. We’re going to set our Color Temperature to 4900 and add +0.40 to the Exposure to give the skin a nice bright look. For those that don’t have the Preset System, here are what our Develop Settings look like after our presets and adjustments are applied.
The first brush adjustment we’re going to be making is for her skin. We’re using our “21 Skin Softener” preset, and you can see settings of our brush in the photo below. These settings will smooth skin without destroying skin texture. We want to make sure we’re only applying this brush to the skin, and you can press “O” to bring up the overlay so you can see exactly where the brush is being applied as shown below. You can also delete areas of brush application by holding down “alt on a PC or “opt” on a MAC to erase the adjustments.

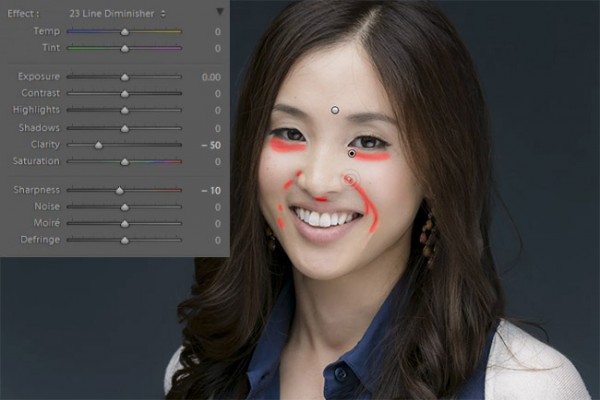
Moving on, we’re going to hit “New” to make new brush adjustments, and we’re going to select our “23 Line Diminisher” preset. We want to diminish some of the smile lines and lines under the eyes. This part of the retouch should be subtle, diminishing the lines and not removing them completely. Once again, you can see the brush preset settings and the area of affect in the image below.
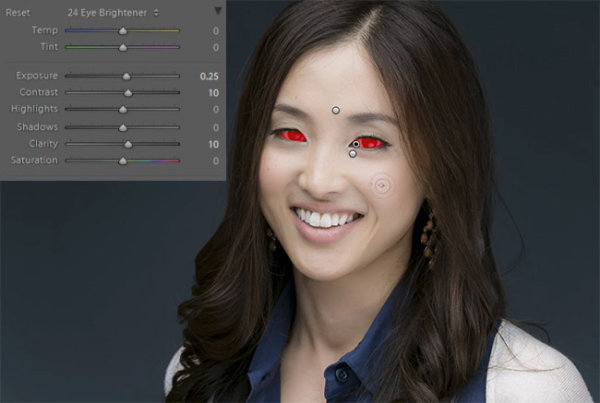
Now we’re going to hit “New” and select the ”24 Eye Brightener” preset. We’re going to brighten up the eyes and we want it to be subtle because if the eyes are too bright it will have an abnormal look. The best way to check if eyes are too bright is to simply zoom out to a thumbnail view and check to see if the eyes look like they are glowing or unusually bright based on the surrounding tones.
Furthering our edit on the eyes, we want to brighten up the iris’ to add nice colors to them and to exaggerate some of the nice catch light. We’re using our “25 Iris Enhancer” and we want to make sure we’re only making adjustments on the iris’ and nothing else.
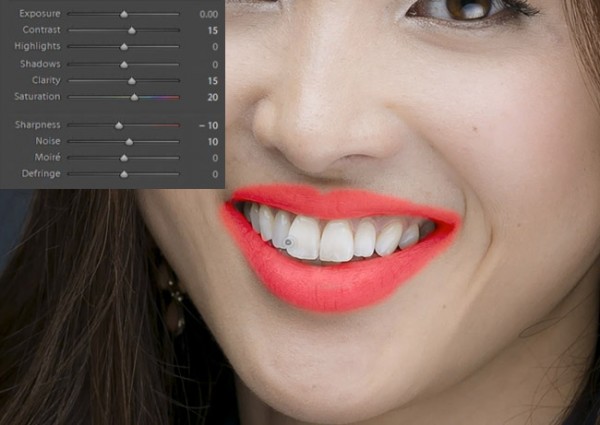
Now we’re going to move onto our lips. Our “26 Lip Enhancer” preset adds nice color and contrast to the lips.
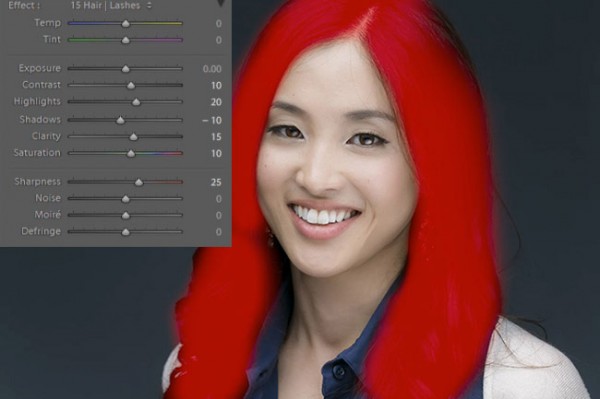
The last brush we’re going to use is for the hair. With our “15 Hair | Lashes” preset, we’re going to pull out some nice color and texture from her hair.
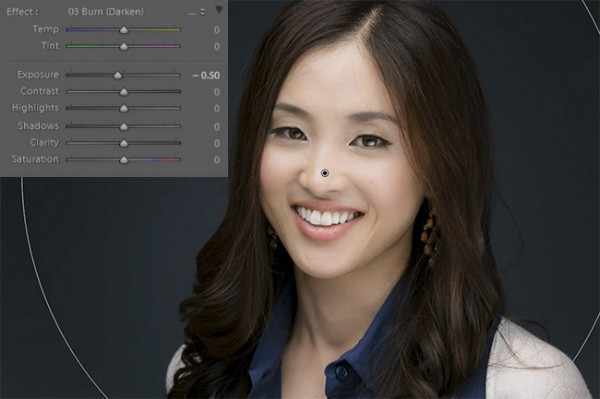
At this point we’re done with our retouches. If you like you can do some additional blemish removal. When doing blemish removal we recommend keeping blemishes that are apart of their look. The last thing we’re going to do is add a Radial Filter with the Exposure set to -0.50.
And now we are left with our final image. Here’s a before and after of our portrait.


[EMBED VIDEO HERE]
If you would like to see exactly how all of the settings and adjustments were applied, please watch the video below from the SLR Lounge YouTube Channel.
We hope you all enjoyed this tutorial. If you are interested in learning more or purchasing the SLR Lounge Lightroom Preset System v5 or the newly released Lightroom Workshop Collection v5, please click any of the links in this article.
Post originally from: Digital Photography Tips.
Check out our more Photography Tips at Photography Tips for Beginners, Portrait Photography Tips and Wedding Photography Tips.
How to Professionally Retouch Portraits in Lightroom
Mark Dubovoy, Luminous-Landscape’s Editor At Large shares his article, A Diiferent Kind Of Backpack, The RPT P3
Michael Reichmann’s final installment of the Olympus OM-D E-M! Field Report From Paris is now Available Here

"Having been to Antarctica with Michael and Kevin, I would say after having traveled the world and shot nearly my entire life as an exhibiting photographer, it was one of my highlights in my life and I talk about it, all the time. The images and experience of seeing something visionary and nearly extinct from the world, to see and experience the wildlife and scenery that does not fear humans is amazing. The images I shot there won me two Smithsonian awards and nearly 18 other international awards". – Tim Wolcott
Find Out More Now
These Expeditions Will Sell Out Quickly. They Always Do
…
The Luminous Landscape – What’s New
Es wird immer kälter und nasser, aber auch schöner und mystischer im Wald. Der Herbst verzaubert unsere Wälder in Welten, die wir sonst nur aus Märchen kennen. Am Morgen liegen dicke Nebelschwaden schwer über dem Boden und am Abend taucht das Licht der Sonne die immer bunteren Farben in ein seichtes Gold. Ein Grund mehr, spazieren zu gehen und zwischen den Bäumen herumzustreifen. Am besten mit Kamera.
Fotospecial: Märchenwald
Flickr


500px


Deutschsprachig
• Zorn zu fotografieren ist schwer, aber Axl Klein hat es geschafft, eine ganze Serie daraus zu machen. Frontal mit Prominenten.
• Die besten Fotos aus 125 Jahren National Geographic.
• Die Fotografin Candida Höfer wird im Art-Kunstmagazin anlässlich ihrer Ausstellung „Düsseldorf“ vorgestellt.
• Die Welt zeigt Fotos aus New York von Thomas Hoepker.
International
• The Street Collective Vol. 1, ein tolles PDF-Mag mit Tipps von Bryan Formhals, Lee Jeffries und anderen ist gerade noch für lau zu haben.
• Der Fotograf Paul Octavious hat kürzlich auf Instagram eine fortlaufende Serie mit dem Titel The Pantone Project gestartet. Auf jeden Fall etwas für Farbliebhaber!
• Es bleibt bunt: Diese Fotos wirken ohne Nachbearbeitung wie Gemälde.
• Etwas zum Schmunzeln: Balletttänzer in verschiedenen Situationen des Lebens.
• Ihr liebt Essen und Instagram? Hier gibt es eine Liste mit den 75 leckersten Accounts, denen man folgen sollte.
• Der Wettbewerb „Australian Professional Photography Awards“ hat ganz wunderbare Bilder zu Tage gebracht. Wir haben bisher nur selten einen Blick nach Down Under geworfen und werden das auf jeden Fall nach diesen Fotos nachholen.
• 500px hat ein schönes Interview mit dem schwedischen Landschaftsfotografen Mikael Sundberg, der sich in verschiedenen Genres zu Hause fühlt.
• Die Titanic in Farbe? Ein russischer Fotograf kollorierte viele der alten Schwarzweiß-Bilder nach und gibt uns so einen neuen Blick auf das beeindruckende Schiff.
• Jade Bell fotografiert Mütter kurz nach der geburt, um die Schönheit des weiblichen Körpers festzuhalten.
• Christopher Capozziello dokumentiert seinen Zwillingsbruder, der an zerebraler Kinderlähmung leidet.
Neuerscheinungen und Tipps vom Foto-Büchermarkt

• Der Bildband „Before they pass away“* von Jimmy Nelson zeigt Lebensweisen und Kulturen von Menschen, die der Globalisierung trotzen. Der Focus beschreibt sie als „epische Portraits von würdevollen Kriegern, eng verbundenen Familienclans und jahrhundertealten Kunstformen“. Mit 128 € leider nicht der günstigste Bildband.
• „Obersalzberg“* heißt der Bildband von Andreas Mühe. In ihm inszeniert er die liebste Idylle des Nationalsozialismus neu. Pinkelnde Nazis vor atemberaubender Kulisse. Um das zu verstehen, empfehlen wir sein Interview mit The Eurpean.
Wettbewerbe
• Ihr sucht eine wirkliche Herausforderung? Dann ist der Wettbewerb anlässlich des 20-jährigen Jubiläums der Thüringer Verfassung genau das Richtige für Euch. „Meine Verfassung in Bildern“ ist das Thema. Wir haben keine Ahnung, wie man das fotografisch umsetzen kann, wünschen Euch aber viel Erfolg und sind gespannt auf die Ergebnisse. Eine Ausstellung der Gewinnerbilder sowie 100 € sind die Preise.
Videos
Wie sieht es aus, wenn ein Mensch in fünf Minuten vom Kind zum Greisen altert? Das seht Ihr im folgenden Video. Die Technik dahinter wird auf kottge erklärt.
Ausstellungen
1914 – Welt in Farbe – Farbfotografie vor dem Krieg
Zeit: 24. September 2013 – 23. März 2014
Ort: LVR-Rheinsches LandesMuseum Bonn, Colmantstr. 14-16, 53115 Bonn
Link
O.T. – Michael Schade, Arthur Zalewski
Zeit: 27. September 2013 – 6. Januar 2014
Ort: Kunstmuseum Dieselkraftwerk, Am Amtsteich 15, 03046 Cottbus
Link
125 Jahre National Geographic
Zeit: 21. Oktober – 29. November 2013
Ort: Amerika Haus, Karolinenplatz 3, 80333 München
Link
Mehr aktuelle Ausstellungen
* Das ist ein Affiliate-Link zu Amazon. Wenn Ihr darüber etwas bestellt, erhalten wir eine kleine Provision, Ihr bezahlt aber keinen Cent mehr.
kwerfeldein – Fotografie Magazin
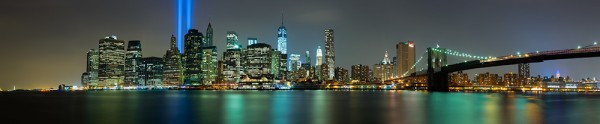
For this image I decided I wanted to cover all of Lower Manhattan from the Statue of Liberty (far left) to the Empire State Building (far right, under the Brooklyn Bride, colored red, white and blue. I was using a Canon EOS 5D Mark III. My EF 24-70 f/2.8L II at 70mm covered the skyline and water with some sky vertically, so I positioned the camera vertically and proceeded to take 9 shots, moving the camera by turning the tripod head on it’s rotating base. I overlapped portions of each frame so Photoshop would have a point of reference when stitching. Each of the nine exposures was taken at ISO 200, 90 seconds, at f/16. If printed at it’s native resolution at 300 dpi, it would measure 18.39 inches by 88.25 inches. My photo lab maxes out at 108″, which it says it can print this image to.
Several months ago I was asked by a potential client if I had any images that were capable of being printed very large- up to 20 feet across! It pained me to explain that, no, based on my camera’s resolution, I did not have any images capable of being printed that large. I had never gotten into doing many stitched panoramas or other prints, and couldn’t afford a Gigapan or other panorama photography tool. For the most part, I’d had no call for it in my daily business. Generally, when shooting landscapes, I think in terms of one frame, and fill it with my composition. This has worked well for the most part, as long as I didn’t want to print much larger than around 48″ inches across. Suddenly, however, I had a desire to go much larger.
This past week in the United States, we commemorated the 12th anniversary of the September 11th terrorist attacks. Every year New York City remembers the victims with a tribute in light- two columns of light representing the fallen towers of the World Trade Center. It seemed a perfect opportunity to start playing with panoramics, especially since one of the images the aforementioned client wanted was a skyline shot of New York City.
The general rule of thumb for printing on standard inkjet printers is to print at 300 dpi. To find out how large you can print an image, simply take the pixel dimensions and divide by 300. From a camera such as the EOS 5D Mark III, that means an image of 5760 x 3840 pixels can be printed at about 12.8 inches by 19.2 inches. It is true, using various resizing techniques you can print larger. I have on many occasions. But to get to the extreme sizes beyond approximately 48″, you’ll need to start combining images by stitching them together.
There are currently a few automated panoramic photo options on the market, including Gigapan’s and Panogear’s. Both can be somewhat pricey. But just because you don’t have these nice accessories does not mean you can’t make stunning panoramic images. A tripod is helpful, but not completely necessary if you can handhold the shutter speed your camera is set to. A tripod is helpful for locking your camera in place from shot to shot. The reason a tripod is helpful is that if your tripod head has markings for panoramics on the base, you can use these for reference when repositioning the camera for each shot. More on that in a bit. Another helpful tool is an L bracket. This will help you position your camera vertically if desired to shoot verticals to stitch the final piece. L brackets can be purchased from several manufacturers and are usually camera-specific. Acratech makes a universal L bracket with a quick release that any camera can attach to using an Arca-Swiss style plate.
You’ll want to start by defining your image in your mind. Where does it start, where does it end? Then, how far up does the image go, and how far down? can you cover the up and down with one vertical? Or would you be better off shooting two rows of images. Or more? Keep in mind when planning that you’ll want to shoot with some extra area around the image to leave room for cropping if needed. You’ll also want to make sure you leave some overlap in each shot so the stitching software can find a point of reference to see where the next shot goes. I used Photoshop for these, but there are other programs out there. Feel free to suggest your favorite in the comments below.
For the first image in this article, I wanted to shoot the Lower Manhattan skyline, from the Statue of Liberty to the Empire State Building. I had a 24-70mm lens, and at 70mm I covered exactly what I wanted, from top to bottom, with a vertical shot. I took 9 shots in that orientation, while rotating the tripod head incrementally until I got my last shot.
For the second shot in this article, there was a more prominent foreground element, the pilings from the old pier. I decided to do this one in a horizontal orientation, using two rows of three shots. This was again taken using the 24-70mm lens, at 70mm. I shot this one starting at the far right, shooting in columns- upper right, lower right, lower center, upper center, upper left, lower left. I used the playback feature on the camera to check my reference points. Again I stitched it using Photoshop’s Photomerge feature.
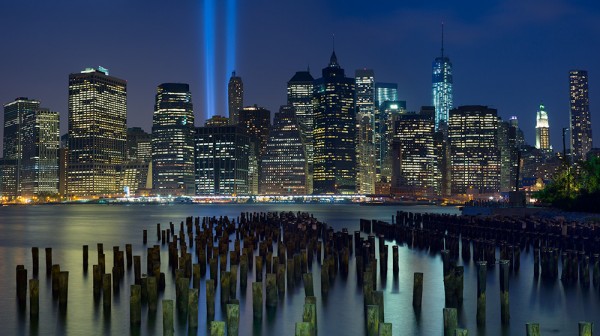
This shot was six horizontal shots stitched together. Because of the overlap, the 3 shots across and 2 up and down will not add up to the full resolution of the individual images simply put together. This image came together at 10,531 pixels by 5904 pixels. At 300 DPI the file can be printed at 19.68 inches by 35.1 inches. My lab, however, tells me they can print this image up to 8 feet wide. They are not using inkjet printers and thus are not subject to the same parameters. The same still holds true however. The larger the file, the larger it can be printed.
I have not yet heard anyone say that any photo stitching program is perfect. There will be errors in stitching. A misplaced post, a skewed building. To correct these, I simply opened the source file and added it to the stitched file on a new layer. Then I created a layer mask to show only the area I wanted shown, which would correct the issue.
For your exposure, you’ll need to be in manual mode. You need the exposure to be uniform across the image. If you leave your camera in any auto mode where the camera helps set the exposure, you run the risk of your exposures varying. For the first image in this article, my exposure was 90 seconds at f/16, ISO 200 for each image. This is important, particularly when photographing the area around the statue of liberty which had huge dark areas. In auto mode, the camera will try to brighten these areas, which will cause problems when the stitching if the skies or water don’t match from shot to shot. In the interest of full disclosure, I made this mistake myself with the second image, the six-shot stitch. I shot in aperture priority and there was a variation of plus or minus 2/3 of a stop from shot to shot. This caused all kinds of headaches in my first attempt at stitching. I was able to correct this by reproccessing the RAW files with an exposure adjustment to match the exposures. In addition, if your camera has a feature for vignette correction, such as Canon’s Peripheral Illumination Correction, turn it on. This will even out the exposure so there are no dark areas in the corners, which can be difficult to correct later on.
I’ve toyed with stitching panoramics before, but never seriously. This is one of my first attempts at a serious pano. It’s well worth exploring more in the future. I might even start saving for a new piece of equipment just for that purpose!
Post originally from: Digital Photography Tips.
Check out our more Photography Tips at Photography Tips for Beginners, Portrait Photography Tips and Wedding Photography Tips.
Stitching Images For Larger Prints
[ By Delana in Art & Installation & Sound. ]

Tunnels are typically scary places. The darkness is enough to give anyone the willies – and then there are the spooky, disorienting echoes. An example of an un-scary tunnel would be Detroit Metropolitan Wayne County Airport’s Light Tunnel. Another can be found in the Netherlands.

The Dutmala tunnel in Eindhoven was once cast in darkness. Amsterdam-based designers Knol Ontwerp illuminated the once-dim tunnel with a light sculpture called Transit Mantra. The interactive corridor reacts to the movement of passersby, a glowing escort through a formerly-gloomy tunnel.

Each person who passes through the tunnel gets his or her own unique experience, as the sculpture produces both light and sound. The amount of walkers, bikers or joggers, as well as their speed, causes fluctuations in the patterns. Now every tunnel, underpass, aqueduct – even the Chunnel – seem boring.
![]()
[ WebUrbanist | Archives | Galleries | Privacy | TOS ]
![]()
| |
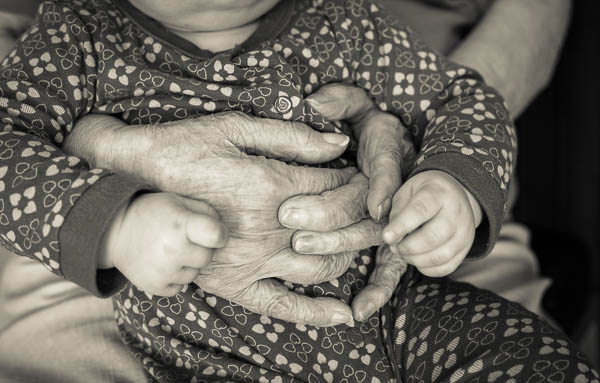
We’ve all gone through times in our lives where we’ve lost loved ones. As a portrait photographer I would get calls all the time for “Urgent” family photos where one family member was terminally ill, and yet others that have photos done after the loss of a loved one.
Why do we wait until it’s too late, or almost too late to capture the lives of those most important to us?
As photographers (and before you argue that you aren’t a “professional” or you aren’t a photographer, I’m here to tell you that you are! If you take photographs you are a photographer, and this applies to you!) it is almost our duty to record the lives and times of those closest to us, family and friends. I’m not just talking about birthday parties and weddings, which are both important, but how about everyday life?
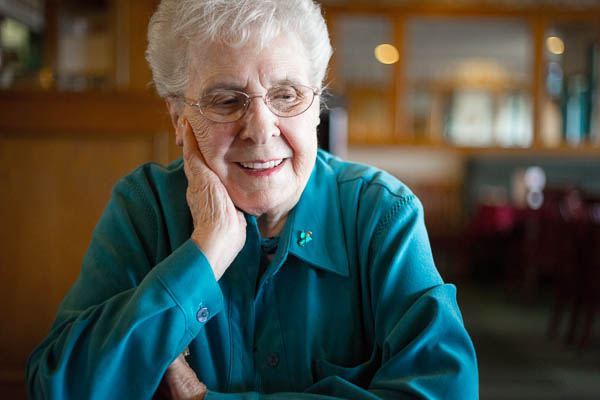
Last fall/winter my husband and I lost our two cats who were 18 and 19. He had them for 18 years, they lived with me for five. It hit me hard and I wrote this: “Do What’s Important Photograph Your Loved Ones”. I vowed to go and photograph my grandmother who is now 92. I finally did that and I have some tips for you on how to go and photograph, and document the lives of your loves ones both young and old.
So this article comes with both tips AND a challenge, for you to go do the same.
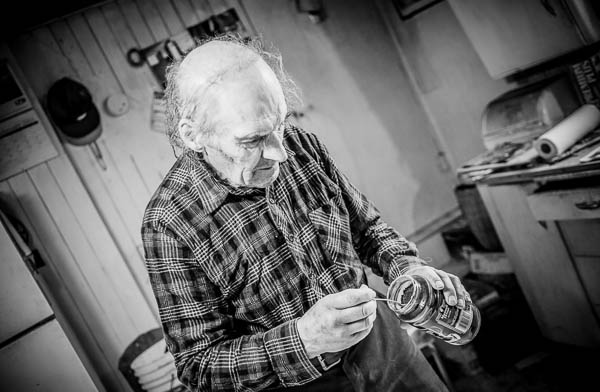
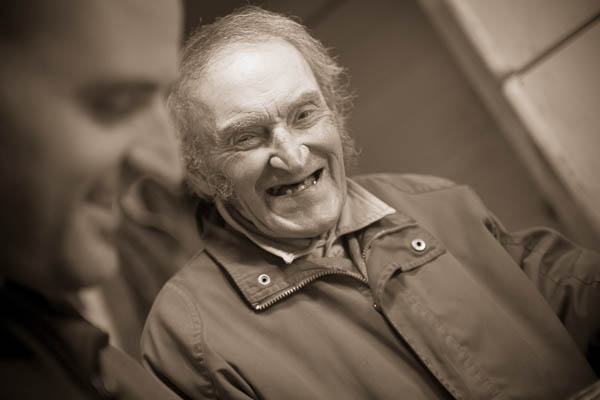
Unfortunately Uncle Ward has now passed on, but his legacy does live on in these images, now treasured by family. They sure did love their instant coffee. He even took a spoonful of the grounds and ate it!
Documentary photography usually refers to a popular form of photography used to chronicle significant and historical events. It is typically covered in professional photojournalism, or real life reportage, but it may also be an amateur, artistic, or academic pursuit. The photographer attempts to produce truthful, objective, and usually candid photography of a particular subject, most often pictures of people. – Wikipedia
Get into their day to day life. Plan to go spend a few hours chatting with the person, listen to their stories, capture what comes naturally and what just happens. Don’t create something that isn’t part of them, just be there to grab moments in time that will mean so much down the road.
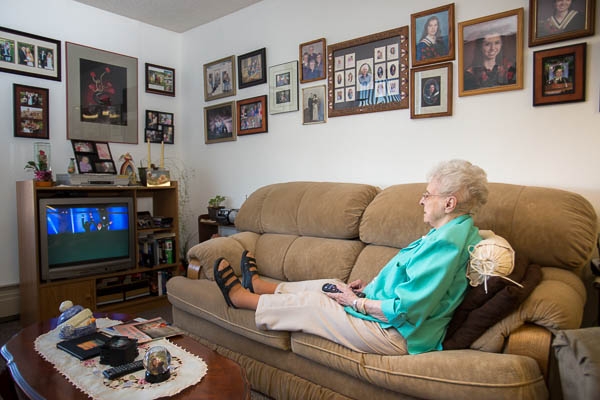
The afternoon “soaps” among all her family photos that plaster the walls.
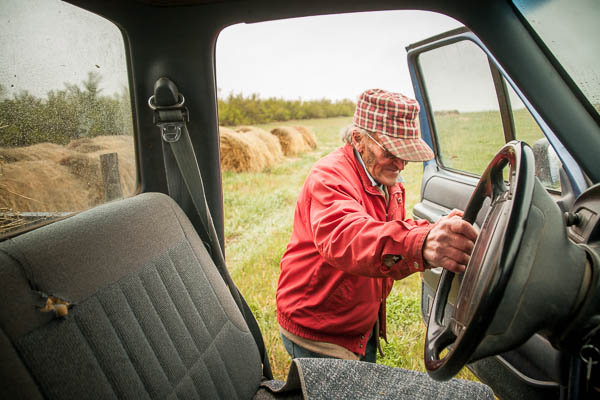
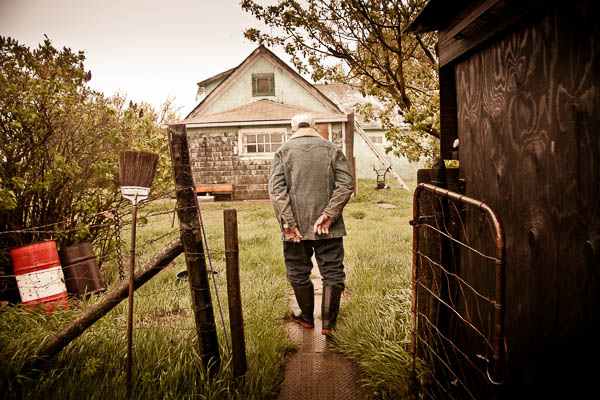
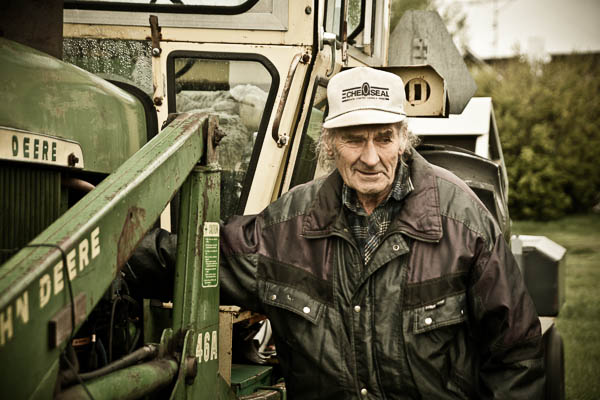
Neil going to feed the cattle
This is not too far off from #1 but let’s take it a bit deeper. Just being in their home, using their environment doesn’t guarantee you’re getting into their heart and soul. If this is someone close to you, as in my grandmother, what is it about them you want to capture? What part of their personality do you want to shine through in the photos: wisdom, a gentleness; intelligence, caring, a sense of fun, or all of the above? Is there something quirky about them that makes them unique, how can you show that in your images?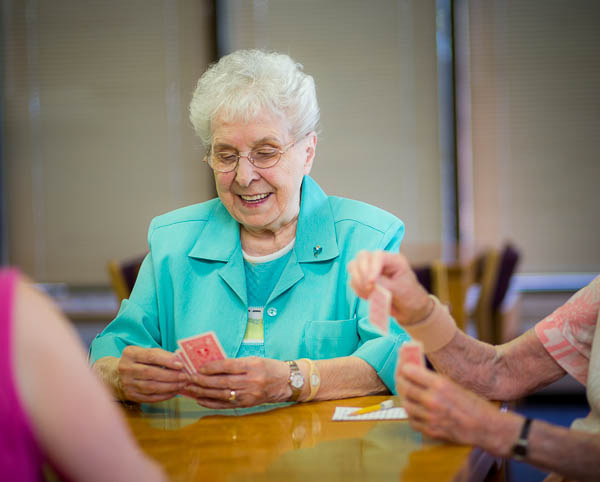
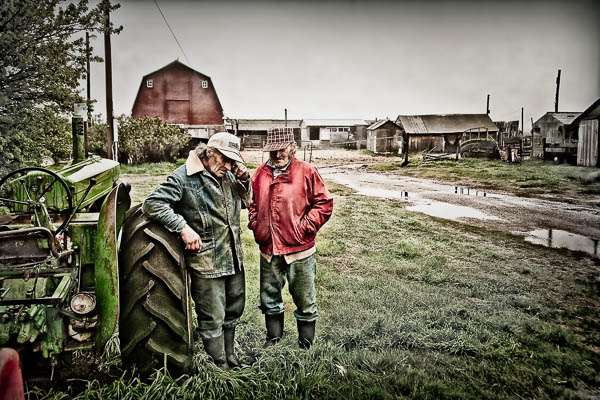
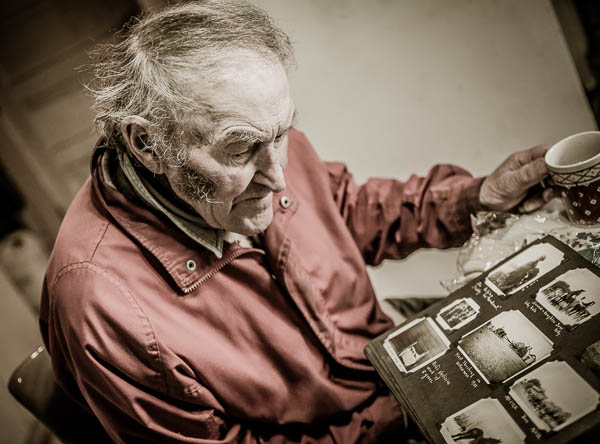
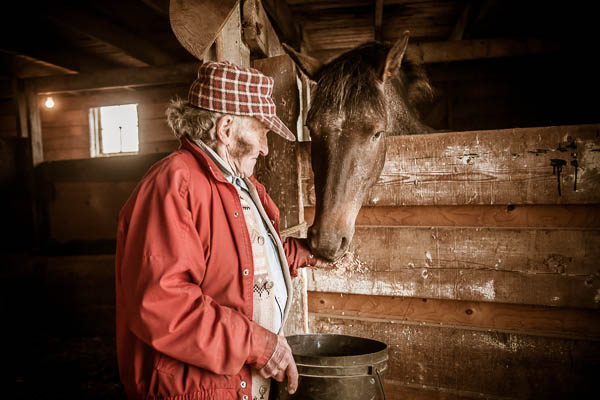
For my grandmother she is a social butterfly so I photographed her with some friends and playing cards (see above). My husband’s uncles are farmers and storytellers. We got out the old family photo albums and listened to them for hours while they showed us old photos from the 1940′s. They came alive as they recounted tales of their younger days and when they had a TV delivered “a couple years ago” which we later learned to be around 1975!
We found out my husband’s grandmother was a hobby photographer during the 20′s and she had some really great images and albums!
The key here is to get emotional. I don’t want to see a studio portrait, or even a lovely window light portrait for this type of project, I go for real, raw, emotion.
When photographing a person with the intent of documenting, make sure you think in terms of these three views: overall, medium range, and close-up or details. What that means is don’t forget to get in close on some things, and not just have the whole face or person in every image. Details like how they hold their spoon as they stir their tea (so get in close on the hands or maybe even just the tea cup) can add a lot of impact.
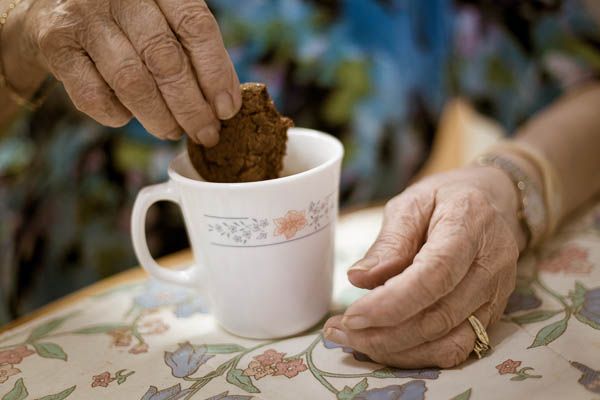
Tea and cookies at Grammy’s. For as long as I can remember she’s been feeding us. “Do you want a cookie dear?”

She does love her Bingo
Tea at the Uncles’
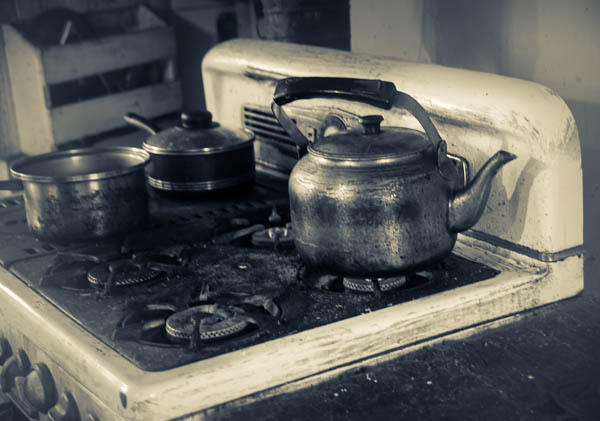
Things around them in their daily life set the scene, so remember to capture some of those things too. If they live in a house make sure to get an exterior shot, some of the garden, and maybe even a close-up of the wall you can use later as a textured background. Does she has a favorite dress, one you always think of when you think of her – if so they photograph it, or a section of the material. Is he a craftsman, then by all means photograph his tools.
The most important thing in my grandmother’s life is her family and in her small living room the walls are literally plastered corner to corner with family photos. Weddings, graduations, new great grandchildren, and even the pets are all there. Every shelf and horizontal surface has photos on it. You can bet I captured that (even though I’d taken make of those photos over the years, seeing them all up in one places speaks volumes to anyone that enters that room and you instantly know what she’s all about. She also collects angels and always has one pinned on her blouse. She has hundreds of them in her house everywhere.

For the uncles that all consuming thing for them was farming and their animals. So I got lots of images of the barn, farm buildings and old retired machinery. Do all that without their assistance, let them go about their day while you just shoot background stuff. Think about how those images may work together making a photo album or even a digital book.

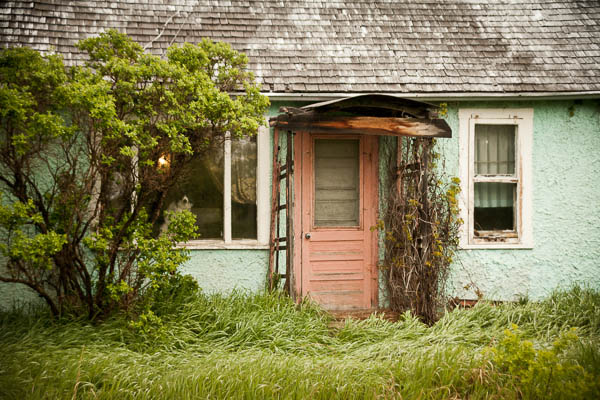
The Cooper Homestead farmhouse
Similar to get in and show the details, think outside the box. Not every image needs to show the face or even hands. How about feet? Use a slower shutter speed and add some motion if applicable. Shoot for something different here that the “norm”. Think about how to represent them, and their life without showing their face.
With her youngest great grandchild, young and old.
Every other point in this article leads directly into this one, telling a story. By following all the tips above you pretty much can’t help but create images that do just that so the only thing I will add here is to do it consciously. Go in knowing you’rl./e creating a story. Intention is a powerful thing. When you show up planning to create a story, your subconscious will naturally kick in and go to work for you, if you aren’t aware (hint: that’s why it’s your subconscious).
One other thing you can do it go look at other photo stories, specifically some of the great photographers, masters of the photo essay. W. Eugene Smith comes to my mind, go study some of his stories for LIFE magazine. Anything by Cartier-Bresson but especially The Decisive Moment. Or some of my favorites Dorothea Lange, Margaret-Bourke White and Walkers Evans who all documented the Great Depression. Find out what draws you in to their images. How do they use scene setters and detail shots? Learn from the masters.
If you read my articles regularly you’ll know what I’m going to say – get out there and go photograph someone important to you. That’s the first step! Then DO something with the images that will create a family heirloom. A book is ideal as you can make copies for the whole family.
To see the full book I made of The Uncles for an example of how to put it all together. Blurb.com is a great way to make books that are high quality that don’t break the bank. I’ve made several copies of this one for family and have done other volumes for special occasions and family events as well as clients.
Cheers, Darlene
Post originally from: Digital Photography Tips.
Check out our more Photography Tips at Photography Tips for Beginners, Portrait Photography Tips and Wedding Photography Tips.
Documentary Photography – Six Tips for Creating a Legacy

You must be logged in to post a comment.