RSS
 

Archive for September, 2013

Nikon Coolpix A Review

24 Sep

Nikon Coolpix A BK_front34l_lo.jpgMy how the game has changed. A few months ago everyone was agog (and still are!) with maxi zoom cameras. Now it seems a few major makers seems to be intent on feeding the market with large aperture, fixed focal length cameras. Among them: Ricoh, Sony, Fujifilm, Sigma.

I’ve used quite a few of these and have to admit their effective use demands quite a bit of restraint and understanding. There’s no point in venturing out to a sports event with the desire to catch superb, close up on-field action; similarly, there’s no joy in banging away on animal and kiddie shots as they duck and weave in an attempt to foil the photographer’s intent; likewise, water-borne subject matter where you have little control of the camera-to-subject distance.

These specialist cameras come into their element where the photographer has complete control: portraits, people shots in general, landscapes, interiors and so on. Another use for them is to go ‘commando’ and hold the camera out from your body, roughly aiming at your target, banging away when you think you’ve caught a ‘live’ one!

Their main attraction is that the photographer can work with fewer concerns to distract him or her: no zoom to worry about (or be distracted by!); just set the aperture and shutter speed … and go shoot!

Where they really sing and dance is where the sensor is on the large side, as with this camera. Another factor (hopefully) is where the camera maker has installed an above average quality lens.
Nikon Coolpix A_BK_back.jpg

Nikon Coolpix A_BK_top_lo.jpg

Nikon Coolpix A_CMOS.jpg

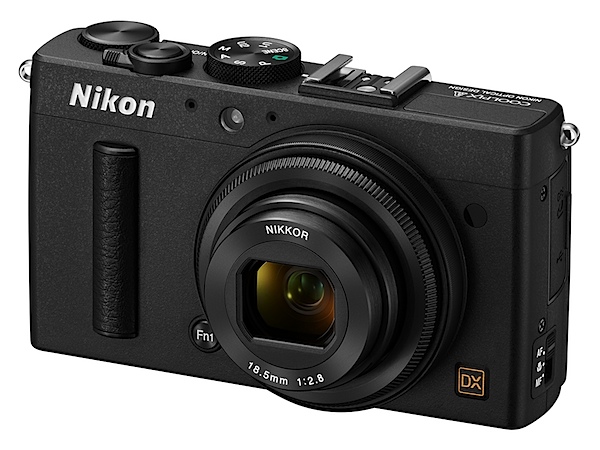
The Nikon Coolpix A has a largish CMOS sensor, in DX format, sized as 23.6×15.7mm, or nearly half the original 35mm frame.

The f2.8 lens is fast-ish and has a 35 SLR equivalent focal length of 28mm that is, to my mind, an ideal focal length for fixed lens photography.
Dee Why church int 2.JPG

The lens has a seven-blade iris diaphragm which avoids the artefacts captured by odd-shaped lens irises, capturing natural out of focus blurs and highlights.

The 16.2 megapixel capture creates a maximum image size of 4928×3264, enough to make a 42x28cm print. You can capture in JPEG or NRW (RAW) images at 14-bit depth.

Video? Full HD MPEG4 video at 1920×1080 pixel resolution. Due to the unusual video recording arrangement (see below), you can’t shoot stills mid video.

Nikon Coolpix A Features

The magnesium and aluminium alloy body is accompanied by a small leather speed grip patch at the right edge of the body and the rear corner.

The camera is without an optical low-pass filter, so expect superior rendering performance and images with superior resolution.

The ISO range runs up to 25600, thanks to an expansion routine.
The camera has in-camera movie editing and you can save a single frame as a still JPEG image.

Continuous shooting at approximately 4fps.
Flowers.JPG

Nikon Coolpix A Controls

Nikon has taken an unusual route to external control points, some of which may take a bit of getting used to.

First up, there is a function button tucked away beneath a corner of the lens; to this can be assigned such functions as AE and AF lock, RAW capture, AF etc.

The lens itself has a focus ring which comes in to play when you select manual focus from a three position selector (other positions: AF and macro). The camera includes autofocus with manual override: when the shutter button is held halfway down and the focus ring is turned the camera focuses automatically.

Top deck: at left is the flash pop up trigger; further right is the mode dial with auto, PASM positions, scene modes (portrait, candle light, silhouette etc), U1 and U2 custom settings.

The shutter button also stands in as the power button; you swing the lever and power turns on, then you shoot, then swing the lever again to turn off the power.

Flanking the above is the command dial to cycle through menu choices.

Rear: at left of the LCD screen is the exposure compensation button, ISO access, screen zoom, screen enlargement in playback, among other options.

To the right of the screen is replay, menu, four way jog dial, an ‘i’ button which takes you into an information display of current settings.

I have to say I did not find the whole arrangement intuitive. To get my head around some of the functions took a careful study of the manual.

For example: there’s no red video record button. To shoot video you tap the ‘i’ button and choose that mode. To get out of it you enter the menu and choose single frame shooting. Far from an ideal arrangement!
Menu 1.jpg

Menu 2.jpg

Menu 3.jpg

The viewfinder menu is extensive and one that I had no quibble with.

To me, one of the joys of a fixed focal length lens is simplicity of use. The menu and options arrangement make life unnecessary difficult on the shooting front.

Nikon Coolpix A Accessories

Some nice new add-ons could well heighten your experience with the Coolpix A.

One of these is an optical viewfinder DF-CP1, with a high eye point, approximately 90% frame coverage and 0.52x magnification.

The camera further supports accessories for Nikon SLRs, such as Nikon Speedlights and the GPS Unit GP-1. The wireless mobile adapter WU-1a can also be used, for easy uploading and sharing of captured images and movies to a smart device.

Nikon Coolpix A ISO Tests

Nikon Coolpix A ISO 100.JPG

Nikon Coolpix A ISO 400.JPG

Nikon Coolpix A ISO 800.JPG

Nikon Coolpix A ISO 1600.JPG

Nikon Coolpix A ISO 3200.JPG

Nikon Coolpix A ISO 6400.JPG

Nikon Coolpix A ISO 12800 equiv.JPG

Nikon Coolpix A ISO 25600 equiv.JPG

A good result all the way to ISO 6400. It was only when we reached above that level and the camera resorted to ISO expansion did we see evidence of noise and loss of definition.

At ISO 25600 equivalent the shots would be ‘acceptable’, depending on subject. But plenty of noise!

Startup Time

It took about two seconds from power on to first shot; follow-ons came in at a little over a second apart.

Distortion

Very slight barrel distortion was evident at frame edges.

Dee Why beach 1.JPG

Nikon Coolpix A Review Verdict

Quality: above average in resolution and colour quality but notice the edge vignetting in the beach shot.

Why you would buy the Nikon Coolpix A: you like the idea of a fixed focal length lens.

Why you wouldn’t: fiddly control points; I have encountered better stabilisers when shooting video.

Nothing more to say except that this one would make an excellent camera, especially when paired to a fully accessorised Nikon DSLR.

Nikon Coolpix A Specifications

Image Sensor: 16.2 million effective pixels.
Metering: Multi, centre-weighted and spot.
Sensor: 23.6×15.7mm CMOS.
Lens: Nikkor f2.8-5.6/18.5mm (28mm as 35 SLR equivalent).
Exposure Modes: Program AE, shutter and aperture priority, manual.
Shutter Speed: 30 to 1/2000 second.
Continuous Speed: 4fps.
Memory: SD/SDHC/SDXC cards.
Image Sizes (pixels): 4928×3264 to 2464×1632. Movies: 1920×1080, 1280×720, 640×480.
Viewfinder: 7.6cm LCD (921,000 pixels).
File Formats: JPEG, NRW (RAW), MPEG4.
ISO Sensitivity: Auto, 100 to 25600 (with boost).
Interface: USB 2.0, HDMI mini, accessory.
Power: Rechargeable lithium ion battery, AC adaptor.
Dimensions: 111×64.3×40.3 WHDmm.
Weight: 299g (inc battery and SD card).
Price: Get a price on the Nikon Coolpix A at Amazon.

Post originally from: Digital Photography Tips.

Check out our more Photography Tips at Photography Tips for Beginners, Portrait Photography Tips and Wedding Photography Tips.

Nikon Coolpix A Review


Digital Photography School

 
Comments Off on Nikon Coolpix A Review

Posted in Photography


Blickfang: Ruine der Kirche von El Carmen Antigue

24 Sep

Eadweard Muybridge war ein Pioner der Fotografie und der fotografischen Technik: Schon in den 70er und 80er Jahren des 19. Jahrhunderts machte er Aufnahmen, die bis in die heutige Zeit als richtungsweisend gelten können und zwar in den unterschiedlichsten Genres.

Portraits, Studien von Bewegungsabläufen von Tieren und Menschen, die er später mit einem sogenannten Zoopraxiskop in kleine, auf Leinwände projizierte Filme verwandelte. Die zum Teil auch als in Endlosschleifen abspielbare Serien konzipiert waren – man könnte fast behaupten, er habe die moderne GIF-Datei erfunden, die heute überall im Internet zum Einsatz kommt – vor allem aber auch viele Landschafts- und Stadtaufnahmen, mit und ohne Menschen. Einige der Bilder dürfen gar als frühe Straßenfotografie betrachtet werden.

Ruine der Kirche von El Carmen Antigue © Eadweard Muybridge

Viele seiner Bilder zeigen dabei auch, was wir heute „Making Of“ nennen würden. Es ist die Präzision und Leidenschaft zu erkennen, mit der er zu Werke geht, wenn er etwa in einer kleinen Felshöhle im Yosemite Valley ein „fliegendes Studio“ einrichtet und dort in verschiedenen Kisten unter anderem die Chemikalien zu sehen sind, mit denen er arbeitet.

Das Foto „Ruine der Kirche von El Carmen Antigue“ von 1875 aus dem Band „Eadweard Muybridge“* des Verlags Phaidon ist Teil einer Serie, für die der Fotograf ein halbes Jahr in Mittelamerika verbracht hat. Sein besonderer Fokus galt dabei verfallenen Kirchen aus der spanischen Kolonialzeit.

Es ist unter den Bildern, die ich von Eadweard Muybridge kenne, eher ein ungewöhnliches Motiv: Einzelne Gebäude fotografierte er sonst öfter in Kombination mit Menschen, an Bauwerken scheinen ihn eher die Strukturen zu interessieren. So sieht man oft etwa Hausdächer und Städte von oben.

Das Bauwerk ist fotografisch nicht sonderlich subtil oder gar originell in Szene gesetzt: Quadratische Aufnahme, wenig Platz an den Rändern, eine Perspektive von schräg vorn. Der Betrachter scheint fast vollständig durch die Augen des Fotografen auf die Szene zu blicken und sieht dennoch alles.

Und trotzdem ist es ein majestätisches, ein mächtiges Bild, was natürlich nicht nur für das atemberaubende Motiv gilt, sondern gerade auch dann, wenn man die Präzision und Leidenschaft bedenkt, mit der dieser Fotograf mit Hilfe der begrenzten Mittel seiner Zeit gearbeitet hat.

Auch 138 Jahre und viele, viele Generationen von technischen, konzeptuellen und kulturgeschichtlichen Revolutionen im Bereich der Fotografie später, kann man eigentlich nicht mit Überzeugung behaupten, dass heute jemand ein besseres Bild von dieser Kirche machen würde. Vielleicht ein experimentelleres, aber kein zeitloseres und gerade das beeindruckt mich an dieser Aufnahme sehr: Sie ist ein sehr altes Stück Fotografiegeschichte und wirkt trotzdem in keiner Weise veraltet.

* Das ist ein Affiliate-Link zu Amazon. Wenn Ihr darüber etwas bestellt, erhalten wir eine kleine Provision, Ihr zahlt aber keinen Cent mehr.


kwerfeldein – Fotografie Magazin

 
Comments Off on Blickfang: Ruine der Kirche von El Carmen Antigue

Posted in Equipment


iPhone 5S real-world Samples Gallery

24 Sep

photo-1.JPG

Apple’s new iPhone 5S features a number of refinements that make it attractive to photographers, including a new, larger 8MP sensor, faster lens, improved panorama mode with ‘dynamic auto exposure’, built-in filter effects and a unique two-color flash for better low-light shots. DPReview editor Barnaby Britton spent the weekend shooting with the iPhone 5S, and you can see a large gallery of samples over at connect.dpreview.com. 

News: Digital Photography Review (dpreview.com)

 
Comments Off on iPhone 5S real-world Samples Gallery

Posted in Uncategorized


Fall Instagram Inspiration

23 Sep

We’re not sure what it is about autumn that makes us feel downright snap happy!

Maybe boots and sweaters just make us feel more poetic than flip-flops.

We know how quickly autumn’s colors fade, and we don’t want you and your lens to miss a minute of it.

So we’ve scoured Instagram for the season’s best hashtags to inspire you to trade in your lemonade for a latte, then get out there and capture fall in all it’s glory.

Fall in Love with the Season’s Most Inspiring Hashtags

why it’s cool

All Link and Henry David Thoreau had to do when their spirits were down was visit their magical ponds. Lucky punks.

We don’t have a magical pond, but we do have a whole internet full of inspiration.

We’re big fans of Instagram, and we especially love the efficiency of the hashtag. It’s a great tool when there’s a certain something we’re trying to capture, be it a subject, place or even a particular color. 

Pulling up a hashtag and spending time with other people’s work helps our photography to keep moving in a fresh direction. With 150 million users on Instagram you’re bound to find someone who makes you see things from a whole new angle.

FANCY FOLIAGE #LeafPeeping

beforeGrams and Pop-Pop used to take us for a scenic drive every fall, which was great until Pop-Pop started belting out Tom Jones, we ran out of cookies and our sister started poking us in the ribs.

These days we like take a gander at #LeafPeeping to enjoy the scenery without ever leaving our couch — or sharing our snacks.

When you head out to capture that leafy goodness for yourself, set your alarm clock to take advantage of that “golden hour” right after sunrise. Or, you could snuggle in for an extra 50 winks and hold out for those just-before-sunset rays.

FAIR GAME #CountyFair

beforeLife doesn’t hand us too many opportunities to capture swirling neon lights, deep-fried snack cakes and Nigerian Dwarf goats all in the same venue.

The #CountyFair might not be such a great place for watching your waistline, but it’s always a good place to grab some fun and fanciful photos.

Apps like Slow Shutter Cam (iPhone) and Camera FV-5 (Android) offer DSLR-like control over your shutter speed, giving you the best shot at getting your best shot of swirling and whirling rides during evening hours.

GROWTH INDUSTRY #harvest

beforeIt was all we could do this summer to keep the tomatoes on our balcony alive, so we’re totally in awe of the work that real farmers put in every year.

Farmers all over the United States are reaping what they’ve sowed this time of year, and it’s a nifty thing to witness. All those golden #harvest hues are really pretty.

Don’t have access to your own agricultural landscape? Head to a corn mazes or apple-picking orchard, which give you full access to farm photo ops without the responsibility of keeping things alive.

CLEAR EYES, FULL HEARTS #FridayNightLights

The contrast of a ginormous floodlight against a clear night sky makes us happier than a backside defensive end on the sunny side of a scrape-exchange cutback.

OK, so we don’t know what that means (or if it means anything at all).

But we do know that a night at your favorite local sporting venue can make for some dramatic and dynamic photos. Check out #FridayNightLights for a quick pigskin fix.

Grab an iPhone Telephoto Lens to get right up in the action!

Taking It Further


Now that you’re totally inspired…

  • Pick out a nearby deciduous muse and take its pic at the same time every day. String the results together with your own hashtag — #JuliaFallsforFall2013, perhaps? — for an awesome time-lapse glimpse of fall.
  • Create a hashtag for your next event so your friends and family can share their pics from #BigJims4thAnnualJimboree, #WandaAndRoderickLeafTour13 or #TheHarveyFamilyCatInASweaterNationals. (Or possibly something like #SmithFamReunion, if your family is more normal than ours.)
  • Take some leaves home and make some chemical-free prints with your scanner.
  • Join us in sharing the fall-tography at #PhotojojoFall. We’ll be looking for your autumnal visions!

Big thanks to pde_; leahohh; hilldwellertom; Amber and her buddy Anubis; Annie Smith; Pocono Tourism; Mandy Cooke; Tiffany Cornwell; leahohh; and shazzwright for sharing their inspirational Instagram photos with us!

Related posts:

  1. 12 Fantastic Fall Photo Tips — Our Extra-Crunchy Guide to Leaf Peeping
  2. A Healthy Dose of Photo Inspiration — George Lange’s 2006 Photo Flipbook Every so often, we run across photos that make us…
  3. 500 Photographers – 100 Weeks of Photo Inspiration Carbonmade, Your online portfolio Find 5 active, amazingly talented photographers…


Photojojo

 
Comments Off on Fall Instagram Inspiration

Posted in Equipment


23. September 2013

23 Sep

Ein Beitrag von: Bernd R.

In The Shelter © Bernd R


kwerfeldein – Fotografie Magazin

 
Comments Off on 23. September 2013

Posted in Equipment


Kenko Tokina enters cine lens market with 16-28mm T3.0 wide zoom

23 Sep

1628cine.png

The ever-increasing video capability of digital SLRs has seen manufacturers such as Canon, Samyang and Zeiss make video-optimised versions of their conventional lenses, and now Kenko Tokina is getting in on the act. The Tokina 16-28mm T3.0 is a manual focus version of the AT-X 16-28mm f/2.8 Pro FX wideangle zoom, with a redesigned barrel that features the usual refinements for video work, including geared focus, zoom and aperture rings, and scales designed to be read from the side of the camera. It’ll be made in Canon EF and Arri PL mounts, with a suggested retail price of ¥580,000 – almost 5 times that of lens it’s based on.

News: Digital Photography Review (dpreview.com)

 
Comments Off on Kenko Tokina enters cine lens market with 16-28mm T3.0 wide zoom

Posted in Uncategorized


100 Incredibly Tasty Instagram Accounts for Foodies to Follow

23 Sep

If you are an Instagram user, I think you’ve clearly noticed a few people who love posting photos of their food. Once, browsing through Facebook, I found a joke that said, “A true hipster does not eat food, he tweets it.” But after looking at my Instagram news feed, I can say that it’s not quite true: People don’t eat Continue Reading

The post 100 Incredibly Tasty Instagram Accounts for Foodies to Follow appeared first on Photodoto.


Photodoto

 
Comments Off on 100 Incredibly Tasty Instagram Accounts for Foodies to Follow

Posted in Photography


… im Mund und im Herzen

23 Sep

„Honig & Galle“ ist eine Serie des Berliner Fotografen Dominic Packulat. Dies fand ich jedoch erst nach einiger Recherche heraus, denn angefangen hatte alles mit einem einzigen Bild, das ausgestellt zwischen allerlei Kunstkitsch bei einem Neuköllner Kunstfestival in Berlin meine Aufmerksamkeit auf sich zog.

Die Serie vereint das Schöne mit dem Tragischen und ist eine Geschichte, die Stück für Stück entsteht. Zunächst nur im Kopf des Fotografen – beim Musikhören, in der Bahn, bei langen Nächten mit Freunden, an grauen, regenbegleiteten Tagen, wie er sagt.

Honig & Galle © Dominic PackulatHonig & Galle © Dominic Packulat

Die erdachten Bilder sind eng verknüpft mit dem Schaffenden, gleich einem Schriftsteller, der sich mit Stift und Buch Notizen macht über seine Charaktere, die Geschichte, seinen Verlauf. So zeichnet er sein Leben, seine Begegnungen in den Bildern auf, schenkt seinen Charakteren Teile seines Selbst und anderer Menschen, denen er begegnet.

Warum er seine Serie so nennt, wollte ich wissen.

Der Titel „Honig & Galle“ ist tatsächlich ein römisches Sprichwort, welches besagt, dass die Menschen den Honig auf der Zunge tragen und die Galle im Herzen. Jeder kennt: „Honig um den Mund schmieren.“

Zudem ähneln sich Honig und Galle sehr in ihrer Substanz, nur dass die Galle eben bitter und der Honig süß schmeckt. Zum einen kann Honig als ein Heilmittel verwendet werden, jeder kennt seinen Tee mit Honig oder zum einschlafen heiße Milch mit Honig, aber im Umkehrschluss regt Honig die Gallenproduktion an.

Honig & Galle © Dominic PackulatHonig & Galle © Dominic Packulat

Die Menschen auf seinen Bildern sind schön, wirken sphärisch und überirdisch. Doch schafft er es, ohne viel Tamtam eine Serie zu gesalten, die durch ihre Klarheit an eine alte Sage erinnert, in der Menschen sich in Tiere verwandeln oder den Krieg auf ihren Schultern tragen.

Das Aufregendste, was ihm bisher für die Serie widerfahren ist, war der Besuch bei einem Pferdeschlachter, um einen Brustkorb zu holen.

Ich verbachte einige Zeit in dieser Schlachterei, sah ganze Pferdekörper ausbluten. Mit einem Kofferraum voller Knochen ging es dann in Richtung der Location. Aber es musste noch „geputzt“ werden, sämtliche Fettüberreste mussten weggeschnitten werden.

Honig & Galle © Dominic PackulatHonig & Galle © Dominic Packulat

Natürlich will er mit solchen Requisiten provozieren, mahnen, zum Nachdenken anregen. Den schmalen Grat zwischen Honig und Galle, Lust und Bitterkeit sichtbar machen, das Schöne umkleiden, jedoch ohne dabei kitschig zu wirken.

Die Geschichte von Honig und Galle ist noch nicht zu Ende. Sie wird Szene um Szene fortgesetzt. Dafür benötigt er weitere Requisiten, Modelle und Freiwillige, die ihm helfen. Er macht Pläne, sucht nach Plätzen, kalkuliert und koordiniert.

Ich bin jedenfalls sehr gespannt und außerdem auch froh, ihn damals beim Neuköllner Kunstfest entdeckt zu haben.

~

Weitere Arbeiten von Dominic Packulat kannst Du auf seiner Webseite betrachten oder ihm bei Facebook folgen.     


kwerfeldein – Fotografie Magazin

 
Comments Off on … im Mund und im Herzen

Posted in Equipment


Chromatic Vortex: 3D Art from 4,416 Sheets of Photo Paper

23 Sep

[ By WebUrbanist in Art & Installation & Sound. ]

chromatic storefront installation art

A site-specific installation in a New York City storefront, this twisting multi-colored tunnel was suspended in mid-air and held together with no less than 17,000 standard office bind clips.

chromatic reflective photo paper

chromatic hanging tunnel inerior

chromatic binder clip assembly

Composed of over 4,000 panels of high-gloss photographic paper, CHROMAtex from SOFTlab (photos by Alan Tansey) was designed to suck passers by right in (proverbially not literally, fortunately for pedestrians).

chromatic art intersection interior

Situated in the Lower East Side of Manhattan, this sculptural work was built from the outside in. As illustrated in the video above, it slowly took shape as it moved from the front of the empty shop toward the back, breaking out into various subsidiary tunnels along the way.

chromatic suspended art sculpture

chromatic art entryp oint

These twists in turn split and curve, morphing from circular tubes into square ports and providing other internal perspectives for those curious enough to enter the interior space in order to see more of the suspended sculpture.

chromatic tunnel installation entrance

SOFTlab itself is composed of “artists, believers, listeners, directors, geeks, architects, sketchers, dreamers, programmers” and above all: designers. It was created by Michael Szivos who has a degree from the “Graduate School of Architecture, Planning and Preservation at Columbia University. The studio has since been involved in the design and production of projects across almost every medium, from digitally fabricated large-scale sculpture, to interactive design, to immersive digital video installations. As the studio adjusted to a wide range of projects, we began to focus less on the medium and style and more on ideas [and] we are able to approach every project from a fresh perspective to create rich spatial, graphic, interactive and visual experiences.”

Share on Facebook


[ By WebUrbanist in Art & Installation & Sound. ]

[ WebUrbanist | Archives | Galleries | Privacy | TOS ]


WebUrbanist

 
Comments Off on Chromatic Vortex: 3D Art from 4,416 Sheets of Photo Paper

Posted in Creativity


Mastering Monochrome Mode

23 Sep

Mastering monochrome mode

Andrew S. Gibson is the author of Mastering Photography: A Beginner’s Guide to Using Digital Cameras, on offer now at Snapndeals for a limited time.

One of the benefits of digital photography that I really appreciate is the ease with which I can convert images to black and white. It was much harder back when I first became interested in photography. I remember wanting to try black and white, and print images in a darkroom, but living in a property with no spare space to build a darkroom meant that it was years before I was able to start learning to print.

Now, black and white is as accessible as switching to your camera’s monochrome mode. Some people still prefer chemical processes, but for the rest of us it means no more darkrooms and no more waiting to process film and make prints. The process is instant. That has opened up black and white photography to many more photographers, which can only be a good thing.

Use Raw

I want to make one thing clear before continuing. You will always get the best results in black and white by using the Raw format and converting your files to black in white in software like Photoshop, Lightroom or a plug-in like Silver Efex Pro 2. But there are still good reasons to switch your camera to monochrome mode for shooting in black and white. Let’s take a look at what they are.

Monochrome mode helps you visualise in black and white.

Mastering monochrome mode

Seeing in black and white is an acquired skill. It takes time to learn how scenes that you are accustomed to viewing in colour translate to black and white.

The benefit of switching to monochrome mode is that the camera displays your photos in black and white on the LCD screen. This helps you see how the scene looks in monochrome.

You can take it further by increasing the contrast or changing the colour filter settings (I’ll cover this below if you don’t know how to do this or why).

The photo above is an example. The colour version is what I would see on my camera’s screen if I set the Picture Style to Landscape. Underneath that is what I would see in monochrome mode.

Monochrome mode helps you take better colour photos.

Mastering monochrome mode

Years ago I read an interview with David Muench in which he described his style as ‘black and white photography in colour’. That statement has always stuck with me.

What did he mean by that? Well, the basis of a good black and white image is tonal contrast – the way that light and dark tones are arranged within the composition.

David Muench’s colour photos rely as much on tonal contrast as they would if he were shooting in black and white. Tones are an important building block in the composition of his images even though he is shooting in colour.

That idea has become the basis of much of my colour photography. I believe that strong colour photography utilises tonal contrast as much as good black and white. That’s why using monochrome mode, and learning to see in black and white will make you a stronger photographer in colour too.

The photo above is a good example of tonal contrast. The two images show how it would look on my camera’s screen in both standard and monochrome Picture Styles. I increased contrast in the monochrome Picture Style as the light was so flat.

Monochrome mode helps you take better black and white portraits

Mastering monochrome mode

I find that models love to see their photos on the camera’s LCD screen during a shoot. If you want to work in black and white, switching to monochrome mode and showing your model the previews in black and white helps them get an idea of how the processed images will come out. If your model gets excited about the results he or she will work harder to create good images.

The example here shows the difference between portrait and monochrome Picture Styles (contrast increased in monochrome mode).

Monochrome mode – what you need to know

Every manufacturer approaches this differently, so check your manual, but the basic idea is the same.

These are the settings you are looking for, by manufacturer:

Canon: Picture Style
Nikon: Picture Control
Sony: Creative Style
Pentax: Custom Image
Olympus: Picture Mode
Sigma: Colour Mode
Fujifilm: Film Simulation

Look for the setting labelled Monochrome (or something similar). Once selected, you should also be able to customise it. My Canon EOS cameras have four parameters you can adjust in Monochrome mode:

Mastering monochrome mode

Sharpness

Ignore this if you’re shooting in Raw, as you can adjust sharpness when processing the image. If you’re using JPEG, be careful not to oversharpen – you can increase sharpness in Photoshop if you need to.

Contrast

The biggest concern many photographers have about using monochrome mode is that the photos often tend to look flat and consequently somewhat boring and inspired. That’s because the camera manufacturer would prefer to give you a flat black and white image by default, in order to retain highlight and shadow detail. The assumption is that you will adjust contrast in Photoshop if you need to.

However, increasing contrast in-camera gives you a better preview that can make it much easier to visualise how the scene converts to black and white. Be careful if you’re shooting JPEG, as you won’t be able to pull back any lost shadow or highlight detail in Photoshop.

But if you’re using Raw, you can set the contrast to whatever you want.

One thing to watch out for in Raw: the histogram and highlight alert are generated from the preview you see on the screen. If you increase contrast, your camera may tell you that the highlights are clipped, when the detail is actually there in the Raw file. You more you increase the contrast, the more likely this is to happen.

Filter effect

Before digital, black and white photographers would use coloured filters to alter the tones of their black and white images. Coloured filters make colours corresponding to the colour of the filter lighter, and the opposite colour on the colour wheel go darker.

For example a red filter makes red colours go lighter and blue ones (such as the sky) go darker.

This is how you could use the filters:

Red: Makes blue skies go really dark. Very dramatic, especially if you increase contrast too.

Orange: Makes blue skies go dark, but not as dark as the red filter.

Yellow: Darkens blue skies a little. Also lightens skin tones, and can be good for portraits.

Green: Makes anything green lighter. Often used to lift photos containing a lot of things that are green, such as grass or vegetation.

Mastering monochrome mode

Here’s an example to help you see the effect of using coloured filters. The differences are subtle, but you will see that the sky is darker and the shutters are lighter in the version with the red filter..

Again, if you’re using JPEG select your colour filter carefully, as you can’t change it in post-processing. In Raw it doesn’t really matter, just choose the filter, if any, that gives you a good preview. You can apply any filter setting you want when you process the image.

Toning effect

On my EOS cameras the toning effects are a bit too strong to be effective. Regardless of whether you are using JPEG or Raw you can tone your photos much more efficiently in post-processing anyway. It’s probably best to leave this setting alone.

Raw vs. JPEG

Remember, if you use monochrome mode with JPEG files you will get what you see on the LCD screen – black and white images with whatever sharpening, contrast and filter effect settings you used. That may suit some photographers but I really suggest that you use Raw. That way you have a full colour image that you can process any way you like, including converting to black and white with software that gives a much better result than your camera possibly could.

Mastering Photography

Mastering monochrome mode

My latest ebook, Mastering Photography: A Beginner’s Guide to Using Digital Cameras introduces you to digital photography and helps you get the most out of your camera. It covers concepts such as lighting and composition as well as the camera settings you need to master to take photos like the ones in this article. It’s available now at Snapndeals for a special price for a limited period.

Post originally from: Digital Photography Tips.

Check out our more Photography Tips at Photography Tips for Beginners, Portrait Photography Tips and Wedding Photography Tips.

Mastering Monochrome Mode


Digital Photography School

 
Comments Off on Mastering Monochrome Mode

Posted in Photography