RSS
 

Archive for August, 2013

Ein Jahr iPhone statt Kamera

16 Aug

Mein Jahresprojekt mit dem iPhone ist zu Ende. Vor zwölf Monaten hatte ich beschlossen, die DSLR mal zur Seite zu legen und dafür nur mit dem iPhone zu fotografieren. Heute schließe ich dieses Projekt ab und schreibe darüber, was ich aus dieser Zeit gelernt habe.

Eigentlich ist mein Projekt erst am 9. September zu Ende. Da ich aber ungefähr einen Monat vor der offiziellen Ankündigung schon begonnen hatte und etwas verfrüht zu einer neuen Kamera gekommen bin, dachte ich, Martin, jetzt ist auch mal langsam gut.

Immer wieder sind im vergangenen Jahr Leute zu mir gekommen und meinten, dass sie meine Entscheidung „krass“ fänden. Ein Monat mit dem iPhone, ja, klar, kann man machen. Aber gleich ein ganzes Jahr?

Für mich fühlte sich das gar nicht krass an. Ich bin ein Mensch, der sich gern in eine Sache voll und ganz einarbeitet, um hinterher auch etwas davon zu haben. Ein Monat klingt nett, aber wenn ich in dem Monat ein paar Mal fotografieren gehe, was habe ich dann davon? Nicht so viel. Deshalb war die Entscheidung für mich stimmig. Und wichtig.

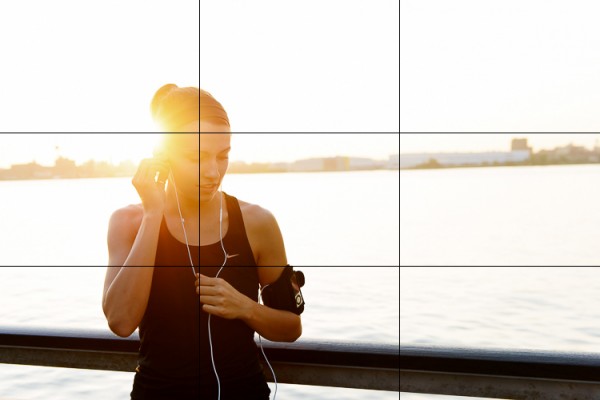
Über das Jahr hinweg habe ich bemerkt, wie entscheidend das Auftreten des Fotografen auf der Straße ist. Komme ich mit einer Riesenkamera auf Leute zu und mache unglaublich professionell wirkende Verrenkungen, kann ich das mit dem „unauffälligen“ Fotografieren vergessen.

Bin ich aber dezent schwarz angezogen und benehme mich so, als wäre ich wie jeder andere nur mal eben in der Stadt, werde ich fast nicht wahrgenommen. Kommt dann obendrauf noch eine Kamera ins Spiel, die als solche nicht profi-verdächtig aussieht, dann fühlen sich Menschen nicht bedroht. Sie verhalten sich natürlich.

Sunny © Martin Gommel

Das iPhone als solches ist für diesen Zweck perfekt. Es liegt gut in der Hand und es ist das Normalste auf der Welt, draufzugucken – schließlich machen das viele andere auch. Das Smartphone ist Teil unseres Aussehens geworden und wird daher nicht als Kamera identifiziert. Zumindest nicht in seiner primären Destination.

Und die ist in meinem Fall, Menschen so aufzunehmen, dass sie sich nicht des Bildes wegen in ihrer Gestalt und Mimik verändern. Denn es ist ein psychologisches Gesetz, dass wir uns, sobald wir wissen, dass uns jemand anschaut, verändern.

Und somit war schnell klar, dass ich nach meinem Projekt nicht mit der 5D wie zuvor in der Stadt fotografieren würde. Dahin gab es dann kein Zurück mehr.

Just a bit © Martin Gommel Pewpew  © Martin Gommel

Desweiteren habe ich im Bezug auf die Fotografier-App nach acht Monaten einen Wechsel vollzogen. So lange hatte ich mit ProCamera gearbeitet, doch als ich sah, was Camera+ kann, wollte ich dessen Vorzüge direkt nutzen.

Denn: In Camera+ ist es nicht nur möglich, die Belichtung getrennt von der Schärfe zu steuern, sondern auch getrennt zu speichern. Das heißt: Ich setze per Hand die Belichtung beispielsweise auf den Himmel, so wird das Bild insgesamt etwas dunkler und ich vermeide Ausrisse in den Spitzlichtern.

Dann speichere ich das auf dem kleinen Schloss-Icon, lasse das Fokus-Icon aber konstant offen. So habe ich immer die gleiche Helligkeit, kann aber dann vor Ort die Schärfe einfach dorthinsetzen, wo ich sie brauche. Beispielsweise auf das Gesicht eines Mannes oder auf eine Menschengruppe weiter hinten.

Sleep ©  Martin Gommel

Je länger ich die DSLR vergaß, desto weniger vermisste ich sie. Ich lernte, das iPhone einzusetzen, wo es einzusetzen ist. Doch das hatte viele Grenzen.

In komplexen Lichtsituationen? Nur vorgespeichertert mit Unterbelichtung. Nachts? Kaum. Jemanden beim Rennen fotografieren? Nur bei strahlender Sonne oder wenn ein Mitzieher gelingt. In Gebäuden Menschen fotografieren, ohne zu verwackeln? Nur bei hauseigener Beleuchtung. Im Winter Menschen halbwegs scharf fotografieren? Bei bedecktem Himmel keine Chance.

Zwar wurde mir in den Mund gelegt, dass ich mit dem Projekt beweisen wollte, dass die Ausrüstung völlig egal ist, aber eines ist klar: Wenn das iPhone abends nichts mehr erkennt, dann ist Ende Gelände. Nichts geht mehr.

Ich bin nach wie vor der Meinung, dass der ganze Technikkram in der Fotoszene komplett überbewertet ist und dem kollektiven Schwanzvergleich dient, aber egal ist die Technik für mich nicht. Beispiele?

Wenn es um die direkte Umsetzung spezifischer Vorstellungen geht, spielt die Technik insofern eine Rolle, dass sie einen Rahmen setzt. Und mit dem iPhone sind bestimme Dinge möglich, andere nicht. Ich kann gut auf der Straße Leute fotografieren, aber Hochzeitsfotos mit superkrassem Bokeh oder feindetaillierte Sport-Aufnahmen sind einfach nicht drin.

Auch, wenn es möglich ist, sich im Nachhinein mit diversen Apps wie tadaa zu helfen. Aber eine sensorbedingte Bewegungsunschärfe wird durch keine App zum knackscharfen Portrait, auf dem man die Härchen zählen kann. Das ergibt folgendes Szenario:

Die Tatsache, dass es sich beim iPhone um einen verhältnismäßig kleinen Sensor handelt (Technik), gibt vor, was ich mit der Kamera an Projekten und Genres (Kreativität) bedienen kann.

Und damit haben wir nur eine Variable im großen Apparaturkomplex behandelt. Ganz zu schweigen von der Bedienungssoftware über die Objektivqualität bis hin zur Abbildungsleistung. Und und und. So wäre es kompletter Bullshit, zu behaupten, dass jeder mit dem iPhone gute Bilder machen kann. Denn es kommt ganz auf das Einsatzgebiet und die Vorgaben an.

FernWärme  © Martin Gommel

Ich habe die Grenzen des iPhones ausgelotet und so viel herausgeholt, wie möglich. Heißt: Täglich raus auf die Straße und probieren, probieren, probieren. Und das macht – wenn man erst einmal den engen Rahmen akzeptiert hat – eine Menge Spaß. Denn so musste ich mir keine Gedanken darum machen, was alles in meine Fototasche müsste, denn das iPhone hatte ich sowieso stets dabei.

Kein Rumgeschleppe diverser Wechselobjektive und kein Speicherkartengefuddel. Eines nahm ich jedoch immer mit: Einen USB-Zusatzakku, der mir in vielen Situationen ermöglichte, weiter zu fotografieren.

Was habe ich also den Lesern zu sagen außer, dass es sich für mich gelohnt hat? Welche Erkenntnis des Projektes könnte auch anderen etwas bringen? Vielleicht eine: So, wie andere es als Genugtuung empfinden, analog zu fotografieren und damit gezwungen zu sein, über jedes Bild nachzudenken, so kann ich darauf schwören, dass die Begrenzung auf ein Minimum, und sei es das iPhone, viele, viele Vorteile mit sich bringt.

Wer schon exakt und auf den Pixel genau weiß, wohin die Reise gehen soll, kann getrost die Finger davon lassen. Wer jedoch noch nicht so genau weiß, wohin mit sich und der Kamera, darf das ja mal ausprobieren. Es muss ja nicht gleich ein ganzes Jahr sein.

~

Wenn ich mir nun diese Fotos so ansehe und mir bewusst wird, dass das iPhone-Projekt abgeschlossen ist, spüre ich Wehmut. Es war eine gute Zeit, auf die ich mit Stolz und Freude zurückschaue. Ich habe durch das Projekt einen ordentlichen Schub nach vorne bekommen und konnte im Genre der Straßenfotografie um einiges sattelfester werden.

Es folgt eine Auswahl der mir wichtigsten Fotos des vergangenen Jahres. Diese zu treffen war – wie zu erwarten – schwer, aber ich habe mich durch meine über 1000 finalen Fotos gewühlt und diese herausgesucht.

I love you  © Martin Gommel

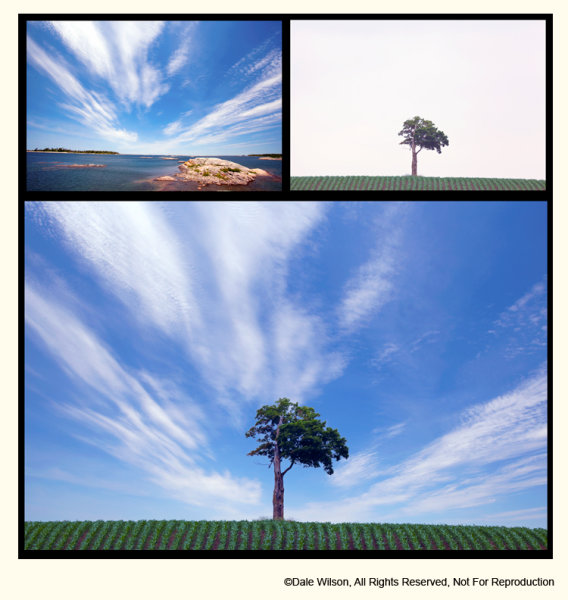
Aus meinem Experiment mit Langzeitbelichtungen. Nach wie vor eines meiner Favoriten und ich kann mir gut vorstellen, mal wieder so eine Reihe (nicht mit dem iPhone) zu fotografieren.

Speedyspeedy  © Martin Gommel

Family  © Martin Gommel

Dog  © Martin Gommel

Die beiden oberen Fotos stammen von einer Oldtimer-Parade, auf die ich zufällig hier in Karlsruhe stieß. Ich hatte Glück – und gutes Licht.

Cement  © Martin Gommel

The King  © Martin Gommel

Scratches  © Martin Gommel

This is a flower  © Martin Gommel

Eines meiner witzig-komischsten Fotos. Die Dame kratzte sich am Rücken und zeigte dabei ungewollt auf die Blume. Ich machte ein paar Fotos und entdeckte mein Glück erst später.

Phone  © Martin Gommel

Erm  © Martin Gommel

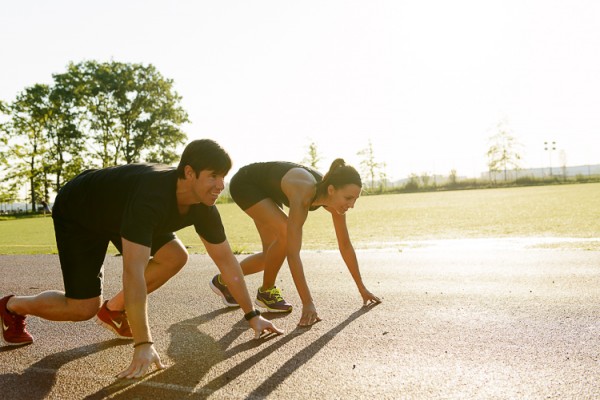
Noch einmal Glück: Der Betrachter wird hier irritiert, da der Arm mit den Blumen nicht zu dem muskolösen Mann gehört. Geplant war die Aufnahme nicht auf diese Weise, aber ich wollte die beiden irgendwie draufbekommen.

Oben gut drauf  © Martin Gommel

Merveille  © Martin Gommel Leggies  © Martin Gommel

OK!  © Martin Gommel

Open  © Martin Gommel

Diese Frau sah ich von Weitem irgendwie seltsam daherlaufen und machte mich bereit, ihrem komischen Gang mit einem Foto auf die Schliche zu kommen. Dass sie ihre Zehennägel auch noch in gleicher Farbe wie die Hose lackiert hatte, machte den Moment perfekt.

Music  © Martin Gommel

The Big One  © Martin Gommel

Taptap  © Martin Gommel

Phony  © Martin Gommel On a way  © Martin Gommel

Abfahrt  © Martin Gommel

Abo  © Martin Gommel

Urban Landscape  © Martin Gommel

Push  © Martin Gommel Daughter  © Martin Gommel

Meine Tochter stand im Hof, schaute nach oben zu mir. Ich war schon die Treppe hochgelaufen und machte auf gut Glück ein paar Aufnahmen. Eine davon gelang.

Flowers © Martin Gommel

Hurry  © Martin Gommel

Cigarette  © Martin Gommel Summer  © Martin Gommel

So. Und jetzt wird erst einmal fotografiert. Und zwar mit meiner „Neuen“, der Fuji x100s, die nach diesem Jahr Beschränkung eine wahre Traumkamera ist. Wer will, darf mir gern 
kwerfeldein – Fotografie Magazin

 
Comments Off on Ein Jahr iPhone statt Kamera

Posted in Equipment


3 Ways to Improve Your Images With Composition

16 Aug

Along with lighting, subject, perspective, composition is one of the fundamental tools to creating better images. It’s one of the easier ones to begin applying to your own photography as well. Here are a few tips on improving your composition, with examples from a recent fitness photo shoot.

Rule of Thirds

You’ve probably heard this one beat to death, but the rule of thirds is one of the fundamental keys in creating stronger compositions. It involves dividing an image into nine equal grids at the thirds. By placing your subject on the line of a third, or at the intersection of two thirds you’re following your eyes’ natural focus. We find photographs with the subject on one of these thirds simply more pleasing.

Take the below image for example, where this woman is placed on the left third line with the focus of her head near the top left third as well. It creates a more pleasing composition and gives the eye plenty of space to wander in the frame.

RuleofThirds

The rule of thirds isn’t a hard and fast rule and it’s often broken to great success, but that’s a topic you can find in many other posts. It’s a great starting point though to create stronger compositions.

1. Second Point of Interest

Applying the rule of thirds, you can now try adding a second point of interest into your images. Adding a secondary point, whether it’s out of focus in the background or in focus with a deep aperture landscape, gives your image a natural viewing progression. Your eye starts at the first focal subject and then moves along to the second.  Not only does this create more interest in your image, it can help reinforce a theme or perspective.

In this fitness image, the woman tying her shoe and preparing for a run is the clear focus of the image. Introducing a second runner in the background now creates another place for the eye to follow through the image. At the same time the “running” theme has been reinforced. Additional factors in leading the eye are; her gaze into the open space of the image, and the leading lines of the banister and concrete blocks.

MDP_5148-Edit

2. Room for Copy Space

If you ever have aspirations to shoot for advertising agencies and many editorials, learning to leave room for copy space is a must. Copy space is the negative area in an image where a brand will place their tag line, logo or product/information. Generally you want this negative space to not be too busy, so that the copy pops out. The effect can be achieved often by using a shallow focus in your images, or by simple ensuring there is a space without too much “busy-ness” in it. A nice open sky often works great in this regard.

In this shot there’s some clear head space in front of the two runners that works great for copy. An important thing to keep in mind though if you do end up applying these principles for a client, is how the images will be placed in publication. Will they be on a poster or against a store wall? Or across the pages of a magazine? This particular image might not work well across a double page spread, as it places the subjects’ heads right where the crease would be. Against a store wall it would work just fine. These are important placement ideas to keep in mind with copy space.

MDP_5190-Edit

3. Bringing It All Together

When you bring all three of these compositional elements into mind you can create a great image that not only holds interest, but appeals to the creative people who hire photographers (always a big plus). The image below is an example when all three work together. The subject is at one of the third grid lines, there’s a secondary point of interest in the background and room has been left below for copy space. When you keep all three elements in mind you’ll be on your way to creating stronger compositions.

EveryDayRun2

Post originally from: Digital Photography Tips.

Check out our more Photography Tips at Photography Tips for Beginners, Portrait Photography Tips and Wedding Photography Tips.

3 Ways to Improve Your Images With Composition


Digital Photography School

 
Comments Off on 3 Ways to Improve Your Images With Composition

Posted in Photography


Book of Cities: Rise & Fall of 10 Places Over 200 Years

16 Aug

[ By WebUrbanist in Design & Graphics & Branding. ]

book of cities infographic

We take it for granted that London and New York will grace the pages of books, but would you be surprised to learn that Madrid and Cairo were once as commonly referenced, or that Mumbai and Beijing are now two of the most popular cities capturing global imaginations?

city popularity infographic

Edgard Barbosa created this infographic (above) and other associated graphics (below) to explore the ebb and flow of famous cities in works of fiction and non-fiction alike.

city data in books

From its creator: “Books of Cities measures the quantity of books, written in the English language, that refers to 10 major cities in the world between 1800 and 2000 … it gives an overall idea of the amount of literature produced in each era about the same city.”

book of cities poster

The graphic covers London, New York City, Rome, Paris, Chicago, Tokyo, Madrid, Beijing, Mumbai, and Cairo, and shows how some cities, like Mumbai and Beijing, have recently hit the scene in a major way. Others, meanwhile, like London and NYC, have consistently attracted attention for much of the last few hundred years.

Share on Facebook


[ By WebUrbanist in Design & Graphics & Branding. ]

[ WebUrbanist | Archives | Galleries | Privacy | TOS ]


WebUrbanist

 
Comments Off on Book of Cities: Rise & Fall of 10 Places Over 200 Years

Posted in Creativity


Is that a Workshop, Tour or Seminar [Part III]

16 Aug

In part I and part II of this series we learned the photo workshop is typically one where the instructor concentrates on delivering an intense teaching/learning experience at a location conducive to enhancing that goal.  In comparison is the photo tour where the delivery is all about exotic or exciting locations with a photo tour leader putting you in the right place at the right time, and might provide minimal formal instruction.

Located somewhere between the tour and workshop is the photo seminar. More often than not the seminar combines the best attributes of the workshop and tour by providing numerous lecturers and presentations, from internationally recognized keynote speakers who augment acclaimed local and national professionals in various photography disciplines.

In 1994, I attended a 60-minute presentation where a digital artist explained that a new software called Adobe Photoshop would revolutionize the photography industry. My notes from that lecture said “alpha mask – change sky.”  I later learned how to do alpha masks and discovered that I need not sit and look out a window while it was raining. Nineteen years later there is little argument that Photoshop has changed our industry, and “masks” are one of the foundation tools every digital photographer must eventually learn.

In 1994, I attended a 60-minute presentation where a digital artist explained that a new software called Adobe Photoshop would revolutionize the photography industry. My notes from that lecture said “alpha mask – change sky.” I later learned how to do alpha masks and discovered that I need not sit and look out a window while it was raining. Nineteen years later there is little argument that Photoshop has changed our industry, and “masks” are one of the foundation tools every digital photographer must eventually learn.

The seminar is also sometimes referred to as a conference, but the crux of the event remains very much constant: numerous presenters under one roof presenting a variety of topics by experts in their field over several days at one venue.

Seminars are offered by both private enterprise as well as professional and amateur photography associations who also may open their doors to non-members.  In Canada the two most recognized national association conventions are hosted in different cities each year by the members of Professional Photographers of Canada (PPOC) and Canadian Association for Photographic Art (CAPA).  You can do a web search in your country of residence for professional associations such as Professional Photographers of America (PPA) or your national amateur chapter of Fedération Internationale de l’Art Photographique (FIAP).

Seminars are typically chock-a-block full of presenters offering a variety of topics and many also offer a slate of add-on field trips. It is not uncommon with the larger conventions to have 25, or more, presenters on a four day program which is augmented with a keynote presentation each evening.  Intensity is the key word with seminars.

A close cousin to the seminar is the non-degree granting photo school. The concept is very similar, the delivery is quite different.  Whereas in the seminar scenario participants are introduced to a variety of instructors, concepts and theories, the school typically places a classroom of students with one instructor for the entire time period.  Additionally, the school tends to be more about a mixture of theory and practical application, whereas the seminar tends to deliver concepts and ideas for individual exploration at a later time.

Each approach has their advantages and disadvantages. If you are seeking exposure to a variety of concepts and motivation the seminar might be the best approach. By comparison, if you are seeking to spend a lot of one-on-one time learning a particular technique or skill set the school might be the better choice.  Be aware, however, if you “hook-up” with a presenter in the seminar situation who has poor instructional technique you can find some solace that the next lecturer, an hour or so later, might be better.  In the school environment, however, if you have a poor instructor you will be less than satisfied over the duration of several days, a week, or even longer.  Be diligent and do your homework well; there are many great photographers who simply are not good at sharing their knowledge, skills or information for a variety of reasons.  As suggested in the opening of this series, there are instructors and then there are teachers – not all are truly teachers.

In summation we can generally draw to following conclusions:

Workshop:  Typically intense training with one instructor that includes field and formal classroom instruction with measureable outcomes. The location is secondary but supportive of the curriculum.

Photo Tour:  Location(s) is the key ingredient and instruction is minimal if at all. The tour leader is typically a well known photographer who should also be familiar with the locations and scope of the tour, be it cultural, wildlife, etc.

Seminar:  Typically a broad array of concepts, discussion and disciplines with a variety of presenters. It is about being introduced to new theories, approaches and motivation. They are typically shorter in duration with minimal practical application.

Post originally from: Digital Photography Tips.

Check out our more Photography Tips at Photography Tips for Beginners, Portrait Photography Tips and Wedding Photography Tips.

Is that a Workshop, Tour or Seminar [Part III]


Digital Photography School

 
Comments Off on Is that a Workshop, Tour or Seminar [Part III]

Posted in Photography


User experience: In-depth look at Canon EOS 70D’s Dual Pixel AF system

16 Aug

70Dnews1.jpg

Following last week’s update to the Canon EOS 70D preview, we’ve been spending a little more time with the camera to get a feel for its new Dual Pixel CMOS phase-detect autofocus system. What we’ve seen so far has impressed us: in live view the camera offers very responsive AF, eliminating the annoying focus seek we’ve seen in past models. We have a complete rundown, with samples, on how the Dual Pixel AF performs in both live view and movie mode, as well as a brief studio and low light analysis. Click through to read our review-in-progress.

News: Digital Photography Review (dpreview.com)

 
Comments Off on User experience: In-depth look at Canon EOS 70D’s Dual Pixel AF system

Posted in Uncategorized


Provence

16 Aug


As we prepare for a return trip to Provence, I will be posting photos from previous years. This one is my all time favourite. It captures for me the essence of Provence: the light, the textures, the colours and the simplicity.

. : LIGHT and SHADOW : .

 
Comments Off on Provence

Posted in Equipment


15. August 2013

15 Aug

Ein Beitrag von: Hennig Welslau

Hennig Welslau


kwerfeldein – Fotografie Magazin

 
Comments Off on 15. August 2013

Posted in Equipment


House Turned Inside Out: All Walls Cut, Flipped & Reattached

15 Aug

[ By WebUrbanist in Art & Installation & Sound. ]

inside out house project

An ambitious art project, the House Turned Inside Out peals away facades, those outer layers of mystery physically surrounding abandoned buildings, and reveals the internal structure. From floors, rooms and walls to hidden support elements, heating fixtures and more, innards are turned outward for the world to see.

building facade home turned

Artist Martin Papcún (images by Ryan Pearl) “gained access to [this] abandoned Cleveland house and then convinced a building contractor, many volunteers, and city officials to allow him to alter the structure so that all of the interior walls were physically on the exterior of the house.”

inside building flip idea

One by one, each building face was carefully cut, rotated 180 degrees with the help of volunteers and a crane, then slotted back into the same place, just in reverse.

inside wall cut paste

Dilapidated, disused and ultimately deserted, the subject structure was reanimated in both a literal and twisted sense, like an architectural corpse come back to life. It is lit up at night, but the lights shift between rooms as if the house were still occupied.

Next Page:
House Turned Inside Out All Walls Cut Flipped Reattached

Share on Facebook


[ By WebUrbanist in Art & Installation & Sound. ]

[ WebUrbanist | Archives | Galleries | Privacy | TOS ]


WebUrbanist

 
Comments Off on House Turned Inside Out: All Walls Cut, Flipped & Reattached

Posted in Creativity


Exposure: Jason van Genderen on ‘pocket filmmaking’

15 Aug

920.png

Sometimes, the best thing that you can do creatively is to give yourself limitations. For filmmaker Jason van Genderen, that meant putting down his camera and picking up his smartphone. Van Genderen prides himself on being a ‘pocket filmmaker.’ Living in Terrigal, Austrailia, van Genderen spends his days running a creative agency and whenever he gets a chance, he uses smartphones to create films. We spoke to van Genderen about his experience using the Lumia 920 for filmmaking. Click through to read the full interview on connect.dpreview.com.

News: Digital Photography Review (dpreview.com)

 
Comments Off on Exposure: Jason van Genderen on ‘pocket filmmaking’

Posted in Uncategorized


On Assignment: Radiance

15 Aug

"What should I wear?" asked Funlayo Alabi when we were touching base the day before I was to photograph her for the Howard County EDA.

"A white shirt if you have one," I said, wanting to distill the photo and feature her skin given she that she runs a boutique beauty products company.

Twenty years ago I might have said, "anything but white." But the more you work with lighting, the easier it is for you to control not only the contrast range but also the specific tone of a person's skin.

Even darker skin against a white shirt.

Read more »
Strobist

 
Comments Off on On Assignment: Radiance

Posted in Photography