RSS
 

Archive for August, 2013

Add Impact to Your Photos by Including Shadows

17 Aug

In music they say the spaces between the notes are just as important as the notes themselves. Similarly in photography, it can be the spaces that are not in the light that add impact to an image.

Imperial Sand Dunes, California by Anne McKinnell

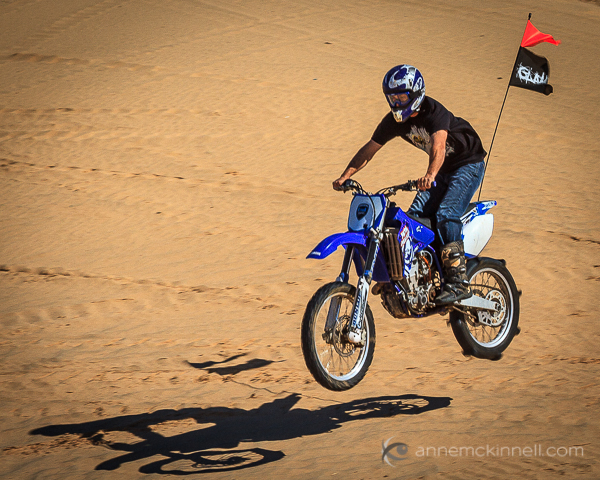
If it were not for the shadow cast by the dirt bike, it might be difficult to tell it was off the ground.

Shadows help tell a story and enhance the mood and visual power of a photograph. In fact, they can be so interesting, that they “overshadow” the subject itself!

By focussing your attention on the shadows, you can create beautiful compositions full of contrast, form, and minimalist simplicity. An object and its shadow will strengthen each other. Sometimes you might even want to cut the object out entirely, and play with capturing only the interesting shadows that are cast by it.

A small plant and it's shadow by Anne McKinnell

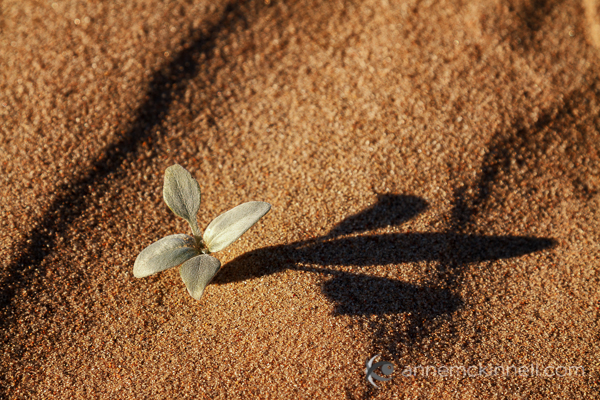
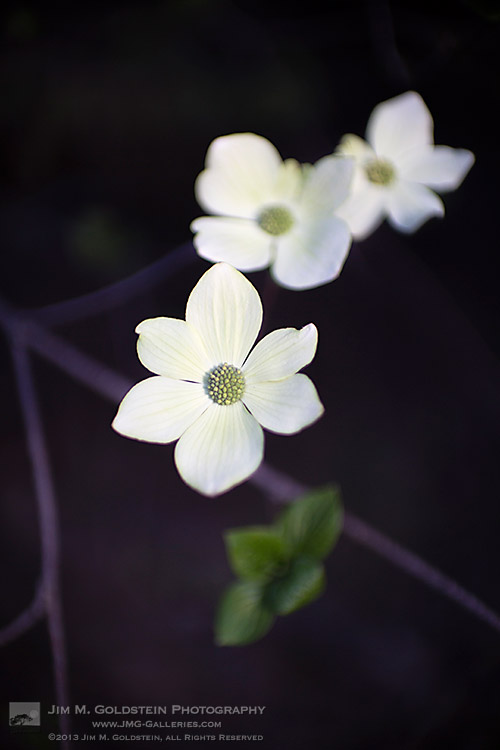
In this image of a small plant, it is really the shadow that is the main subject for the image would have very little interest without it.

Photographing shadows works best with strong, simple shapes that make interesting graphic designs such as flowers, sharp lines, or even human beings. After all, who hasn’t taken a picture of their own shadow as it stretches out across the sidewalk in front of them?

You can use shadows compositionally the same way you would use any other element in the scene: as leading lines, patterns, curves that guide the eye into the scene or to create a balance of negative and positive space.

Sandstone blocks and shadows by Anne McKinnell

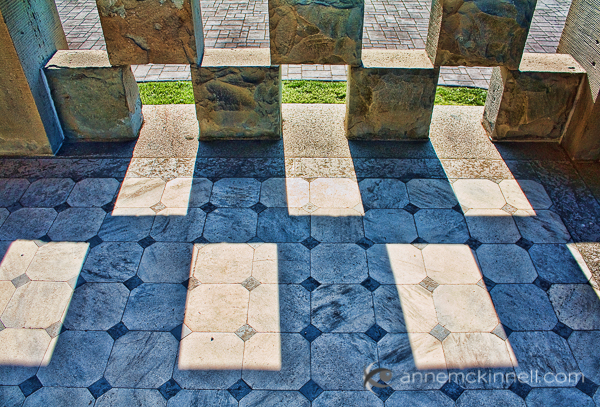
Look for patterns created by shadows. Here, an interesting pattern is formed by the sandstone blocks and their shadows.

Exposing for the Shadows

If you put your camera on an automatic mode (even aperture or shutter priority mode) and try to photograph a shadow, it’ll probably come out too light. This is, after all, what cameras are designed to do – expose with enough brightness to see detail. Of course, this isn’t always what we want, and shadows are a prime example of when you need to manually change your exposure to make sure the shadow remains in darkness.

There are a few ways that this can be done:

  • Set your camera to manual mode. This is for advanced photographers. On manual mode, you’re responsible for setting your aperture, shutter speed, and ISO value. If you’re not sure what settings to use, you can copy them from the values on your auto setting and then tweak them as you go.
  • Use EV compensation. If you take a shot and see on the LCD screen that it is too bright, you can simply locate the camera’s EV (exposure value) compensation button. Almost every camera will have one, even point-and-shoots and camera phones; it is denoted by a square with a (+/-) symbol. Using that, you can simply turn the exposure up or down to be brighter or darker, as you see fit, and if you’re using live view it will probably render directly in the display. If the shadows come up too bright, just lower the exposure compensation a little to deepen them.
The El Prado Pedestrian Walkway, Balboa Park, San Diego, California, by Anne McKinnell

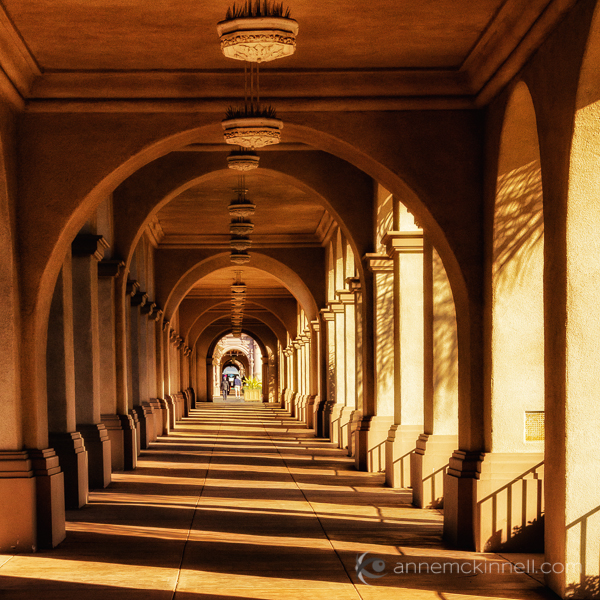
Late afternoon sidelight created a pattern, an interesting repetition of lines, in this arcade.

  • Lock down your exposure. If you have a DSLR, it probably has an exposure lock feature, though it may need to be configured in the camera’s menu. Using exposure lock, you can fill your frame with the part of your scene that’s not in shadow – or else some well-lit mid-tone – and let your automatic exposure calculate for that. Then you lock it in by pressing the AE-L (auto-exposure lock) button on your camera. This will freeze the settings as they are, so you can recompose the image to include the shadow and the camera won’t re-calculate and brighten the exposure to account for them. This way, you’ll get perfectly exposed highlights and deep shadows. Alternatively, you can simply note the settings, dial them in to manual mode, and bypass the exposure lock altogether.
  • Bracket your shot. When you bracket your image, you take several shots at different exposures. Mid-range cameras and higher will have this feature built in – it might feature a dedicated BKT button, or the option might be available in the menu. If so, you’ll be able to select how many pictures to take and how many stops of difference between them. This makes it simple to take three exposures, for example, one with the exposure the camera thinks is correct, one underexposed by one stop and one overexposed by one stop. If this feature is not available, it can be achieved through changing the settings in manual mode, or by taking several shots with different EV compensations.
Imperial Sand Dunes, California by Anne McKinnell

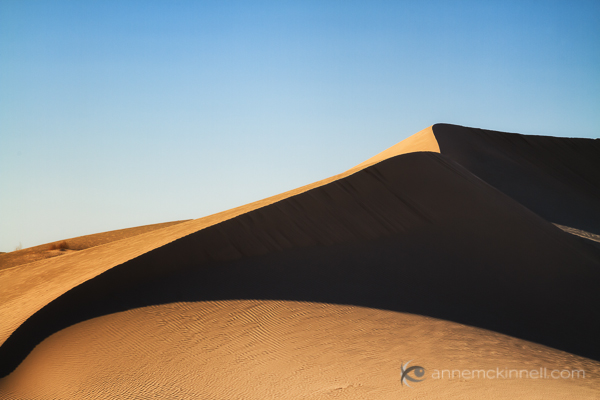
In this image of a sand dune, the shadow adds form to the dune and creates a strong and balancing line in the image. I made this image mid-afternoon during a scouting trip. It turned out much better than the image I made of the same location later in the day when the right side of the dune was entirely in shadow.

Next time you’re out shooting, make a point of noticing the shapes of the shadows. Challenge yourself to actively use them to create mood, to add dimension to your subject, or to take center stage in a creatively crafted composition.

Post originally from: Digital Photography Tips.

Check out our more Photography Tips at Photography Tips for Beginners, Portrait Photography Tips and Wedding Photography Tips.

Add Impact to Your Photos by Including Shadows


Digital Photography School

 
Comments Off on Add Impact to Your Photos by Including Shadows

Posted in Photography


Secondary Point of Interest: Weekly Photography Challenge

17 Aug

Earlier this week we published a post on composition of images in which author Matt Dutile introduced the concept of adding a second point of interest to your photos to give your image a natural viewing progression.

Adding a secondary point of interest can not only add more interest in your image but reinforce a theme or perspective argues Matt.

NewImage

A number of people commented that they’d not considered this technique before so we thought this might be a fun weekly challenge – taking photos that not only have a single point of interest – but which have a second one.

Check out Matt’s post and then head out with your camera to practice the technique.

Once you’ve taken your ’2nd Point of Interest’ photos upload your best ones to your favourite photo sharing site either share a link to them even better – embed them in the comments using the our new tool to do so.

If you tag your photos on Flickr, Instagram, Twitter or other sites with Tagging tag them as #DPS2NDINTEREST to help others find them. Linking back to this page might also help others know what you’re doing so that they can share in the fun.

Also – don’t forget to check out some of the great shots posted in last weeks Black and White Landscapes challenge – there were some great shots submitted.

Post originally from: Digital Photography Tips.

Check out our more Photography Tips at Photography Tips for Beginners, Portrait Photography Tips and Wedding Photography Tips.

Secondary Point of Interest: Weekly Photography Challenge


Digital Photography School

 
Comments Off on Secondary Point of Interest: Weekly Photography Challenge

Posted in Photography


Bolivian airline’s demise documented in haunting photos

17 Aug

Ezekiel3.jpg

Photographer Nick Ballon stumbled across the Lloyd Aero Boliviano headquarters on an annual trip to Bolivia. He was captivated by the expansive property and dilapidated buildings he saw, and his curiosity sparked a photo series and collaboration with Bolivian writer Amaru Villanueva Rance. Six months exploring the grounds, talking with employees and researching the long history of the dying airline has resulted in a stunning photo series and a book called Ezekiel 36:36. Click through for a glimpse into the L.A.B. 

News: Digital Photography Review (dpreview.com)

 
Comments Off on Bolivian airline’s demise documented in haunting photos

Posted in Uncategorized


Augenschmaus: Wiener Apfeltorte

16 Aug

Ein Beitrag von: Isabelle

Bei Apfelkuchen bin ich ganz gegen meine sonstige Gewohnheit gar nicht experimentierfreudig und backe seit Jahren immer den gleichen „Apfelkuchen sehr fein“ aus dem Backbuch von Dr. Oetker. Aber jetzt hat die Eintönigkeit an der Apfelkuchenfront ein Ende: Mit dieser Wiener Apfeltorte.

Buttriger Mürbeteig. Saftige Äpfelchen in leichter Creme. Gekrönt von knusprigen Mandelblättchen. Mmmmmh. Ein ganz feines Kaffeehaustörtchen für wunderbare Anlässe. Anlässe wie Geburtstage, Taufen, Konfirmationen, Kommunionen, Bar Mitzwas, Kaffeeklatsch, Liebeskummer, Ferienbeginn oder schlicht und einfach Kuchenhunger. Oder für jeden anderen Anlass, der Euch so einfällt.

Erst waren hier alle ein bißchen skeptisch. Ein anderer Apfelkuchen? Warum? Weshalb? Muss das sein? Aber jetzt sind alle ganz verliebt in das köstliche Törtchen. Ein richtiger kleiner Glücklichmacher. Und wisst Ihr, was das Beste am Sonntagskuchen ist? Wenn man ihn am Sonntag gar nicht essen kann (weil man zu spät mit dem Backen angefangen hat) und man ihn dafür die ganze Woche im Büro in der Frühstückspause genießen darf.

© Isabelle, Applewood House© Isabelle, Applewood House

Portionen: 1 Kuchen
Zeit: ca. 2 Stunden, davon aktiv zu tun ca. 30 Minuten

Zutaten

Für den Mürbeteig:

100 g Zucker
1 Pk. Vanillezucker
125 g Butter
1 Ei
1 Prise Salz
1 TL Backpulver
200 g Mehl
etwas Mehl zum Ausrollen

Für den Belag:

1 kg Äpfel
250 g Sahne
150 g Butter
125 g Zucker
1 Zitrone (Bio)
1 Ei

100 g Mandelblättchen
1 EL Zucker

 
Zubereitung

Alle Zutaten für den Mürbeteig verkneten. Den glatten Teig zu einer Kugel formen und für eine Stunde kaltstellen. Den Boden der Springform mit Backpapier auslegen. Den Teig ausrollen und Boden und Rand der Form damit auskleiden.

Die Zitrone waschen und die Schale fein reiben. Sahne steifschlagen. Die Äpfel schälen, das Kerngehäuse entfernen und grob würfeln. Auf dem Teigboden verteilen. Zucker und Butter schaumig rühren. Zitronenschale und das Ei hinzufügen, gut verrühren. Die Schlagsahne unterheben und die ganze Masse auf die Äpfel geben.

Die Mandelblättchen und den Esslöffel Zucker mischen und über den Kuchen verteilen.

Bei 160°C (Heißluft) ca. 80 – 90 Minuten backen. Ggf. zwischendurch mit Alufolie abdecken. Anschließend gut auskühlen lassen, die Füllung ist erst nach mehreren Stunden optimal fest.

© Isabelle, Applewood House© Isabelle, Applewood House

Fotorezept:

Mit Wien assoziiere ich gleich ein gewisses Kaffeehausflair, also kam nur der feine geblümte Kuchenteller mit dem Goldrand vom Flohmarkt auf einem weißen Tischchen in Frage. Rechts befand sich ein bodentiefes Nord-Fenster mit feinstem diffusen Tageslicht, links stand ein silberner Reflektor. Fotografiert habe ich mit einer Canon 5D MarkII und einem Canon EF 100mm f/2.8 Macro USM Objektiv mit ganz offener Blende und einer Verschlusszeit von 1/125 für eine ganz geringe Tiefenschärfe und einen Hauch von Leichtigkeit.

~

Du hast auch ein leckeres Rezept und die passenden Food-Fotos dazu, die einem das Wasser im Munde zusammenlaufen lassen? Dann werde einfach selbst Teil von „Augenschmaus“!


kwerfeldein – Fotografie Magazin

 
Comments Off on Augenschmaus: Wiener Apfeltorte

Posted in Equipment


Crack the Code in London Street Art Created for Tech Fest

16 Aug

[ By Steph in Art & Street Art & Graffiti. ]

Campus Party Street Art Code

If you’re among the attendees of international technology festival Campus Party, which will take place during the first week of September in London, you have a much better chance of cracking the codes featured in a new series of street art than the average passerby. The murals were commissioned by the festival in celebration of the 75th anniversary of the Government Code and Cypher Schools team, which broke the Enigma code.

Campus Party Street Art Code 2

Each freehand painting features the face of a code developer, including Alan Turing, Samuel Morse and Tim Berners-Lee, along with a code. Onlookers are challenged to break the code, and anyone who successfully does so can enter it into a special location on the Campus Party website for a chance to win two tickets to the event.

Campus Party Street Art Code 3

“Mixing raw graffiti with complex binary decimals, these visual contradictions are set to spring up in London, Manchester and Birmingham as we work our way towards the launch of Campus Party at The O2 on September 2nd,” say the organizers.

Campus Party Street Art Code 4

Other forms of code that have popped up in street art include QR codes for digital nomads, binary and other ‘geekfiti‘, and, of course, traditional ‘hoboglyphs.’

Share on Facebook


[ By Steph in Art & Street Art & Graffiti. ]

[ WebUrbanist | Archives | Galleries | Privacy | TOS ]


WebUrbanist

 
Comments Off on Crack the Code in London Street Art Created for Tech Fest

Posted in Creativity


ThinkTank introduces TurnStyle sling bag

16 Aug

turnstyle.JPG

ThinkTank has announced a new sling-style camera bag. Called the TurnStyle, it’s available in three different models, the smallest of which is targeted to mirrorless camera owners. TurnStyle 5 is designed to hold a mirrorless body and up to four lenses. ThinkTank claims the larger TurnStyle 10 and TurnStyle 20 will hold a standard DSLR body and up to three and four lenses, respectively. All three are built with weather-resistant materials and include a rain cover. Click through for details.

News: Digital Photography Review (dpreview.com)

 
Comments Off on ThinkTank introduces TurnStyle sling bag

Posted in Uncategorized


What The Duck #1427

16 Aug

wtdlogo_big.jpg

We’ve been fans of Aaron Johnson’s comic strip ‘What the Duck’ for years. ‘WTD’ is one of the best satirical comic strips in the world, and it’s published here every week, as well as being included in our weekly newsletter. Barbed, topical and always amusing, we hope you enjoy WTD as much as we do. 

News: Digital Photography Review (dpreview.com)

 
Comments Off on What The Duck #1427

Posted in Uncategorized


16 August, 2013 – The Life and Times of Mark Stothard

16 Aug

Today we begin a new series of articles which will feature write-ups, interviews and videos about excellent photographers that Kevin and Michael have met in their travels around the world.

These are not famous people, and you likely heavn’t heard of them. Many are unpublished. But they are fascinating, talented, hard working, and probably like you, passionate about their photography.

We begin the series with Mark Stothard, from Australia.

"Having been to Antarctica with Michael and Kevin, I would say after having traveled the world and shot nearly my entire life as an exhibiting photographer,  it was one of my highlights in my life and I talk about it, all the time.  The images and experience of seeing something visionary and nearly extinct from the world, to see and experience the wildlife and scenery that does not fear humans is amazing.  The images I shot there won me two Smithsonian awards and nearly 18 other international awards". – Tim Wolcott

 Find Out More Now
These Expeditions Will Sell Out Quickly. They Always Do

 Find Out More Now


The Luminous Landscape – What’s New

 
Comments Off on 16 August, 2013 – The Life and Times of Mark Stothard

Posted in News


Dogwoods, Yosemite National Park

16 Aug
Dogwoods, Yosemite National Park

Dogwoods, Yosemite National Park

“To love beauty is to see light.” – Victor Hugo

This Victor Hugo quote in its original context had nothing to do with photography, but it is quite appropriate to photographers and those who love photography. Not only does nature photography revolve around the art of light and seeing, much to Hugo’s original intent, beauty inspires and gives us hope. One of the  many reason I enjoy photography and share it with others.

Photo Details:

Canon 5D Mark III, Canon 50mm f/1.0 at f/1.0, ISO 320, at 1/3200/sec

Copyright Jim M. Goldstein, All Rights Reserved

Dogwoods, Yosemite National Park

The post Dogwoods, Yosemite National Park appeared first on JMG-Galleries – Landscape, Nature & Travel Photography.


Related Stories

  • Dogwoods, Yosemite National Park – Enclosure
  • Quiet of the Fog
  • Quiet of the Fog – Enclosure
Feed Ads by FeedBlitz
powered by ad choices


JMG-Galleries

 
Comments Off on Dogwoods, Yosemite National Park

Posted in Equipment


The Intrepid Landscape Photographer’s Guide to Bag Packing

16 Aug

Landscape photography is a lot like fishing: There are good days and there are bad days…sometimes the weather isn’t on your side…. Other times it is…. You can wait around for hours and come away with nothing, or sometimes you end up with too much to carry! One thing is definitely certain: The better prepared your kit is prior to Continue Reading

The post The Intrepid Landscape Photographer’s Guide to Bag Packing appeared first on Photodoto.


Photodoto

 
Comments Off on The Intrepid Landscape Photographer’s Guide to Bag Packing

Posted in Photography