Ein Beitrag von: Christian Richter

kwerfeldein – Fotografie Magazin

World War II and Depression-era America was mostly documented in black and white. That’s color photos of the time belonging to the Library of Congress is so engrossing. Shot in color at the same time as more widely recognized black-and-white photos, these images offer a vivid look into American life in 30’s and 40’s. We’ve picked a few favorites of the more than 1500 images total contained within the Library of Congress’ Flickr account.
News: Digital Photography Review (dpreview.com)

Printing in 3D is in the news a lot lately, but applications are usually limited to industrial prototypes. A company called Captured Dimensions has a different use for this technology. They’ve rigged 60 DSLRs in a 360-degree array to capture 3D portraits. The likeness is then printed using a substance containing gypsum powder, resulting in a 3D sculpture of 1/12 to 1/5 scale. Ready for your 3D closeup? Click through for more details (including how much it’ll set you back).
News: Digital Photography Review (dpreview.com)
In unseren Bücherschränken verstecken sich eine Menge verdammt guter Fotobände. Leider nimmt man diese viel zu selten zur Hand. Das haben wir nun geändert. Seit Anfang August präsentieren wir Euch zwei Mal in der Woche zu später Stunde, den Blickfang.
Fotospecial: Perspektivwechsel
Flickr


500px


Deutschsprachig
• Alessio Pizzicannella ist der offizielle Fotograf des Filmfestival Locarno und berichtet in einem Interview über seine Arbeit.
• Ein Video der Sendung ttt über den Fotografen Jimmy Nelson kann man hier nachsehen. Seine inszenierten Bilder indigener Völker sind sehr beeindruckend.
• Einen ausführlichen Artikel zum Thema Fotografie auf dem Kunstmarkt haben wir auf Zeit Online entdeckt.
• Zeit Online zeigt auch die Luftaufnahmen deutscher Städte des Fotografen Gerhard Launer. Meisterhaft musterhaft.
• Stern.de zeigt 12 Bilder aus Nordkorea vom Fotograf Jason Lee.
International
• Fong Qi Weis „Time is a Dimension“ bringt den Faktor Zeit ins gedruckte Bild. Wie? Schaut selbst.
• Brian Sokol fotografierte Flüchtlinge mit ihrem kostbarsten Besitz. Sehr beeindruckende Serie.
• James Sebright war vor dem Krieg in Syrien und hat dort die freundliche Stimmung des Landes dokumentiert.
• In Nigeria sind Hochzeiten nicht privat, sondern öffentlich. Glenna Gordon hat eine davon dokumentiert.
• Ana Carolina Fernandes lebte zwei Jahre unter Transvestiten in Rio de Janeiro – ihre Fotos sind schön und intensiv zugleich.
• Olivier Duong war süchtig. Wonach? Nach Kameras. Und hier schrieb er sich seinen Frust von der Seele.
• Jeff Jacobson, ehemaliger Magnum-Fotograf, spricht hier über die Entstehung seines einzigartigen Stiles – und seiner Traurigkeit, als Kodachrome eingestellt wurde.
• Martin Parr sagt, dass viele Menschen eigentlich die falschen Urlaubsfotos machen.
• David Harriman fotografierte illegale Einwanderer, die zurück nach Mexiko abgeschoben werden sollten, an deren Tiefpunkt.
• Sehr einfühlsame Fotos zum Thema Übergewicht gibt es von Abbie Trayler Smith.
Neuerscheinungen und Tipps vom Foto-Büchermarkt

• Einmal den tollen Bildband „Rainbox Transit“* von Per-Anders Pettersson über Südafrika durchgeblättert bekommen? Bitteschön.
• Für Martin ein absolutes Muss: Die von Elliot Erwitt* selbst ausgewählten und von ihm als „die Besten“ deklarierten Aufnahmen. Zwar kein Hardcover, aber mit vollflächig bedruckten 30 cm ein Hingucker.
Wettbewerbe
• Für den Felix Schoeller Photo Award kann man sich noch bis Ende des Monats anmelden. Jeder Teilnehmer kann seine Arbeiten in bis zu fünf Kategorien einreichen: Portrait, Landschaft/Natur, Architektur/Industrie, Foto-Journalismus/Editorial und Freie/konzeptionelle Fotografie. Pro Arbeit sollen die Teilnehmer mindestens drei, maximal aber fünf Motive einreichen.
Videos
Zeitraffer scheint das beste Mittel zu sein, um das Gewusel von New York Citys Midtown wiederzugeben. Das Video entstand aus nicht weniger als 50.000 Einzelbildern.
Ein Blick über der Tellerrand eröffnet uns Kreativität auf allerhöchstem Level. Selbst der Abspann des Skate-Videos ist unglaublich schön.
Ausstellungen
Die nackte Wahrheit und anderes – Aktfotografie um 1900
Zeit: 03. Mai bis 25. August 2013
Ort: Museum für Fotografie, Berlin
Link
9 Blinkwinkel – Abschlussarbeiten der IMAGO-Fotoklasse 32
Zeit: 17. August – 14. September 2013
Ort: imago fotokunst • Linienstraße 145 • 10115 Berlin
Link
Götz Schleser – Politische Porträts
Zeit: 22. August – 10. Oktober 2013
Ort: FREELENS Galerie, Steinhöft 5, 20459 Hamburg
Link
“I’m not afraid of anything”. Porträts junger Europäer
Zeit: 2. August 2013 – 27. April 2014
Ort: Museum Europäischer Kulturen, Berlin
Link
Mehr aktuelle Ausstellungen
* Das ist ein Affiliate-Link zu Amazon. Wenn Ihr darüber etwas bestellt, erhalten wir eine kleine Provision, Ihr bezahlt aber keinen Cent mehr.
kwerfeldein – Fotografie Magazin
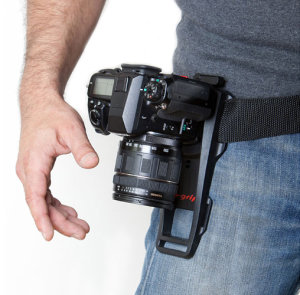
The B-Grip (short for “belt grip”) is a way to carry your camera on a belt, rather than around your neck. The camera is carried around in the holster with a quick release plate that’s easily accessed when you’re ready to shoot. It’s best paired with the hand strap also available, and it is this pair which I was sent for review by a local reseller. I tested this grip out on the busy weekend of an anime convention which I attend every year and usually take about 1000 photos a day for each of the two days. For Saturday I used the B-Grip. For Sunday I switched back to my preferred strap, a Sun Sniper strap. This way I was able to get a good comparison of the two.

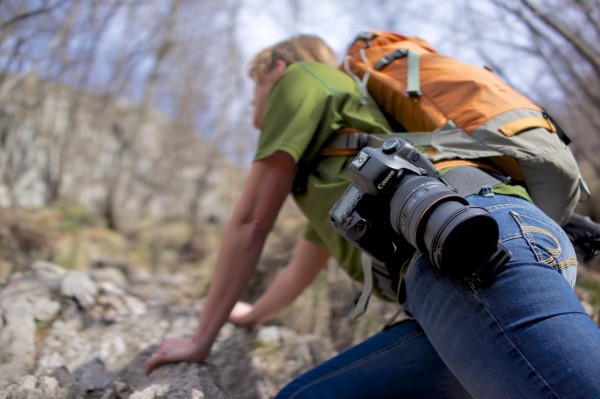
If you regularly find yourself in a situation where you carry your camera with you and stop for occasional shots, or have to have your camera secure without the possibility of it swinging around, the B-grip is a great solution. You can pick one up at Protog.
If you’d like to see early impressions and photos from other camera gear that I’m reviewing, pop over to Facebook and like my page. I post that kind of thing regularly!
Post originally from: Digital Photography Tips.
Check out our more Photography Tips at Photography Tips for Beginners, Portrait Photography Tips and Wedding Photography Tips.
B-Grip Camera Holster Review
I received two new cameras for testing recently, the Panasonic GX7 and the Panasonic FX70. The GX7 is coming with me to Mexico on vacation this week, and I’ll be putting it through its paces there with a variety of lenses, shooting both stills and video.
My review of Panasonic’s latest superzoom, the FZ70 is now online.
"Having been to Antarctica with Michael and Kevin, I would say after having traveled the world and shot nearly my entire life as an exhibiting photographer, it was one of my highlights in my life and I talk about it, all the time. The images and experience of seeing something visionary and nearly extinct from the world, to see and experience the wildlife and scenery that does not fear humans is amazing. The images I shot there won me two Smithsonian awards and nearly 18 other international awards". – Tim Wolcott
Find Out More Now
These Expeditions Will Sell Out Quickly. They Always Do

…
The Luminous Landscape – What’s New
[ By WebUrbanist in Art & Photography & Video. ]

Without proof, it makes for a tough sell – what looks like four photographs arranged into a square is indeed a single shot, meticulously staged, as only accompanying images and videos will convince.

Bela Borsodi created and photographed the scene for use as an album cover. And while it is still hard to trick your mind into seeing the reality of the overlap, there are subtle cues – certain objects that span multiple quadrants and lead the eye between them. The animation below shows the stages of setup and construction in a kind of stop-motion animation format.

About the artist: “Bela Borsodi was born in Vienna 1966. After studying graphic design and fine art he started to work as a photographer. In 1992 Bela moved to New York and in 1999 he focused on still life photography, which is still the main direction of his work. Bela lives and works in New York.” He has worked for editorial clients including The New York Times and Wired Magazine and advertising clients including Hermes, Puma, Nike and Freitag.
![]()


[ WebUrbanist | Archives | Galleries | Privacy | TOS ]
![]()
     |
Wouldn’t it be nice to make money doing something you love – even if it were just enough to cover the costs of that hobby?
I’m going to share with you four ways that I have personally used to try and make money as a photographer. I’ll share with you my experience with each, advice on getting started, and whether or not I was successful in my attempts. I’ve also found a few more posts on DPS that will help you find more information on a few of these topics if they peak your interest.
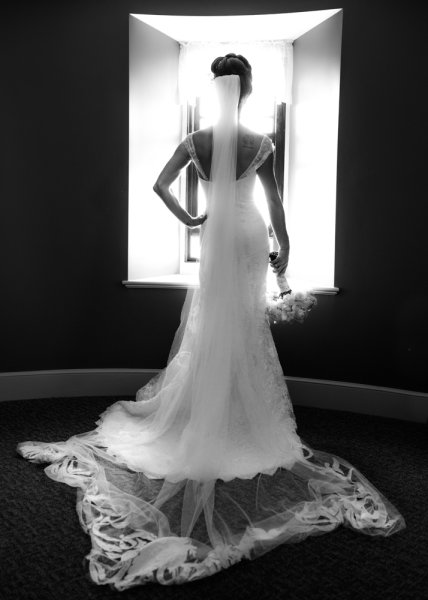
Wedding photography is probably one of the more profitable ventures – I know for me even having only photographed one wedding I’ve made more in that one day than the other three methods I’ve tried combined. It has a relatively low cost to entry and if you’re lucky enough to be in or know a lot of people in their early to mid 20s you have a pontential gold mine of a client base to tap.
I recently was asked to photograph my sister’s friend’s wedding and after some convicing I finally said yes. Instantly I felt the pressure of the task before me. Even though I had nearly a year to prepare before the big day it still felt like I had a mountian to climb. Now I’d suggest that if you don’t feel this pressure when you’re about to photograph your first wedding then you probably shouldn’t be photographing a wedding. It was this pressure that pushed me to get help and make sure that I did the best I possibly could with the experience that I had.
Four words of advice if you’re going to try breaking into wedding photography
These are four of the most important ways to get started in wedding photography, but by no means is an exhaustive list of wedding photography tips. Here’s the first post in a great series here on DPS about wedding photography for more information.

Okay so the global economy is still pretty much in the ICU, but things are starting to look a little better right? After all the housing market is slowly starting to come back to life and as it does there’s an opportunity here for a photographer to make some money on the side photographing interior and exterior shots for real estate agents to use in order to sell the house.
I’ve only done this once and I wasn’t even really looking towards this as an option, but out of the blue a real estate agent who helped me buy my house contacted me after seeing the photographs I share on Facebook and asked if I’d be interested – I agreed to give it a shot.
Again – don’t fall for the working for experience line here if you’re serious about making money the worst thing you can do is start out giving your time away for free so come up with a price and stick with it. The going rate for real estate photography is going to change based on region so you might want to see if you can find local rates in your area.
A Couple Ideas for Pricing Your Real Estate Shoot
The best part about this type of photography is you don’t really need too much gear. A DSLR, a wide-angle lens and a tripod will go a long way. Here’s a post with a bunch of DPS reader comments on the subject of entering the real estate photography business if you’re interested in more information.
I’ll be honest here and tell you that I’ve only given stock photography a very half hearted attempt. I signed up for one of the many agencies out there and submitted a handful of my photographs – they didn’t sell – and I gave up.
It’s a very hard industry to break into if you’re just starting out because the agencies typically will feature popular photographer’s work first. One point I’d like to make is that you have to keep in mind that the photographs people are looking for are ones that will help them sell a product or service to their clients and therefore you have to think about that when you take your photos.
Just because I failed at selling anything through a stock agency doesn’t mean it’s not a good source of income for you. After all there are people out there who make good money with stock photography and that’s the main reason I chose to include it in this post.
So if you’d like to know more about getting into stock photography read this article on DPS it’s much more involved than what I’ve gone over here.
Fine art photography is probably the most competitive and most difficult avenue to break into due to the fact that the market is saturated with photographers trying to sell their photography and the fact that wall space is limited (we all only have four walls in each room to hang photographs on and typically we want those photographs to mean something to us).
Key Points to Think About as You Get Started
Ways To Sell Your Photography
Okay so now that we’ve gone over some of the basics of what you’ll need to do before you even begin to sell your photography how do you actually go about selling it?
Are you making money with your photography? If so are you using one of the options listed above or do you do something else? Share below!
Post originally from: Digital Photography Tips.
Check out our more Photography Tips at Photography Tips for Beginners, Portrait Photography Tips and Wedding Photography Tips.
4 Ways To Make Money As A Photographer
Ein Beitrag von: Kilian Schönberger
Im heutigen Beitrag zur Serie „Fotogenes Deutschland“ möchte ich Euch das Dreiländereck Deutschland – Tschechien – Österreich vorstellen. Als natürliche „Fortsetzung“ des Nationalparks Bayerischer Wald liegt es im äußersten Südosten Bayerns. Das Gebiet gehört vollständig zum Landkreis Freyung-Grafenau und liegt etwa 50 km nordöstlich von Passau.
Die Landschaft des Dreiländerecks Bayerischer Wald findet ihre Fortsetzung im tschechischen Nationalpark Sumava (Böhmerwald) und im Nordwaldkamm des oberösterreichischen Mühlviertels. Die dominantesten Berge auf deutscher Seite sind der von bizarren Granitklippen gekrönte 1.312 m hohe Dreisessel und der 1.167 m hohe Haidel mit seinem Aussichtsturm.
In den letzten Jahrzehnten hörte man häufig vom Waldsterben im Nationalpark Bayerischer Wald. Auch das hier vorgestellte Gebiet blieb von Stürmen und Borkenkäfern nicht verschont. Erst langsam wächst heute wieder ein junger artenreicher Bergmischwald zwischen den bleichen Baumgerippen der ehemaligen Fichtenwälder nach. Beste Bedingungen für Landschaftsfotografen, die gern mal den Blick bis zum Horizont schweifen lassen: Durch den abgestorbenen und zum Teil abgeholzten Wald bieten sich Ausblicke, die bis vor wenigen Jahren nicht möglich gewesen wären.
Spektaktulär Stimmungen erlebt man besonders im nahen Herbst, aber auch im Winter, wenn der Blick von den genannten Bergzügen weit nach Böhmen, Österreich und über Bayern hinweg bis zum Alpenhauptkamm reicht.
Für Landschaftsfotografen spielt das „gute Licht“ eine wichtige Rolle. Ein Vorteil der genannten Aussichtspunkte diesbezüglich ist ihre gute Erreichbarkeit. Der Dreisesselberg ist über eine Hochstraße gut erschlossen. Am Gipfel lockt die Fernsicht von den Felstürmen des Dreisessels und des nahen Hochsteins über den Bayerischen Wald, das oberösterreichische Mühlviertel und das Tal der jungen Moldau bis hin zu den Alpen.
Der 360° Rundumsicht bietende Haidel Aussichtsturm kann über Bischofsreut im Osten und Grainet im Westen ebenfalls schnell erreicht werden. Auf 1000 m Höhe wird von Graint aus der Ortsteil Obergrainet passiert – an sich schon ein hervorragender Aussichtspunkt.
Für Fernblicke bis zu den Alpen favorisiere ich den Spätherbst: Wenn bei Inversionswetterlagen die Täler bis hin zur Donau und Moldau im Nebel versinken, herrscht auf den Bergen Sonnenschein mit hervorragender Aussicht. Bei dieser recht stabilen Wetterlage bewegt sich die Nebelobergrenze meist zwischen 700 und 1000 m. Darüber finden sich dagegen blauer Himmel und Hochdruckeinfluss.
Nur die höheren Bayerwaldberge ragen dann wie Inseln aus dem schier endlosen Nebelmeer heraus. In südwestlicher Richtung begrenzen erst die 150 km entfernten Alpen das Naturschauspiel. Östlich und nördlich erheben sich in den Nationalparken Sumava und Bayerischer Wald weitere Bergkuppen (Rachel, Lusen, Bobik und Boubin) weit über die Nebelobergrenze und strukturieren das samtig weiße Meer.
Hervorragend ist die Fernsicht auch an Föhntagen im Winter. Dachstein, Großvenediger, Schneeberg und Watzmann bilden mit ihren Gipfeln gut auszumachende Landmarken am Horizont. Wobei zu bedenken ist, dass die Hochlagen des Bayerischen Waldes im Winter regelmäßig mehr als zwei Meter Schnee abbekommen und die Temperaturen unter 30 °C fallen.
Dann sind Tourenski oder Schneeschuhe für die Fortbewegung dringend zu empfehlen. Der Aufstieg auf die Aussichtspunkte ist dann ebenfalls nicht völlig risikofrei. Für die Mühen wird man dafür mit teils 25 cm Raureif an den Felsen und abgestorbenen Bäumen belohnt.


Borkenkäfer und Stürme haben in jüngster Vergangenheit dazu beigetragen, dass der Hochwald des Bayerischen Waldes aus der Nähe betrachtet eher einer unfotogenen Geisterlandschaft gleicht. Aber gerade diese Umstände und die dadurch entstehenden neuen Aussichten machen das Dreiländereck Bayerischer Wald für mich zu einer der fotografisch spannendsten Mittelgebirgslocations in Deutschland.
kwerfeldein – Fotografie Magazin

You must be logged in to post a comment.