RSS
 

Archive for August, 2013

Totgesagte leben länger:

20 Aug

Ein Beitrag von: Sandro Schroeder

Was mich an der Analogfotografie begeistert

Ja, ich gehöre der Generation Y an. Der Generation Smartphone, die mit Instagram ihr Essen dokumentiert. Die Selbstportraits bei Facebook hochlädt. Die Urlaubsbilder mit dem Handy macht. Alles am liebsten mit Filtern, die irgendwie oldschool oder retro aussehen.

Die Generation Y, die das „Fotoalbum“ fast nur noch als Symbol auf einem Display kennt. Die Generation der Digital Natives, die schon als Kind eine Digitalkamera hatte. Ja, ich gehöre der Generation Y an. Und trotzdem: Ich begeistere mich für die analoge Schwarzweiß-Fotografie. Warum? Sie ist eine willkommene Abwechslung zu meinem digitalen Alltag, ein bisschen Ruhepol im digitalen Datensturm.

Bei meiner freien Mitarbeit für eine Zeitung gibt es Situationen, in denen ich keinesfalls eine Analogkamera in der Hand halten möchte. Gruppenfotos zum Beispiel. Alle müssen genau in diesem einen Bruchteil einer Sekunde, in dem ich auf den Auslöser drücke, in die Kamera schauen und passable Gesichtsausdrücke aufsetzen.

Das klappt selten beim ersten Versuch. Eigentlich nie. Ein kurzer Blick auf das Display verrät mir, wer die Augen geschlossen hatte. Zweiter Anlauf. Bildkontrolle. Dritter Anlauf.

Bildkontrolle. Vierter Anlauf. Bildkontrolle. Egal, wie viele Anläufe es braucht, die Speicherkarte ist geduldig. Mich kostet es nur minimal Zeit – aber keinen Film, keine Chemie. Ein Bild nach dem anderen, bis alles passt. Im Zweifel ein Bild mehr als zu wenig. In dieser Situation bin ich froh, digital arbeiten zu können und empfinde Respekt für die Zeit, als es noch nicht möglich war.

Fotografiere ich zum Vergnügen, dann verzichte ich bewusst auf diese digitalen Vorzüge. In der Freizeit arbeite ich analog und fast nur für mich. Ein Großteil der Bilder ist allein für meine Augen bestimmt. Meistens sind es schlichte Motive, die es mir angetan haben: Linien, kleine Details im Alltag, nichts Aufregendes, nichts, was ich unbedingt mit anderen teilen muss.

Die Generation Y teilt sonst nahezu alles in Echtzeit mit den Freunden, der Welt, so ziemlich jedem. Facebook übernimmt dann schon die Selektion der Inhalte. Analog zu fotografieren heißt für mich Verzicht: Auf Vorteile, auf das Komplizierte und auf Öffentlichkeit. Bewusster Verzicht auf die digitale Realität also.

Der Prozess des Fotografierens ist dabei mindestens genauso wichtig wie das Endprodukt. Deswegen lasse ich mir vor dem Auslösen bei allem Zeit: Ausschnitt bestimmen, die Fokussierung läuft butterweich. Belichtung einstellen, das Zeitenrad klickt mechanisch beim Drehen. Blende auswählen, der Blendenring rastet in seiner Stellung ein. Zur Sicherheit eine letzte Kontrolle, ob der Ausschnitt stimmt. Alles in Gelassenheit, alles ohne Hektik.

Die Analogfotografie und die dreißig Jahre alte Kamera sind ein absoluter Kontrast zum beschleunigten und digitalen Alltag meiner Generation. Druck auf den Auslöser. Dann knallt der Spiegel einmal robust im Metallgehäuse. Das Bild ist im Kasten. Die Kamera ist schwer, groß, hat Ecken und Kanten – sie ist eben aus einer anderen Zeit.

Ihre mechanische Präzision begeistert mich immer wieder. Auch wenn es diese Technik ist, die klar über die Ergonomie gesiegt hat. Natürlich könnte ich auch mit dem Smartphone losziehen. Aber das imitiert mit seinem Auslösegeräusch nur auf alberne Art das Gefühl, das analoge Kameras und Film bieten.

Die Analogfotografie hat etwas Entspannendes. Jede Auslösung kostet Material, Geld und später auch Zeit in der Entwicklung. Die Filme sind teurer geworden, die Chemie ist ebenfalls nicht billig. Das erzeugt aber keinen Druck, im Gegenteil. Analog fotografiere ich viel bewusster, nehme die Kamera oft auch ohne auszulösen wieder vom Auge.

Im Zweifel ein Bild weniger als zu viel. Manchmal dauert es Wochen, bis 36 Auslösungen auf dem Film sind. Es kommt vor, dass ich in dieser Zeit vergesse, was auf den Filmanfang gebannt ist. Kein schnelles Nachgucken, keine Bildkontrolle. Gut so. Nur das Wissen, dass jede Auslösung es in diesem Moment wert war.

Die Filmentwicklung fügt sich dann schließlich in den meditativen Prozess von der Aufnahme bis zum fertigen Bild: Jeder Schritt ist streng vorgegeben, der Ablauf bleibt immer der gleiche.

Nachmittags im Keller die Patrone knacken. Film aufspulen. Abends dann im Bad einschließen. Dose mit Entwickler füllen. Bewegen. Warten. Leeren. Fixierer rein. Bewegen. Warten. Fixierer raus. Wasser einfüllen. Bewegen. Wasser auskippen. Aufhängen. Trocknen lassen. Und dann die Freude am nächsten Morgen. Auch das ein Reiz, den die Analogfotografie selbst für einen Kontrollfreak wie mich hat: Unvorhersehbarkeit.

Es kann immer etwas schief gehen. Fehler unterlaufen und es gibt kein STRG+Z, keine Rückgängig-Funktion, falls mir etwas nicht gefällt. Natürlich kann auch in der Analogfotografie nachgebessert werden. Aber ich nehme diese Möglichkeiten nicht wahr, ich will größtmöglichen Kontrast zur Digitalfotografie.

Ich will nicht die weiche Schwammigkeit, die immer mögliche Umkehrbarkeit von digitaler Nachbearbeitung. Ich will niemanden, der mich wie sonst fragt: Sind Sie sich sicher? Wollen Sie den Vorgang trotzdem ausführen?

Die Bilder, die es auf Papier schaffen, sammele ich dann in einem schwarzen Karton. Privatsphäreneinstellung: Nicht öffentlich, sozusagen. Ich nehme die Bilder immer wieder heraus, schaue die Filme wirklich Bild für Bild durch. Kein immergleiches Scrollen und Klicken, sondern etwas Reales in den Händen. Dafür kann ich mich begeistern.

Dabei wurde der Analogfotografie immer wieder der Tod ausgestellt. Nämlich immer dann, wenn die Produktion einer legendären Kamera eingestellt wurde. Wenn die letzte Charge einer Filmsorte produziert ist. Wenn digitaler Speicherplatz wieder ein bisschen billiger geworden ist.

Das Internet, so hieß es, werde das Analoge begraben. Im Gegenteil. Auf der analogen Insel lässt sich wunderbar Urlaub vom digitalen Stress machen. Und das „Reisegepäck“ kann man bequem im Internet bestellen. Man muss ja nicht immer auf die Vorteile verzichten.


kwerfeldein – Fotografie Magazin

 
Comments Off on Totgesagte leben länger:

Posted in Equipment


Seeing and Street Photography

20 Aug
The Pose of a Generation.

The Pose of a Generation.

The next time you are out shooting street photography, try this.  Put your camera down at your side and just look around for awhile.  Watch things happen and let moments develop in front of your eyes.

It sounds simple but it goes against our natural instincts to throw the camera in front of our face every time we see something remotely interesting.  That is especially true with digital.

The camera is the tool, but it can get in the way sometimes.

The camera can be easy to hide behind and it can become a crutch.  It’s so easy to rev the engine and just start clicking away, trying to capture everything.  Meanwhile, in the haste the most important moments go unnoticed.

Most of the work that goes into capturing a good photo is done before you put the camera to your eye and after you take it away, in editing.  You need to see the photograph or the potential for a photograph with your eyes before you can get to the point of trying to capture it.

The key is to hold back, slow yourself down and scan the area until you finally see something,  Then you can pounce.  Often, just seeing something isn’t enough and you’ll have to wait for the situation to develop further.

Always think, can this be better?

Gust, SoHo.

Gust, SoHo.

It’s better to be proactive instead of reactive.  You need to see the potential for a moment before it occurs.  Of course there will be great images that will suddenly spring out at you and you will have to photograph them as fast as you can, but that’s only a fraction of the time.

An important tip is to try to notice people from further away, especially in a crowd.  Scan the area and go from person to person.  If you’re only first noticing people as they are 8 or 10 feet away from you, then there’s nothing you can do but react.  Yes, some brilliant photos are created this way, of course, but if you instead focus on the people coming towards you from say 25 feet away, then you’ll have much more of a chance to get in position and capture the moment if it occurs.

The camera is just a tool to capture what your eye sees.  And the more your eye is able to see without the camera, the better your photographs will be.

Post originally from: Digital Photography Tips.

Check out our more Photography Tips at Photography Tips for Beginners, Portrait Photography Tips and Wedding Photography Tips.

Seeing and Street Photography


Digital Photography School

 
Comments Off on Seeing and Street Photography

Posted in Photography


Nextdoor App Lets You Get to Know Your Neighbors, Virtually

20 Aug

[ By Steph in Gadgets & Geekery & Technology. ]

Nextdoor Neighbors App 1
If you long for the days when everyone in the neighborhood knew each other’s names – and business – you’ll either be delighted or horrified by Nextdoor, an app that lets you get to know your neighbors without ever actually talking to them. The app offers a private social network accessible only to those in a certain neighborhood so you can invite people to social events, find babysitters, organize a neighborhood watch or locate a lost pet.

Nextdoor Neighbors Community App 2

Nextdoor can be accessed through the mobile app or on the web, with over 17,000 neighborhoods currently in its database. The idea is to connect with your neighbors to share important local information, goods and recommendations. Participants can discuss suspicious activity, share numbers for reliable plumbers, notify each other of special local events or report found items like wallets and keys. Every neighbor has to sign in with their real name and verify their address.

Nextdoor Neighbors Community App 3

In an age when most people communicate through Facebook and Twitter, and nearly all of us have smart phones semi-permanently glued to our palms, apps like Nextdoor can re-forge the connection between neighbors that has degraded over time.

Nextdoor Neighbors Community App 4

Some may mourn the loss of real, face-to-face interactions between neighbors, and fear that apps like Nextdoor will make it worse – but how else can you get to know the recluse on the hill who’s averse to barbecues but acutely interested in the identity of a local mail thief? Online neighborhood communities could be particularly helpful in emergency situations, as well. Check it out at Nextdoor.com.

Share on Facebook


[ By Steph in Gadgets & Geekery & Technology. ]

[ WebUrbanist | Archives | Galleries | Privacy | TOS ]


WebUrbanist

 
Comments Off on Nextdoor App Lets You Get to Know Your Neighbors, Virtually

Posted in Creativity


Sony Cyber-shot RX1R Samples Gallery Expanded!

20 Aug

Screen_Shot_2013-08-19_at_12.55.29_PM.png

We’ve just expanded our gallery of real-world Samples from Sony’s Cyber-shot RX1R. The RX1R is essentially the same camera as the older RX1, but without an AA filter on its 24MP full-frame CMOS sensor. We’ve been shooting with it since we received a production-quality sample and recently took it on a camping trip here in Washington State. We’ve added 35 images from that trip to our original gallery of real-world samples, including a handful of Raw conversions ‘to taste’, to give you an idea of what the camera can do. Click through for a link. 

News: Digital Photography Review (dpreview.com)

 
Comments Off on Sony Cyber-shot RX1R Samples Gallery Expanded!

Posted in Uncategorized


Blickfang: Renate Schottelius

20 Aug

Mein heutiger Blickfang zeigt die junge Tänzerin Renate Schottelius. 1954 wohnte sie gemeinsam mit der Fotografin Ellen Auerbach in New York. Hier entstand auch dieses wunderbare Foto aus dem Bildband „All die Neuanfänge…“*.

Es zeigt die Tänzerin auf einem New Yorker Dach. Ellen Aucherbach hat sie während eines Luftsprungs fotografiert. Mindestens einen halben Meter schwebt sie über dem Boden, den Blick hat sie dabei nach unten gerichtet und lacht.

Es ist kein einfacher Sprung. Nur ein geübter Tänzer kann so hoch und so grazil springen, den einen Fuß nach oben, den anderen nach unten. Eingerahmt wird sie von Wolkenkratzern links und rechts.

Renate Schottelius, New York 1954 © Ellen Auerbach

Das Schwarzweiß-Bild zeigt für mich Lebensfreude, trotz oder gerade durch diese enge und graue Großstadt. Der Sprung wirkt so befreiend und leicht, dass auch mir als Betrachter gleich leichter wird und ich lächeln muss.

Den Bildband habe ich nach einer Ausstellung von Ellen Auerbachs Werken in Köln gekauft. Er zeigt eine Auswahl ihrer frühen Aufnahmen aus dem Werbestudio „ringl + pit“ bis hin zu ihren späteren Reisebildern. Das erste Drittel des Buches enthält Texte über Ellen Auerbach. Zwischen den Bildern befinden sich schöne Zitate der Fotografin. Mit einem solchen möchte ich auch gern schließen:

Man denkt, man sucht sich das Objekt aus […] und dann stellt sich nachher raus, dass da noch was anderes mitspielt, eine andere Kraft in einem, die bestimmt, wie und wo und wann man irgendetwas photographiert.


* Das ist ein Affiliate-Link zu Amazon. Wenn Ihr darüber etwas bestellt, erhalten wir eine kleine Provision, Ihr bezahlt aber keinen Cent mehr.


kwerfeldein – Fotografie Magazin

 
Comments Off on Blickfang: Renate Schottelius

Posted in Equipment


Interview with Burn Magazine

20 Aug

Today, burn Magazine published a wide-ranging interview I did with Magnum (and NatGeo) photographer David Alan Harvey.

David has long been one of my photographic idols/compass points. We met in person for the first time in San Miguel D’Allende, Mexico in 2010 and became fast friends. He is my sounding board for anything photo-journalistic or documentary in nature. And I am always happy to discuss the web and vertical ecosystems with him, usually at about 2:00am, and over drinks.

This interview is essentially one of those free-form discussions, transcribed and uncut. It took place on the back stoop of a hotel in Dubai earlier this year. You can read it here.

And if you have any interest at all in documentary photojournalism and on the off-chance have not yet discovered burn, OMG are you in for a treat. Dave’s compass point is absolutely pure, which is why that web magazine has quickly become the place to go to learn about documentary photography and documentary photographers. Enjoy.


Strobist

 
Comments Off on Interview with Burn Magazine

Posted in Photography


Rokinon launches Cine 16mm T2.2 lens for APS-C and Micro Four Thirds

20 Aug

rokinon.png

Rokinon has made available a video version of the Samyang 16mm f/2.0 prime. The 16mm T2.2 Cine lens is available for pre-order in Nikon F, Canon EF, Micro Four Thirds, Sony A, and Sony E mounts. Like other video primes, it offers focus and aperture racks for use with cinema rigs, stepless aperture control, and calibration in T-stops rather than F-stops. Rokinon’s website lists compatible mounts for Pentax, Samsung NX and Fujifilm X though they aren’t yet available for pre-order, and lists the lens at an MSRP of $ 499.

News: Digital Photography Review (dpreview.com)

 
Comments Off on Rokinon launches Cine 16mm T2.2 lens for APS-C and Micro Four Thirds

Posted in Uncategorized


10 Tips for Creating Great Family Portraits

19 Aug

Hood-August2013-0212-Google

With my background being in classic style studio portraiture (aka “boring”), and 25 years experience photographing portraits and weddings, I have a few tips up my sleeve for you. If you’ve never done a family or group portrait before don’t be intimidated. Be honest with the family and tell they you’re just learning, I bet they’ll be willing participants to help you out and they get some nice photos in exchange.

With a little planning, doing a family portrait should be fun for both you, and the family you’re photographing. Here are 10 quick tips to help you have a successful and fun photo session.

SUMMARY – 10 TIPS FOR BETTER FAMILY PORTRAITS

  1. Use a tripod when possible
  2. Shoot in Manual exposure mode
  3. Lock the focus or use manual focus
  4. Arrange people with heads staggered
  5. Allow kids to be kids and get goofy with them
  6. If it bends, bend it – how to help people pose
  7. Pose people to flatter them
  8. Lighting is key – get some in their eyes
  9. Expression is everything!
  10. Have a little fun with it and let go

Let’s take a look at each in more detail.

Heise-0005fsm

#1 USE A TRIPOD WHENEVER POSSIBLE

“Ugh”, I already know what you’re thinking. A tripod cramps your style. It’s too heavy and cumbersome. Your style is more free flowing. That all may be true and in some cases (like photographing kids running or doing more documentary style photography) it may be better to shoot hand held.  However, just consider another side of the coin.

When being photographed  most, if not all, people are nervous. Yes nervous! Some are down right scared, and some would even go as far to say that they “hate it”. So it is part of your job to help your subjects feel more comfortable and relaxed. That can be hard to do when you’re also nervous, especially if you’re new to portraits. But there’s a big advantage of putting that camera on the tripod.  Two actually.

#1 – it automatically forces you to slow down. That’s a good thing. You can check your settings, review the composition, and exposure to make sure you’ve got everything right. All to often it’s easy to get carried away once you put the camera up to your eye and forget to check something only to see later you had the wrong White Balance, or ISO was 6400, or you accidentally shot Small JPG. Slow down, avoid an “oops”.

#2 – it allows you to get your eye away from the camera so you can actually make eye contact with your subjects. They are very real people and they feel even more uncomfortable staring straight into your lens than they do looking at you. You can make gestures to get kids attention, or make faces. But you’ll get way better expressions by interacting with them than you will looking through the viewfinder. Try it!

Hood07-034f

#2 SHOOT IN MANUAL EXPOSURE MODE

Assuming that you are setting something up, choosing the time of day and the location carefully, you have control of all the elements. Meaning, once you get set up the exposure should not need to change. But if you put it in Aperture or Shutter priority, depending in the metering mode selected, the camera could choose a slightly different exposure for each frame. You do NOT want that! Consistency is very important.This post is sponsored by our partners Wigs

Inconsistent exposures create more work in post processing, as you have to even them all out. It also can cause a slight color shift, increase noise (if underexposed) and other undesirable things. To keep your exposures consistent through the whole shoot, use Manual Mode. Just remember that each time you change the pose, location, etc, you need to check exposure again. I just fire off a quick test shot, review the histogram, adjust if necessary and continue.

#3 LOCK THE FOCUS

Just as you do not want the exposure to change from frame to frame, neither do you want the focus to be adjusted. Assuming you’ve taken #1 to heart and are using a tripod, you will not be moving. Likely if you’ve posed your group in a relatively static position, they will not be moving. Not much anyway. We are only concerned with moving closer to, or further away from the camera. So . . .

Set your camera up to do one of the following: use focus lock, back button focus, or use manual focus. With any of those options the focus will not change from shot to shot. If you use the shutter button to focus and someone moves a little bit so that the focus dot hits the background, you got another “oops”. If you aren’t sure how to do this, consult your camera manual.

Bonus tip: If your camera has video capabilities you have a neat way of doing manual focus. Turn on the Live View so you can see the image on your screen. Hit your “zoom” button (it may have a magnifying glass or a “+” sign on it) once or twice. The image on the screen will zoom in (your lens doesn’t) so you can see what is in focus which allows for much most precise manual focusing. Press zoom again to return to normal view and turn off Live View.
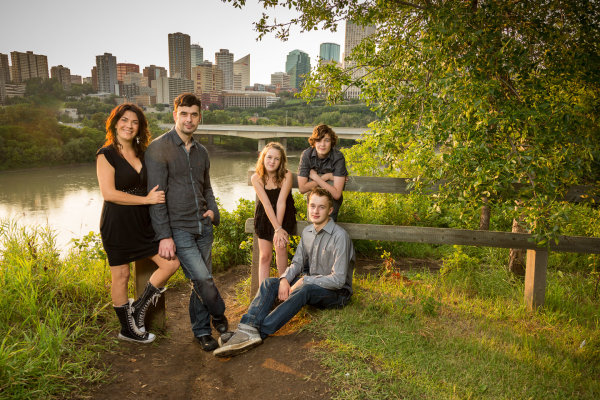
Liebel-002-600px

#4 STAGGER THE HEADS

You may or may not have heard this one before, or perhaps you weren’t 100% what it meant. What you want to avoid is a boring straight line, row, or column of heads. Diagonal lines are more dynamic and add interest to an image, so try to do that with the people in your grouping.

Imagine there is a line drawn from each face to the next. Try and position them so that no head is directly on top of, or beside (same level) another. Make diagonal lines not totem poles. Use props to seat some people or bring some small folding stools. Have some people sit down, or stand up on something. Use what is naturally in the environment to pose them, or if you have nothing available just arrange them so the heights are staggered.

Stevens-017

#5 IF IT BENDS, BEND IT

This is a general rule when photographing any people and it’s a good one. People tend to stand stiff and rigged when you position them, so you need to get them to bend a few body parts to look more natural. Nobody naturally stands stiff as a board. Here are a few starters

  • get them to shift their weight to one foot and stick out one hip, away from the camera
  • get them to put a hand in a pocket, I usually recommend thumb out otherwise they have a tendancy to shove their hand to the bottom of the pocket also not looking natural
  • OR hook a finger on their belt or a belt loop
  • if they are sitting lean forward a bit and put weight on one hip
  • if standing against something have them cross one foot over the other, toe down
  • if sitting (males) put one knee up, foot flat on the ground (make sure they rotate so you aren’t looking straight into their crotch

You get the idea. The best way to get someone to do any of this is to do it yourself and have them mirror you. Face them, do the pose you want them to do, and have them mimic it exactly.

Hood-August2013-0129-Google

Example of bending body parts. The girls did a much better job here than the guys but even the arms bent at the elbow helps. Some people are stiff and you may have  a challenge with them. Just do your best.

#6 LET KIDS BE KIDS

I’ve found that often parents will tell their kids “you need to be good and smile” before a photo session. For many kids that puts too much pressure on them to “perform”. I usually prepare my parents by getting them to tell their kids this instead:

We’re doing to the park to take some photos. It will be a lot of fun.

That’s it! No expectations other than fun. Then prepare yourself. Bring along props, get mom to bring one of their favourite toys or books. I usually have a hand puppet and bubbles in my camera bag along with my gear. If the kids don’t want to sit and smile don’t force them. Then them run around and be kids for a while and shoot that. Play with them, make it fun. Then they may cooperate and sit for a bit a few minutes later.

When I’m photographing kids I make a total idiot of myself. I make funny noises, I sing songs (I’m really bad but they don’t care), I make fish faces, I play peek-a-boo behind the camera.  I run back and forth to the camera with the puppet. I lie on the ground, I stick my butt out. Kids are the ones that have life the right way around, it’s us adults that ruin it. Let them be kids, let them have fun. Then be ready to capture it when it happens.

This was a game of peek-a-boo around the tree.

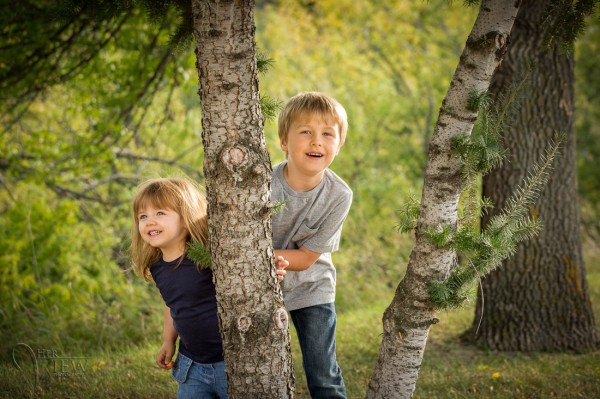
This was a game of peek-a-boo around the tree. Look at those genuine smiles! You can’t force those.

#7 POSE PEOPLE TO FLATTER THEM

Here’s the bottom line – if mom thinks she looks fat she isn’t going to like them no matter how great the lighting and expressions (see #8 and #9 below). So get this one right.

Be aware of people’s perceived “flaws” and work with them. A list of some quick tips.

  • If someone has a bigger bottom half, don’t pose them walking away from the camera using a wide angle lens.
  • For double chins take a slightly higher camera angle, above their eye level. Making them look up stretches it out and minimizes the chin/neck area
  • A bump on a nose will show up when they face one way and not the other (usually) study their face to find out which way to shoot them
  • When you have a couple that has a huge height difference get the man (usually the taller one) to stand with his feet further apart. That will make him slightly shorter, closing the gap a bit.
  • For really heavy people (or those overly self-conscious of their weight) use the lying down in the grass pose and pile the kids on top. Works great every time. Hides tummies, stretches out chins and makes the kids closer in size because it’s just faces.
The lying in the grass, pile on top pose. Great for families with small children.

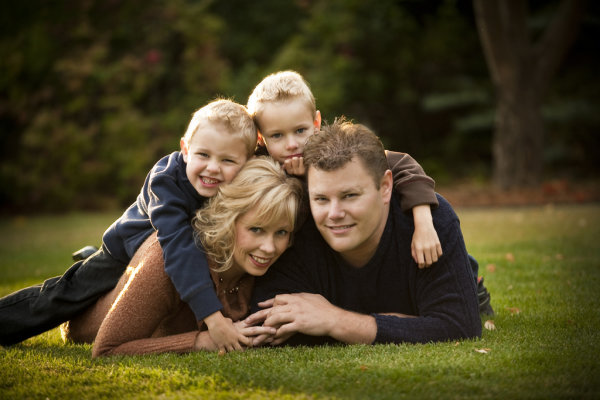
The lying in the grass, pile on top pose. Great for families with small children. This family didn’t need the pose to correct anything, it’s also just fun having the kids jump on top and squish mom and dad.

#8 LIGHTING IS KING – GET SOME IN THEIR EYES

Light can make or break any photograph, portraits are no different. The very derivative of the word photography is “drawing with light”. The biggest thing you want to make sure you do for portraits is get light into your subjects’ eyes. There are many ways to do that and that’s a whole huge topic but there are a few things you can do to set yourself up to start off with good light.

  • Choose the time of day to do the portrait! Ideally late evening about an hour before dusk is the best time for portraits. Why because the sun is lower on the horizon and you don’t get the harsh overhead light you do at midday. It’s more directional and usually a bit diffused if there’s haze on the horizon.
  • If you can’t shoot at dusk, find some shade. Get your family out of the sun, BUT make sure you don’t get the background lit up. Bright areas in the background will draw attention away from the subjects. Look for areas in the shade of large buildings, or under large trees.
  • Avoid using an overcast day simply because the lighting is even and less harsh than bright sunlight. While it is true the light is softer and less harsh, the direction isn’t great. Overcast days give you direct overhead lighting and dark eyes, especially anyone with deep eye sockets.
  • Add some light using a reflector or a flash if need be. Again this is a whole other class on lighting but learn to know when you need more light on their faces. If you cannot see a catchlight (the lightsource reflected in their eyes) then there isn’t enough light in their faces.

Just as important as getting some light in the eyes is having it come from a good direction. We’ve established overhead isn’t good direction, neither is straight from camera. So turning on your built-in pop flash isn’t going to give you good light. Neither is sticking a speedlight on top. Light direct from the camera angle flattens the subject, that is not what you want. You want the light to come from the side more, 30-45 degrees from camera is a good starting point. To learn more about this read my article on the 6 Lighting Patterns Every Photographer Should Know.

This was done just before sunset. The sun is coming just over their shoulders on the left. I used a flash in an umbrella also to the left to add light to their faces, without it they'd be in shadow.

This was done just before sunset. The sun is coming just over their shoulders on the left, behind them. I used a flash, bounced into an umbrella also to the left to add light to their faces, without it they’d be in shadow.

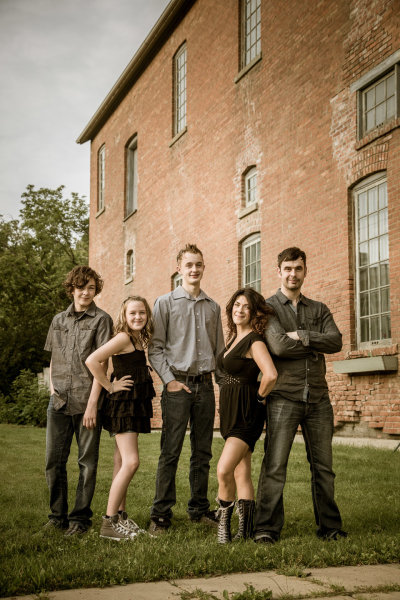
#9 EXPRESSION IS EVERYTHING

So if lighting is king, getting the right expressions is everything! You can totally screw up the lighting, and the pose, but if you get them laughing or making “that” face – it’ll be a big hit!  So how do you do that?

See #1 first of all. Then look at #6. Being a photographer means that sometimes you have to also become a comedian, or a clown. Knowing the right thing to say or do to make people smile is mostly experience. Sometimes you’ll get tough adults too. The dad in the photo above by the brick wall pretty much has the same expression all the time. I’ve known this family and photographed them for 13 years, they’re friends too. So I know I can bug him a little bit or get out the ducky to have some fun at his expense.

If there are small children or babies involved make sure to get their attention. It even helps to have an assistant, tell them to bring Grandma along or a friend to help out. But what always happens is you get the kids all looking and smiling, and what are the parents doing? Looking at the kids!  Oops again! I always tell the parents, “no matter what keep looking at me as I make a total fool of myself, do NOT look at your child”.

Stamhuis-0038-Google

Baby laughing, everyone else followed instructions and looked at me, success!

#10 HAVE A LITLE FUN WITH IT

Last tip is to no take yourself so seriously. Create a few really whacky shots at the end of the session (or even in the middle if the energy seems to be fading). Tell them to do a group squish and really get them to squish. Often they will start laughing and as they pull apart you grab the shot. Do a pile on down in the grass. Ask them to jump in the air or make goofy faces (you make one too). It breaks the tension and lightens up the mood.

I volunteered my time at an event called Help Portrait last year that has photographers, make up artists and organizers giving their time to create portraits for people that otherwise couldn’t afford a professional one. They ended up sending most of the families to me, initially because I had the biggest area to do the group photo and later because the other photographers said I was the best with the kids.  To see some of my photos from that event go to Help Portrait, Edmonton  2012. 

Dino-Park-0131-600

I was making a similar face!

Hood-August2013-0263-Google

My off camera flash stopped working so this is direct from camera, not my first choice. But we were all tired and I thought this would be fun so we just went for it. Notice dad has a new expression!

BONUS TIP

Get the family to think about what they are going to wear. Some people disagree with my point of view on that, which is totally fine. But if you want to read more about it go to Clothing for Portraits.

Get out there and photograph some families and have fun!


Post originally from: Digital Photography Tips.

Check out our more Photography Tips at Photography Tips for Beginners, Portrait Photography Tips and Wedding Photography Tips.

10 Tips for Creating Great Family Portraits


Digital Photography School

 
Comments Off on 10 Tips for Creating Great Family Portraits

Posted in Photography


7 Crazy Theories About Life, The Universe & Everything

19 Aug

[ By Steph in Conceptual & Futuristic & Technology. ]

Mind Blowing Theories Universe main

Our universe is located inside the black hole of another universe – or it’s just a holographic projection – or it’s all one big computer game being played by bored super-intelligent aliens. Or not. These scientific and philosophical theories about the origin and nature of existence can be major head-scratchers, but there are at least a handful of physicists around the world who support each one.

Multiverse Theory: We All Have a Doppelganger

Mind Blowing Theories Multiverse Doppelgangers

(image via: kevin dooley)

It’s highly unlikely that we live in the sole existing universe. We’re probably in one of many. Physicists have theorized that there could be infinite universes existing next to each other in a sort of giant patchwork quilt, that the Big Bang led to the generation of many other ‘bubble universes’ and that parallel universes hover just outside of our own. Columbia University physicist Brian Greene, author of the book ‘The Hidden Reality: Parallel Universes and the Deep Laws of the Cosmos’ says the latter theory supports the idea that we all have doppelgangers.

“The argument for doppelgangers is pretty straightforward. Assuming that space goes on infinitely far, in any finite chunk, matter can only arrange itself in a finite number of ways, like cards in a deck. You and I are just a configuration of particles, so sooner or later we’re going to repeat. Matter can almost repeat its configuration but not repeat it identically. Your physical body may repeat, but your mental configuration can be a little bit different, so there might be an evil version of you, and a version that loves skydiving.”

Our Universe Could Be in a Black Hole

Mind Blowing Theories Universe Black Hole

(images via: wikimedia commons)

Our universe might be so small and insignificant in the grand scheme of things, that it’s hidden inside the black hole of another universe, totally unbeknownst to theoretical sentient beings in that universe. And that means all the black holes so far found in our own universe could also contain doorways to alternate realities. This theory is based on new mathematical models of the spiraling motion of matter falling into a black hole.  The matter absorbed by black holes isn’t necessarily destroyed – it could be expelled, to become the basis for new galaxies, stars, and planets. This could explain the mystery as to how the universe could have started with a singularity in the Big Bang theory – instead of just existing with no explanation, it was birthed by a white hole, the hypothetical escape hatch for matter at the other end of a black hole.

The Ekpyrotic Scenario: Universes Colliding

Mind Blowing Theories Universes Colliding

(image via: western paradigm)

Did our universe actually come about due to a collision of two three-dimensional worlds? The ekpyrotic scenario is a cosmological model of the origin and shape of the universe that illustrates it as a giant, stretched rubber band that could fly back into our faces at any moment. It contradicts the Big Bang theory, in which time and space began when something created a bubble of energy from nothing – a bubble that blew up into what we now know as the universe in a tiny fraction of a millisecond. Based on string theory (which suggests that once you get smaller than an atom, everything is a 2D unit called a quantum string – an attempt to marry Einstein’s theory of relativity with quantum physics), it’s highly controversial, but intriguing all the same.

In the ekpyrotic scenario, two three-dimensional worlds (branes) collide in a space with an extra (fourth) spatial dimension. It amends the earliest point of the Big Bang theory, stating that rather than beginning with nearly infinite temperature and density, the universe began cold and nearly vacuous.

“The hot expanding universe we know came as a result of a collision that brought the universe up to a large but finite temperature and density,” says Paul Steinhardt of Princeton University, who came up with the concept. “The rest of the story is as the Big Bang model would have it, but the beginning is different.”

“Quantum effects cause the incoming three-dimensional world to ripple along the extra-dimension prior to collision so that the collision occurs in some places at slightly different times than others. By the time the collision is complete, the rippling leads to small variations in temperature, which seed temperature fluctuations in the microwave background and the formation of galaxies. We have shown that the spectrum of energy density fluctuations is scale-invariant (the same amplitude on all scales). The production of a scale-invariant spectrum from hyperexpansion was one of the great triumphs of inflationary theory, and here we have repeated the feat using completely different physics.”

Next Page:
7 Crazy Theories About Life The Universe Everything

Share on Facebook


[ By Steph in Conceptual & Futuristic & Technology. ]

[ WebUrbanist | Archives | Galleries | Privacy | TOS ]


WebUrbanist

 
Comments Off on 7 Crazy Theories About Life, The Universe & Everything

Posted in Creativity


The ChargeCard: Keeping a USB CableIn Your Wallet Just Makes Cents

19 Aug

Extra photos for bloggers: 1, 2, 3

Your phone can’t stand the flavor of 5 Hour Energy. So for its midday pick-me-up, you’ve got to plug it in. Now where’d you leave that USB cord…?

Check your wallet! If you’ve put a ChargeCard in there, the search is over.

The ChargeCard is a USB charging connector that works with any iPhone/Android/other camera phone, is made of durable plastic, and is the same size as your library card.

Think of is at your phone’s version of that pillow you keep under your desk. Always there for you when you need to recharge.

Swipe A ChargeCard
$ 25 at the Photojojo Store

 Tweet it!      Share

Related posts:

  1. The iPhone Lens Wallet
    Keeps Your Cell Lenses in One Place Check out that sweet collection of lenses for your smarty-pants…
  2. The Secret to Keeping Your New Year’s Resolutions Don’t be ambitious. That may strike you as a bit…
  3. The Cam Caddie Makes Your DSLR Vids Smooth as the Pros’ If those hapless videographers from “The Blair Witch Project” knew…


Photojojo

 
Comments Off on The ChargeCard: Keeping a USB CableIn Your Wallet Just Makes Cents

Posted in Equipment