RSS
 

Archive for July, 2013

What the new Nexus 7 tablet means for photographers

26 Jul

TS520x0~cms_posts-1397955347-SocialNexus7-24Web.jpg

Google debuted the second iteration of its popular Nexus 7 tablet yesterday at a San Francisco press conference, inciting excitement amongst fans of the Android device and plenty of comparisons to Apple’s iPad mini. Of course we’re most interested in how this second-gen device might fit into a photographer’s workflow. Click through for our opinion on connect.dpreview.com.

News: Digital Photography Review (dpreview.com)

 
Comments Off on What the new Nexus 7 tablet means for photographers

Posted in Uncategorized


How to Shoot Landscapes at Sunset

26 Jul

Sunsets are a huge draw for landscape photographers due to the unique light at the end of the day. Not only is the colour of the light attractive but also its low angle as the sun goes down gives greater texture to the landscape.

Whilst the conditions at sunset have the potential to yield great images, they also provide challenges that need to be overcome to maximise that potential.  Here I want to share some tips and approaches for shooting landscapes at sunset.

Camera Settings

One thing I am often asked is “what settings should I use to photograph a sunset?”.  Photographing at sunset is no different to shooting any other landscape; therefore the following make a good starting point:

Shooting mode: Manual
ISO: 100
Aperture: f/11 (maximising depth of field, without compromising image quality)
Shutter speed: Adjust so that detail is retained in the sky highlights (if too bright, make it faster, if too dark, make it slower)
White balance: Daylight/Sunny (if shooting in JPEG)

However camera settings alone do not guarantee success, there are a few other things to consider.

Sunset with star burst

Shot into the sun as the sun crossed the tree line (ISO 200, f/11, 30s, using 3-stop graduated ND filter, 10-stop ND filter)

Exposure

Often, the draw of a sunset is a brightly coloured sky containing reds, pinks and oranges and the temptation can be to make the sky the focal point of the image, expose for it, and throw everything else into silhouette.  If there is an interesting skyline, this can work compositionally however if not, you will be left with an image that can lose the viewers interest quickly – after the sky, there is nowhere left for the eye to go.

Also, one of the joys of sunset is capturing the golden light illuminating the world in front of you and casting long shadows.  Therefore, capturing both the land and sky correctly exposed can produce images with a much higher impact that will hold the viewers attention for longer.  However, therein lies one of the challenges.

When the sun is low, the sky will appear very bright in comparison to the land.  Due to the limited dynamic range of digital sensors, the difference in brightness between the sky and the land can cause problems for the resulting image – if the difference is too great, you will either lose detail in the highlights (sky) or shadows (land).

There are two ways to overcome this:

  1. Use graduated neutral density filters (as covered in this post) to reign in the bright sky, and ensure that you can record the full range of highlights and shadows in one image
  2. Take multiple images (one exposed for the sky, one exposed for the land as a minimum) and blend the two together using photo editing software.

Both approaches come with complications (the potential for unwanted flare or colour casts from filters, or unwanted movement between exposures for the blending).  My preference is to use graduated neutral density filters, with the aim of getting as much right in-camera in one image, to save having to spend time blending exposures when back at my computer.

Sunset, shot away from the sun

Shot with the sun at 90 degrees to my right highlighting the foreground rock detail (ISO 100, f/11, 1.6s, using 3-stop graduated ND filter)

Don’t pack up when the sun goes down

Too many people pack up and head home when the sun goes down, but it’s only 10 or so minutes after the sun has set that the real colour display in the sky begins.  A small amount of time after the sun drops below the horizon, you often see any clouds in the sky take on a red/pink hue.  As there is no bright light source at this time, shutter speeds soon increase to a few seconds, so a tripod is a must, but you will be able to capture images with incredible saturation in the sky, without any post processing.

Sunset taken after the sun went down

Taken approx. 30 minutes after the first image above, showing the clouds taking on the pink/purple tones (ISO 200, f/11, 4s, using 2-stop graduated ND filter)

Don’t forget sunrise

Everything I’ve written here discusses shooting at sunset, but it all applies to sunrise too.  It is a much more difficult to motivate yourself to go out at sunrise, but it is my favourite time of day to take landscape images as the light is just as magical and, depending on the overnight temperatures, you can often be greeted with early morning mists that can add a whole new dimension to your landscape images.

Sunrise with mist rolling over landscape

Taken just after sunrise with mist rolling in the valley below (ISO 100, f/11, 1/40s, using 3-stop graduated ND filter)

So whilst sunrise or sunset are challenging times of day to shoot effectively, hopefully the above tips will help you go out and capture the full potential of the landscape in front of your lens.

Post originally from: Digital Photography Tips.

Check out our more Photography Tips at Photography Tips for Beginners, Portrait Photography Tips and Wedding Photography Tips.

How to Shoot Landscapes at Sunset


Digital Photography School

 
Comments Off on How to Shoot Landscapes at Sunset

Posted in Photography


Lomography seeks crowd funding for new production of Petzval lenses

26 Jul

Petzval.png

The people at Lomography have built a business around promoting and selling lo-fi cameras and accessories. What’s (really) old is new again in their latest Kickstarter campaign, an effort to bring the centuries-old Petzval lens back into production. The ‘New Petzval’ lenses look and function much like the originals with a brass exterior, and would be produced in both Canon EF- and Nikon F- mounts. Click through and read more about the project.

News: Digital Photography Review (dpreview.com)

 
Comments Off on Lomography seeks crowd funding for new production of Petzval lenses

Posted in Uncategorized


25. Juli 2013

26 Jul

Ein Beitrag von: Ralf Heppel

In The Cloud © Ralf Heppel


kwerfeldein – Fotografie Magazin

 
Comments Off on 25. Juli 2013

Posted in Equipment


Animated History of Western Architecture in Just 15 Minutes

25 Jul

[ By WebUrbanist in Art & Photography & Video. ]

design in a nutshell

These six super-short videos are an architectural tour de force for visual learners bent on absorbing as much as possible in as little time as needed. Narrated by actor Ewan McGregor, the Design in a Nutshell series (all playable below) presents whole history of Western architecture (and related design fields). This historical tour is highly engaging, thanks to lovely animations and engaged narration complete with famous examples and dynamic illustrations.

design architectural history series

Diagrams and dramatic descriptions will carry you through from Gothic Revival to Arts & Crafts and Bauhaus, then onto Modernism and Postmodernism. For the design-inclined, these educational mini-films should be enough to whet your appetite, leaving you to want more on each of these movements. But meanwhile, since you may be in a hurry, let us forgo further description and get started below:

Created by The Open University, a distance-learning institution based in the United Kingdom, these are by no means exhaustive, but they are a great introduction to thinking about architecture. Visually, they can begin to help you when it recognizing and understanding time-specific and universal themes, and start to connect what you see in cities around you to design theories and historical contexst. Or, if you already know the basics, simple share these with friends you want to get excited about built environments instead!

Share on Facebook


[ By WebUrbanist in Art & Photography & Video. ]

[ WebUrbanist | Archives | Galleries | Privacy | TOS ]


WebUrbanist

 
Comments Off on Animated History of Western Architecture in Just 15 Minutes

Posted in Creativity


Manfrotto creates Arca-Swiss compatible ‘Top Lock’ quick release

25 Jul

toplock.png

Manfrotto has announced a ‘Top Lock’ quick release system for its tripod heads that’s compatible with standard Arca Swiss-type plates. It uses a clamp design that allows the camera to dropped in from above rather than slid in from the side, and three bubble levels to help keep the camera straight. The Top Lock release is available as an add-on adapter, or pre-installed on the company’s top-end 054, 055, 056 and 468MG ball heads.

News: Digital Photography Review (dpreview.com)

 
Comments Off on Manfrotto creates Arca-Swiss compatible ‘Top Lock’ quick release

Posted in Uncategorized


Sony Cyber-Shot DSC-HX50V Review

25 Jul

Sony Cyber-Shot DSC-HX50V Review.jpg

I’ve had lots of experience with these mega zoom cameras: some enjoyable, some not so much.

If you’re new to the field, approach them with caution: the zoom range is appealing, impressive and somewhat frustrating.

For one, you simply cannot use them handheld at the full tele end: at best, use a tripod; at worst, lean them on something substantial, like a fence or a wall.
If you’re crazy enough to want to shoot video with the zoom working mid shot … practice, practice.

Sony Cyber-Shot DSC-HX50V Rear.jpg

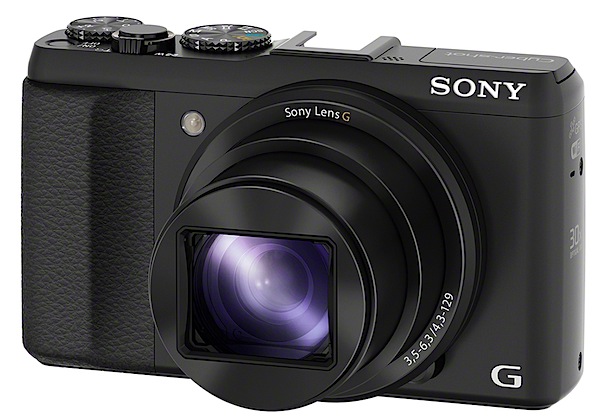
The HX50V initially surprised me: feels solid, pocketable, well-balanced in the hand, thanks to a prominent speed grip.

At rest, the camera is only 38mm deep; powered up, the lens protrudes and the depth increases to 73mm; with the zoom fully extended, it reaches 100mm depth.

Most external controls are id’d in white but some are rendered in off-white text. Designers: make ‘em all white next time!

Bridge and ferry wharves Full wide.JPG

Bridge and ferry wharves Full tele.JPG

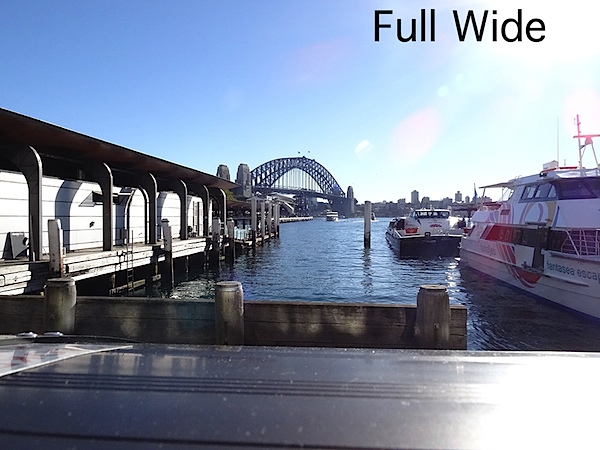
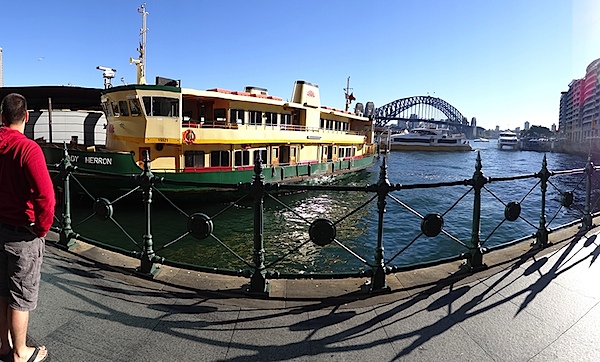
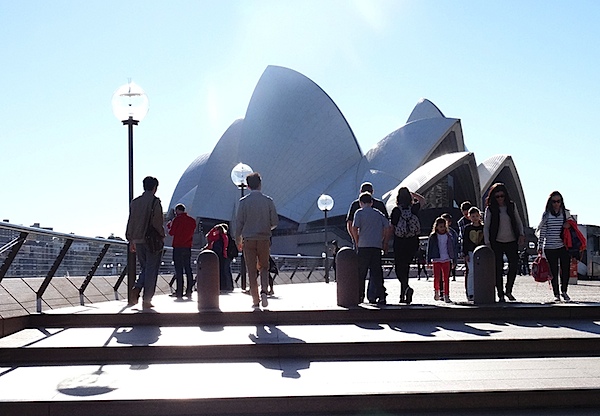
Sony claims it’s the world’s smallest 30x zoom, a claim with which I have no argument. The zoom range has a 35 SLR equivalent of 24-720mm, which makes it a very powerful shooting tool.

What sets it apart from most other mega zoom cameras is it ability to capture 20.4 million pixel images. This large image size is of course burdened by a small CMOS size, so noise will be a factor in large prints.

Bridge and ferry pano 1.JPG

Maximum image size is 5184×3888 pixels or as a 44x33cm print.

Video can be shot in either MPEG4 or AVCHD formats up to Full HD 1920×1080 pixel resolution. You can’t shoot stills while recording video.

Opera House.JPG

For what it’s worth the HX50V model offers enhanced Optical SteadyShot image stabilisation that is claimed to be about twice as effective as the HX200V high-zoom model of last year. It seems to me that each HX model raises the bar in image stabilising. Where will it end?

Sony Cyber-Shot DSC-HX50V Features

At first glance I felt the camera had minimal external controls. Anything missing?
No, as far as I could tell, everything appeared to be on deck.

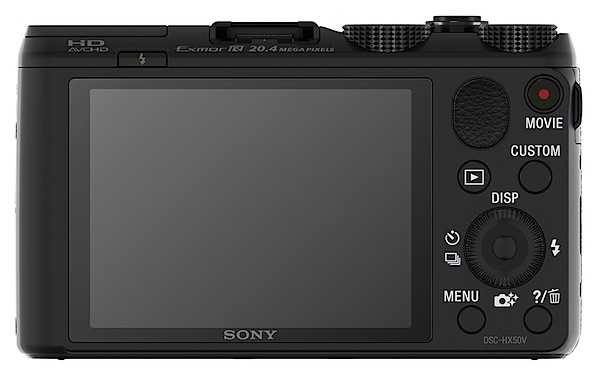
Top surface: at left is the flash cell, with activating button just below; mid-surface is the multi interface shoe to attach electronic viewfinders, flashes or mics.

Moving further right is the power button, zoom lever, leading to the mode dial, with positions for intelligent and superior auto, PASM, scene modes, video, sweep panorama, memory recall. And a dial for exposure compensation.

Scene.jpg

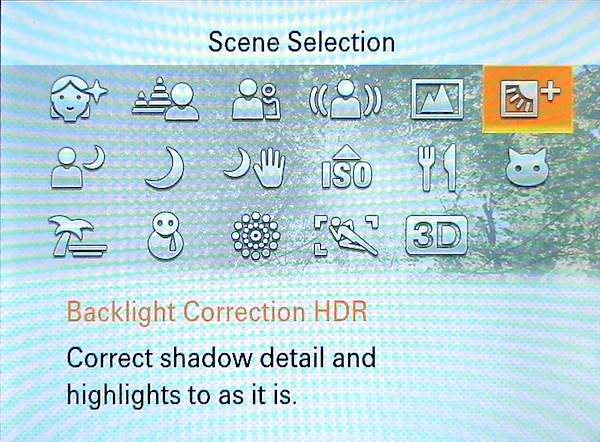
The scene modes (17 in all) include positions for 3D shooting, fireworks, night portraits etc. Nine picture effects are accessed via the finder menu and these include HDR painting, rich tone mono, pop colour etc.

Rear: buttons for video record, replay, menu and trash. The four position control wheel gives access to self timer/burst shooting, flash options, display and ‘photo creative’ options. There is also a custom button that takes you directly to ISO, white balance, metering mode and smile shutter choices.

The finder menu is graphically clear and not at all intimidating.
The PDF manual I found to be sufficient bot no more than that. For a beginner, it’s poorly laid out and a little jumbled in access to important features.

Sony Cyber-Shot DSC-HX50V ISO Tests

Sony Cyber-shot DSC-HX50V ISO 80.JPG

Sony Cyber-shot DSC-HX50V ISO 400.JPG

Sony Cyber-shot DSC-HX50V ISO 800.JPG

Sony Cyber-shot DSC-HX50V ISO 1600.JPG

Sony Cyber-shot DSC-HX50V ISO 3200.JPG

Sony Cyber-shot DSC-HX50V ISO 6400.JPG

Sony Cyber-shot DSC-HX50V ISO 12800.JPG

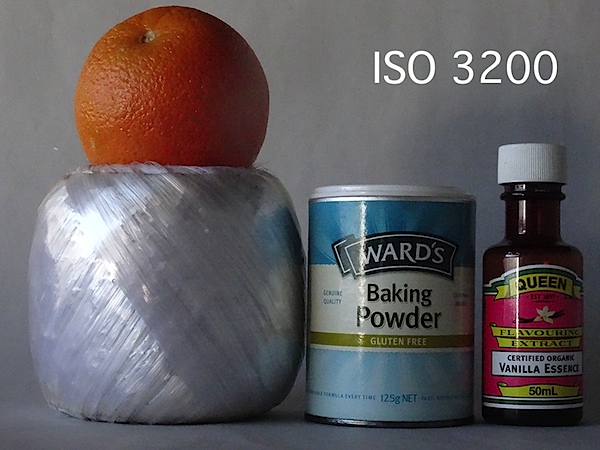
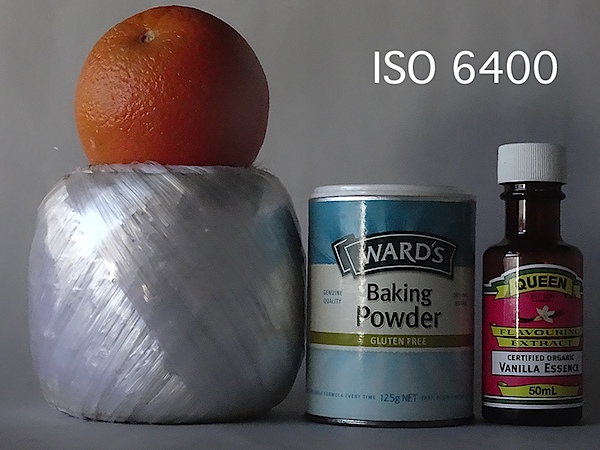
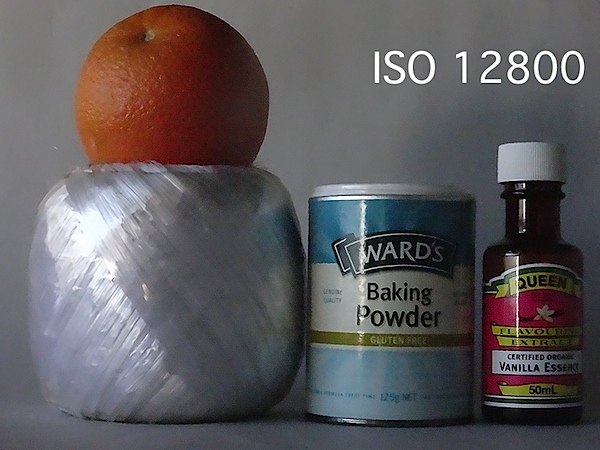
Only at ISO 6400 did noise become a problem. At ISO 12800 noise was well up and definition down.

Distortion

No problems at either end of the zoom.

Startup

About two seconds from power on I could shoot the first shot; follow-ons as fast as I could tap the button.

Sony Cyber-Shot DSC-HX50V Review Verdict

Quality: above average.
Why you would buy it: compact; powerful zoom range; integrated WiFi; GPS functionality.
Why you wouldn’t: no RAW capture; no optical finder; no vari-angle finder.

Having already bought a couple of mega zoom compacts, I am loathe to invest more hard-earned shekels in acquiring another one, but this baby is enormously appealing. Please, mummy, can I raid the piggy bank one more time?

Sony Cyber-Shot DSC-HX50V Specifications

Image Sensor: 20.4 million effective pixels.
Metering: Multi pattern, centre-weighted, spot.
Sensor Size: 11mm CMOS.
Lens: Sony G f3.5-6.3/4.3-129mm (24-720mm as 35 SLR equivalent).
Shutter Speed: 4 to 1/1600 second.
Memory: Memory Stick Duo, PRO Duo/PRO-HG Duo/SD/SDHC/SDXC and Micro SD/SDHC cards plus 48MB.
Image Sizes (pixels): 5184×3888 to 640×480.
Movies (pixels): 1920×1080, 1440×1080, 1280×720, 640×480.
Rear LCD Screen: 7.6cm LCD (921,600 pixels).
File Formats: JPEG, AVCHD, MPEG4.
ISO Sensitivity: Auto, 80 to 12800.
Interface: USB 2.0, HDMI, WiFi, DC.
Power: Rechargeable lithium ion battery, DC input.
Dimensions: 108.1×63.6×38.3 WHDmm.
Weight: 272 g (with battery and card).
Price: Get a price on the Sony Cyber-Shot DSC-HX50V at Amazon.

Post originally from: Digital Photography Tips.

Check out our more Photography Tips at Photography Tips for Beginners, Portrait Photography Tips and Wedding Photography Tips.

Sony Cyber-Shot DSC-HX50V Review


Digital Photography School

 
Comments Off on Sony Cyber-Shot DSC-HX50V Review

Posted in Photography


ACDSee 16 and Pro 6 gain Raw support for 14 additional cameras

25 Jul

ACDSee.png

ACD Systems has extended the Raw support offered by its ACDSee Pro 6 and ACDSee 16 software packages. Version 6.3 of the Pro version and and ACDSee v16.1 gain support for an additional 14 cameras including the Canon EOS 100D and 700D, Nikon D7100 and Coolpix A, Sony NEX-3N and SLT-A58, Olympus XZ-10, and the Panasonic DMC-G6. This update also includes performance improvements. Click through for more information.

News: Digital Photography Review (dpreview.com)

 
Comments Off on ACDSee 16 and Pro 6 gain Raw support for 14 additional cameras

Posted in Uncategorized


Contemporary House Inserted into Crumbling Castle Ruins

25 Jul

[ By Steph in Architecture & Houses & Residential. ]

Modern Castle Renovation Home 1

A ruined 12th-century castle serves as a stunning historic shell for a contemporary residence in a renovation by Witherford Watson Mann architects. The medieval Astley Castle has been in ruins since the 1970s, when a fire destroyed the hotel that occupied it at the time. Now, it’s preserved as an integral part of a two-story holiday house, the crumbling areas of its sandstone walls filled in with clay brickwork.

Modern Castle Renovation Home 2

The architects blended the new elements of the structure with the old, yet made sure that there is a clear distinction between the two. It’s harmonious, but allows the historic castle to be seen as it was before it was altered. The modern home is nestled within the walls, with the historic bricks still visible throughout the interior.

Modern Castle Renovation Home 3

Extensions added to the castle in the sixteenth and eighteenth centuries were topped with a roof and massive skylight, but left open to the elements through the arched windows and doorways to create a sunny courtyard. Laminated wooden beams separate the structure into individual living spaces and bedrooms.

Modern Castle Renovation Home 4

Modern Castle Renovation Home 5

The home features four bedrooms on the ground floor, and a second-floor living room with large windows looking out onto the English countryside. Witherford Watson Mann won a competition held by architectural charity The Landmark Trust to design the home, and their renovation is one of six projects nominated for the prestigious 2013 Stirling Prize.

Share on Facebook


[ By Steph in Architecture & Houses & Residential. ]

[ WebUrbanist | Archives | Galleries | Privacy | TOS ]


WebUrbanist

 
Comments Off on Contemporary House Inserted into Crumbling Castle Ruins

Posted in Creativity