Ein Beitrag von: camlilar

kwerfeldein – Fotografie Magazin
![]()
Our friends and collaborators over at DxOMark have been investigating lenses for the Canon EOS 6D, and have tested no fewer than 95 lenses from Canon, Samyang, Sigma, Tamron, Tokina and Zeiss to see which score highest. The results are presented in a multipart article, that also compares the EOS 6D results to those from the EOS 5D Mark III and the Nikon D600. Meanwhile for APS-C SLR users, this week DxOMark also reviewed two fast lenses from Sigma, the 30mm F1.4 DC HSM and (in case you missed it earlier this week) the 18-35mm F1.8 DC HSM. Click through for the links.
News: Digital Photography Review (dpreview.com)
Ein Beitrag von: Isabelle
Wenn mich jemand fragt, was für mich das Allerschönste am Sommer ist, dann muß ich gar nicht lange überlegen: Die überschwängliche Vielfalt an Früchten, die uns der Sommer beschert. Ich brauche es da gar nicht so exotisch, schon allein die Früchte, die hier in unseren Breiten wachsen, machen mich sehr sehr glücklich.
Man kann so einen Pie in small, in quite small oder gar in itsy bitsy Größe backen. Oder bist du eher für think big? Das geht natürlich auch, dann haben sie nur keinen Welpenschutz mehr. Auch jede andere Sorte Obst kann in die Pies wandern, es darf auch bunt gemischt werden. Aprikosen, Pfirsiche, Nektarinen, Himbeeren, Johannisbeeren, Pflaumen und natürlich Äpfel, sozusagen die Mutter aller Pies.

Portionen: ca. 10 (Muffinform)
Zeit: ca. 1 Stunde und 15 Minuten, davon ca. 20 Minuten aktiv
Zutaten
150 g kalte Butter
250 g Mehl
30 g Puderzucker
1 Ei
1 EL Eiswasser
600 g Blaubeeren
1 EL Zitronensaft
100 g brauner Zucker
80 g Speisestärke
1 Ei
1 EL Milch
1 EL brauner Zucker
Zubereitung
Butter, Mehl und Puderzucker mischen. Ei und Wasser dazugeben und schnell zu einem Teig verkneten. Aus dem Teig eine Kugel formen und in Klarsichtfolie im Kühlschrank mindestens 30 Minuten ruhen lassen.
Den Backofen auf 180°C (Heißluft) vorheizen. Die Form gut fetten. Ich habe die Mini-Pies in einer Form für Yorkshire-Pudding gebacken, dabei sind die Mulden etwas größer und flacher als bei einer Muffinform.
Blaubeeren, Zitronensaft, Zucker und Speisestärke gut vermsichen.
Den Mürbeteig auf einer bemehlten Arbeitsfläche ausrollen. Teigstücke passend zur verwendeten Form ausstechen. Die unteren dabei aus der Form herausschauen lassen, also dafür einen größeren Durchmesser wählen.
Die Förmchen mit dem Teig auskleiden, mit der Blaubeermasse füllen und mit dem Teigdeckel verschließen. Den überstehenden Rand umschlagen und mit einer Kuchengabel andrücken.
Ei und Milch verquirlen und auf den Pies verstreichen. Zucker darüber streuen. Für ca. 25 Minuten backen und am besten noch warm mit etwas Sahne genießen.
Very delicious sind die kleinen Süßen übrigens ofenwarm, mit flüssiger Sahne, Vanilleeis, Mascarpone oder, falls (in ganz besonderen Glücksfällen) verfügbar, Clotted Cream. Mmmmmh.


Fotorezept:
Diese Pies sollten ganz ursprünglich, rustikal und bodenständig rüberkommen. So frisch aus der Farmhaus-Küche, also wählte ich als Untergrund eine alte Holzkiste, einen rustikalen Steingutteller und einen Kuchenrost.
Du hast auch ein leckeres Rezept und die passenden Food-Fotos dazu, die einem das Wasser im Munde zusammenlaufen lassen? Dann werde einfach selbst Teil von „Augenschmaus“!
kwerfeldein – Fotografie Magazin

Earlier this year I had quite the late night adventure driving the Big Sur coastline and photographing the stars on a moonless night. I had some time to enjoy the vastness of the night sky as I was shooting a time-lapse. While laying there in the dark, the combination of hearing crashing waves and watching the stars provided an interesting juxtaposition. Visually I could get lost scanning the stars, but the ocean seemed to keep me anchored so as to not completely escape into the ether. While I’ve photographed the Milky Way atop tall mountains, volcanos and the desert photographing it on the coast has been the most surreal simply because the role the ocean plays breaking the silence.
Copyright Jim M. Goldstein, All Rights Reserved
Big Sur Stars
The post Big Sur Stars appeared first on JMG-Galleries – Landscape, Nature & Travel Photography.
JMG-Galleries – Landscape, Nature & Travel Photography
As a photographer and aspiring writer, I’ve asked myself a few times before, “What subject or person in photography hasn’t been done to death, and is worthy of an article I’d actually read myself?” The answer, I found, is a formula. Take a young, talented photographer. Give him an idea, unlike any other you’ve encountered in the field. Make him Continue Reading
The post Celebrity Interview – Roof Topping: Standing on the Edge with Tom Ryaboi appeared first on Photodoto.
 We all love a bargain! For us here at dPS HQ this was the reason we created SnapnDeals.
But as much as we’d like to think all the good deals for photographers call SnapnDeals home, there are many other places to pick yourself up something nice at a great price. So each fortnight we’ll share with you a list of deals we’ve found from all over the web. Here’s some to get you started …
Know a deal you’d like to be included? Send us an email here.
Post originally from: Digital Photography Tips.
Check out our more Photography Tips at Photography Tips for Beginners, Portrait Photography Tips and Wedding Photography Tips.
Deals for Photographers This Week
[ By WebUrbanist in Art & Installation & Sound. ]

If castles of sand are ordinarily creative (if childish) works of artistic expression, then these are their opposite – boring and relentless repetition of identical houses inspired by postwar suburbia and deployed on an incongruous grid.

This piece of Master Plan is (or rather: was) the first small and temporary installation of an ongoing series by Chad Wright (photography by Lynn Kloythanomsup of Architectural Black). The project is intended as a personal reflection on his own history as well as commentary on the American Dream in light of recent history, particularly the housing crisis. Much like market shocks (metaphorically) or the passage of time (literally), each incoming wave cracks and erodes the constituent buildings in a relentless yet unpredictable fashion.

About the artist and how his history is intertwined with this work: “I was raised in Orange County—a sprawling suburb of Southern California built by disciples of Levittown. We lived in a tract house, a symbol of the American Dream, just like our neighbors. Dad, a realtor, and mom, a preschool teacher, met while working at JCPenneys in 1970. We spent our summers in Breezy Point, New York, at the yellow beach bungalow that my grandma Stella bought with war bonds, unknown to grandpa who was stationed in Iwo Jima soon after they eloped. As children, my big brother Christopher and I would build cities in the sand, beneath the bungalow’s slatted porch floorboards. Phase One [of Master Plan] focuses on the mass-produced tract house, re-examining it as symbol for the model American Dream.
![]()


[ WebUrbanist | Archives | Galleries | Privacy | TOS ]
![]()
     |

We love this 50 Things I’ve Learned About Mobile Photography List (and iPhone Photography) by Misho Baranovic, an accomplished mobile photographer and Connect contributor. You’ll find some universal truths in there and maybe a few things you disagree with, but Baranovic’s list is guaranteed to get you thinking, and laughing, too. Click through for some extracts and a link to the full article.
News: Digital Photography Review (dpreview.com)

This shot was done using a tradition speedlight setup. I used 4 speedlights- two on the background with no modifiers, and two in softboxes on the subject.
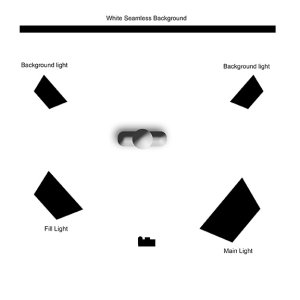
This is the lighting setup used for the first image above. Exposure was f/4, 1/250, ISO 400. The background lights were Canon 430 EX II speedlites, and the main and fill were 580 EX II speedlites.
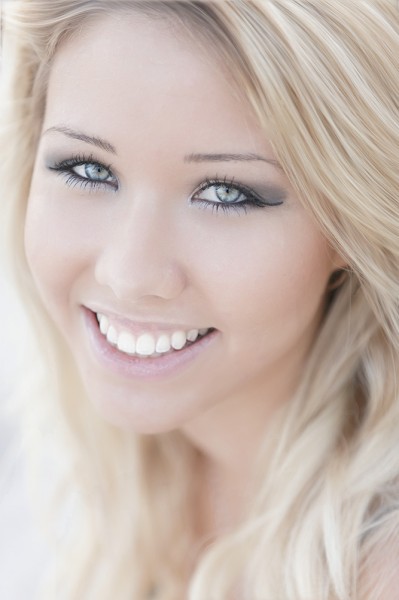
When shooting portraits, the very first decision I make is what look I’m going for. The answer to that question lies directly in how I want to light the scene. Generally, I want to evoke a mood or a feeling. Low key portraiture which has dramatic lighting, tends to be very moody, while high key portraiture will have a more even light, with very few harsh shadows. High key lighting tends to make the scene much more upbeat.
The problem with high key lighting is that, indoors, it can be costly to achieve. First, you need a white or light colored background. Seamless paper will work best, but I’ve also found that I can get away with flat bedsheets; one hung from a background stand and another on the floor, with the two meeting . When done right the seam can be hidden nicely. of course, a light colored muslin will work as well. Once the background is set, you need to light the background evenly. This requires at least two lights to light it evenly. Once the background has been lit, you need to light your subject. Using softbox for the main light and a smaller softbox for the fill, you can adjust the lighting to have some soft shadow on your subject if you prefer, or you even the lighting out if you want to eliminate shadow altogether. A reflector can also help kick more light into your subject’s face and further soften shadows.
High key lighting can be also be achieved outdoors, and at lesser cost as well. If the light is flat and even, a simple metallic reflector can be used to fill any shadows that occur. I find bright cloudy days perfect for this type of shooting. By the same token, a sunny day will work well also. A scrim can be used to soften the sunlight on the subject, while the sunlight brightly lights the background and creates that high key look.

For this shot, I ventured away from the setup above, and used a 50-inch softbox with a Canon 580 EX II speedlite. This was positioned on the far side of the subject- her left. To camera right, I used a large silver reflector to fill the shadows. I used white sheets as a background on the floor to complete the scene.
As far as camera settings go, it’s important to note that a high key image is not simply overexposed. You’ll want to watch your histogram to keep from clipping the highlights, but you will want to keep your exposure to the right on the histogram to ensure that the shows aren’t too deep. if I’m indoors, I’m using either studio lights or speedlights and using them to generate my exposure. Outdoors, I’ll shoot on aperture priority and use exposure compensation to push my exposure where I want it, again, careful not to clip the highlights.
I find high key portraiture a great way to photograph children or adults. It brings a happy, upbeat mood to the scene, and can also give an edgy look to things. Ultimately, it will take some experimentation to get the lighting the way you like it, but once you do, it’s another technique in your pocket to work with and use to create images. Happy shooting!
This shot was taken outdoors. It was a bright day but the sun was diffused by a thin layer of clouds, making it very soft and even. Canon EOS 1D X, EF 70-200 f/2.8L IS II. 1/320, f/2.8, ISO 200.

This was another bright day. This image was taken at the beach, and a light fog rolled in to diffuse the bright sun. A reflector positioned right next to the camera further softened shadows. Canon EOS 5D Mark III, EF 85mm f/1.2L. ISO 100, 1/8000, f/1.2.
Post originally from: Digital Photography Tips.
Check out our more Photography Tips at Photography Tips for Beginners, Portrait Photography Tips and Wedding Photography Tips.
Awash In Light: High Key Portraiture

You must be logged in to post a comment.