RSS
 

Archive for June, 2013

The Worst Forms of Abuse Your Camera Wants You to Stop Doing

10 Jun

All photographers are some of the most well-intentioned people on the face of the entire planet. They like to think of themselves as never, ever doing anything to their precious cameras that would ever result in damage coming to them or in their misuse. However, in spite of their sense of being well-intentioned, the reality paints quite a different story. Continue Reading

The post The Worst Forms of Abuse Your Camera Wants You to Stop Doing appeared first on Photodoto.


Photodoto

 
Comments Off on The Worst Forms of Abuse Your Camera Wants You to Stop Doing

Posted in Photography


First impressions shooting with the Sigma 18-35mm F1.8 DC HSM

10 Jun

Cover2.jpg

We’ve just published our first impressions of shooting with the Sigma 18-35mm F1.8 EX DC lens. We’ve tried to express just why we’re so excited about this lens, which offers APS-C DSLR users access to some of the depth-of-field and low-light capabilities that full-frame shooters get from their F2.8 zooms. We’re hoping to hear about pricing and availability soon so, in the meantime and in the light of our first impressions, what would you expect to pay for this lens?

News: Digital Photography Review (dpreview.com)

 
Comments Off on First impressions shooting with the Sigma 18-35mm F1.8 DC HSM

Posted in Uncategorized


Adobe releases Camera Raw 8.1 and DNG Converter 8.1

10 Jun

shared:AdobeLogo.png

Adobe has released Camera Raw 8.1 and DNG Converter 8.1, as final versions of updates that were originally posted as ‘release candidates’. ACR 8.1 is designed to work with Photoshop CC but, as promised, is also compatible with Photoshop CS6. It brings support for 7 additional cameras, including the Olympus PEN E-P5 and E-PL5, Ricoh GR and Panasonic Lumix DMC-G6, along with profiles for 16 more lens, including Sigma and Zeiss’s latest models. Click through for more details and how to download.

News: Digital Photography Review (dpreview.com)

 
Comments Off on Adobe releases Camera Raw 8.1 and DNG Converter 8.1

Posted in Uncategorized


Bildvorstellung: Sunshine

10 Jun

Ich wohne nicht gerade in der fotogensten Ecke Deutschlands. Doch jedes Jahr im Juli ändert sich das. Wenn in Franken die Sonnenblumenfelder zu blühen beginnen, beginnt für mich jedes Jahr aufs Neue eine ein- bis zweiwöchige Jagd nach dem perfekten Sonnenblumenfoto.

Perfektion liegt hier natürlich im Auge des Betrachters. Für mich heißt das: Ein weites Feld voller blühender Sonnenblumen, dahinter ein dramatischer Sonnenuntergang und Windstille, damit ich die Blumen scharf einfangen kann. Die letzten drei Jahre habe ich gemerkt, dass es gar nicht so einfach ist, alle Elemente für so ein Foto am gleichen Abend vorzufinden.

Der erste Schritt ist für mich immer, ein Feld mit interessanter Lage und unverbautem Horizont zu suchen. Wenn die Blumen dann richtig blühen, habe ich etwa eine Woche Zeit, in der ich jeden Abend zu diesem Feld fahre. Solange, bis mir ein spektakulärer Sonnenuntergang vergönnt ist.

Vor drei Jahren klappte das beim vierten Versuch, vor zwei Jahren nach sechs Tagen. Letztes Jahr jedoch blieb der Erfolg zunächst aus. Zwei Mal glühte der Himmel, doch starker Wind machte jeden Versuch zunichte, die Blumen scharf abzubilden. An den anderen Tagen vermisste ich das magische Licht.

Für Ende Juli hatten wir dann unsere Reise nach Nordirland geplant und es schien, als würde ich in diesem Jahr kein besonderes Sonnenblumenfoto präsentieren können. Die Vorfreude auf die bevorstehende Reise ließ mich das aber verschmerzen.

An einem Samstag sollte unser Flug nach Dublin gehen. Ich erspare Euch die Details, aber wegen einer Verspätung in Nürnberg war es uns unmöglich, den Anschluss in Frankfurt zu erreichen. Wir mussten auf den nächsten Tag umbuchen. Ich war wirklich sauer, denn am Abend wollte ich eigentlich schon am Giant’s Causeway stehen.

Aber Glück im Unglück: Stattdessen fuhr ich wieder zu meinem Sonnenblumenfeld und endlich kooperierte auch das Wetter. Ich hatte beste Fotobedingungen. Die Schwierigkeit lag nur noch darin, einen geeigneten Ausschnit zu finden. Wer schon einmal ein Sonnenblumenfeld fotografiert hat, weiß, dass es dabei nicht einfach ist, ein aufgeräumtes Foto zu komponieren. Auf den ersten Blick ist das ein riesen Durcheinander an Blumen unterschiedlicher Größe.

Aber ich hatte genug Zeit mitgebracht und nach 15 Minuten auch meine Einstellung gefunden. Ich wartete, bis die Sonne den Himmel zum Glühen brachte und musste dann das Bildmaterial nur noch ernten.

© Michael Breitung

Bezüglich des genauen Vorgehens möchte ich auf meinen Artikel In die Sonne Fotografieren verweisen. Die Technick war hier sehr ähnlich. Nur das Fokus Stacking mit den vielen Blumen war eine besondere Herausvorderung. Wie in meinem Start2Finish-Tutorial führte ich dieses manuell durch.

Sunshine © Michael Breitung

Blicke ich nun zurück, stellt sich die Frage, ob ich froh bin, dass sich der Flug nach Dublin verzögert hat. Trotz des erfreulichen Ergebnisses muss ich ganz klar mit nein antworten. Wer möchte schon auf einen Urlaubstag in Irland verzichten? Trotzdem ist Sunshine mein wichtigstes Foto aus dem letzten Jahr, weil es mir gezeigt hat, wie schnell sich das Blatt in der Fotografie auch mal zum Positiven wenden kann.


kwerfeldein – Fotografie Magazin

 
Comments Off on Bildvorstellung: Sunshine

Posted in Equipment


Adobe releases Photoshop Lightroom 5

10 Jun

shared:lr5box.png

Adobe has released Photoshop Lightroom 5, the latest version of its workflow and image editing software. Available as either an individual license or as part of a Creative Cloud subscription, Lightroom 5 adds a more advanced healing/cloning tool, automatic image leveling and perspective correction, a new selective editing tool and the ability to edit files that are offline. US pricing is $ 149 for new customers and $ 79 for the upgrade. Click here for more information, including our features preview and download links.

News: Digital Photography Review (dpreview.com)

 
Comments Off on Adobe releases Photoshop Lightroom 5

Posted in Uncategorized


Natural Lighting: Grow Your Own Glow-in-the-Dark Plants

10 Jun

[ By WebUrbanist in Conceptual & Futuristic & Technology. ]

glowing plant synthetic biology

Imagine the possibilities: cities illuminated at night not with carbon dioxide-producing energy sources, but with real glow-in-the-dark trees that light up streets and sidewalks alike.

glowing plant use cases

What started as a Glowing Plant campaign to raise just sixty-five thousand dollars has now ended with ten times that much in funding, all toward one purpose: naturally-glowing, biologically engineered plant life. The seed funding, in both senses, has been secured.

Glowing plants are not new, but crowd-funding the research and gene splicing,  aiming for sustained bioluminescence, and distributing the resulting plants all push into new (and apparently fertile) territories. The project team will start small, with household plants including glowing roses, and work up from there.

glowing plant how to

Concerned critics, however, have also noted that such ground-up, grass-roots synthetic biology experiments come with risks – including releasing new and untested plant strains into the wild.

glowing plants history process

With recommendations coming in from folks with Harvard to Singularity University on their resume, ranging to endorsements from known names including Cory Doctrow of BoingBoing, one hopes this team has their house in order. Still, even if the researchers in this case are careful and responsible, who is to say the next project of this type will be devoid of danger?

Share on Facebook


[ By WebUrbanist in Conceptual & Futuristic & Technology. ]

[ WebUrbanist | Archives | Galleries | Privacy | TOS ]


WebUrbanist

 
Comments Off on Natural Lighting: Grow Your Own Glow-in-the-Dark Plants

Posted in Creativity


What the Numbers on your Lens Mean

10 Jun

Some things seems pretty straight forward and like they’re common knowledge, but I’ve run into this a few times with my students that feel embarrassed to ask what all the numbers on the lens mean. There is no reason to feel stupid or embarrassed if you don’t know this, it is sometimes confusing. So I’m going to run through them one by one.

Common settings seen on newer digital lenses

FOCAL LENGTH

If you have a zoom lens you will have a ring that turns to zoom in and out and it will also indicate what focal length you are currently set to. For example of your lens is a 70-200mm like mine you may see this which indicates I’m at 100mm currently.

focal-length-600px

If you are using a prime or fixed lens you won’t have a zoom ring, it will simply indicate the focal length on the lens barrell, as you see on my 85mm lens below.

focal-length85mm-600px

MAXIMUM APERTURE

The maximum aperture is the largest opening (the smallest number) on the aperture scale that your lens is capable of opening to.  Larger apertures like f2.8 or even f1.8 are highly desirable because they let in more light and allow you to shoot in low light conditions without getting camera shake.  (for more on that read 5 Tips for getting sharper images or Why the 50mm lens is your new best friend) This will vary from lens to lens and you may actually see a range of numbers such as 3.5-6.3.

You can usually find this information in one of two places on your lens, or perhaps even in both places:

  1. right on the end of the lens barrel on the edge
  2. on the front of the lens inside the filter ring area.

In the example below you can see two different lenses.  My Tamron 17-35mm (notice the focal length range is shown there also) and my 85mm. On the Tamron you see “1:2.8-4″ and on the 85mm you see “1:1.8″.   What that means is that the maximum aperture on the 85mm lens is f1.8, but on the Tamron zoom it changes from f2.8 to f4 as you zoom the lens.  At the lenses widest, 17mm, I can open the aperture to f2.8, but if I zoom all the way in to 35mm now my maximum aperture is only f4. This is pretty common with kit lenses and ones that have a large focal length range such as 28-300mm or 18-200mm.

maximum-aperture-600px

FOCUSING RANGE AND DISTANCE SCALE

Some lenses, not all digital ones have this now, you will see a range of distances – usually marked in two scales, feet and meters. Look for the infinity symbol at one end, the other end will show how close your lens can focus, or its minimum focusing distance. Some lenses have built in MACRO settings which allow you to get a bit closer. They aren’t a true macro and you can’t get in super close but it’s a handy thing to have if you want to get closer without the expense and weight of an extra lens.

In the two lenses below you can see the scale on the Tamron (on the right) is in the outside of the lens and on the Canon 70-200 you can see it inside under a cover. Both will move if you manually focus your lens (**note: please remember to turn off auto focus if you do this because turning the focusing ring while autofocus is on can damage the gears and mechanisms inside your lens**)

focus-ring-distance-600px

FILTER SIZE OR LENS DIAMETER

Also on the end of your lens you may see a funny symbol that looks like a zero with a strike through it, then a number.  That indicates the diameter of the front of your lens or the size of filter required to fit on it. You can also find that same number on the back side the lens cap, see below – for this lens it is 77mm. Handy to know if you want to go to the camera store to buy a filter, or you’re buying something online.

filter-size-600px

Less common settings often seen on older manual focus lenses

APERTURE RING

This is one that you may or may not have on your lens, most newer digital lens do not have this as the aperture is set and controlled by the camera body now. Back in the days of film and manual focus lenses, the shutter speed was set on the camera and the aperture was set on the lens. You can pick up some great deals on older film lenses for specialty uses like macro, or fixed lenses with large apertures often for a fraction of the price of a new digital lens (you just need to get a special mount adapter ring to attach them to your camera). Just be aware that they will be manual focus and some of them you have to set the aperture on the actual lens itself. If you have one of these it may look something like either of the ones below:

6849853919_313cb31dae_z

Photo by Alvin Trusty

aperture ring example

Photo by Andrew Sales

HYPER-FOCAL DISTANCE SCALE

This is a bit of a trickier one to find and explain. If you have all zoom lenses, you will not find this on your lens. If you have a prime lens, especially an older model you may see an extra ring of numbers on your lens such as in the image below (the numbers in the middle radiating out from the central orange line).

1782641653_5e7c6f2280_z

Photo by Bob Usselman

The numbers on the lens above represent (in order from top to bottom ring)

  • the distance scale
  • the hyperfocal distance scale
  • the aperture ring that actually sets the lens aperture

You use the hyperfocal distance scale to know which parts of your image will be in focus at different aperture settings. Notice the lens above is set to f16 and it is focused at 5m (15 ft). Now look at the middle scale and go to f16 on the left side of the orange line – that is indicating the closest point that will be sharp when focused at that distance, using that aperture – in this case it looks like about 2.75m (approx. 9ft). Now look at the f16 on the right of the orange line and you see it’s at infinity. So what we can tell from this is that at f16 we can get from about 9ft to infinity in focus, but the trick is to focus in the right spot.

Using the hyperfocal distance scale you’d actually put the infinity mark at the f16 mark on the right and that will give you the most depth of field possible at f16 (notice you don’t actually focus ON something, you set it on the lens by the numbers).  Note:  if you focused on infinity you’d only get from about 15ft to infinity in focus (estimating here) or if you focused at 7ft you would not get infinity sharp.  There’s a bit more to it than that but if you pick up a lens that has such a ring – do some research on how to use it and you’ll get a lot more of out of your small apertures.

If you’re curious what the little red dot means, that’s the infrared focusing mark. When shooting with infrared film you actually had to focus at a different place  than normal because the infrared spectrum of light is different than what we see with our eyes.  I used to shoot infrared film now and then, fun stuff, but tricky to handle, focus and you need to know what you’re doing with it.  There’s now ways to replicate fairly closely that same look digitally, even though now and again I think about shooting some film.

That’s it for lens numbers (I hope!) if I missed anything let me know.  Share a photo of your lens and any numbers you can’t decipher and if I don’t know what it means I can try and find out for you, or maybe someone else can help out in the comments section.

Post originally from: Digital Photography Tips.

Check out our more Photography Tips at Photography Tips for Beginners, Portrait Photography Tips and Wedding Photography Tips.

What the Numbers on your Lens Mean


Digital Photography School

 
Comments Off on What the Numbers on your Lens Mean

Posted in Photography


Nikon Coolpix P520

10 Jun

Nikon Coolpix P520 review.jpg

It was love at first sight!

Totally smitten!

Pulled the P520 out of its unassuming box and there it was: a gleaming vision in deep cherry red.

At the outset, the red base colour and overlaid control ID texts picked out in white made everything abundantly clear … much better than the usual white text on black!
And what a piece of kit it is.

BK_LCD_1.jpg

Nikon Coolpix P520 top zoom.jpg

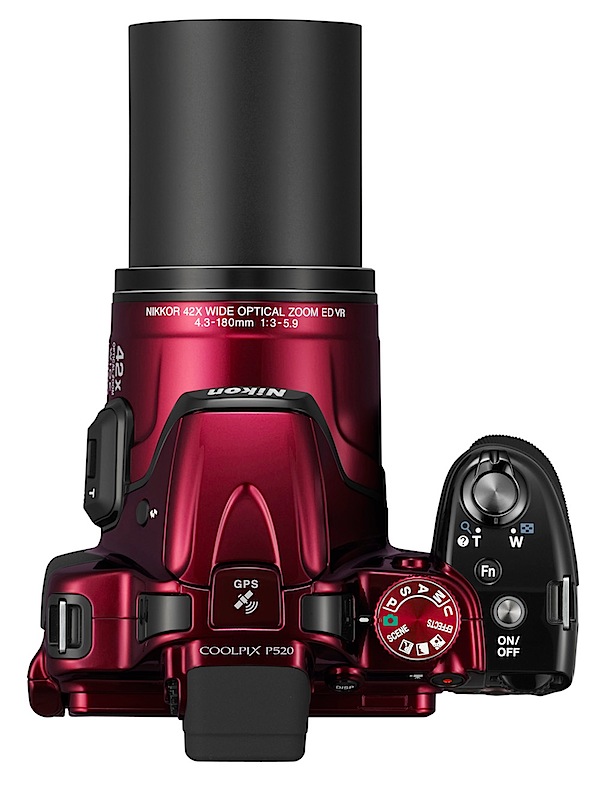
Hitting off with a 42x zoom that moves from a 35 SLR equivalent of 24mm at the wide end and slipping in to a tele of 1000mm, it’s quite a piece of glass, although I found the stabiliser to be wanting when I handheld the camera while shooting video.

The maximum still image size is 4896×3672 pixels, printing out to a final 41x31cm result.

Video can be recorded in Full HD at 1920×1080 resolution. While shooting video you can also shoot stills, with no interruption, although you will hear the click of the shutter.

Full wide 2.JPG

Full tele 2.JPG

Controls

Nikon Coolpix P520 top.jpg

Top: at the right end of the top deck you find the mode dial with auto, PASM, scene modes, night landscape, landscape, backlighting, special effects and special user settings.

Scene modes.jpg

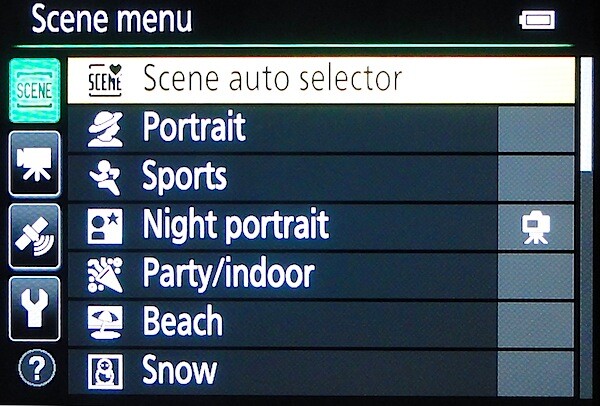
There are 17 scene modes, including settings for beach, sunset, food shots, fireworks, panorama, 3D photography etc.

Special effects.jpg

The five special effects include soft image, sepia, high contrast mono, high and low key shooting.

Forward and mounted on top of the pronounced speed grip is the shutter button, encircled by the zoom lever.

Behind is the Function button which gives access to the continuous speeds further to the rear is the on/off power switch.

Nikon Coolpix P520 back.jpg

Rear: next the top viewfinder is the display options button and further to the right is the video record button and the command dial; lower down is the replay button and the four way jog button which takes you to flash options, exposure compensation, macro and self timer; lower still is the menu and trash buttons.
Menu.JPG

To my mind the array of external controls is not at all intimidating. It’s only when you get to accessing the viewfinder menu that many more options become evident. Spend a few hours here and you will come away with a far better understanding of how the camera sings and dances.
Board rider 2.JPG

Fish 4.JPG

Water bottles.JPG

Viewing is via the top finder or the rear, vari-angle LCD screen, variable by 180 degrees laterally and 225 degrees vertically.

There is built in GPS, so you can record and store shooting locations; there is also a pre-populated database of 1.86 million points of interest included.

Nikon Coolpix P520 ISO Tests

Nikon Coolpix P520 ISO 80.JPG

Nikon Coolpix P520 ISO 400.JPG

Nikon Coolpix P520 ISO 800.JPG

Nikon Coolpix P520 ISO 1600.JPG

Nikon Coolpix P520 ISO 3200.JPG

Nikon Coolpix P520 ISO 6400.JPG
All OK until ISO 3200, when a little softness appeared. By ISO 6400 softness increased but, surprisingly, noise was very low.

Startup Time

It took about two seconds from startup to first shoot; follow ons about two seconds a shot.

Distortion

No problem at the wide or tele ends of the zoom.

Nikon Coolpix P520 Review Verdict

Quality: if you want to extract the full benefit of this camera, especially to enjoy the tele end of the zoom you need quite an amount of discipline (for ‘discipline’ read a tripod or firm shooting base!).

Most shots I took showed about average quality.

Why you would buy it: long zoom; easy to use; vari-angle screen.

Why you wouldn’t: long zoom can often lead to poor shots; AF at long tele a bit slow.

In spite of my generally glowing report, it’s not all a rosy picture: maximum lens aperture is f3.5, fully an f stop slower than many compacts; there is no support for RAW file format … JPEG is all you get in stills.

In two colours: red and black. Go for the red!

Nikon Coolpix P520 Specifications

Image Sensor: 18.1 million effective pixels.
Metering: Matrix, centre-weighted and spot.
Sensor: 11mm CMOS.
Lens: f3.5-5.9/4.3-180mm (24-1000mm as 35 SLR equivalent).
Exposure Modes: Program AE, shutter and aperture priority, manual.
Shutter Speed: 8 to 1/4000 second.
Continuous Speed: 7 fps.
Memory: SD/SDHC/SDXC cards plus 15MB internal memory.
Image Sizes (pixels): 4896×3672 to 640×480. Movies: 1920×1080, 1280×720, 960×540, 640×480 at 25 or 30fps.
Viewfinder: 8cm LCD (921,000 pixels).
File Formats: JPEG, MPO (3D), WAV, MPEG4.
ISO Sensitivity: Auto, 80 to 6400.
Interface: USB 2.0, AV, HDMI mini, WiFi, DC input.
Power: Rechargeable lithium ion battery, AC adaptor.
Dimensions: 125x84x102 WHDmm.
Weight: 550 g (inc battery and SD card).
Price: Get a price on the Nikon COOLPIX P520 at Amazon.

Post originally from: Digital Photography Tips.

Check out our more Photography Tips at Photography Tips for Beginners, Portrait Photography Tips and Wedding Photography Tips.

Nikon Coolpix P520


Digital Photography School

 
Comments Off on Nikon Coolpix P520

Posted in Photography


9. Juni 2013

09 Jun

Ein Beitrag von: Stefanie Wenzel

flowers


kwerfeldein – Fotografie Magazin

 
Comments Off on 9. Juni 2013

Posted in Equipment


As The Whirl Turns: 9 Abandoned Heliports & Helipads

09 Jun

[ By Steve in Abandoned Places & Architecture. ]

abandoned helipads heliports
Like the last episode of M*A*S*H, the choppers won’t be back. These abandoned heliports and helipads stand in silent contrast with their past buzzing busy-ness.

Old Cold Warrior

abandoned helipad Sweney Ridge California(image via: Randy52)

Sweeney Ridge in Pacifica, California is part of the Golden Gate National Recreation Area these days but back in Cold War times it sheltered a SF-51C Nike missile control facility. The sun-blistered helipad above was used to shuttle military personnel and support staff to and from the site. Kudos to Flickr user Randy Lloyd for capturing the eerie loneliness embodied in this long-disused helipad.

District 9 Revisited

abandoned heliport Cape Town South Africa(images via: Eduard Grebe, Tropicfruit and Wikipedia)

Only chunks of disarticulated concrete remain of a former heliport located at Mouille Point in Cape Town, South Africa. The gritty war-zone vibe and stark stenciled lettering evoke the disturbing atmosphere that permeated the futuristic 2009 sc-fi film District 9, shot on location in South Africa. Coincidence or just bad vibes?

abandoned heliport Cape Town South Africa(image via: Cape Town Daily Photo)

Text and arrow notwithstanding, you wouldn’t want to attempt any landing (by helicopter or otherwise) in this area. Are these the remains of a heliport in situ or have some of the original components been moved to a central scrap storage depot? Will the bits & pieces be reassembled someday by otherworldly refugees trapped in a desperate tug-of-war between brain and prawn? Further discussion on this topic has been banned by the MNU Department of Alien Affairs.

Ukraine Not Weak!

abandoned helipad Ukraine Kaniv(images via: KyivPost)

When Ukraine was awarded the honor of hosting the Euro 2012 soccer championship, the governmental powers that be decided a brand, spanking new heliport was needed to welcome assorted billionaires, oligarchs and the like. The order was given, $ 11 million worth of  funding was committed and before long, the city of Kaniv boasted an impressive new heliport with a spiffy glass-walled mini-terminal. Unfortunately, the assorted billionaires, oligarchs and the like DIDN’T like the Kaniv heliport, which these days only impresses those who appreciate infrastructural white elephants.

Next Page:
As The Whirl Turns 9 Abandoned Heliports Helipads

Share on Facebook


[ By Steve in Abandoned Places & Architecture. ]

[ WebUrbanist | Archives | Galleries | Privacy | TOS ]


WebUrbanist

 
Comments Off on As The Whirl Turns: 9 Abandoned Heliports & Helipads

Posted in Creativity