RSS
 

Archive for June, 2013

7 Tips for Photographing Newborns without Becoming Clichéd, Derivative or Boring

11 Jun

by Lynsey Peterson.

When I first started doing professional photography, newborn babies were the coveted prize. An adorable sleeping creature that would look cute no matter what? Sign me up! Let’s put that baby in a stockpot! In a basket! Wait! –A headband that looks like a flower! In a field of flowers! With butterflies! And maybe a big gift box bow!

Then I realized that Anne Geddes is the landlord of that entire market. And that it’s rare for a portrait client to actually want a picture of their baby in a stockpot. What people do want is a picture of their baby, that looks like their baby. Because in about 5 minutes their baby isn’t going to look like this anymore.

BABY1

Set the Scene

In an ideal situation, you are photographing a newborn that is less than two weeks old (when they tend to be more “mold-able”), in the morning (when they tend to be a more willing participant), just after being fed (when they tend to be a little more tolerant), and in a warm room (where they tend to be a little more comfortable).

Having everything ready to go before shooting a single shot is taken will serve you well: various blankets for background and warmth, cloth diapers for when someone pees on you (let’s hope it’s the baby), any clothing you plan to use and back-ups of every possible thing. I prefer minimal clothing on newborns, but this is just personal preference. Amble natural light is important because even if you do usually shoot flash, it’s often disruptive enough to wake a newborn and rule number one in photography, parenting, and life is: Never wake a sleeping baby. If there is anything I’ve learned, it’s that.

Be prepared to work fast because babies can be ticking time bombs, but slowly because they are delicate ticking time bombs. You are methodical. You are confident. You are patient. You are the baby whisperer. Because we are speaking in ideals. And if you’re me and we are still speaking in ideals, you also have on your cute jeans and are having a great hair day. Because, why not?

BABY2

Find the Purpose

Photographing newborns is one of the few times I make a point of asking clients what they are planning on doing with the end result. Often it’s for use in a baby announcement or just as “baby pictures” documenting this time. But if it’s going to end-up as a 24″x36″ canvas above a fireplace, I want to know beforehand. Or if I’m going to need negative space to create an announcement card, I’d rather shoot with that in mind then trying to backtrack later in post.

Another thing to think about is the ratio of images of the baby alone and the baby with parents or siblings; there is no right or wrong answer here but knowing what you or your client is wanting in advance is key. Newborn shoots are not (usually) guided by a free-spirited toddler and therefore require more of a plan from you than shoots with older children. And you never know when a baby will decide that pictures are just not what he wants to do today and let’s you know this in a very unsubtle and loud way.
  
BABY3

It’s all about the Baby

The only thing I always bring to a newborn shoot is a large piece of black cloth. I have had it for nearly a decade and more babies have peed on it than I wish to think about. I have hung it on walls and used it on floors and beds as a back-drop. I use it every single time because it simplifies everything and allows the focus to be completely on the baby. Lots of photographers do a version of a black background of some sort and I’ve found that there is no need to get fancy.

Many photographers use a velvet, but mine is about 2 yards of a stretchy thick cloth that I bought at a fabric store for ten dollars. It washes well (luckily) and the light sheen of it makes editing out any wrinkles in post extremely easy. I carry thumbtacks and painters tape to hang it with if I need to and it’s thick enough to hang over about anything and not have backlight shine through. I cannot stress having a way to simplify a newborn shoot enough. If a black background isn’t your style, find what is that will clean-up everything and let the newborn to be the focus, and allow it to become your key piece for baby photography.

BABY4 1

It’s in the Details

And why shouldn’t it be? Baby details are sorta amazing. I mean have you seen a baby toe recently? Talk about something I’d like to dip in butter and call a snack. We have all seen baby parts photographed in the same boring ways: wedding rings on toes, close-ups of belly buttons and umbilical cords (ew), tops of bald heads in big grown-up hands. I am guilty of doing every one of these, multiple times over. I now see that the shots that will stand the test of time will be very simple close-ups that highlight just how small newborns are: tiny hands holding a parent’s finger, brand new feet that have yet to see wear, yawns and other adorable expressions that only look adorable on a baby.

BABY5

As Cute as they are Awkward

Oh sure, we all know they are adorable, but what are you supposed to do with them? They are flimsy and tiny and often naked. This is where I think we get into trouble and put them in baskets and stockpots. Because we can. Instead of creating scenes, it’s better to just think of “positions”. Babies can only do about two positions unassisted—laying down this way or that way. Work with that.

They may just lay there, but the beauty in this is that they often let you adjust them however you want. Tuck legs up under bodies, pull flailing arms into blankets, curl them up into someone’s hands. The baby is the star of this show and is plenty cute to pull off this role without a big supporting cast of props. A key to getting the position you want and having it stay that way long enough to get the shot you want is to keep your hands on the baby longer than needed after positioning them.

Think of it as long hug—you don’t need that extra ten seconds at the end, but it feels nice. Get the baby settled and then stay there for a bit longer. The warmth of your hands and the consistency and reassurance is often exactly what the baby needs to “hold” the position you are seeking.

BABY6 1

Got Extra Arms? Use them

I like to include siblings as often as I can, no matter the age. This gets tricky because the very definition of tricky is a two year old holding a newborn while exhausted parents watch the situation go down. Enough pillows and promises of lollipops though will get you a shot or two and a little variation in the final images. Interaction is the name of the game here—look for whatever the emotion is that’s happening and play on it. If it’s pride, comment on it to instill confidence and document a sweet moment in sibling history. If it’s indifference, engage the older child so they forget there is even a new addition in the photograph and are happy to be your star for a moment.

BABY7

Stop Worrying

I love a good worry and consider myself to be quite good at it. But as jobs go, photographing newborns is about as close to shooting fish in a barrel as you are likely to get. It’s easy to feel the pressure given that babies are so fragile and grow every single second. The truth is any picture you take of a newborn is a gift. Just as any time spent getting to photograph a newborn. I don’t get sappy often, but newborn babies are pretty special. Enjoy it.

Especially if the newborn belongs to someone else and you get to walk out of there without a crying baby and go home to a bed where you’re permitted to sleep through the night.

Check out more of Lynsey Peterson’s work on her website.

Post originally from: Digital Photography Tips.

Check out our more Photography Tips at Photography Tips for Beginners, Portrait Photography Tips and Wedding Photography Tips.

7 Tips for Photographing Newborns without Becoming Clichéd, Derivative or Boring


Digital Photography School

 
Comments Off on 7 Tips for Photographing Newborns without Becoming Clichéd, Derivative or Boring

Posted in Photography


Just Posted: Canon EOS 700D / EOS Rebel T5i review

11 Jun

t5i.png

Just Posted: Our review of the Canon EOS 700D / EOS Rebel T5i. The 700D may be an identical twin of the short-lived EOS 650D, but it’s still a worthy option for novice DSLR upgraders, combining high image quality and an articulated LCD with a comprehensive touchscreen interface. This new model also ships with an STM version of the 18-55mm kit zoom, providing another welcome option for faster, silent AF. What else does the 700D have to offer? Read our review to find out.

News: Digital Photography Review (dpreview.com)

 
Comments Off on Just Posted: Canon EOS 700D / EOS Rebel T5i review

Posted in Uncategorized


What Apple announcements mean for mobile photographers

11 Jun

Screen_Shot_2013-06-10_at_11.43.06_AM.png

As expected, Apple revealed iOS 7 today at the 24th annual World Wide Developers Conference, and there’s plenty for mobile photography enthusiasts to be excited about. From photo filters built into the Camera app to better automatic organization within the Photos app, we take a look at Apple’s forthcoming revamped mobile operating system and what it will bring to photographers on the go.

News: Digital Photography Review (dpreview.com)

 
Comments Off on What Apple announcements mean for mobile photographers

Posted in Uncategorized


Hasselblad Lunar interchangeable lens camera now shipping

11 Jun

Lunar-Mahogany-Wood-18-55-Hood_b.jpg

Swedish camera manufacturer Hasselblad is finally shipping the ‘Lunar’. This 24 megapixel camera – essentially a rebadged Sony Alpha NEX-7 – was announced at Photokina last year and comes with your choice of grips: black or brown leather, carbon fiber, and wood: mahogany or olive, to be precise. The Lunar includes an 18-55mm lens and is priced at $ 6995/£5280. 

News: Digital Photography Review (dpreview.com)

 
Comments Off on Hasselblad Lunar interchangeable lens camera now shipping

Posted in Uncategorized


15 Tips for Successful Fireworks Photography

10 Jun

fireworks-tips-dps-08

With the summer coming up and different celebrations you may have the opportunity to photograph some fireworks.  If you’re in the USA you have the 4th of July, in Canada July 1st.  In many other places you can find fireworks festivals or competitions even, or special occasions when fireworks may be set off including weddings, New Years Day or course and of course at Disneyland!

So here’s a few tips to help you photograph fireworks. The biggest thing to remember is that it’s all about practice, experimentation, and the following mantra (say it with me!)

SHOOT – REVIEW – ADJUST – REPEAT

Please remember that if you’ve never tried fireworks before it’s all trial and error and I’ve made a lot of mistakes myself before I got any images that I was happy to show anyone.  Each time I photograph fireworks there’s always some element that’s unpredictable so you have to learn to adapt and learn from your own mistakes, correct for next time and do it again. So take these tips to help you get started.

15 tips for fireworks photography

#1 Use the right equipment: use a sturdy tripod and remote to fire the camera  and bring an extra battery as long exposures tend to use them up quickly.  I say STURDY tripod because it needs to hold your camera steady for several seconds without sinking, tipping, or wobbling. I wrote an article on my site on Tips for buying a tripod of you need more info on what to get.

This image was actually purchased by the company that put on the fireworks show in Portland.

This image was actually purchased by the company that put on the fireworks show in Portland.

#2 Set your ISO low like 100 or 200, for a couple reasons. First the higher the ISO you use the more noise you’ll introduce into your images, so keep it low to prevent that. Noise also lives in blue areas of images and nighttime has a lot of blue so that compounds the issue.  Long exposures also tend to increase noise so if you add it all up you get a lot of noise so keep the ISO low to eliminate that variable.

#3 Turn OFF long exposure noise reduction.  This setting, while it does a really good job of noise reduction, adds an extra complication you don’t need when doing photography of fireworks.  The way it works is that if you take say a 10 second exposure, it takes a second one of equal length but just black (the shutter doesn’t open). Then it merges the two together and blends the blank one into the shadow areas of the first one which is where noise typically shows the most. The problem is that fireworks happen so fast you don’t want to have to wait 10 seconds to be able to see your image, make any adjustments and shoot again. I did this once my accident and it was very frustrating and I missed most of the show and did not get the results I wanted because I couldn’t review and correct.

#4 Do NOT use live view if your camera has it. This will eat up your battery really fast. Live view is really for shooting video and using the display screen so much uses a lot of power, as does making long exposures.  Save your battery for actually shooting and set up your shot using the eyecup viewfinder.
fireworks-tips-dps-09#
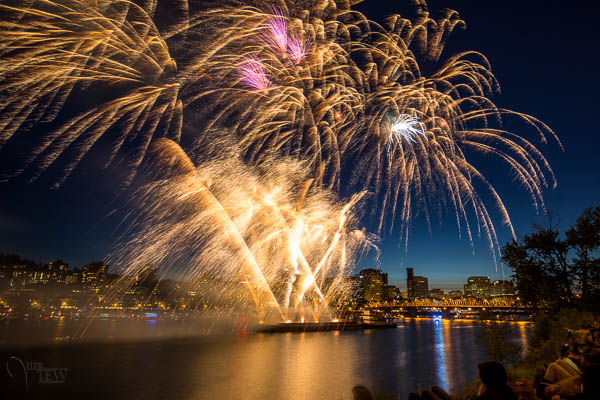
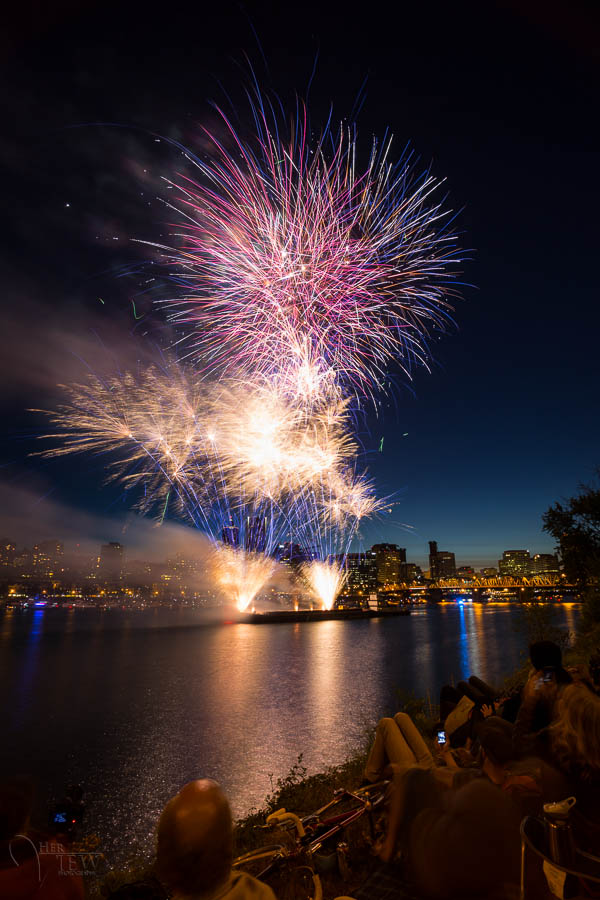
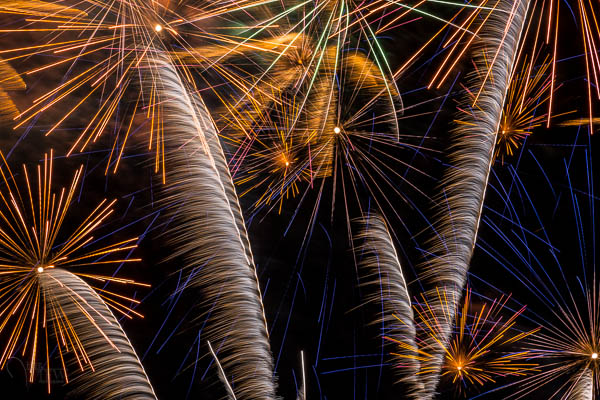
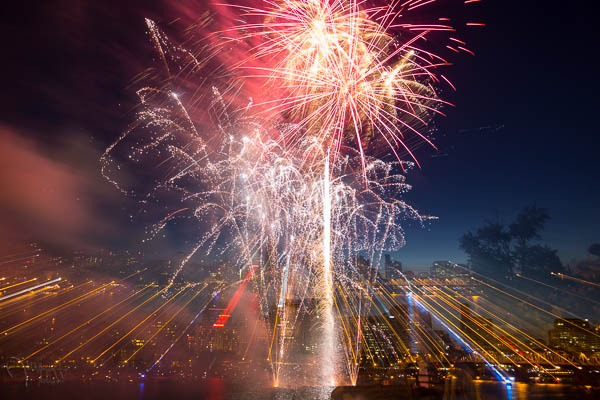
5 set your camera on Manual mode for exposure and set your aperture to f5.6 or f8.  Those apertures are pretty optimal for fireworks as the light streaks are controlled by the size of the aperture.  Closing down more will make the light trails thinner, opening up more will make them wider and possible too over exposed.  Do some tests but all the times I’ve done fireworks I keep coming back to f8 as my preference.

#6 Set your shutter speed to between two and ten seconds.  Do a test shot before the show starts and see if the sky is too dark or too bright and adjust the exposure time accordingly. As long as you’re under 30 seconds you can let the camera time the shots for you.  Or you can switch to Bulb and just open and close manually when you feel you’ve captured enough bursts in one image.

#7 Focus your lens ahead of time, and then turn off AF otherwise the camera will keep trying to refocus every shot and you may end up with missed images or blurry fireworks if the camera misses. Assuming you’re a fair distance away from the fireworks you shouldn’t have to refocus at all unless you change your angle of view or want to focus somewhere else, like the people in front of you.

#8 Use a neutral density filter to get a longer exposure if need be.   If it’s not 100% dark out yet it (the sky still has some light) this will allow you to get a longer exposure and make sure the fireworks bursts have a nice arch.  If your exposure is too short you’ll end up with short stubby looking bursts, not the nice umbrella shaped ones. If yours are too short, just make the exposure time longer. If you are getting too many bursts in one shot and it’s coming out over exposed, shorten the exposure time.  Using the ND filter if it IS dark will also allow you to shoot longer exposures and capture more bursts per image.  Play with that and try it with and without the filter if you have one.  A polarizing filter will work to a lesser degree also.

ISO 100, f/10, 1 second

ISO 100, f/10, 1 second – notice the bursts don’t really make a nice arch? A longer exposure will make your trails longer. You choose how you want them to appear and adjust accordingly.

#9 Shoot most of your shots at the start of the show to avoid the smoke/haze that appears a bit later. Eventually the sky will be filled with smoke and it’s not as pretty looking.  That’s when I’ll try some close ups or abstracts (keep reading for more on that later)

#10 Scout your location ahead of time and get there early to get a good spot, think about background (what’s behind the show) and if you want the people around and in front of you as part of the shot. In general the good viewing areas fill up sometimes 1-2 hours prior to the fireworks show. If you want a good spot with enough room for you and your tripod, go early and take a good book or something to entertain you while you wait.

Notice I've included the crowd to show perspective.

Notice I’ve included the crowd to show perspective.

#11 Make sure you leave enough room in your frame to anticipate the height of the opened bursts. Adjust as necessary if you miss on the first shot – it’s a lot of trial and error and correcting. It’s often hard to tell where the highest fireworks will end up in the sky, you may want to try both horizontal and vertical compositions.

Try a vertical composition for an added sense of power, especially if you can get a reflection like this one.

Try a vertical composition for an added sense of power, especially if you can get a reflection like this.

#12 It takes a bit of practice to time your shots when you hear the fireworks being released, so ideally you capture a few bursts.  Do some testing to see how many bursts is just right for your taste.  Try some with more, and some with less. Having too many may overexpose the overall image, so keep that in mind.

#13 Shoot into the eastern sky not facing west, if you want a darker sky. Here in Edmonton we are quite far north and even by 10:30pm in the summer the sky is not fully dark yet.  I’ve found that when I shoot into the sunset my sky gets too blown out and the lights of the fireworks don’t show up as well as they do against a darker sky.  So try and find a vantage point that has you facing east when possible if that’s an issue for you as well.

Western facing, notice the sky isn't dark enough and the fireworks seem lost against it.

#14 Try some telephoto shots as well as the usual wide, try some close ups zoomed in tighter for something a bit more abstract. For this you will need to aim basically into thin air and try to anticipate where the bursts will open

Abstracted using a longer lens, I think they look like palm trees.

Abstracted using a longer lens, I think they look like palm trees.

#15 if you have a zoom lens try zooming during the exposure and see what you get!  If you’re going to try this make sure you have focused at the most zoomed in point of the lens.  Try different technique including counting 1/2 the exposure before you zoom, or zooming right away and the last 1/2 is zoomed out. Try zooming fast, then slow. Try more bursts, or less. Get some city lights in the shot too.

ISO 100, f/6.3, 6 seconds - zoomed during exposure.

ISO 100, f/6.3, 6 seconds – lens zoomed during the exposure.

Summary

The biggest tip I can give you overal is experiment with your settings to get the look you want. Use my settings above as a starting point, adapt to your situation and your camera equipment until you’re happy with the results.

Have a great time this summer trying these out and don’t forget to share your images of fireworks, and any additional tips you’d like to add.

Post originally from: Digital Photography Tips.

Check out our more Photography Tips at Photography Tips for Beginners, Portrait Photography Tips and Wedding Photography Tips.

15 Tips for Successful Fireworks Photography


Digital Photography School

 
Comments Off on 15 Tips for Successful Fireworks Photography

Posted in Photography


Abandoned on Film: 15 Terrifying Desolate Movie Settings

10 Jun

[ By Steph in Abandoned Places & Architecture. ]

Abandoned Places in Movies Main

Sometimes, the setting of a film is almost more important than the plot itself, and that’s particularly true with abandoned places. Crumbling ruins of hospitals, prisons, houses, schools and other facilities seem to host echoes of past residents and events, often radiating a sense of trauma and loss. Of course, the catch – at least, in fiction and fantasy – is that these places aren’t really abandoned after all. Here are 10 (more!) abandonments, real and invented, that feature prominently in scary movies and television shows.

Abandoned Sanitorium – Death Tunnel

Abandoned Places in Movies Death Tunnel

Death Tunnel may not be the greatest horror film ever made, but it’s the setting that’s the real star of the show. This 2005 movie about five college women locked into a Kentucky hospital where 63,000 people died from a disease known as the ‘white plague’ was filmed at the real life Waverly Hills Sanitorium in Louisville. And that part about thousands of people dying there? It’s actually true. Treated with little more than fresh air and sunlight in an era before antibiotics, the tuberculosis patients admitted to the hospital invariably ended up in the 500-foot tunnel located beneath the hospital, called a ‘body chute.’ The dead were secretly lowered into the tunnel and loaded on a train so that the remaining patients wouldn’t give up hope that they’d get out alive.

Built in 1910, Waverly Hills closed in 1961 after the advent of advanced medical care drastically reduced the number of patients coming in. Plans are underway to turn it into a hotel that will play up its ‘haunted’ history.

Abandoned Town – Silent Hill

Abandoned Places in Movies Silent Hill

‘Silent Hill’ is based on a real place. This seemingly fictional setting of a series of video games and a movie is based on Centralia, a borough of Pennsylvania that has been abandoned as a result of a mine fire that has burned underground since 1962. Prior to the 1980s, it had about 1,000 residents; there are just a handful left today despite the town being condemned. The blaze beneath Centralia has opened steam pits, sink holes and carbon monoxide vents. The fictional Silent Hill is located in West Virginia, and the reasons for its abandonment are far more frightening.

Abandoned House: The Abandoned

Abandoned Places in Movies The Abandoned

In the 2006 film The Abandoned, an adopted American film producer returns to her hometown in Russia after receiving a phone call from a notary public that she had inherited her family’s abandoned farm. When Marie arrives at the house to learn more about the family she never knew, a man tells her he received the same phone call, and that they’re twins. But once inside, the pair find that the dead residents of the house don’t really want them to leave.

Hidden Subway Tunnel Under London – Raw Meat

Abandoned Places in Movies Raw Meat

Released overseas as ‘Death Line’, Raw Meat is a 1973 movie set in an abandoned subway tunnel under London. Inspired by the many real-life abandoned tube stations of the area, Raw Meat envisions these creepy, darkened subterranean settings filled with a family of cannibals descended from Victorian railway workers.

Abandoned City – New York in I Am Legend

Abandoned Places in Movies I Am Legend

The idea of a once-bustling metropolis utterly abandoned (by humans, anyway) serves as fodder for all sorts of fiction, from books to films. The 2008 adaptation of ‘I Am Legend’ starring Will Smith is just one of many giving us a glimpse of what New York City might look like if it were allowed to fall into ruin, taken back over by the forces of nature. Smith stars as a lone survivor of an epidemic that has turned most of the population into bloodthirsty mutants.

Next Page:
Abandoned On Film 15 Terrifying Desolate Movie Settings

Share on Facebook


[ By Steph in Abandoned Places & Architecture. ]

[ WebUrbanist | Archives | Galleries | Privacy | TOS ]


WebUrbanist

 
Comments Off on Abandoned on Film: 15 Terrifying Desolate Movie Settings

Posted in Creativity


Berlin Fotofestival 2013 – The BROWSE

10 Jun

Vom 13. Juni bis zum 13. August gibt es in Berlin Kreuzberg fotografisch einiges zu entdecken. Das internationale Fotofestival The BROWSE wird am Donnerstag eröffnet und zeigt in der STATION Berlin auf 5.000 m² Fläche über 70 Ausstellungen.

Inhaltliche Schwerpunkte sind die dokumentarische Fotografie, die Zukunft des Fotojournalismus und die Mobile Photography in Zeiten von Internet, Handy und Sozialen Netzwerken.

Besonders hervorzuheben ist dabei die Ausstellung „Time in Turkey“, die Fotoreportagen aus der Türkei von 25 preisgekrönten Fotografen wie Christopher Morris, Anthony Suau und Ed Kashi zeigt. Die türkische Zeitung Zaman hatte bereits 2010 international anerkannte Fotografen dazu aufgerufen, ihren Blick auf die heutige Türkei in Bildern teilen. Entstanden ist dabei diese Wanderausstellung, die nun erstmals auch in Deutschland zu sehen sein wird.

© Paolo Pellegrin
Aus der Ausstellung „Time in Turkey“, © Paolo Pellegrin

Das Projekt „OPEN THE SHUTTERS“ umfasst gleich drei große Ausstellungen und zeigt den Wahnsinn von Grenzkonflikten auf. Mit der Serie „Wall on Wall“ nimmt der deutsche Fotojournalist Kai Wiedenhöfer an dieser Ausstellung teil. 36 seiner Mauer-Panoramabilder aus acht Regionen der Welt werden auf der Rückseite der East Side Gallery ab dem 7. Juli auf einer Länge von 364 m plakatiert sein.

„Picturing Derry“ zeigt Bilder aus den späten 60er Jahren aus Nordirland. Mit der Serie „Broken Lights“ dokumentiert Emmanuel Ortiz das ehemalige Jugoslawien und die Balkankriege.

© Kai Wiedenhöfer
Aus der Ausstellung „Wall on Wall“, © Kai Wiedenhöfer

„From War to White House to Fashion“ heißt die Ausstellung von Christopher Morris und der Name verrät auch bereits, um was es geht: Morris fotografierte von 1970 bis 1990 als Kriegsfotograf auf dem Balkan, im Irak, in Afghanistan und in Tschetschenien.

Danach lichtete er als White House Photographer George Bush Junior und Barack Obama ab und heute arbeitet er als Modefotograf für die großen Modehäuser der Welt. Ein Werdegang, der neugierig macht. Christopher Morris wird auch persönlich in Berlin sein, wo er den drei-tägigen Workshop „Learning to see“ hält.

© Christopher Morris
Aus der Ausstellung „From War to White House to Fashion“, © Christopher Morris

Aktuelle Bilder zeigt die Ausstellung „Wüste Demokratie“ von Robert King. Er dokumentiert die Kriegsverbrechen in Syrien und unterbricht seine Arbeit als Kriegsfotograf während des Fotofestivals. Ebenfalls von King ist die Ausstellung „KKKRIPS“ über den Ku Klux Klan.

Nathan Bedford Forrest © Robert King
Aus der Ausstellung „KKKRIPS“, © Robert King

Auch der große fotojournalistische Wettbewerb „World Press Photo“ zeigt seine Gewinnerbilder 2012 im Rahmen des Festivals im Willy-Brandt-Haus, nur zehn Minuten vom Festivalgelände entfernt. Zu sehen wird es hier auch das wegen seiner Nachbearbeitung umstrittene Foto „Gaza Burial“ des schwedischen Fotografen Paul Hansen geben.

Alle weiteren Informationen sowie eine Übersicht der gesamten Ausstellungen und Workshops findet Ihr auf der offiziellen Webseite des Festivals.


kwerfeldein – Fotografie Magazin

 
Comments Off on Berlin Fotofestival 2013 – The BROWSE

Posted in Equipment


10. Juni 2013

10 Jun

Ein Beitrag von: Erkan Camlilar

1 © Camiliar


kwerfeldein – Fotografie Magazin

 
Comments Off on 10. Juni 2013

Posted in Equipment


10 June, 2013 – Vision Part 3

10 Jun

We have just published Alain Briot’s latest essay, Vision and The Artists Statement – Part 3.


I returned from Western Australia yesterday after two days of almost continious travel. Whew. Four airports, five movies, two novels, and at least a half dozen indescribable airplane meals. But, no delays, no lost bags, and no drama, so lot’s to be thankful for.

Kevin is still there, taking care of winding things up, and shipping all the Phase gear back to Denmark. He’ll be home by Thursday.


Adobe started shipping Lightroom 5 today. We filmed our Lightroom 5 Tutorial Update a few weeks ago and it is now in the final editing stages. It will be ready shortly and will have compehensive tutorials on all of the new features in LR5.

Watch for a special promotional price soon.


 "Yes I downloaded the videos. THEY ARE AWESOME!!! 
I learned so much I 
think my brain is going to explode.


The Luminous Landscape – What’s New

 
Comments Off on 10 June, 2013 – Vision Part 3

Posted in News


On Assignment: Dahlia Flute Duo

10 Jun

Whenever possible, I scout not only location but also time of day when planning an outdoor shoot. Especially if that shoot is in the evening.

When does the sun set? Where does the sun set? When is golden light? Where will it come from?

So in this case, the I knew the ideal pop of tree-filtered backlight would happen at about 7:22pm. And at that time we were ready and in place, waiting for the light.

Shame about the sun not showing up.

Read more »
Strobist

 
Comments Off on On Assignment: Dahlia Flute Duo

Posted in Photography