DxO Labs has tested 85 lenses on the Canon EOS 5D Mark III and analysed the results, looking at its two proprietary measures: ‘Perceptual Megapixels’ for lens sharpness, and the overall DxOMark score. In the first section of a multi-part series, it makes comparisons against both the EOS 5D Mark II and the Nikon D800, with results that may be surprising. Click through for a link to the full article.
[ By WebUrbanist in Art & Street Art & Graffiti. ]
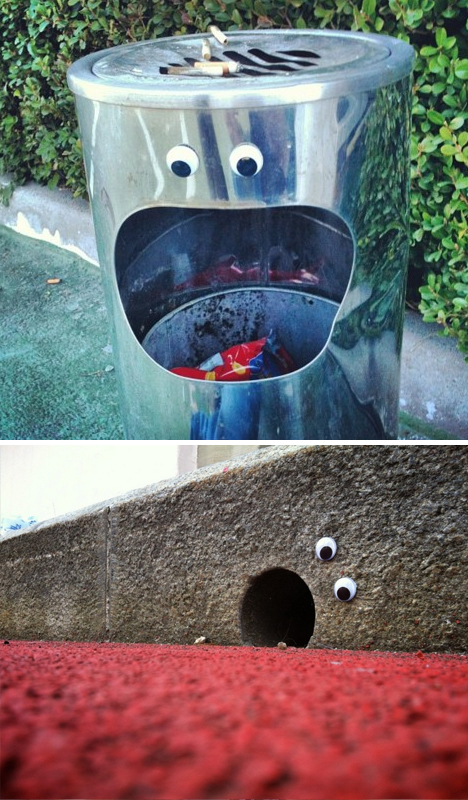
Unlike graffiti tags or other stylized and personalized approaches to urban art, eyebombing is an equalizer. Like a crowd behind Guy Fawkes masks, the work of any of the following 21 example ‘eyebombers’ is inherently anonymous due to the similarly simple materials used in each case.
Of course, the eyes just set the stage for further anthropomorphic interpretation ; with them in place, other street elements like grates, slots, posts and more suddenly become faces, mouths and limbs.
Context, with or without the intention of an artist, supplies emotion – even the most neutral eye placement makes for implied facial expressions of all kinds.
Per Eyebombing.com, these unsigned interventions are “different from traditional types of street art like tagging, sticking, stencils” because “the above forms are largely driven by egocentric behaviour, like getting seen, respect and maybe a hope to get famous, often using vandalism as modus operandi.”
Instead, they claim, it is about the message, the humor and simply brightening someone’s day. And while you can buy eyes from their site, they are also (again like a generic mask) available essentially anywhere and quite inexpensively, making this an easy art form to get involved with wherever you may be.
[ By WebUrbanist in Art & Street Art & Graffiti. ]
You may have heard that once you get a DSLR you need to learn to shoot in manual and only ever use that mode. That if you are using the Aperture or Shutter Priority you’re cheating and if you want to be more like a pro you have to shoot in Manual only, all the time. To that I say “horse pucky”! (if you’re old enough to remember M.A.S.H. you’ll get that reference).
What you’ll learn from this article:
what each of the A (Av), S (Tv) and M modes are, a definition of each
what types of situations I would choose each of them and why
some advantages of A (Av) and S (Tv) over manual
some advantages of Manual and when it’s the only choice
some things to look out for
The three manual shooting modes what are they?
Manual mode: this mode puts you in full control of the three settings on your camera that control the exposure (commonly known as the exposure triangle). ISO, aperture and shutter speed. In manual you will be making all of those choices.
Aperture priority:(A on Nikon, Av on Canon) this mode has you in control of two of the three exposure controls: ISO and aperture. The camera will select an appropriate shutter speed to give you a correct exposure.
Shutter priority: (S on Nikon, Tv on Canon) this mode once again puts you in control of two of the three exposure settings, this time it is ISO and shutter speed. The camera will select the aperture for a correct exposure.
There are of course other factors involved that will affect the exposure such as what Metering Mode you’re using and Exposure Compensation. More on the latter later.
Shot in Aperture mode to control Depth of Field
How do you decide which mode to use?
I actually use the Aperture and Shutter priority modes more often than I use Manual. How I decide which mode to use is based on my subject matter and what is my goal of the image as follows:
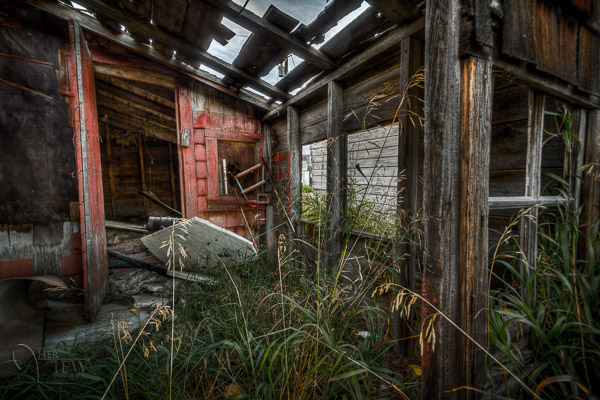
I choose Aperture Mode when I want to control depth of field (DoF) as my top priority. Such as to create shallow DoF for a portrait, people photos, or any time I want a blurred background (choose a large aperture like f2.8 or f1.8). That also applies if I want a larger DoF as well such as for a landscape photo, group portraits, or shots where I want maximum detail and sharpness (choose a smaller aperture like f11 or smaller)
I choose Shutter Mode when my top priority is controlling motion, either freezing or blurry it. So freezing for subjects like sports or action and I will choose a faster shutter speed such as 1/500th or faster depending on the subject. Subjects like flowing water, waterfalls, or panning a moving subject I will select a slower shutter speed like 1/15th for panning and 2-5 seconds for flowing water. (for more on this topic read my article Using Shutter Speed to Freeze or Blur Motion)
I switch to Manual Mode in a few specific instances: doing a portrait where the subject is not moving; night photography; pretty much any time I’m using a tripod; doing HDR bracketed exposures (even though my camera does 7 on AEB I still use Manual when on tripod); when using studio lighting; certain times when using a speedlight (such as working in a dark room and I want to maintain some ambient light levels)
Here’s some example images taken with each of the modes as explained above.
Shot in Aperture mode to control Depth of Field
Shot using Shutter Priority to use a panning technique and slow shutter speed
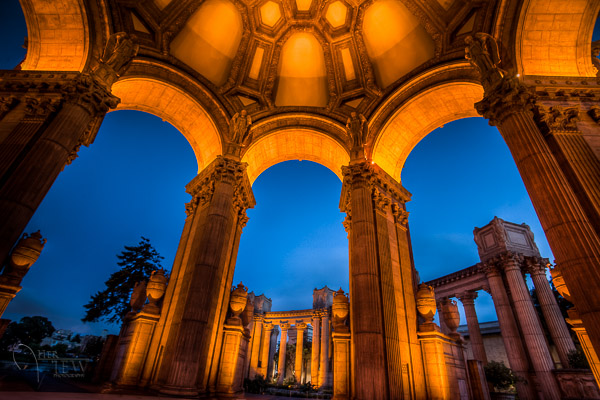
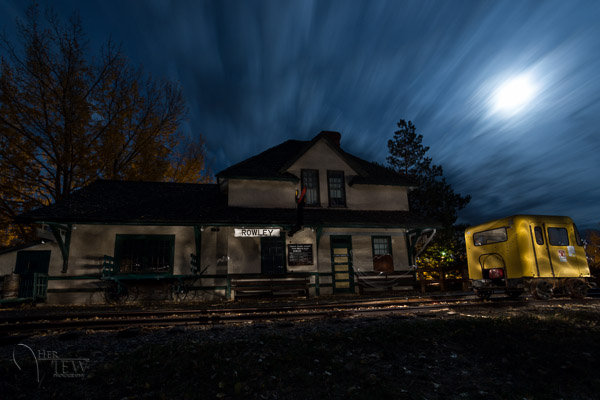
Shot in manual mode for night photography challenges
Things to watch out for and keep in mind
ISO: remember that when you select either A or S mode you are still choosing the ISO
I usually select my ISO first, based on the lighting conditions I’m shooting in. If it’s bright sunlight I go to 100 or 200. If it’s subdued light, shade or overcast I might bump it up to 400. For indoors or dimly lit rooms I may go to 800 or higher up to 3200 if necessary (you need to test to know the upper limits of your ISO and where you’re comfortable shooting with your camera, mine will yield pretty decent results even at 6400 and beyond).How I know I’ve gone high enough with the ISO, is if I have a fast enough shutter speed to eliminate camera shake when hand holding. If I’m on a tripod, I’m usually shooting a ISO 100 or 200 because I can use any shutter speed safely.
Check your shutter speed when in A mode
Just because the camera is picking the shutter speed does not mean it will give you a nice sharp image. Yes it will choose a shutter speed to give you the correct exposure, but if you set up your camera for ISO 100 at f16 in dark room you’ll wind up with a pretty slow shutter speed like 1/2 of a second perhaps, and without a tripod you’ll get blur from camera shake.So keep your eye on the shutter speed the camera is picking and if it is too slow (I suggest you follow the 1/focal length rule for minimum shutter speed – for more on getting sharp images read my article 5 tips for Getting Sharper Images) readjust the ISO, the aperture or both – picking a higher ISO will help, so will choosing a larger aperture like f4 as that will let the camera pick a faster corresponding shutter speed.
Multiple bracketed exposures using Manual for HDR processing taken during my Drumheller Workshop
Watch for exposure warning notices in A or S modes
Your camera is pretty smart but it can only work within its own limitations. So it will tell you if you’ve gone outside that boundaries of what it can adjust for you. This will show up as a flashing warning in your viewfinder. I’ll give you an example for both Aperture and Shutter modes.
Scenario #1 in Aperture mode if you choose say ISO 800, F1.8 on a bright sunny day the camera will tell you there is simply too much light and give you a flashing shutter speed (your fastest) like 1/4000th of a second. If you take the photo it will be overexposed which is what the camera is warning you above. Choose a lower ISO or smaller aperture and try again until the warning is gone.
Scenario #2 in shutter mode in a darkened room with settings of ISO 400 and 1/1000th of a second you will likely get a flashing aperture shown in your viewfinder (the largest your lens goes to such as f3.5 or f5.6). To correct this you need to choose a slower shutter speed and likely a larger ISO as well until that warning disappears.Side note: this is why kit lenses with a maximum aperture zoomed in of f5.6 become somewhat limiting. Grab yourself a simple 50mm f1.8 for low light conditions, it’s an inexpensive great lens to have in your bag
Painting with Light during night photography on my Drumheller workshop
Exposure compensation in Manual
There is often confusion among students about using Exposure Compensation when in Manual mode. This behaves differently depending in the camera you have, in Canons for example it just doesn’t apply, as it is has no affect. When using a Nikon if you shift the Exposure Compensation to say +2 what it does it adjusts the scale you see in your viewfinder to reflect that so if you then set the exposure to match the “0″ mark it will give you a +2 exposure. I’d personally find that even more confusing, so if you want +2 just set your exposure in Manual so that it shows +2 on the scale.
Summary
Steps I use are these:
choose ISO first
decide whether motion or depth of field are most important and choose my shooting mode
set my shutter speed or aperture for the results I want
check for warnings and slow shutter speeds
review image and correct as necessary
Tell me what you do and if you find this information helpful.
Post originally from: Digital Photography Tips.
Check out our more Photography Tips at Photography Tips for Beginners, Portrait Photography Tips and Wedding Photography Tips.
Getting off Auto – Manual, Aperture and Shutter Priority modes explained
Have you ever had a dream where you looked around the room and everyone looked exactly like you?
Wait, was that a dream?
Either way, you can turn your camera into the ultimate cloning device and make like a million clones of yourself!
With our guide, you can learn how to make carbon copies of yourself (the best photo subject around).
Lay on the couch while vacuuming, or build a human pyramid out of 10 versions of yourself.
You can make images where you (appear to) do it all. You’ve always wanted a stunt double, right?
Go Ahead, Duplicate Yourself
p.s. Learn the elements of lighting and sweet power-moves you didn’t know your phone had in our Phoneography 101 course. All the cool kids are doin’ it. Sign up!
Why it’s cool:
We thought about actually cloning ourselves, which would be awesome in so many ways.
But then we thought digital clones might be better, and a lot less complicated in the long run.
Duplicating yourself is easier than you think.
And you can fool everyone into thinking you have a twin, or a triplet.
Ingredients:
A model (yourself or a friend)
Camera
Tripod
Computer
Editing Software
Props (optional)
STEP 1: Find Your Scene:
First, find the scene you want to photograph.
Set your camera up and compose your image.
Think about where you will place your carbon copies and what each figure will be doing.
It is best to use your camera on a tripod, so that your background stays exactly the same throughout this process.
If you don’t have a tripod, place your camera somewhere stable, like on top of a bookshelf or stool.
Make an exposure to check your composition.
Step 2: Meter Your Scene:
Place your model in the scene.
Make another exposure to check the light falling on the person.
You can use the light meter in your camera, or if you want to be more specific, use a hand held light meter.
Did you know there’s a light meter app for the iPhone and Android?
For our first shot, we metered the light for the furthest distance from our lens to make sure it wouldn’t be too dark.
Step 3: Make Your First Image:
With your camera on a tripod, get ready to take your first photo.
Focus on the area where your model will be.
For focusing self portraits, place something in the scene that can be easily moved. You could prop up a pillow or set a stool where you are going to be.
If you are using yourself as a model, set your camera to self-timer mode.
Once you’ve got your camera set, make sure your model is in place.
Make an exposure.
Step 4: Make your Second Image:
The important thing here is to make sure your model is the only thing that moves in the scene.
Move your model to the another part of the scene.
Make sure to focus on your model in the new part of the image.
If your camera has a live view mode, you can use the zoom button on the back of the camera to make sure your focus is precise.
Make your second exposure.
Step 5: Repeat:
Place your model in a third part of the scene.
Check your focus and make an exposure.
Repeat this as many times as you’d like to have multiple individuals throughout your scene.
Step 6: Import Images:
Once you have made your exposures, it’s time to put them on the computer.
Open the photos you want to combine in Photoshop or another photo editing software.
Hold off on cropping or editing just yet.
It’s best to work with images straight out of the camera before making any color, brightness, or white balance adjustments.
For this tutorial, we’ll be using Photoshop CS6. Other editing programs, such as Gimp, will have similar methods, but the commands and tool placement may be slightly different.
Step 7: Copy and Paste:
Starting with the second image from your series, select the entire image.
Use the copy function to copy the image (Command + C on macs, Control + C on PC’s).
Paste that image as a new layer onto the first image from your series.
You can use keyboard shortcuts (command or control + V), or go up to “Edit” in the menu, and select “Paste in Place.”
“Paste in place” ensures that the images will be lined up on your canvas.
Step 8: Make a Layer Mask:
Now, looking at your image, the photo you just pasted is Layer 1. Your first image is the “Background”.
By adding layers stacked right on top of each other, you will be able to erase parts of the Layer 1 to reveal the background image underneath.
This is how you will appear to be in multiple places at the same time.
Because you left your camera on a tripod, the background of each image should line up perfectly.
Erasing part of the layer will reveal what is different between the photos (i.e. yourself within another part of the frame.)
To make things easier in the long run, create a layer mask for Layer 1 by clicking the layer mask icon at the very bottom of the layers palette. It looks like a square with a circle in it.
By making a layer mask, you’ll be able to erase from your layer and paint parts back in with the Paintbrush tool if you mess up.
If you don’t use a layer mask and you accidentally erase something important, you won’t be able to paint parts back in.
Here’s a little more info on layer masks if you’ve never used them before.
Step 9: Erase:
Set your eraser to a pretty decent size to start with.
Erase all of Layer 1, except your model.
You will see your background image and first figure start to appear
Use a large brush for the background, and zoom in close and use a smaller brush to get the details and edges.
Step 10: Brush Tool:
When using a layer mask, it’s okay to make a mistake.
If you happen to erase too much, like we did here with the model’s hand, it’s not a big deal.
Use the brush tool to paint that part of the layer back in.
By working back and forth with the eraser and the brush tool, you can remove what you want from the image with precision.
Step 11: Repeat:
Repeat steps 7-10 for your third image.
Select it, copy it, and paste in place.
Don’t forget to make a layer mask for this new layer as well.
Erase the extra info from your layer, revealing the figures underneath.
Step 12: Save your Layers:
It’s always important to save your work as you go along.
Saving your image as a PSD (photoshop file) or a TIFF will allow you to save the layers and layer masks.
This way, you can come back and edit them at any point.
Step 13: Share:
Once you’re satisfied with your photo, save your final version as a jpg.
When you go to File, select “Save As”, then select JPG. Doing this automatically flattens the image into one layer, and compresses the file size a bit.
JPG is more friendly with websites and social media sites, and will make emailing your creation easier.
Take it further
Make elaborate scenes, like the one above, with the live-view zoom to focus method.
Create composite photos on your phone! Photoshop Touch lets you work with layers.
Use this layering technique to create levitating photos.
Related posts:
Learn How To Mat. Matting Gives Photos Teh Snappiness! There’s no question about it, a mat and frame make…
The Fastest Way to Learn Keyboard Shortcuts for Photoshop, Aperture, FCP, and more This Photojojo made possible by… ~Have a cool photo product…
Double Exposures: A DIY Project That Brings Friends Together With Photos! Extra photos for bloggers: 1, 2, 3 We love hanging…
Samsung US has announced the Wi-Fi version of its Galaxy Camera will be available from the end of this month at a retail price $ 449.99 – $ 50 less than the version with both 3G/4G and Wi-Fi. Announced in February 2013, the Wi-Fi model shares the same feature-set as the 3G and 4G versions, including a 21x, 23-481mmm equivalent zoom lens on the front with a 4.8″ touchscreen on the back. It runs Android 4.1 (known as Jelly Bean), the latest version of the operating system. Click through to read more at connect.dpreview.com
Ich erinnere mich noch genau. 30. September 2011, Sarah und ich sitzen im Hugeldubel in München, trinken Caramel Macchiato und warten auf einen gemeinsamen Freund. Ich erzähle von diesen Fotoprojekten bei denen man fremde Menschen auf der Straße fotografiert. Sarah sagt, was ich denke: „Wow, die trauen sich, einfach die Leute auf der Straße anzusprechen?“
Das sagt jeder, dem ich von diesem Projekt erzähle. Und das dachte ich auch, als ich an diesem Tag zurück ins Sonnenlicht auf den Marienplatz lief und meinen ersten Stranger ansprach. ?Ich war ziemlich überrascht, dass dieser junge Mann tatsächlich stehen blieb, mir zuhörte, lächelte und ja sagte. Obwohl ich gestottert und viel zu viel geredet habe. Naja, ich sag es lieber gleich: Das war Anfängerglück.
Fast täglich bekomme ich eine Nachricht von jemandem, der dieses Projekt machen möchte, aber nicht weiß, wie. Daher dachte ich, ich erzähle von meiner Herangehensweise und meinen Erfahrungen, um anderen den ersten Schritt einfacher zu machen und ein paar Tipps zu geben.
Wie spreche ich die Menschen an?
Es hat eine Weile gedauert, bis ich den ‚richtigen‘ Spruch entwickelt hatte. Denn, wenn man nicht in den ersten drei Sekunden glaubhaft vermitteln kann, dass man weder Daten noch Geld möchte, flüchten die Menschen mit einem Kopfschütteln.
Man kann es ihnen auch nicht übelnehmen, schließlich wollen die meisten Menschen, die auf der Einkaufsstraße zielstrebig auf einen zukommen, dass man sich irgendwelchen Fragebögen stellt, etwas kauft oder abonniert. ?Außerdem ist heute ja jeder in Eile, also muss man auch noch versprechen, dass es schnell geht.
Ich sage meistens etwas wie: „Hallo, haben Sie zwei Minuten Zeit? Ich möchte nichts verkaufen und weder Ihren Namen noch Ihre Adresse. Ich arbeite zur Zeit an einem privaten Fotoprojekt, Sie sind mir aufgefallen und ich würde Sie sehr gern fotografieren.“
Es gilt, diesen Satz mit einem Lächeln auf den Lippen zu sagen und zwar so schnell, dass auch weitergehende Menschen alles mitbekommen und trotzdem langsam genug, dass man es überhaupt verstehen kann. ?Meiner Erfahrung nach bleiben 90% der Menschen jetzt erst einmal stehen.
Dann erzähle ich kurz, worum es bei meinem Projekt geht und warum ich ausgerechnet sie dafür begeistern will. Ein treffendes, ehrliches Kompliment kommt immer gut an. ?Ich erkläre, dass ich zwei Bilder mache. Ein nahes Portrait und eine Ganzkörperaufnahme, dazu zeige ich ihnen die zwei Fotos der letzten Person auf der Kamera, was alle restlichen Zweifel verschwinden lässt.
Ich erkläre, dass das Bild auf meinem Blog und Facebook zu sehen sein wird, gebe der Person eine kleine Karte mit den Links und mache klar, dass ich das Bild umgehend lösche, falls es ihnen nicht gefällt.
Es bleiben etwa 15 Sekunden, um die beiden Bilder zu machen und sie der Person zu zeigen. Dann verabschiede ich mich mit einem Danke von meist zufrieden lächelnden Menschen.
??Welche Menschen spreche ich an?
Generell spreche ich Menschen an, die auf irgendeine Art und Weise aus der Masse herausstechen. Meistens ködern mich hierbei Haare und Kleidungsstil, aber auch besondere Gesichter oder ein tolles Lachen.
Natürlich frage ich niemanden, der durch etwas heraussticht, auf das er ganz sicher nicht angesprochen werden will. ?Man muss eine gewisse Sensibilität entwickeln. Oder besser: Sie entwickelt sich von ganz allein.
Ich frage am liebsten Menschen, die allein oder in Gruppen von mehr als zwei Personen unterwegs sind. Das haben mich unangenehme Zwischenfälle gelehrt: Wenn ich bei einem jungen Pärchen den Mann frage, durchbohrt mich seine Freundin mit bösen Blicken.
Frage ich zwei Freundinnen, steht das zweite Mädchen verkrampft lächeln daneben und schaut auf ihre Füße. Oder, noch schlimmer, das erste Mädchen schlägt vor, das andere Mädchen auch ins Projekt aufzunehmen und ich muss mich erklären.
Natürlich könnte mir das egal sein, aber ich möchte, dass die Menschen durch mich eher ein positives als ein negatives Erlebnis haben. ??Es ist wesentlich einfacher, Menschen in meinem Alter zu überzeugen und schwerer, je älter die Person ist. Teilweise, weil diese sich selbst nicht schön genug für ein Foto halten, aber auch, weil sie viel misstrauischer sind.
Man neigt dazu, es sich leicht zu machen, aber es hat sich gezeigt, dass es sich sehr lohnt, auch immer wieder ältere Menschen anzusprechen.
Warum liebe ich dieses Projekt?
Weil ich viel gelernt habe und immer noch lerne. Über meine Kamera, die Fotografie, aber auch über mich selbst. Darüber, wie man Menschen anspricht und wie man schnell ein gutes Portrait macht.
Außerdem macht es Spaß, sich in den Strom von Menschen zu stellen und alles zu beobachten. Es macht Spaß zu sehen, wie sich das Leben zweier Menschen für ein paar Minuten überschneidet und ich werde für immer ein Erinnerungsfoto zu jeder dieser Begegnungen haben.
Mit einigen meiner Stranger habe ich mich länger unterhalten und ich denke oft an diese Gespräche zurück. Manchmal bin ich fast ein wenig traurig, dass ich ihren Namen nicht kenne und sie wahrscheinlich nie wieder sehen werde.
Das Wichtigste ist jedoch, dass das Projekt glücklich macht. Es ist toll zu sehen, wie sehr sich viele der Angesprochenen freuen. Gerade ältere Leute sagen mir oft, wie überrascht sie sind, dass sie jemand schön findet oder überhaupt wahrnimmt.
Es gäbe zu jedem dieser Bilder eine Geschichte zu erzählen, aber das würde dieses Format sprengen – und ist es nicht viel spannender, seine eigenen Stranger-Geschichten zu erleben?
Am 8. Juni 2012 habe ich meinen hundertsten Stranger fotografiert und in derselben Sekunde entschieden, das Projekt ganz schnell von „100 Strangers“ in „1001 Strangers“ umzubenennen. Dieses Projekt macht zu viel Spaß, um je zu enden.
We’ve just posted a selection of real-world samples shot with the Nikon Coolpix A. The Coolpix A offers a 16MP APS-C sensor in a genuinely compact body, mated to a 28mm equivalent F2.8 retractable lens. We’ve put together a 21-image gallery of images shot in a variety of situations and at a range of apertures. Click through to see how it performed.
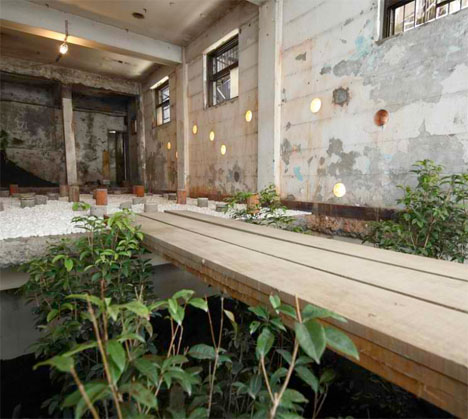
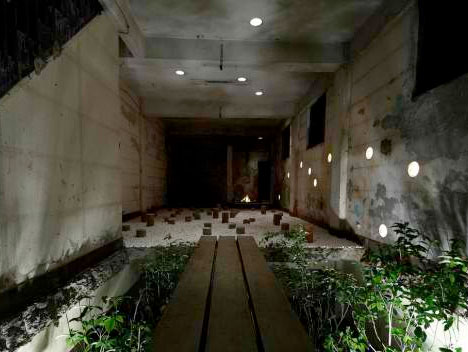
Occupying an abandoned five-story apartment building in central Taipei, Ruin Academy is a living architectural laboratory where holes drilled in the walls let rain inside, plants grow from the floors and the bones of the structure serve as ‘compost’ for the future of the city. A collaboration between Finland-based Casagrande Laboratory and the Taiwanese JUT Foundation for Arts & Architecture, this project aims to “re-think the industrial city and the modern man in a box.”
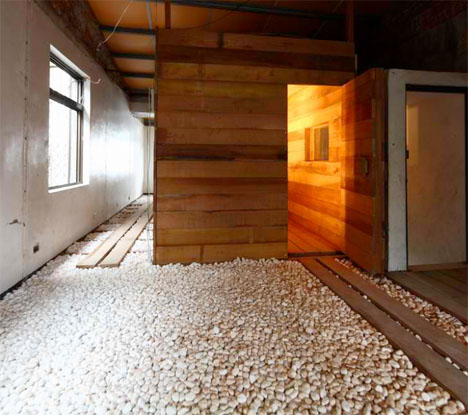
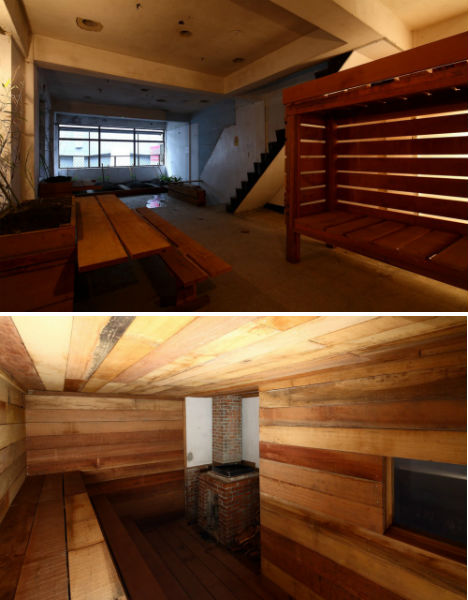
Ruin Academy serves as a setting for workshops and courses for various Taiwanese and international universities in subjects like architecture, urban design and environmental art. The lines between the city and the building have been blurred with the removal of windows and interior walls, so bamboo and vegetables can be grown indoors. Students and professors sleep in ad-hoc dormitories. The mahogany elements of the interiors, like walkways and steps, are made to be rearranged as the inhabitants’ needs change.
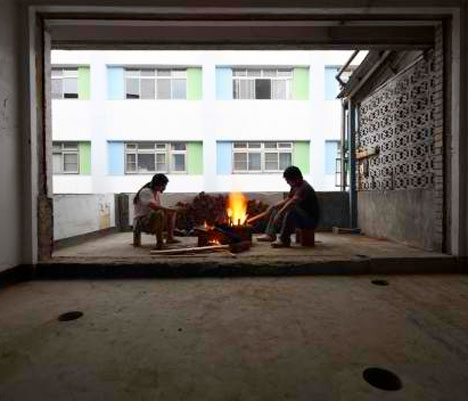
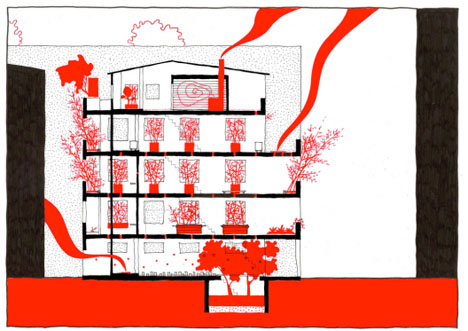
“The Ruin Academy is looking at the ruining processes of Taipei that keep the city alive,” says Marco Casagrande on the Ruin Academy blog. The idea is that static urban structures aren’t a natural way of life, and that the ‘Third Generation City’ would mix nature with human construction in an ever-changing symbiosis. Restoring nature within cities, growing food indoors, and living in structures that constantly adapt and change is seen as a more organic way for humans to interact with our environment.
The Ruin Academy is just one of the many illegal, unsanctioned ‘parasite’ structures that have popped up on top of and around Taipei’s conventional modern buildings. Organic and often transient structures made of materials like bamboo or plastic sheeting sprout on the roofs of concrete skyscrapers and in abandoned lots, used as artist housing, urban farms, night markets and other social gathering places.


 You may have heard that once you get a DSLR you need to learn to shoot in manual and only ever use that mode. That if you are using the Aperture or Shutter Priority you’re cheating and if you want to be more like a pro you have to shoot in Manual only, all the time. To that I say “horse pucky”! (if you’re old enough to remember M.A.S.H. you’ll get that reference).
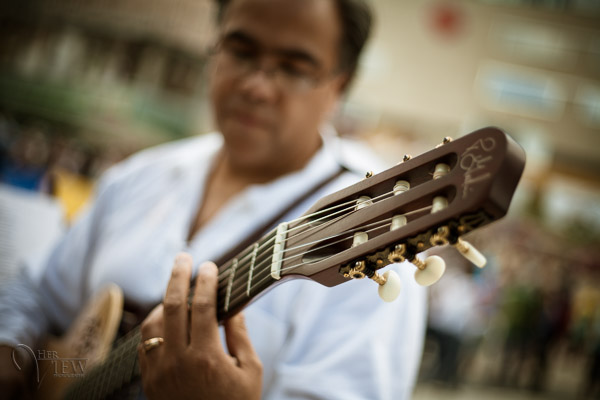


 We thought about actually cloning ourselves, which would be awesome in so many ways.
 First, find the scene you want to photograph.
  Place your model in the scene.
  With your camera on a tripod, get ready to take your first photo.
  The important thing here is to make sure your model is the only thing that moves in the scene.
 Place your model in a third part of the scene.
 Once you have made your exposures, it’s time to put them on the computer.
 Starting with the second image from your series, select the entire image.
 Now, looking at your image, the photo you just pasted is Layer 1. Your first image is the “Background”.
 Set your eraser to a pretty decent size to start with.
 When using a layer mask, it’s okay to make a mistake.
 Repeat steps 7-10 for your third image.
  It’s always important to save your work as you go along.
 Once you’re satisfied with your photo, save your final version as a jpg.


You must be logged in to post a comment.