RSS
 

Archive for April, 2013

Exotic Green Getaway: Lush Villa Made of Local Materials

05 Apr

[ By Steph in Boutique & Art Hotels & Global. ]

Alila Villas Eco Travel 1

Merging traditional Balinese visual flair with the openness of modern architecture, Alila Villas Uluwatu is a picturesque resort with individual villas connected by bridges over sparkling expanses of water. The hotel is set on a gently sloping hillside, and eschews typical high, pointed Bali-style roofs in order to maintain a democratic view of the sea. Made of locally sourced materials, the hotel and villa development aims to balance environmental responsibility with a sense of luxury.

Alila Villas Eco Travel 5

Alila Villas Eco Travel 2

Located in Uluwatu on the Bukit Peninsula of Bali, Alila Villas has 50 hotel suites and 35 residential villas.  Rather than standing out in stark relief against the natural setting, like many other self-consciously tropical resorts in the area, Alila Villas follows the natural contours of the land.  The terraced, low-pitched roof of the main structure was made of Balinese volcanic pumice rock that can support the growth of ferns and other vegetation, mimicking the look of local hillside farms.

Alila Villas Eco Travel 4

Each of the hotel rooms faces the gardens, which are full of reflecting pools and native plants, making them feel as if they extend into the outdoor spaces. The villas are glass structures encased in slatted wood, which screens the sun and provides a bit of privacy. Each has its own pool with a cabana overlooking the ocean.

Alila Villas Eco Travel 3

The stone walls of the resort came directly from the site itself, and all other materials were sourced from either Bali or the neighboring island of Java. Sustainable materials, careful preservation of vegetation, rainwater collection, a greywater recycling system and large roof overhangs that provide natural cooling come together for an eco-friendly getaway that honors the local culture and history.

Share on Facebook


[ By Steph in Boutique & Art Hotels & Global. ]

[ WebUrbanist | Archives | Galleries | Privacy | TOS ]


WebUrbanist

 
Comments Off on Exotic Green Getaway: Lush Villa Made of Local Materials

Posted in Creativity


Photoshop Basics: Working with Layers

05 Apr

Photoshop.  For photographers, web developers and graphic designers alike, its the go-to program for creating and editing professional grade graphics.  And like every beloved piece of software, it has to have a strong foundation to build upon; a base system that supports all other operations.  For Photoshop, it’s layers. Operations we describe here are performed using Adobe Photoshop CS5, but Continue Reading

The post Photoshop Basics: Working with Layers appeared first on Photodoto.


Photodoto

 
Comments Off on Photoshop Basics: Working with Layers

Posted in Photography


BTS: Cafeteria Lunches

05 Apr

One of my favorite things about being a photographer is that if you pay attention, stories are everywhere. But the trick is paying attention—even if that story is presenting itself after you have had a drink or two at a New Year's Eve party.

That's where I met Judith Schardt-Shure, a cafeteria manager at a local public middle school. We asked each other the typical "So, what do you do?" party questions, and the 30-minute discussion about cafeteria food that followed left me wanting to know more—and wanting to make sure other local parents knew, too.

Which is exactly why I have developed HoCo360 over the last three years. It has now turned into what I had for 20 years as a newspaper photographer: a license to be curious.

Read more »
Strobist

 
Comments Off on BTS: Cafeteria Lunches

Posted in Photography


How To Sync Multiple Camera Time Stamps In Lightroom 4

05 Apr

Syncing the time stamp on multiple cameras is best done ahead of time. Every six months or so I take all of my digital SLR camera bodies and sync the clocks in them. This is important because if you use multiple cameras on a photo shoot like a wedding, you want to be able to sort the photos by the time they were taken so you can give the client a set of photos that are organized from start to finish. If your cameras time stamps are off, this can become very annoying in post because you’ll notice images being out of order. This becomes amplified the more your cameras are out of sync.

Well, none of us are perfect and I certainly don’t claim to be! I recently shot a wedding with my good buddy Cliff Baise and I totally forgot to sync our cameras ahead of time. When I got his images on my computer to start editing everything together I was getting frustrated because I wasn’t seeing ANY of my images in Lightroom. Everything was sorted by time like it always is and I double checked everything. Well, it turns out our cameras were a full hour out of sync with my camera being an hour ahead of Cliff’s. So my images weren’t showing up in the timeline until much later in the wedding. This was pretty nerve racking because I hadn’t run into this problem before. I’ve always synced my own cameras (my wife usually shoots with me and uses my other main camera) so I’ve never had to deal with this before. I thought I was out of luck. So I started rummaging through the menu options in Lightroom and eventually figured out a way to sync the two cameras very quickly and very easily. Here’s how to do it:

Find Images You Know Were Taken At The Same Time

Screen Shot 2013-03-29 at 9.05.11 AM

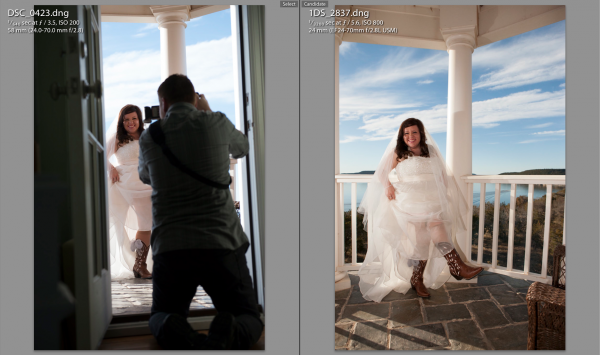
At some point during the day of a wedding or any shoot, it’s likely that the two shooters took a photo at the same exact time (or dang close to it). This doesn’t have to be an exact, down to the mili-second thing…they just need to be close. For this wedding I found a shot that Cliff took of me taking a picture of the bride showing off her boots. Perfect. All I needed to do was find the picture that I took at that moment.

Screen Shot 2013-03-29 at 9.05.24 AMThe first thing you need to do is select the first photo you find by clicking on it in Library Mode. Then, scroll down to the other image from the second camera, hold down command on a Mac (control on PC) and click that one as well. This will select both images at the same time. Now hit the ‘C’ key on your keyboard which will bring up the two images in Compare mode side by side. Once in compare mode you can click back and forth between the two images to see all the EXIF information on the right hand side. Again, this all has to be done in Library Mode, not Develop Mode.

On the right hand side in the EXIF data, you will see the Capture Time. This is how you tell if the images are off at all. Just click back and forth between the two images and watch how the time changes. If they are off by more than a few seconds, it’s time for the next step.

Syncing The Times

This part was a little tricky the first time. Go ahead and write down the exact times of each photo on a piece of paper or type it onto your computer somewhere. Note which time correlates with each image.

Now you need to decide which set of images you want to sync. In all honesty, it doesn’t really matter which one you choose. Nobody cares what time the picture was taken, they just need to be in order of when they were taken. So I just chose to make Cliff’s images match the time of my images. I could have gone the other way around and gotten the same result.

Screen Shot 2013-03-29 at 12.14.44 PMTo sync the time stamps, select all the images from the camera you want to correct. If you have them in separate folders this will be easy. If they are all mixed in to the same folder, you can sort by File Name in Library Mode and then the images will be separated. If all the images from the one camera are in their own folder, just hit Command A on a Mac (Control A on PC). This will select all the photos. If the images are mixed with another camera in the same folder, separate them by file name, then select the first image from the camera you want to correct by clicking on it, then scroll down to the last image from that camera, hold down Shift and click the last image.

Now that you have all the images selected that you want to fix, go up to Metadata in the top menu and scroll down to Edit Capture Time. When the window pops up all you need to to is update the time under the ‘New Time’ section. The original time will be on the top so just plug in the time that you wrote down from the correct camera in the ‘Corrected Time’ section.

Screen Shot 2013-03-29 at 12.16.11 PM

Once this is done, it’s important to just double check everything and make sure you have everything correct. It says at the bottom of the window that the operation cannot be undone so don’t make any mistakes! Once you are sure you have everything right just click Change and you’ll be done! You should now be able to select the images from both cameras in library mode, sort by time and see all of the images in chronological order.

Conclusion

Like I said in the beginning, it’s way easier to do this right the first time by synching the cameras before the shoot. But if you ever forget this like I did, being able to do it in Lightroom is a life saver!


Post originally from: Digital Photography Tips.

Check out our more Photography Tips at Photography Tips for Beginners, Portrait Photography Tips and Wedding Photography Tips.

How To Sync Multiple Camera Time Stamps In Lightroom 4


Digital Photography School

 
Comments Off on How To Sync Multiple Camera Time Stamps In Lightroom 4

Posted in Photography


Vikas Vasudev: Baltistan

05 Apr

Würde. Daran muss ich immer wieder denken, wenn ich Vikas Vasudevs Portraits baltistanischer Menschen betrachte. Aus respektvoller Distanz werden sie fotografiert, meist in Farbe und im Kontext ihrer heimatlichen Umgebung. Oft mittig positioniert, scheinen die Charaktere das Zentrum der Aufmerksamkeit zu sein, mit ihren Hüten, Gewändern und farbenfrohen Kleidern.

„Wenige Menschen selbst in Indien wissen überhaupt, dass es den Ort Baltistan gibt. Erst kürzlich wurde Baltistan von der Außenwelt abgeschnitten und die Armee gestattet nur sehr begrenzten Zugang zur Region“, berichtet Vasudev über das Gebirge in Pakistan. Als er zum ersten Mal in diesem Teil des Kaschmirgebirges zwischen Karakorum und Himalaya eintraf, wusste der Fotograf nicht, was er überhaupt erwarten sollte, denn es gab für ihn nichts wirklich Interesstantes zu sehen.

„Ich lief erst einmal fünf Tage herum und versuchte, Zugang zu den Menschen zu bekommen, einfach abzuhängen. Das war aber gar nicht leicht, denn die Leute sind nicht an Fremde gewöhnt – geschweigedenn, fotografiert zu werden.“ Irgendwann brach dann aber doch das Eis und trotz brüchiger Kommunikation mit den Menschen entdeckte Vasudev die wundervolle Welt der Balti.

Balti © Vikas Vasudev

Balti © Vikas Vasudev

Balti © Vikas Vasudev

Balti © Vikas Vasudev

Balti © Vikas Vasudev

Balti © Vikas Vasudev

Balti © Vikas Vasudev

Balti © Vikas Vasudev

Zum fotografischen Ablauf bemerkt Vasudev nur, dass er seine Aufahmen niemals plane. „Alles hängt davon ab, wie ich auf einen bestimmten Ort und die Menschen emotional reagiere.“ Es habe schon Zeiten gegeben, in denen er über einen Monat voll ausgerüstet reiste, ohne ein einziges Bild zu machen. Es scheint, als müssen viele Dinge zusammenkommen und dann, im entscheidenden Moment, entsteht ein Portrait.

Ich freue mich, dass sich Vikas Vasudev den Menschen und dem Land geöffnet und dort großartige Portraits gemacht hat. Sein Tumblr werde ich jedenfalls weiter verfolgen.


kwerfeldein – Fotografie Magazin

 
Comments Off on Vikas Vasudev: Baltistan

Posted in Equipment


Photoshop in Real Life: Portrait Series Takes Tools Literally

05 Apr

[ By WebUrbanist in Design & Graphics & Branding. ]

photoshop realism

Anyone who has used Adobe products, Photoshop or otherwise, knows that they have necessarily become quite creative in naming some of their more abstract, surreal and unusual functions.

photoshop based manipulation series

Flora Borsi of Budapest, Hungary, is a photographer and photo editor who has explored these meanings in return, taking them back out of the digital realm and applying them to ‘real life’ situations.

photoshop in real life

Through turns of phrase (‘Convert to Smart Object’) and other twisted interpretations, this series of portraits is an exploration of self, exhibition of abilities and simply fun series of mildly manipulated photos.

photo manipulations historical portraits

Her other series show off her capacity to understand and reproduce historical styles, but also to take and subvert visual expectations, in turn silly, serious and in some cases quite macabre.

Share on Facebook


[ By WebUrbanist in Design & Graphics & Branding. ]

[ WebUrbanist | Archives | Galleries | Privacy | TOS ]


WebUrbanist

 
Comments Off on Photoshop in Real Life: Portrait Series Takes Tools Literally

Posted in Creativity


Nikon D7100 preview updated with a look at effect of OLPF omission

05 Apr

D7100_18_105_front.png

In the course of preparing our in-depth review of the Nikon D7100, we’re exploring the potential image quality advantages of Nikon’s decision to forgo an optical low pass filter (OLPF). As part of this process, we compared the D7100 alongside the Nikon D5200, which also uses a 24MP APS-C sensor, but includes an OLPF and have just added the results to our hands-on preview. Does the D7100’s lack of OLPF really make a difference? Click through to read what we’ve found.

News: Digital Photography Review (dpreview.com)

 
Comments Off on Nikon D7100 preview updated with a look at effect of OLPF omission

Posted in Uncategorized


Ongoing Site Issues – An Apology

05 Apr

shared:DPRlogo.png

As you may have noticed, dpreview.com has been experiencing periodic outages in the past few hours, of varying duration. Issues may have included site unavailability, slow page loading times, and temporary unavailability of our forums. We sincerely apologise for the inconvenience this may have caused. We’ve been working hard to return everything to normal, but some of these issues may persist over the coming hours as we shuffle the zeros and ones back into line. As always, if you experience performance or functionality problems with any area of the site, we encourage you to send feedback via the link at the bottom of this page.

News: Digital Photography Review (dpreview.com)

 
Comments Off on Ongoing Site Issues – An Apology

Posted in Uncategorized


Neal Rantoul shares his aerial photography with Luminous Landscape

05 Apr

neil2.jpg

Aerial photographer Neal Rantoul has written an article for The Luminous Landscape, explaining how he got started in air-to-ground photography, and sharing some interesting advice. Click through for extracts from the article, and selection of Neal’s impressive abstract aerial landscapes.  

News: Digital Photography Review (dpreview.com)

 
Comments Off on Neal Rantoul shares his aerial photography with Luminous Landscape

Posted in Uncategorized


4. April 2013

05 Apr

Ein Beitrag von: Rebekka Plies

Glacier_©_Rebekka-Plies


kwerfeldein – Fotografie Magazin

 
Comments Off on 4. April 2013

Posted in Equipment