[ By Marc in Architecture & Houses & Residential. ]
Churches are some of society’s most stylistically beautiful buildings. A large amount of building design comes down to functionality and affordability, so churches, built for a spiritual purpose rather than a materialistic one, tend to include elements that highlight beauty and detail. When these churches grow old, or are purchased, they can then be renovated into amazing houses that uniquely introduce religious elements into a pedestrian environment.
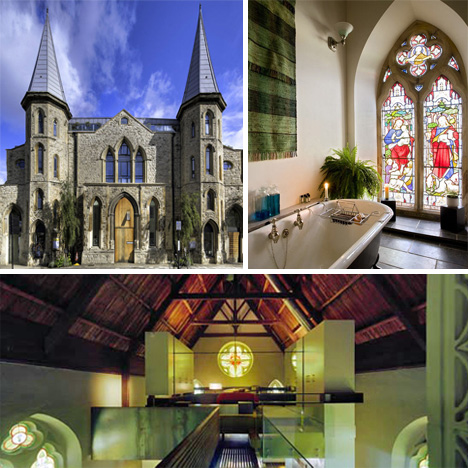
The Church of Living

The Church of Living is a transformed structure, from church to residence, carefully designed by Zecc architecture in the Netherlands. This firm is no stranger to church conversions, and their design chops are shown to full affect in this example from Utrecht. White walls and modern appliances and motifs maintained the atmosphere of the church, while making it a home worth living in. The small old church touches that remain are what keep this building anchored. For example, the chandelier in the ultra modern bathroom is the perfect example of an old touch balancing out a very modern renovation.
WG Architects, Brisbane

Willis Greenhalgh Architects, known better as WG Architects, transformed this Brisbane church into a gorgeous home full of light. Built in 1867, this is a heritage site, and thus required a very delicate renovation. The unique elements of an old style church were maintained, while contemporary elements were introduced to bring the church house “up to speed.”
Westbourne Grove Church

This imposing building, Westbourne Grove Church, was transformed into a modern home with a 2 floor renovation by London-based DOS Architects; the steps taken to complete the process are presented visually on their site here. Design site Abduzeedo provides additional background information about the history of the church, which despite seeming ancient, was built with a Victorian style in 1953. The design team decided to go highly modern in the interior, which contrasts nicely with the old-style stone outside.
Glenlyon Church

Multiplicity is the two person team of designer Sioux Clark and architect Tim O’Sullivan. Bedecked with awards (for good reason) they hold tightly to their commitment of “creating spaces that are intrinsically beautiful, highly useable, readily enjoyable and environmentally friendly.” Their 2004 conversion of the Glenlyon church into a livable residence pulls out all of the design stops, as it required that they literally create a 2nd story out of thin air. Utilizing glass and the many gorgeous windows, they were able to highly increase the usable space, while keeping the structure in the middle from making it seem too crowded.
Next Page:
Church Bells To Doorbells 8 Churches Turned Into Homes


[ By Marc in Architecture & Houses & Residential. ]
[ WebUrbanist | Archives | Galleries | Privacy | TOS ]

WebUrbanist
 This week your photographic challenge is to take and share a photo on the theme of ‘Cute’.


You must be logged in to post a comment.