The post Dodging and Burning in Lightroom: A Comprehensive Guide appeared first on Digital Photography School. It was authored by Rick Ohnsman.

Digital photographers who have never worked with film or never even set foot in a darkroom still encounter terms from the early days of photography. The phrase “dodging and burning” is a throwback to those times.
Now, the reasons for using this technique still apply, but the tools and methods for dodging and burning are much easier today. In fact, you can do effective dodging and burning in most post-processing programs, including Lightroom.
So let’s dig into the what, why, and how of dodging and burning in Lightroom – and show you how this technique can improve your photos.

A history lesson
Adobe’s “Lightroom” is a tip of the hat to the place photos were made in days gone by, the darkroom. I had a makeshift darkroom in a corner of my garage and remember the tanks and trays of smelly chemicals, working in the orange glow of a safelight, developing negatives, and making prints. It was a laborious process, and one for which there was no “undo” when a mistake was made.
The standard darkroom workflow went something like this:
- Load the film (sheet film for larger “view cameras,” roll film for smaller cameras)
- Make shots in the field
- Return to the darkroom, and in total darkness or using a film bag, put the film in a developing tank
- Develop the film in a multi-step series of chemical baths (develop, rinse, stop bath, rinse, fix, rinse, Photo-Flo, rinse, dry)
At this point, you’d have your negatives, which were film with reversed lights and darks (and colors if you were using a color film.) Next, you’d need to print. Photos were prints; you couldn’t view images on a computer screen.
(Later came reversal film, “slides” that still were physical renditions of your photo but able to be shown with a projector.)

At this point in the darkroom workflow, you’d be getting to the dodging and burning part.
You’d put your negatives in an enlarger – a projector of sorts which would shine the negative image down onto a piece of photo paper.
(This was all done in the darkroom under a “safelight,” which allowed you to see your work because the orange color wouldn’t expose the photo paper.)
Now, you had to decide how much time was needed to expose the photo paper to the light in order to make a proper exposure. Often, you’d create a “test strip,” a print where you’d create a succession of incremental exposures (shown below). Of course, that would have to be developed in a series of chemical baths, too.

Finally, you’d be ready to make your print. You’d put a piece of photo paper under the enlarger, set your timer for the exposure duration you established, hit Start, and expose the paper to the light of the projected negative image.
But wait! What if you wanted some parts of the image to be darker and others lighter?
Well, the amount of time the paper was exposed to the light determined how dark the image was.
So if you used an instrument to block light from portions of the image during the projected exposure or, in a second exposure, exposed select portions of the paper to more light, you’d selectively brighten or darken parts of the final print.
The term for selectively blocking the light from the photo paper is “dodging,” and the term for exposing areas of the photo paper to more light is “burning.”

Granted, that was a long story just to explain these key terms, but you need to feel the pain just a bit. Imagine doing all those things, then developing the photo paper, spending time and money, only to find that your print didn’t turn out as you hoped. Frustrating, right?
(Guess you weren’t the…wait for it…”artful dodger” you thought you were.)

Lighten and darken
We have it so much easier, cheaper, and safer with digital photography. No chemicals, no working in the dark, and maybe best of all, the ability to experiment, undo, and replicate the finished results with ease.
So while you will still hear about dodging and burning in Lightroom (as well as in Photoshop and most other digital editing programs), and the tools are still labeled as such, let’s substitute something easier to understand:
Dodging = Lightening.
Burning = Darkening.
Why dodge and burn?
When we use the sliders in Lightroom to adjust our image, we are working with “global” controls. These uniformly apply the effect to the entire image.
For instance, increase or decrease the Exposure slider, and the entire image will get lighter or darker.
What we may want to do is selectively control portions of the image, making some areas darker and some areas lighter. A major reason for doing this is because viewers tend to look at brighter portions of an image first, concentrating less on darker areas.
So to emphasize and deemphasize portions of our image, we may wish to selectively lighten or darken them.
(Remember, lighten=dodge and darken=burn).
The “quick and dirty” method
Dodging and burning in Lightroom can be complicated – but it can also be very simple, and that’s what I’m going to discuss in this section.
Here’s how it works:
- Bring up the image you wish to edit in the Develop module of Lightroom. Perform whatever global adjustments you like using the sliders.
- Select the Adjustment Brush tool. Double-click the word “Effect” to zero all the sliders. First, we’ll work on areas we wish to lighten (dodge) in the image.
- Now let’s “load” the brush. In the Basic panel, drag the Exposure slider up to about +1.0. Set your Feather, Flow, and Density all to 100. This will likely create too much of an effect, but will make it easier to see what you’re doing. You can always back off the brightness later by bringing down the Exposure slider.
- Pick an area of the image you wish to lighten and start painting on it with the brush. You will see the area get lighter. Only work on one area. When you’ve painted over all the desired sections, go back to the Exposure slider and drag it up or down to get the final amount of lightness you desire. Click Done when finished with this area.
- To work on another area of the image, click the Adjustment Brush again (which will add a new “pin”) and repeat the steps explained above. Because adjustments with the sliders will affect everything done via that “pin” adjustment, you will have more control if you work on multiple smaller areas, rather than lightening multiple areas all at once so you’re forced to apply the same degree of lightening (dodging) to each one.
- To darken areas of the image, you can use the same procedure, though you’ll need to drag the Exposure slider in the negative ( -) direction.

With the Adjustment Brush and the Exposure slider, you can selectively lighten (dodge) and darken (burn) areas of your image.
It works, but maybe you’d like to refine your skills a bit, which is what the next sections are all about:
Tools of the trade
When we talk about dodging and burning in Lightroom, we have three tools we can use:
- Adjustment Brush
- Radial Filter
- Graduated Filter
These tools allow you to select areas of your image where you can apply lightening and darkening.
Let’s discuss how each of these tools might be used and look at some examples that illustrate these concepts.

The Adjustment Brush
The Adjustment Brush in Lightroom allows you to selectively “paint” the area of the photo you wish to affect. It might help to think of how you’d control an airbrush rather than a regular paintbrush.
You can make several changes to the Adjustment Brush, including:
- Size: Changes the size of the brush. Roll the mouse wheel, use the left and right bracket keys, or use the slider.
- Feather: Changes how hard the edge of the brush is and how rapidly the effect falls off. Use Shift while rolling the mouse wheel, Shift and the bracket keys together, or the Feather slider.
- Flow: Controls how quickly the effect is applied with each stroke of the brush. Use the slider to adjust the flow, or with the Adjustment Brush selected, change the flow with the number keys on the keyboard. Using multiple strokes will build up the effect.
- Density: Controls the maximum opacity of the brush effect. For example, if the Flow was at 100 but the Density was at 50, one stroke of the brush would apply the effect at 50% opacity.
The Radial Filter
The Radial Filter works somewhat like the Adjustment Brush – but rather than allow you to paint randomly, your adjustments are restricted to a circle or oval shape.
You can control the size and shape of the Radial Filter, and you can also feather the edges. Plus, you can control whether the effect takes place inside the circle or outside the circle.
I often use the Radial Filter with the Invert box checked (so only the inside of the circle is affected), and then adjust the filter strength with the Exposure and Feather sliders. You can create what appears to be a spotlight and use it to selectively lighten (dodge) areas of your image.
Some other tips for working with the Radial Filter:
- Hold down the Shift key when you drag out the Radial Filter to constrain it to a circle
- Use the “handles” on the top, bottom, and sides to drag the Radial Filter into other oval shapes
- Once the Radial Filter is created, move the cursor just outside the shape until you see the double-headed arrow and then drag to rotate the shape
- Get another “spotlight” to use on a different area by right-clicking a previously-created Radial Filter pin, choosing Duplicate, and then dragging the new Radial Filter off to the next place you want to work.


The Graduated Filter
The Graduated Filter can also help you lighten and darken selective areas of your image, but in a more gradual way.
While you might not immediately think of the Graduated Filter as a dodging/burning tool, the concept is the same – you can use it to choose which areas of your image are affected. While it’s a separate subject, combining the Graduated Filter with range masking in Lightroom can provide a very powerful method of selective dodging and burning, which is why I suggest you also read up on range masking.

The vignette
A vignette is used for darkening or lightening the edges of your photo.
When used to darken the frame edges, a vignette puts more attention on the center, brighter areas of the image, and helps direct the viewer to the center of the photo.
The Post-Crop Vignetting option is found under the Effects tab in the Lightroom Develop module.
Behind the mask
Any of the tools you use for selective dodging and burning – the Adjustment Brush, the Radial Filter, or the Graduated Filter – are all applying “masks” to your work, controlling how and where the effect is applied.
Often, it can help to see exactly where the masks are applied.
When we first choose one of our dodging and burning tools and begin to work with it, Lightroom will create a “pin,” a marker showing that an effect has been applied.
There is a control to choose when a pin will be displayed, which pins are active, and where the mask has been applied. You can even choose the color of the mask to help you best see it while editing. Hold down Shift, and each time you tap the “O” key, the mask will cycle through its available colors: red, green, white, and black. Use whichever color helps you best see where you’re working.

Paint on, paint off
Even once you’ve created a dodge or burn effect, there are ways to further refine your selected areas.
Let’s take a quick look at a few of them.
- Adjustment Brush: If you need to erase portions of your mask, turn on the overlay so you can see what you’re doing (hit the “O” key). Hold down the Alt (Option on Mac) key, and the “+” sign in the middle of the brush pin will change to a “-” sign. Keep holding down the Alt key, and erase the portions of the mask you don’t want.
- Radial and Graduated Filters: After applying a radial or gradient mask, click the word Brush (at the top of the adjustment panel). Then hold down the Alt/Option key so the symbol turns to a “-” sign. Finally, brush out portions of the radial mask you don’t want.
- Auto Mask: Checking this box will help the Adjustment Brush find edges and may assist you in selectively masking areas. I suggest you do some further reading to understand how this tool works.
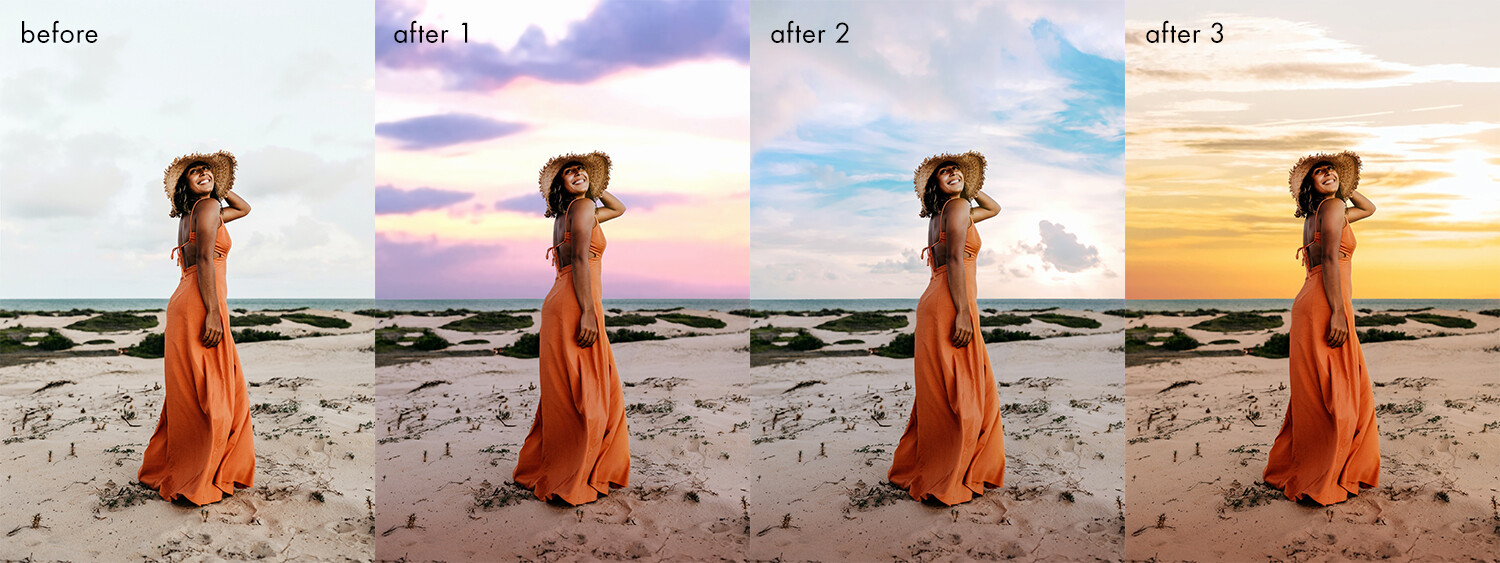
Using the histogram
One feature of the histogram is the ability to show any shadow or highlight clipping. Tap the “J” key, and if any shadows are clipped they will show in blue, while clipped highlights will show in red.
By using the tools we’ve already discussed, you may be able to “rescue” such areas by selectively lightening or darkening them.
There could also be images where you purposely want to black out or white out areas. The “J” key will show you any clipping, then you can dodge or burn areas you wish to black out or white out.
Have a look at the images below, where I used this technique:


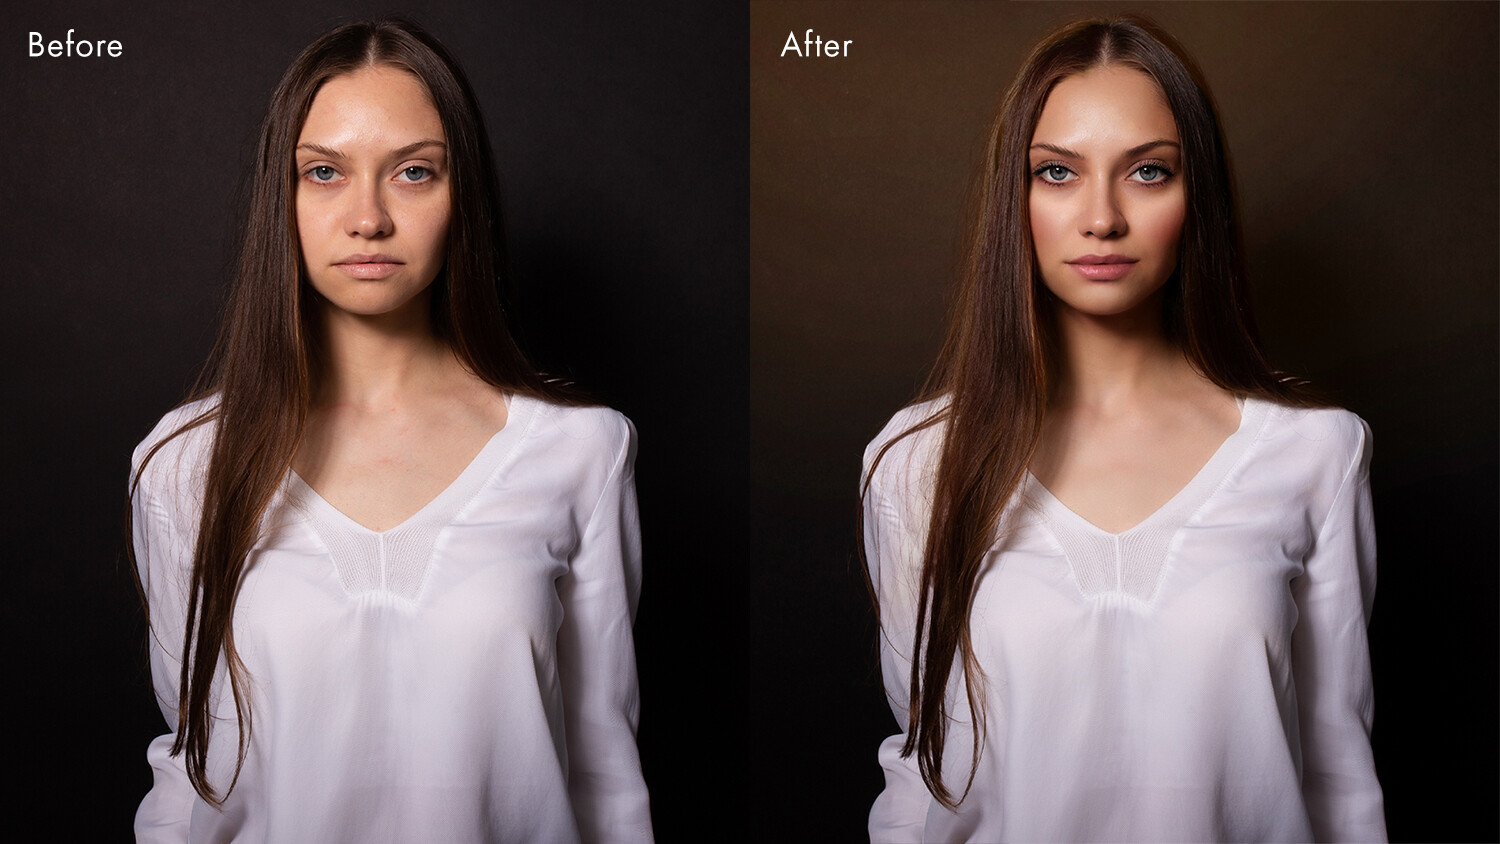
Complexifying the light
When I was first learning to use Lightroom, I spent quite a few hours watching French photographer Serge Ramelli’s Youtube videos. He would often use the term “complexifying the light” when speaking about dodging and burning, and when talking about how you could use dodging and burning to make images more interesting.
I suggest you take a look at some of his tutorials; below is an image I edited with similar techniques.

Less is more
A good chef knows that a little salt can enhance the flavor of a dish, but too much can ruin it. A good photo editor learns that any manipulation of an image needs to be subtle, enhancing the image while not drawing attention to itself.
After a session of dodging and burning, it’s a good idea to get away from the screen for a while, then come back and view the image again. If you didn’t know, would you suspect that areas had been lightened or darkened with dodging and burning techniques?
I think you’ll often find that – especially when learning – you’ll need to dial back the sliders a touch to make the effects more subtle.
The technical and the aesthetic
As with all of photography, there are two sides to dodging and burning.
First, there’s the technical side, which requires learning the tools and techniques for dodging and burning in Lightroom.
The other component is aesthetic; you need to understand how to artistically view your image and decide where to dodge and burn to better direct the eye of your viewer to and through the image.
The technical side requires study to learn the tools. The aesthetic side requires artful contemplation and practice.


Dodging and burning in Lightroom: Conclusion
There are many photo-editing programs, tools, and techniques for dodging and burning your photos.
Some photographers may favor Photoshop, Luminar, ON1, Corel PaintShop Pro, or any of the dozens of other choices.
So feel free to choose your weapon.
But realize that no one will ask you what tool you used to improve your image. Master the tool you choose and wield it well. For me, dodging and burning in Lightroom is one tool for adding flair to my photos.
Now over to you:
Do you do dodging and burning in Lightroom? Do you want to? Share your thoughts, tips, and tricks in the comments below!
The post Dodging and Burning in Lightroom: A Comprehensive Guide appeared first on Digital Photography School. It was authored by Rick Ohnsman.


You must be logged in to post a comment.