The post Weekly Photo Challenge – Mirrors appeared first on Digital Photography School. It was authored by Sime.
Mirror mirror on the wall… or, in my case, in a train station! Where will you find a mirror and how will you make a creative photo with it! I have a couple of ideas in mind and will be out and about making my photo to submit in the Facebook group, during the week! Meanwhile, here are a couple from yesteryear!
Find a mirror in a train station and make a self portrait.
Here are 19 more creative mirror self-portraits if you’d like to try!
A couple more great examples for you, below.
Photo by Caroline Veronez on UnsplashPhoto by Marc-Olivier Jodoin on Unsplash
Don’t forget, you can go back and try ALL of our CHALLENGES over HERE!
You can upload your photograph here (comments down below) or over in our Facebook Group.
Share them on Instagram or Twitter and use the hashtag #dPSMirror so we can see them!
Great! Where do I upload my photos?
Simply upload your shot into the comments field (look for the little camera icon in the Disqus comments section) and they’ll get embedded for us all to see. Or, if you’d prefer, upload them to your favourite photo-sharing site and leave the link to them.
The post Weekly Photo Challenge – Mirrors appeared first on Digital Photography School. It was authored by Sime.
The post A Beginner’s Guide to Working With Flash Off-Camera appeared first on Digital Photography School. It was authored by Gina Milicia.
I spent the first three years of my photography career avoiding the use of off-camera flash.
Why?
Because I couldn’t wrap my head around the concepts and science behind it.
I tried to cover up my struggles by saying things like “I’m a natural light photographer,” or “I really don’t like the aesthetics of flash photography.”
But I eventually – reluctantly! – invested in a flash for my first Nikon. This was the ’90s, pre-digital, pre-autofocus, and pre-TTL. I had to calculate how much power to use via a chart on top of the flash.
Each photoshoot I went on that required flash was preceded by a sleepless night filled with anxious dreams about turning up to the shoot naked. And the thought of having to use flash also had a mild to moderate laxative effect on me.
Luckily, those days are long gone and shooting flash off-camera has never been easier! In this tutorial, I’ll show you the quick and easy steps I take to shoot portraits using off-camera speedlights.
The gear essentials
If you’re going to use off-camera flash, here’s what you’ll need:
1. Speedlights
I use speedlights most often when I’m traveling and need light, portable flashes, when I’m working on location without access to power, or when I’m working in small, confined locations where studio flashes would be too powerful or cramped.
I work with two Canon speedlights. A great alternative if you are looking to save a few bucks is the Yongnuo YN560 IV. It has a very similar look to Canon speedlights as well as Nikon’s SB speedlight series.
2. Remote triggers
Remote triggers allow you to fire speedlights when they’re not mounted to your camera. As you can imagine, this is essential when using off-camera flash.
The cheapest and most reliable way to fire your speedlights off-camera is by using a sync cord — basically, you connect your speedlight to your camera via a long cable.
The drawbacks of using a cable are that it reduces the distance you can be away from your flash, and it can create a tripping hazard. That said, I still carry a couple of spare sync cables in my kit; remote triggers do fail from time to time, and the sync cords have saved me on a few occasions.
The next option for firing off-camera flashes is cheap infrared triggers. These do the job of setting your flash off remotely, but they’re sensitive to bright sunlight and affected by external factors such as alert lights on emergency vehicles and forklifts, etc., so they can go off without warning. I started out with a $ 30 set of triggers and used them for a couple of years before trading up to PocketWizards, which I’ve been using for the last eight years.
3. Light stands
Speedlights don’t float in the air – which means you need something to hold them up!
Now, there are three options when it comes to mounting speedlights off-camera:
First, you can use a light stand. Light stands vary in price from $ 20 to $ 200+ dollars, depending on the make and construction.
Second, you can use a GorillaPod and mount your speedlight to a door or place it on top of something near your model.
Third, you can mount your speedlight to an extension pole (or monopod) and have someone hold the light above your model. I like to do this because it gives me more options when shooting, and it also means there aren’t any light stands that get in the way of my shot.
4. Light shapers
Using a speedlight as a bare light source creates a very hard style of lighting similar to harsh sunlight. This looks great in certain situations, but I prefer to soften and control the light source with a small or medium softbox. This creates a much softer, more flattering, and more realistic-looking light source.
A good softbox to start with is the LumiQuest Mini Softbox. It’ll attach to your speedlight with velcro and can fold flat for easy storage.
5. Camera with a hot shoe
Finally, you will need a camera that works in Manual mode. It must also have a hot shoe.
Note that the “hot shoe” is just a square bit of metal on top of the camera that an external flash or wireless trigger slides into.
Working with off-camera flash
Once I got over my fear of off-camera flash, I started to believe that great portraits needed artificial lighting regardless of the environment. I often added two or three lights to my portrait shoots because I thought that anything less was lazy or unprofessional. I actually felt guilty when I shot with natural light because I thought it was cheating.
Fortunately, I’ve gotten over those thoughts. Here’s what I know now:
Finding great light and being able to use it are learned skills – and so is knowing when to use fill-flash in a portrait.
Nowadays, whenever I set up portrait shoots, I always look for opportunities to use great natural lighting first. It’s the most beautiful and flattering light for portraits, so if it ain’t broke, no need to fix it.
Having said that, there are many times when natural lighting is only just okay or even terrible – and sometimes a portrait needs more mood or drama than the available light can provide.
The following is an example of how I used off-camera flash to light a heavily backlit image. My objective was to create a shot that looked naturally lit. This technique can be used for any portrait that requires off-camera fill flash.
In the first shot (A), you can see that my model was heavily backlit, which makes a great silhouette but not such a great portrait.
For the second shot (B), I attempted to correct the lighting by increasing my ISO, which overexposed the background and brought more detail to the motorbike, but leaves the model’s skin tones flat, dull, and underexposed. It also added extra noise to the shadows. At this stage, I could have used a reflector to bounce light back onto the model to help create better skin tones.
Finally, for the third shot (C), I used an on-camera flash. As you can see in my example, the Canon speedlight did an okay job of lighting my model, given that I was about five meters (sixteen feet) away using a 200mm lens.
But the thing I don’t like about using flash on-camera for portraits is that it tends to make the subject look unnatural and have a flat appearance. On the other hand, by using a flash off-camera, you can control the direction and amount of light going onto your model to achieve a more natural look.
Which leads me to my off-camera flash setup:
Here’s a bird’s-eye view of my setup.
My speedlight was positioned approximately one meter (three feet) from the model. I set it at a 45-degree angle because I wanted to make my model look like he was lit from the side.
I was working with a 70-200mm zoom lens set to a focal length of 200mm because I wanted to blur all the details in the background.
My camera was approximately six meters (20 feet) from my model.
My ISO was set at 100, and my aperture was set to f/4. I was working at f/4 rather than wide open at f/2.8 because I find it very difficult to make eyes look sharp at f/2.8 at that distance and in such extreme lighting conditions.
Setting up the gear
Setting up speedlights and radio slaves.
For this motorbike model shoot, I mounted my speedlight to a light stand via an adapter and used a small LumiQuest Softbox to soften and shape my light.
To manually adjust the flash output of your speedlight, first switch the setting from its default of TTL to M (Manual mode). I recommend you start with the following settings:
First, if you’re shooting in full sunlight and you need an aperture of f/16 or higher, use a power setting of 1/1 (full).
If you are shooting at f/2.8 or f/4, start at around 1/16-1/32 power.
The diagram above is based on Canon’s 580EX II speedlight. For any other flash, check your manual for instructions on how to increase and decrease power. It should be very similar.
Now take a look at how I set my flash power:
Flash set at 1/32 power is underexposed, skin tones look muddy, and there’s no detail in the blacks.
Flash set at 1/16 power is starting to look better.
Flash set at 1/8 power is looking good, but I prefer slightly brighter skin tones.
Flash set at ¼ power is the correct reading for the look I was going for.
Flash set at ½ power gives slightly overexposed skin tones, which is perfect for many portraits, as it creates a very flattering light (no model will ever tell you they love seeing all the detail in their pores and skin tones!).
Flash set at full power is overexposed; there’s very little detail in the skin tones and the blacks are too light (gray).
A step-by-step guide to how I lit this shot with off-camera flash
Now that you know how to set up your flash and how to determine a good exposure, I’d like to run through my motorcycle photoshoot.
How did I get a nice final result?
Let me take you through the step-by-step process:
My ambient reading was f/4 at 1/125s with ISO 100.
Take an ambient reading to determine the correct exposure for the background (without any flash). In this case, my ambient reading was f/4 at 1/125s and ISO 100. This exposure was set for the entire shoot.
Ask yourself if adding flash will improve or detract from the shot. In this case, the answer is a definite yes – it will improve the shot.
Bring in your flash and set it up as per the diagrams above.
The quickest and easiest way to figure out the best flash power settings is to use a light meter. (If you don’t have a light meter, you can still work with off-camera flash. It will just take a bit longer to work out your exposure.) I believe a light meter is an essential tool in good portrait photography, and I would never leave home without one. When you use a light meter, you know you’ll end up with the most accurate readings and lighting becomes easy. I suggest you set up your lights per the diagram above, start at a power setting of 1/32, and gradually increase your power in small increments (1/32, 1/16, 1/8, 1/4, etc.) until you get your desired result.
Set your light meter to non-sync and press the button on the side of the meter. The non-sync button will flash on and off indicating that it’s ready. If you don’t have an assistant, I suggest taking a radio slave off-camera and using it to test-fire your flash so you can take a reading. Hold the meter in front of your subject’s face and point the sensor dome toward the camera.
Keep increasing or decreasing the amount of light until you have it a half stop to one stop over the ambient setting.
If you want a clean, beauty-style shot with lots of shadow detail, add one stop of fill-flash and shoot at your ambient meter settings.
This is something I strongly urge you to practice with as many patient friends, family members, and pets as possible. That way, you can build up your confidence and really get to know your equipment.
And here’s my final image:
Glauco Junior Solleri. Vespa courtesy of Glow Studios.
Notice the different background? It’s from a shoot I did in St Mark’s Square, Venice last year. I merged the two images together using Photoshop.
Working with off-camera flash: Conclusion
Now that you’ve finished this article, you should be ready to capture some beautiful shots using off-camera flash!
So make sure you have the right equipment. And make sure you follow my process carefully.
You’ll come away with amazing results.
What are your experiences working with off-camera flash? Have you tried it? Does it intimidate you? Share your thoughts in the comments below!
The post A Beginner’s Guide to Working With Flash Off-Camera appeared first on Digital Photography School. It was authored by Gina Milicia.
The post See the Wildlife Photographer of the Year People’s Choice Award Winners appeared first on Digital Photography School. It was authored by Jaymes Dempsey.
The Natural History Museum in London just announced their Wildlife Photographer of the Year People’s Choice Award winner plus four highly commended images, and they are stunning.
Over 55,000 votes were cast. Here is the overall favorite photo, “Bushfire,” by Robert Irwin:
Robert Irwin / Wildlife Photographer of the Year
As explained by the Natural History Museum:
“After spotting smoke billowing out of the horizon, Robert knew he had a prime opportunity. Launching his drone, he sent it straight over to the location of the fire. With only a few minutes of battery left, he knew he had to act fast. Taking it right into the thick of the smoke, he managed to frame a clear 50:50 shot, with a pristine natural conservation area on one side juxtaposed with the blackened, devastated remains on the other. Taken near the Steve Irwin Wildlife Reserve in Cape York, Queensland, the area is of high conservation value and is home to over 30 different ecosystems with many endangered species.”
Robert goes on to comment:
“I am incredibly excited to win the Wildlife Photographer of The Year People’s Choice Award. For me, nature photography is about telling a story to make a difference for the environment and our planet. I feel it is particularly special for this image to be awarded, not only as a profound personal honor but also as a reminder of our effect on the natural world and our responsibility to care for it.”
The four “Highly Commended” images are equally inspiring.
First, Ami Vitale’s heartbreaking photo, entitled “The Last Goodbye:”
Ami Vitale / Wildlife Photographer of the Year
“Joseph Wachira comforts Sudan, the last male northern white rhino left on the planet, moments before he passed away at Ol Pejeta Wildlife Conservancy in northern Kenya. Suffering from age-related complications, he died surrounded by the people who had cared for him. With every extinction we suffer more than loss of ecosystem health. When we see ourselves as part of nature, we understand that saving nature is really about saving ourselves. Ami’s hope is that Sudan’s legacy will serve as a catalyst to awaken humanity to this reality.”
Then Andy Parkinson’s gorgeous image, called “Hare Ball:”
Andy Parkinson / Wildlife Photographer of the Year
“Andy spent five weeks watching the mountain hares near Tomatin in the Scottish Highlands, waiting patiently for any movement – a stretch, a yawn or a shake – which typically came every 30 to 45 minutes. As he watched, frozen and prostrate, with 50 to 60 mph winds surging relentlessly around him, the cold started to distract and his fingers clasping the icy metal camera body and lens began to burn. Then relief came as this little female moved her body into a perfect spherical shape. A movement of sheer joy. Andy craves such moments: the isolation, the physical challenge and, most importantly, time with nature.”
Next, Guillermo Esteves’s “Close Encounter:”
Guillermo Esteves / Wildlife Photographer of the Year
“The worried-looking expression on this dog’s face speaks volumes and is a reminder that moose are large, unpredictable wild animals. Guillermo was photographing moose on the side of the road at Antelope Flats in Grand Teton National Park, Wyoming, USA, when this large bull took an interest in the furry visitor – the driver of the car unable to move it before the moose made its approach. Luckily, the moose lost interest and went on its way after a few moments.”
And finally, Neil Parkinson’s “Drey Dreaming:”
Neil Parkinson / Wildlife Photographer of the Year
“As the weather grew colder, two Eurasian red squirrels (only one is clearly visible) found comfort and warmth in a box Neil had put up in one of the pine trees near his home in the Scottish Highlands. In the colder months, it’s common for the squirrels, even when unrelated, to share dreys. After discovering the box full of nesting material and in frequent use, Neil installed a camera and LED light with a diffuser on a dimmer. The box had a lot of natural light so he slowly increased the light to highlight his subjects – and using the WiFi app on his phone he was able take stills from the ground.”
The Natural History Museum in London is currently closed. But when it reopens, you’ll be able to view the physical images – along with other Wildlife Photographer of the Year photos – in person.
Wildlife Photographer of the Year is developed and produced by the Natural History Museum, London.
The post See the Wildlife Photographer of the Year People’s Choice Award Winners appeared first on Digital Photography School. It was authored by Jaymes Dempsey.
Who doesn’t love Amazon? Come on, where else can you buy live ladybugs, a ready-made shipping container home or tiny house kit, and a bacon-scented mustache all in one place? Amazon’s Prime membership is pretty sweet too. It allows you to take advantage of free delivery, as fast as same-day delivery for some products. You can also take advantage of Continue Reading Photodoto
Comments Off on Review of Amazon Prime Photo Storage: The Good and the Bad
The post 10 Tips to Boost Your Creativity appeared first on Digital Photography School. It was authored by Simon Bond.
Do you want to capture more creative photos?
In this article, you’ll discover tips to boost your creativity so that you can start taking photos that stand out from the crowd.
There are a number of different approaches you can use for creative images, each with its own benefits.
Read on to find out how you can be even more creative!
1. Try a new technique
A great way to boost your creativity is to learn a new photographic technique.
The choices available to you are vast, so there really is no limit to your creative potential here. And the great thing about learning a new concept is that it’ll generally offer plenty of options for experimentation!
Plus, you can apply what you’ve learned to areas of photography you already know; that way, you can grow in genres you thought you’d already mastered.
Here are a few creative techniques for you to try:
Light painting – Transform your scene using tools such as a flashlight or a programmable LED lightstick.
Flash – Up your game in both portrait and still life photography by learning how to use off-camera flash.
Drone – Get dramatic angles from the sky, once only available to the select few who could hire a helicopter.
Light painting is a very popular creative technique.
2. Constrain yourself
The best way to really master something is to add constraints.
Too many techniques, ideas, or pieces of equipment can negatively affect the way you approach a subject.
But if you allow yourself to only start taking photos once limitations are in place…
…the results are often much more creative.
For instance, if you only shoot with a 50mm lens, you’ll need to think more creatively about how you’re going to use it.
How about limiting the area you can photograph to 100 meters from your house? You’ll have to work with what you have and think about how you can apply techniques to get creatively interesting photos near your home.
The key here is that, when you’re forced to work with limits, you’ll find different ways to express your vision. Those lessons you learn can then be applied to all of your general photography.
Here, the festival happened to be 100 meters from my house, literally just down the street!
3. Increase your knowledge
Of course, increasing your knowledge of photography is a good way to improve your creativity.
After all, you can only get so far by learning on your own through experimentation. There are many times when reading a photography book, visiting a website like Digital Photography School, or downloading digital resources will make a big difference.
This often happens when you experiment with a new technique and you initially get better, but you then hit the intermediate plateau.
At such a point, looking for expert outside help on the topic you’re learning is a good idea.
4. Use new equipment
Using new equipment is in essence learning a new photography style.
The first time you use a wide-angle lens, your photography will change forever. That’s why getting new equipment is one of my top tips to boost your creativity.
Of course, you need to keep your Gear Acquisition Syndrome under control; going out and buying something new every time you run out of creative ideas is not the way forward.
Also, if you do decide to purchase new equipment, choose something that will really add value to your photography. A wide-angle lens, a tripod, or a flash are all good investments. Then take the time to really learn what the new equipment brings to the table.
Why not try a lensball? This photo combines a creative zooming technique with a lensball.
5. Explore a new location
You’ve learned a new technique or mastered some more equipment, so what is the next challenge?
Indulge your wanderlust and try a brand new destination!
Going somewhere new is the equivalent of a painter starting with a blank canvas; you have so many possibilities. Once you know the area to which you’ll be traveling, I recommend you plan your trip beforehand. Start by researching the iconic photography locations that are worth visiting. Then go beyond the iconic photos and see how you can photograph the locations in a way that is uniquely yours.
This photo was taken on a visit to Greece the first time I visited there.
6. Revisit places
It’s also possible to capture creative photos of places you’ve visited before!
There are several reasons you might get different – and perhaps even better – results by revisiting a place.
First of all, you will know where the locations with the best angles are (though the challenge is to reinterpret compositions you’ve found in the past).
Here’s some advice for getting creative shots when revisiting locations:
Go during different seasons – Locations can have a dramatically different feel from one season to the next, such as summer to autumn.
Try a new technique – If you’ve learned a new skill since last shooting a location, why not try it out?
Wait before revisiting – Sometimes, you simply need time to think about a location before revisiting with fresh ideas.
This local folk village is a short drive from where I live in South Korea.
7. Join a photography club
One of the best ways to learn from other photographers is to join a photography community. So consider joining your local photography club or an online photography group.
Clubs and groups are a great place to be inspired by other photographers and to learn from their experience. You may also get the chance to collaborate on creative projects. You might even get to run a joint exhibition.
Joining other photographers for club meet-ups like photowalks is a great experience.
8. Start a project
A great way to bring focus and direction to your photography is to start a project.
There are plenty of options, though a successful project will take some time commitment. The benefits are huge, though, as your mind will be focused on how to enhance your project, which will then increase your creativity.
Why not begin a project by photographing the same location repeatedly?
9. Combine techniques
Here’s another tip to boost your creativity:
Combine different techniques or photographic styles. This might give you a fresh take on a style of photography you’ve been practicing for years.
For instance, why not try combining light painting with lensball photography? Or you could try flash photography and light painting (which is another excellent combination!).
Think about the techniques you know and how they complement each other. That way, you can combine them to create a new style of image.
10. Get feedback on your work
There are plenty of benefits to getting feedback on your photography.
First of all, it will improve your work! However, remember that you’ll be getting other people’s opinions – people who may not understand the creative vision you have.
You need to ensure you keep your own unique creative drive, while also taking on board the ways you can improve your game.
Ideally, you’ll find someone whose feedback encourages your creativity and pushes you to get the best results.
Tips to boost your creativity: Conclusion
Now that you’ve read this article, you should be ready to try some creative photography.
So pick your favorite tip and get creative!
Now I’d like to know your thoughts:
How do you stay creative? Are there any tips you can give to the community? Please share your thoughts in the comments section below!
The post 10 Tips to Boost Your Creativity appeared first on Digital Photography School. It was authored by Simon Bond.
The post How to Create a Vignette in Photoshop appeared first on Digital Photography School. It was authored by Megan Kennedy.
Do you want to know how to create a vignette in Photoshop?
In this article, we’ll show you a step-by-step method to do just that.
And by the time you’re finished, you’ll be able to apply a vignette to any digital photograph quickly and easily.
Let’s get started.
A subtle vignette added in Photoshop. Canon 5D Mark IV | Canon EF 100-400mm f/4.5-5.6L IS II USM | 1/125s | f/5 | ISO 100
What is a vignette?
In photography, a vignette is any shadowy darkness that appears around the periphery of an image.
Like this:
An artificial, highly-exaggerated example of vignetting.
Now, vignetting can occur for a number of reasons.
For instance, optical vignetting is caused by the physics of wide-aperture lenses, which allows less light to reach the edges of the camera sensor.
But the type of vignetting we’re interested in for this article is artificial vignetting – where you create vignetting yourself using a program such as Photoshop.
Why create a Photoshop vignette?
Vignetting can be a contentious topic in photographic circles. Some photographers love vignettes, while others loathe them.
But as photography has evolved, applying artificial vignettes in Photoshop has become a useful compositional device. Vignettes are an enduring photographic technique that can add to the gravitas of an image by creating a sense of atmosphere, age, or depth.
How to create a vignette in Photoshop
There are quite a few ways to create a vignette in Photoshop, and in this article, I’m going to cover three of them.
These methods are simple, easy to apply, and will do a great job of creating a customizable vignette effect.
Method 1: The Lens Correction filter
If you’re looking for a quick way to create a vignette, then this method is a perfect choice.
To start off, open your image in Photoshop.
I’m going to use this lavender photo:
Step 1: Create a layer for your vignette
In Photoshop, it’s best to edit non-destructively; that way, you can always go back and adjust your original file if required.
So right-click on the Background layer in the Layers panel, then select Duplicate Layer.
In the pop-up window, rename the layer Vignette.
Step 2: Lens Correction filter
With the Vignette layer selected, click Filter in the Photoshop menu. Then select Lens Correction.
A new Lens Correction window will open. Click the Custom tab on the right-hand panel. Under the Vignette heading, adjust the Amount and Midpoint sliders until you’re happy with the vignette effect.
Then click OK.
If the image looks a little dull after applying the vignette, you can give it a contrast boost with a Curves adjustment layer. You can also adjust the intensity of the colors with a Vibrance adjustment layer. Make edits until you’re satisfied, then call it a day!
Keeping it subtle; the final result of the Lens Correction vignette method.
Method 2: The Gradient fill layer
This second method is a little more complex than the Lens Correction method, but it’s also more flexible.
Step 1: Set the foreground color to black
With your file open in Photoshop, the first thing to check is that the foreground color swatch is set to black.
To revert to the Photoshop default of a black foreground and a white background, press the D key.
Step 2: Add a Gradient fill layer
Next, click on the Layer menu and select New Fill Layer>Gradient. Click OK on the first pop-up window that appears.
There will be a second pop-up, the Gradient fill settings window. Make sure to tick the Reverse box. Set the Style to Radial and input the Scale to alter the intensity of the gradient (smaller numbers correspond to a more intense gradient). I usually enter around 300% to 350%.
Click OK.
The image after the Gradient fill layer has been applied.
Step 3: Experiment with opacity and blending modes
Once you’ve applied the Gradient fill layer, your image may look a little dark and flat. To blend the gradient effect more carefully, make sure the Gradient fill layer is selected and reduce the opacity of the layer via the Opacity slider.
Each image will be different, but I usually reduce the opacity of the Gradient Fill layer to around the 50% mark.
The vignette effect is more subtle with the opacity reduced.
To further blend the Gradient fill layer with the underlying image, you can also work with Photoshop blending modes.
Click on the blend mode dropdown menu and see what works best for your image.
Finally, if your image is still feeling a little flat, make some adjustments with a Curves layer to boost the contrast.
The final result, with a Hard Light blending mode applied to the Gradient fill layer and a contrast boost with a Curves adjustment layer.
Method 3: Using the Shape tool
Photoshop’s Shape tool has endless uses – including adding a vignette to a photograph.
And by working with an ellipse shape, you can easily create a versatile vignette.
Step 1: Create an ellipse
First, make sure your foreground color is set to black.
Then, with your image open in Photoshop, select an ellipse from the Shape Tool menu on the far left Photoshop toolbar. Check to make sure that the Fill swatch located toward the top of the screen in the Shape menu is set to solid black (if it’s not, then double-click and adjust the Fill color).
Once the color is set, drag the ellipse outline over your image to form an oval shape. When you release the mouse button, the shape will automatically fill with black.
Step 2: Invert the ellipse
With your Ellipse layer selected, click on the Properties window and select the Subtract front shape icon located under the Pathfinder heading (see below). The shape will reverse, creating a black border around a now-transparent ellipse.
Step 3: Adjust the vignette with masks
Make sure the Ellipse layer is selected, then refer back to the Properties menu.
This time, click the Masks icon; it looks like a gray circle on a dark background (see below). The Masks menu allows you to adjust the Density and Feather of the Ellipse layer. I usually leave the Density at 100%, but I push the Feather adjustment to its upper limits (which softens the vignette effect).
The Feather slider softens the edges of the vignette.
Step 4: Add finishing touches to your vignette
To increase the subtlety of the vignette, you can adjust the opacity of the Ellipse layer.
Experimenting with different blending modes is another effective way to adjust the impact of the artificial vignette.
And feel free to alter the dimensions of the vignette with the Transform options or tweak the contrast and saturation with layered adjustments.
The results of applying a vignette with the Shape tool in Photoshop.
How to create a vignette in Photoshop: Conclusion
As you can see, applying vignettes to your photos in Photoshop doesn’t have to be hard.
In fact, it’s really very simple!
So open some of your favorite images in Photoshop. See how they look with vignettes.
Because a subtle vignette can make a big difference!
Photoshop vignetting FAQs
What is a vignette?
A vignette is a darkening around the periphery of a photograph. It occurs for various reasons in many photographic circumstances.
How do I add a vignette in Photoshop?
There are several ways to create a vignette in Photoshop. The methods listed in this article are simple and effective ways to apply a vignette aesthetic.
Where can I find the vignette tool in Photoshop?
Unfortunately, Photoshop doesn’t offer a vignette tool. However, you can easily create a vignette with the Shape tool, a Gradient fill layer, or a Lens Corrections filter.
How do I remove in-camera vignetting?
The easiest way to remove vignetting in post-production is to open the image in Photoshop and – with the image layer selected – click Filter>Lens Correction. The Lens Correction window will present various options for reducing unwanted vignetting.
The post How to Create a Vignette in Photoshop appeared first on Digital Photography School. It was authored by Megan Kennedy.
The post Fine Art Landscape Photography: The Complete Guide appeared first on Digital Photography School. It was authored by Rick Ohnsman.
Perhaps you’ve heard the term fine art landscape photography.
But is fine art landscape photography something you should aspire to make? And what distinguishes a fine art photograph from a snapshot?
In this article, I’m going to explain everything you need to know about fine art landscape shooting. I’ll start by explaining what it actually is – and I’ll go on to give you plenty of tips you can use to improve your own landscape photos!
Let’s get started.
What is fine art landscape photography?
Some terms are hard to define, and fine art photography falls into that category.
“There are always two people in every picture: the photographer and the viewer.”
— Ansel Adams
That said, fine art photography is less about the subject and more about the photographer. Your goal in fine art landscape photography is not to simply to show your viewer what you saw; it’s to communicate how it felt to be there and how the scene made you feel.
It was subzero the morning I made this shot in Yellowstone National Park. I added a blueish tone to help the viewer experience the cold I felt when making the image.
“Photography for me is not looking, it’s feeling. If you can’t feel what you’re looking at, then you’re never going to get others to feel anything when they look at your pictures.”
— Don McCullin
So how do you communicate feelings through photographs?
Here are some tips to consider when capturing fine art landscape photography.
This image is a favorite because of how it “feels.” I think it does a nice job of conveying the cold, wet, foggy atmosphere of a morning in the Columbia Gorge of Oregon, a place where the fog often hangs thick.
1. Think about what would make your image unique
Have you ever been making a landscape photo at a location where other photographers are lined up next to you also working the scene?
Most of us have.
The question to be asked is:
How will your photo be different, unique, special? What is it about your image that will stand out? How can you put your unique signature on the shot?
The choices you make to create an image that is uniquely yours matter. Any cook can follow a recipe, and if a dozen cooks all work from that same recipe, the dishes will be essentially indistinguishable. The gourmet chef making their signature dish, however, will strive to make the meal unique.
And as a fine art landscape photographer, your objective ought to be the same.
Almost everyone loves a sunset photo, probably because of how they make us feel. Injecting feeling in your landscape photos is a large part of what takes an image into the “fine art” realm.
“Great photography is about depth of feeling, not depth of field.”
— Peter Adams
2. Be intentional and deliberate
When the light is rapidly changing, a landscape photographer might need to move quickly. However, most landscape photography can be done at a slow and thoughtful pace.
Rather than simply seeing a scene, positioning your tripod, shooting first and asking questions later, do the opposite. Before even touching your camera, thoughtfully observe the scene. Slow down.
Ask yourself what first attracted you to the scene. How does it make you feel? How can you best compose the shot? What if you moved higher, lower, to a different vantage point, used a different lens? What can you do to best capture your feelings in the frame?
The morning light, the fog, and the forest all combined to make it a magical morning when I had the opportunity to shoot in the Groton State Forest in Vermont.
Never be a one-and-done shooter. Take advantage of the instant playback capability of your camera, evaluate your image, and decide what might be better.
Then make a few more shots.
While he’s not a photographer and not talking about fine art landscape photography, famed hockey player Wayne Gretsky still offers advice photographers would do well to remember:
You miss 100 percent of the shots you never take.
Wayne Gretsky
3. Practice previsualization
You will know your skills are growing as a photographer when you can see your photograph before you even put your eye to the viewfinder.
Eventually, you should previsualize your finished image, have the vision, and then simply use the camera as an instrument to capture that vision.
It’s a beautiful loop:
The more you photograph, the better you become at seeing – and the better you become at seeing, the better your photographs will become.
I had been to this location many times, and so I had a good idea of what I wanted when I went there to make this blue hour image. I helped it a little more with a split-toned edit.
“The camera is an instrument that teaches people how to see without a camera.”
— Dorothea Lange
But while previsualization is important, fine art landscape photography should always be open to serendipity: those unexpected moments when the light changes, the angels sing, and the miraculous appears for a brief moment for you to capture.
There have often been times when I’ve previsualized a shot, got set up, and waited for the light, only to have something amazing appear behind me out of the blue.
Practice working with your camera controls so that, when such a moment occurs, you can respond quickly and get the shot.
I was busy making the first shot, which was nice and even had a rainbow. Then I turned around and there was a second great opportunity. Always be ready for that serendipitous moment.
4. Fine art landscapes aren’t just monochrome
Google “fine art photography,” and you will mostly see black and white (monochrome) images. Due, perhaps, to its long existence, as well as a good number of early photographers for whom black and white was the only option, monochrome photographs may outnumber color images in the world of fine art.
But that’s not to say that color images can’t also be considered fine art photographs.
Circle back to our definition: Fine art photography is more about the artist/photographer and their vision than the content of the photograph. Whether color or monochrome, the best way to portray a vision will depend on the maker’s intent.
I had already decided this photo of an old snag should be monochrome when I made it. You can see the color version is just okay. The split-toned monochrome shot better exemplifies a fine art image.
“What I love about black and white photographs is that they’re more like reading the book than seeing the movie.”
– Jennifer Price
Now, bear in mind the strengths of black and white photography. Without the addition of color, monochrome images rely more on the basics, the “bones” of a good photo: line, shape, form, tone, and texture.
Black and white images are typically simpler, with greater attention paid to the subject. Sometimes, a monochrome image can convey a look or mood better than its color counterpart.
I like both the color and black and white versions of this shot and think either could be classified as fine art landscape photography.
When deciding whether an image might be best in color or black and white, the fine art photographer needs to come back to the objective, and ask themselves:
Which version best conveys the feelings and vision I had when making the image?
That, and not some notion that fine art photographs are always monochrome, should dictate the direction the photographer takes.
One advantage of monochrome is that it can get down to the “bones” of a good image – line, shape, form, tone, and texture – while stripping away color that would distract from those basics.
5. Don’t be afraid to alter reality
We talked about fine art photography being less about an accurate interpretation of a subject and more about the photographer’s feelings and vision.
So who says you can’t completely change your image to better convey those things?
Techniques like long shutter speeds to blur moving objects and very fast shutter speeds to totally freeze rapidly moving objects are right at home in fine art photography.
Learn how to use long shutter speeds to take your images from simple snapshots to fine art photography.
So is purposely blurring scenes with intentional camera movement (ICM) and using special digital tools to give an image a “painterly” look.
Infrared photography or other techniques that shift colors? Sure!
Art is totally subjective, and so is fine art landscape photography.
How you choose to portray a scene is your prerogative, where the “right way” is whatever best communicates your feelings and message.
I wanted to do two things with this image: Emphasize the cold, which I did with a white balance skewed toward the blue tones, and emphasize the frozen, static ice against the flow of the river, which I did with a long shutter speed. Use your camera as a tool to capture your vision.
“I really believe there are things nobody would see if I didn’t photograph them.”
— Diane Arbus
Go abstract with your fine art photography and give abstract images a try. Intentional camera movement (ICM) can give you some beautiful results.
6. Experiment with interpretive editing
I’ve read much about the phrase “getting it right in camera,” something with which I both agree and disagree. Yes, I do believe one should master their camera controls so as to get the best possible exposure of an image while in the field.
I made this shot of Grand Fountain Geyser in Yellowstone National Park a little earlier in the evening. In post-processing, I took the color toward the cooler tones.
Yes, making the best possible image in the field is important. Never should an editing session be a rescue mission where you try to overcome mistakes made when shooting. Fixing an image in Photoshop is an option, but usually not a good one.
A little later in the evening, I made this second shot, and I edited it with warmer tones!
However, enhancing an image with dodging, burning, or any of dozens of other editing techniques is the mark of a skilled fine art photographer. Using editing skills to further interpret an image, to convey feelings and intent, is part of the craft.
People who like to brag that their images are unedited and straight-out-of-camera have likely never studied the work of perhaps the most renowned landscape photographer of all time, Ansel Adams. He didn’t have the advantage of digital editing software to edit his images, yet that didn’t deter him.
Take a look at some of his before and after images, and you will marvel at how much change there was between the camera-captured negative and the final print.
I was going for an Ansel Adams-like editing style with this shot of “Moonlight Over the Eastern Sierra.” How’d I do?
7. Put in the time
Fine art landscape photography isn’t done in a hurry.
I’ve seen software makers claiming their programs will allow you to work faster using artificial intelligence. While these programs have come a long way, I’m not convinced that they can yet equal the quality of old-school human intelligence and a more careful, though slower, style of editing.
You might be able to get some interesting results with a one-click preset, but will it result in an image that communicates your unique vision? If you replace a sky with something “canned,” it might be more dramatic, but is it still your photograph?
Artificial intelligence (AI) editing is making inroads, but what’s wrong with taking your time, using human intelligence, and learning to edit the old-school way?
I also have to ask: What’s the hurry?
I enjoy photo editing, seeing where I can take an image with some thoughtful work. I know there are those that don’t care for editing, and I guess that’s okay. I just believe that most carefully-crafted art takes time.
I have used such software on occasion, and so can you. But rather than just learn the tricks of the trade, how about putting in the time and effort to learn the trade itself?
If fine art landscape photography that has your own personal style and signature look is your objective, there are no shortcuts. One-click presets will only make your work look like everyone else’s!
“Once you learn to care, you can record images with your mind or on film. There is no difference between the two.”
— Anonymous
8. See(k)ing the light
I enjoy various kinds of photography, from table-top still life and macro photography to flash-lit work and especially landscapes. What differentiates landscape photography from many of these other genres is the lighting, the degree of control the photographer has over the scene, and the ease of creating the desired look.
I can previsualize the look I want for a tabletop still life shot, set it up on the kitchen counter, light it, make adjustments, and tweak until I get the shot I like.
Not so for landscape photography.
Instead, I must travel to the area I want to photograph, be there when the weather is cooperative, the light is right, the foliage is in season, and everything else (none of it in my control) all comes together. If it ever does.
But this is also the joy of fine art landscape photography.
Sometimes you just gotta wait…and wait…and wait some more. It had been overcast all day, but just a few moments before sunset, as the sun neared the horizon, the sky broke out with this unique light. I love the mood of this Oregon coast shot.
It might mean sitting patiently in the pre-dawn chill, hoping the clouds come in just right and the sunrise hits just so. You might hike miles to get to that overlook for a sunset that never comes, or get lucky and have a sudden thunderstorm come in over the canyon with dramatic clouds and lightning.
The lack of control is part of the attraction of landscape photography, the knowledge that luck really is when preparation meets opportunity.
“My life is shaped by the urgent need to wander and observe, and my camera is my passport.”
— Steve McCurry
So if you want to be a great fine art landscape photographer, then you’ll have to work at it. You’ll need to sacrifice a bit, get up before sunrise, stay well after the sun has set, hike into difficult spots, seek places drive-by photographers will never see, and strive to be different with your images, capturing not just what you see, but what you feel.
A stormy, moody sky and a weird, twisted tree reaching for the light. I like the feel of this shot, which I call “The Creature Rises.”
9. Shoot to a theme
Sometimes, a good way to stimulate your creative juices is to shoot to a theme. Rather than simply grabbing your gear and going to a location to do some landscape photography with whatever you see, decide that you’re going to make all of your images fit a theme.
Visually describe a concept or maybe make photos as if you were doing an article on a place or a single subject. Then, use the “visual vocabulary” that are your photographs to describe and define that subject.
Add your own style as a fine art landscape photographer to determine what you want your viewer to know and feel about your subject.
I like the serene feeling of these fallen autumn leaves floating in the still, dark waters of a river eddy. I spent over an hour working this theme and making many images.
“The whole point of taking pictures is so that you don’t have to explain things with words.”
— Elliott Erwitt
10. The print is the performance
Today, most photos that are made are probably never printed. Instead, they’re viewed only on monitors or LCD screens, and sometimes projected. In the film days, photographers had no such options. After shooting and developing their film, they were only halfway to being able to show their photograph to viewers. Prints were mandatory.
Ansel Adams viewed it this way:
The negative is the equivalent of the composer’s score, and the print the performance.
– Ansel Adams
When discussing fine art landscape photography, I must raise the question:
Can a photograph be considered fine art if it is only viewed on a monitor and never printed?
If you’ve spent any time at all in a photo gallery and closely looked at printed photographs, you will know there is no comparison between seeing a printed photograph and seeing that same image on a monitor. Prints can render so much more detail, color, and tone.
Even the type and texture of the paper or other substrate on which a photograph is printed can make a huge difference.
Finally, when viewing photographs on a screen, the light is produced by the screen itself, whereas when you view a print, the light is reflected. It changes the way you view the shot.
This is a nice image on-screen, but to really appreciate it, you’d have to see a print. Then, depending on the paper type, or maybe even as a print on acrylic or aluminum, it would really pop.
So to repeat my question in a different way:
Must a photograph be printed to be considered fine art?
I could argue either side, but I must confess that I’m a big proponent of printing. Yes, learning to make good prints yourself is a whole other skill, and not an easy one to learn. Simply getting the color and brightness of a printed image to approximately match what you see on your monitor is a challenge.
But I would argue that learning to print is part of the photographic craft.
You might also choose to hand off your photos to a professional printer whose specialty is knowing how to get the most from your image. That’s okay, too. I guess my point is that the difference between a printed fine art landscape photograph and the same image viewed on a monitor is almost as great as the difference between going to a concert and just watching one on TV.
“Fine art prints created by the artist, or the artist’s collaborator, are important because they best represent the artist’s vision. Images displayed on digital devices are subject to the non-uniform nature of different displays and they may appear radically different than the artist intended.”
– Mac Holbert
11. Your photos are about you
What you see, what attracts your eye and your camera, and how you choose to interpret a subject says a lot about you.
Even if you haven’t consciously defined a “photographic vision” for yourself, chances are good that, if you review your archives, you will be able to identify commonalities in your work.
Hopefully, you will have developed a rating system (perhaps color coding or star rating as can be done in Lightroom) so you can determine which photos you consider to be your favorites. Take some time to look through your best shots and perhaps make some notes about defining styles, features, or techniques.
What are you consistently doing that works, and what signature style do you have?
“Only photograph what you love.”
— Tim Walker
The predawn shot on the left required shivering in the cold of a mountain morning. The mist was hanging low over Little Redfish Lake in Idaho. In the shot on the right, I can still feel the crisp autumn air and the sound of the rustling leaves in the aspen grove. Hopefully, a viewer will get some sense of those moments in my images.
Focus specifically on your landscape images and look for commonalities. What has worked well? What hasn’t worked? How can you find ways to build on your successes and also further define and develop your personal style so that your images communicate with your viewer?
“We are making photographs to understand what our lives mean to us.”
— Ralph Hattersley
When considering the subject of fine art landscape photography, you may be asking, “Does my work measure up? Am I good enough that my photographs could be considered fine art? Do I belong in the elite club of fine art photographers?”
I would suggest that what constitutes a fine art photograph is less about the quality of the image, and much more about the photographer’s success communicating something to the viewer.
I know the backstory behind this image, but you, as a viewer, don’t. Does this image speak to you? What does it say? What do you think and feel when you see it? Good photographs speak to the viewer.
“Good photographs are like good jokes. If you have to explain them, they aren’t very good.”
Anonymous
If you want to be successful in fine art landscape photography, or any other genre of photography, for that matter, teach your photos to speak for themselves. If they were displayed in a gallery without you there to say a word, what would they say to a viewer? What would a person feel when viewing them?
Yes, a photo can be worth 1000 words, maybe more. But it has to speak for itself!
Fine art landscape photography: Conclusion
Now that you’ve finished this article, you know all about fine art landscape photography.
And you know how to create some beautiful fine art landscape shots of your own!
So get out and get shooting. Best wishes in your photographic endeavors!
The cold blue of an Idaho winter day with just a pop of red on a distant barn. This one says a lot about me, where I live, what I love, what images I like to make. What do your photos say about you?
Fine art landscape photography FAQs
What is fine art photography?
This Wikipedia description sums it up nicely: “Fine-art photography is photography created in line with the vision of the photographer as artist, using photography as a medium for creative expression. The goal of fine-art photography is to express an idea, a message, or an emotion.”
Must an image be black and white to be considered a fine art photograph?
While many photographers choose to use black and white when making fine art landscape photos, and while traditional images were made that way, it’s not a requirement. The photographer should choose whatever representation best conveys their intention for the image.
How can previsualization help me make fine art photographs?
Good photos are made in the mind, and the camera then becomes a tool for capturing what the photographer has already “seen.”
Must a photograph be printed to be considered “fine art?”
No, but a print can do much more to convey the photographer’s message to the viewer as a tangible, physical object with much greater subtlety of color, tone, and higher resolution. Further, while every display device will affect how the image is seen, a print retains the look of the image as the photographer intended. Printing is also part of the art and craft of photography.
If you could only give one tip about making fine art landscape photographs, what would that be?
Determine what you want your viewer to see, think, and feel when looking at your image, and imbue your photograph with those qualities such that it can speak on its own to the viewer.
The post Fine Art Landscape Photography: The Complete Guide appeared first on Digital Photography School. It was authored by Rick Ohnsman.
The post Is it Time to go Full Frame? Weigh These Pros and Cons Before You Decide appeared first on Digital Photography School. It was authored by Bruce Wunderlich.
Has anyone ever said to you, “That’s a nice photo; you must have an expensive camera”?
According to photography legend Ansel Adams, “The single most important component of a camera is the twelve inches behind it!”
Your camera is simply a tool, one that you use to create your vision of the scene in front of you. A camera can only do what you tell it to, so it’s not going to capture that “nice photo” all by itself.
But what if a camera doesn’t perform up to your expectations? Then it may be time for an upgrade – from APS-C to full frame.
Captured at ISO 6400 on a full-frame Nikon D750, this image shows great tonal range with acceptable noise levels.
I recently made the jump from a crop sensor camera to a full-frame body (a Nikon D750, used in all the images below). For this article, I am not going to get into a technical discussion about the differences between a crop sensor camera and a full-frame camera.
Instead, I want to talk about if and when upgrading to a full-frame camera is desirable, especially if you’re on the fence about purchasing a full-frame body.
Now let’s discuss some important full-frame pros and cons:
Advantages of full frame
Enhanced low-light performance: The larger sensor of a full-frame camera has bigger pixels, which create less digital noise at higher ISOs. In most cases, you will get a one- or two-stop improvement in high-ISO noise over crop sensor cameras, which allows you to shoot with faster shutter speeds in low light.
More control over depth of field: This is a commonly misunderstood benefit of full-frame cameras, because the larger sensor does not really affect the depth of field of an image. However, with the larger sensor of a full-frame camera, you can move closer to the subject while using an equivalent focal length, and this causes the depth of field to become narrower. Ultimately, you get smoother background bokeh.
Improved dynamic range and color depth: A full-frame sensor can record more tonal range within shadows and highlights. Detail and color are much improved at both ends of the spectrum.
Disadvantages of full frame
This heron in flight was captured at a high ISO to achieve the fast shutter speed needed to get a sharp wildlife image.
Expense: Not only is the cost of a full-frame DSLR or mirrorless camera higher than crop sensor alternatives, but you may also need to invest in full-frame lenses.
Size and weight: The overall size and weight of full-frame cameras is greater than their crop sensor counterparts. Full-frame lenses are also larger and heavier. This may not matter to many photographers, but if you frequently carry gear for long distances, it could be a factor to consider.
No crop factor: The telephoto reach of a full-frame camera is lessened by not having a crop sensor. A 200mm lens on a full-frame camera reaches to 200mm; a 200mm lens on a 1.5x crop sensor camera reaches to 300mm.
If you’ve made it this far and you still like the sound of a full-frame camera, it’s time to ask yourself a few key questions:
How much will it cost?
As mentioned above, the cost of buying a full-frame camera is significantly more expensive than a crop sensor one, plus you’ll likely need to purchase new lenses. There isn’t much use in changing to full frame if you are not going to use high-quality lenses designed for full-frame cameras. So if you plan to make the jump to full frame, you may want to begin by upgrading your lenses to those compatible with full-frame cameras.
What type of photography do you enjoy shooting?
Choosing a smaller aperture of f/22 produced enough depth of field to keep both the boys and the waterfalls in focus when using my full-frame Nikon D750.
Full-frame sensors offer advantages and disadvantages for different types of photography.
Landscape: Enhanced low-light performance and more detail are both key advantages of full-frame cameras for landscape photography. The only possible drawback here is the effectively shallower depth of field, but this can be compensated for by using a smaller f-stop.
Portraits: The larger size of a full-frame sensor will result in a shallower depth of field. For portraiture, this means the backgrounds can feature more blur and make the subjects stand out better.
Wildlife: A full-frame camera loses the telephoto reach that a crop sensor camera offers. Nevertheless, a lot of wildlife photography is shot in low-light situations, where a full-frame sensor gives a significant advantage.
Sports: As with wildlife photography, high-ISO capabilities are helpful for sports photography. However, the loss of increased reach may be a problem.
To summarize:
If you are a portrait or landscape shooter, there are many reasons to switch to full frame. But if you’re a sports or wildlife shooter, you’ll need to consider more carefully.
This scene was captured at 24mm on a full-frame Nikon D750. The white line shows how much of this image would be captured on a crop sensor camera from the same shooting location.
This image was captured at 600mm with a full-frame camera. The white line shows the reach advantage that a crop sensor camera would provide. Still, capturing this image in low-light conditions with an ISO of 2000 is possible thanks to my full-frame sensor.
Is your current camera holding you back?
Every camera has a limited number of shutter releases, so if your camera is nearing the end of its life cycle, it might be time to consider an upgrade. If your older crop sensor model is limiting your results in low light, and you are constantly frustrated by high levels of noise, you might benefit from an upgrade to full frame.
However, keep in mind that it’s convenient to blame a camera for taking poor images, but it may not be the camera that’s holding you back.
Many times, photographers don’t get the results they expect from high-end equipment simply because they struggle with more fundamental techniques. No matter what type of camera you shoot with, get to know it and how all of its features work before moving on to a different one.
This cityscape was captured with a full-frame camera in low light by increasing the ISO.
What is your level of photography experience?
A full-frame camera is probably not the best option for beginners.
So if you are a beginner, I’d recommend starting with an entry-level camera and working up to a full-frame model. In fact, if you are looking for a camera to take photos of family and friends, a crop-sensor model is a great choice.
Having a good handle on the exposure triangle (aperture, shutter speed, and ISO) and how its key components work together is essential if you’re going to take advantage of a full-frame sensor. You must also be comfortable shooting in Manual mode.
Do you make large prints?
A full-frame sensor has larger pixels, which will capture more light – and this results in high-quality large prints. If you never make any prints larger than 8×10″, then a full-frame model won’t help you much here.
Captured with a full-frame Nikon D750, this sunrise image reveals a nice range of tones, without any of the digital noise in the shadows that is likely to be present with some crop-sensor cameras.
Will purchasing a full-frame camera make you a better photographer?
You may have heard this quote, “Skill in photography is acquired by practice, not by purchase.”
Do you need a full-frame camera to capture great images? No, of course not! Most new crop sensor cameras on the market today are engineered to take beautiful images!
But if you’re an experienced photographer, you may benefit from switching to full frame.
The bottom line
If you are thinking of upgrading from a crop sensor camera, be sure to consider the price, lens compatibility, and type of photography you do before you make the change to full frame. Jumping to a larger sensor can be intense – but if you’re ready for that big step, the results are often rewarding.
Now tell me:
Are you ready to go full frame? Please leave your answer in the comments below!
The post Is it Time to go Full Frame? Weigh These Pros and Cons Before You Decide appeared first on Digital Photography School. It was authored by Bruce Wunderlich.
The post When NOT to use a Polarizing Filter appeared first on Digital Photography School. It was authored by Gavin Hardcastle.
There are times when a using a polarizing filter is a bad idea.
Yes, I just blasphemed against the gods of landscape photography. Not using a polarizing filter for landscape shooting could be considered sacrilegious in some circles, and indeed, I myself have written ad nauseam about the importance of this simple yet powerful photographer’s tool.
However, today I’m going to selectively contradict myself.
Because while a circular polarizing filter can hugely improve your photographs in most outdoor photography situations, there are times when leaving that shady piece of glass off the lens can actually give better results.
And that’s what this article is all about!
So if you’re ready to learn all about the times you should keep your polarizer packed away…
…let’s get started.
What does a circular polarizer do?
A polarizer reduces reflected light before it enters your lens.
Note that a polarizing filter can be turned by hand to engage or disengage the polarizing effect. This is useful for shooting reflective surfaces such as water, glass, wet rocks, and cars.
Most of the time, you want to control those reflective surfaces and reduce the glare of reflected light. But what if you like that super wet look and glare on certain surfaces?
Let me give you some examples where I felt that not using a polarizer actually made for a better image.
When the reflected light has color
For the image above, I decided to remove my polarizer.
And here’s why:
Because the reflected light on the wet rocks in the foreground had a distinct red color, which I really liked.
Using a polarizer would have reduced this red reflected light and would have made for a less dramatic image.
When you want that super wet look
When taking this image, I found that the wet rocks had lovely highlights that caused a soft glare from reflected sunlight.
Even though the highlights didn’t really have any dramatic color, I still felt that the wet look made for a better image, so I opted not to use the polarizer.
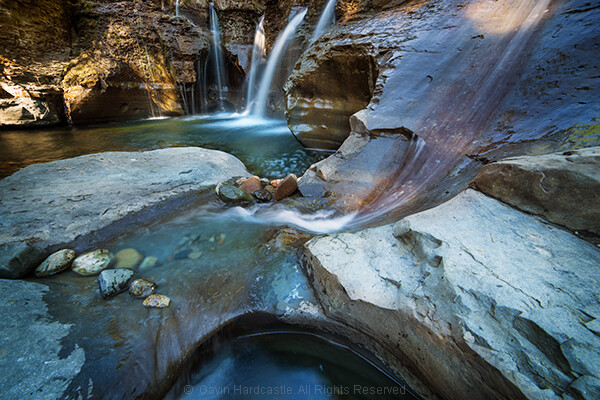
In very low light or when shooting totally shaded areas
This shot of a waterfall at Silver Falls State Park was a long exposure in very dim light, taken inside a canyon that had no direct sunlight at the time.
You see, when the sun has gone down and it’s starting to get dark, there’s little point in using a polarizer for a scene like this.
The only wet surfaces that could cause glare were the leaves in the foreground, and the light was so dim that there was no glare at all.
Night shooting
When you’re photographing at night, you want to get as much light as possible into your lens.
A polarizer is going to reduce the amount of light and force you to use a longer shutter speed or a higher ISO setting.
So if you’re shooting in the dark, do yourself a favor and remove the polarizer.
When capturing the full moon shot above, the polarizer would only have served to slow down my shutter speed.
When you want reflections in water
Here’s where you want the best of both worlds.
Let’s say you like the look of your image with the polarizer on. Your colors are nicely saturated and all of the glare has been reduced from the surfaces, but you’re annoyed to see that the lovely reflections in the water have either vanished or diminished.
What do you do?
The simple answer is to take two shots – one with the polarizer engaged and another without the polarizer.
Then you can blend the two exposures in Photoshop and take the best elements from each.
For the shot above, I really enjoyed the look of the reflected waterfall in the pool, so I took two shots with different polarizer settings and then combined them.
When you want to shoot rainbows
I’m sure I’ll be corrected by our more well-educated readers, but from a polarizer’s standpoint, a rainbow is reflected light.
So if your polarizer is engaged, the rainbow will perform a disappearing act in your photo.
Disengage or remove the polarizer and – presto! – the rainbow will be back in your photograph.
But still don’t forget your polarizer!
As I mentioned at the start of this article, a polarizer is a key landscape photography tool.
In fact, if I leave the house and forget my polarizers, I’ll actually turn around and drive home; they’re that important.
At the same time, I urge you to learn when conditions call for the removal of your polarizer.
And I hope this article helps you identify those golden moments so that you can get the best possible shots!
Now over to you:
Do you use a polarizing filter? How often? Are there times when you prefer to go without it? Share your thoughts in the comments below!
The post When NOT to use a Polarizing Filter appeared first on Digital Photography School. It was authored by Gavin Hardcastle.
The post Weekly Photo Challenge – Flowers appeared first on Digital Photography School. It was authored by Sime.
BEFORE you all rush to your archives to share that photo you’re thinking of, the ‘challenge’ part of our weekly challenges is that you get out and make a new photo for each challenge, and while we know that can be difficult, we would love to see you challenge yourselves and make a new, better than you’ve EVER done, image for the weekly challenges, rather than just grabbing one from the archives – if you can!
Need Inspo? Click Here or Here or Here
This week our theme is ‘Flowers‘ and while it has been done before, we want to see it done again, better than ever! From your garden, someone else’s garden, in the street, in the hills… What can you do with a simple flower? Work on your depth-of-field, eliminating distraction, or maybe make it part of a bigger scene, hidden beauty kind-of-thing.
Make sure you use the hashtag #dPSFlowers if you post your challenge entry on social media!
Not Always Alive – #dPSFlowers
Don’t forget, you can go back and try ALL of our CHALLENGES over HERE!
Fields of Gold #dPSFlowers
Great! Where do I upload my photos?
Simply upload your shot into the comments field (look for the little camera icon in the Disqus comments section) and they’ll get embedded for us all to see. Or, if you’d prefer, upload them to your favourite photo-sharing site and leave the link to them.
Share in the dPS Facebook Group
You can also share your images in the dPS Facebook group as the challenge is posted there each week as well.
The post Weekly Photo Challenge – Flowers appeared first on Digital Photography School. It was authored by Sime.


You must be logged in to post a comment.