RSS
 

Archive for the ‘Photography’ Category

Notes on the Paul Buff Link 800ws Flash

29 May

The Paul C. Buff Link monobloc studio strobe ($ 895.95) delivers 800ws of portable power, and deserves consideration from anyone in the United States who is considering a big gun for use on location.

Please note: This is not a full review.

There have been several thorough examples already published — most notably this one by Mike McGee. There are many others, from the usual suspects, a Google search away.

Rather, this is a quick write-up of some first-hand impressions, thoughts and features I have not seen much mention of elsewhere.
Read more »
Strobist

 
Comments Off on Notes on the Paul Buff Link 800ws Flash

Posted in Photography


The Weekly Photography Challenge – High Noon

29 May

The post The Weekly Photography Challenge – High Noon appeared first on Digital Photography School. It was authored by Sime.

High Noon, when the sun is its most harsh, when things tend to get very bright, can be a tough time to make a photograph – that’s why, this week, we’re challenging you to share your best ‘high noon’ photograph in this week’s weekly challenge.

Remember to tag your photographs #dPSHighNoon

Generally most photographers will try to avoid high-noon, or the middle of the day, so that they don’t need to struggle with the harsh light (and in some cases, the heat, though from a cold Melbourne afternoon I say ‘bring the heat!’) but when you have a small window in which to shoot and you have to go and make photos, all you can do is the best you can do!

Here are a couple of little helpers on the blog to help you out;

“Bright ideas for shooting in the midday sun”
“3 Quick tips for photographing in harsh midday sun”

The Weekly Photography Challenge – High Noon
Photo by Michael Kroul on Unsplash

Your photograph can be of anything, a portrait, a wildlife scene, a landscape, but it must be taken in the middle of the day – we’re not checkin’ exif because we trust you! Ha.

Remember to tag your photographs #dPSHighNoon

But how do I upload my photos?

Upload your photo into the comments field below this post (look for the little camera icon in the Disqus comments section below this post) and they’ll get embedded for us all to see. Or, if you’d prefer, upload them to your favourite photo-sharing site and leave the link to them.

Weekly Photography Challenge – Looking Up

The post The Weekly Photography Challenge – High Noon appeared first on Digital Photography School. It was authored by Sime.


Digital Photography School

 
Comments Off on The Weekly Photography Challenge – High Noon

Posted in Photography


Panasonic Unveils the GH5 II, With Wireless Live Streaming and Improved IBIS

28 May

The post Panasonic Unveils the GH5 II, With Wireless Live Streaming and Improved IBIS appeared first on Digital Photography School. It was authored by Jaymes Dempsey.

Panasonic Lumix GH5 II released

Panasonic has announced its latest Micro Four Thirds mirrorless camera: The Lumix GH5 II, an update to the much-loved GH5, which debuted back in 2017.

While the GH5 II retains many of the capabilities that made the GH5 such a praiseworthy camera, it also features several upgrades – particularly to its videography and streaming options, though also for action photography, low-light photography, and more.

Let’s take a closer look.

Panasonic Lumix GH5 II: What does it offer?

The Lumix GH5 II is a Micro Four Thirds camera combining significant photography and videography capabilities; as such, it should appeal to both enthusiast and professional hybrid shooters, though it can certainly perform well as a standalone photography or videography option.

Here are the key features that are identical (or nearly identical) to those on the GH5:

  • The GH5 II packs the same build as the GH5, including solid construction and weather resistance. The GH5 II is perfect for the outdoor photographer or videographer, though heavier than hobbyist alternatives.
  • The sensor is the 20 MP MFT technology used in the GH5, but Panasonic has added a new anti-reflective coating for better backlit shooting.
  • Like the GH5, the GH5 II features dual SD card slots, useful for professionals who require redundancy in their work.
  • 12 frames-per-second continuous shooting (in AF-S) and 9 frames-per-second continuous shooting (in AF-C) promise decent action performance.
  • The electronic viewfinder remains a respectable 3.68M dots.

And here’s what you get from the GH5 II over the GH5:

  • 10-bit 4:2:0 DCI 4K/60p; pre-installed V-Log L for improved dynamic range; simultaneous external 10-bit 4:2:2 4K and internal 10-bit 4:2:0 4K recording.
  • The GH5 II supports wireless live streaming. As Panasonic explains, with the GH5 II, “high-quality live streaming is possible with minimum equipment – only the camera and a smartphone are required…in either an indoor or outdoor environment.”
  • Improved autofocus performance. Panasonic claims that the GH5 II “features high-speed and high-precision AF” that “detects eyes and faces at a 2x faster recognition-cycle speed than the GH5.” The camera also packs “enhanced AF-C, which…enables users to keep tracking small or fast-moving subjects.”
  • An improved buffer for action photography (108+ RAWs, 999+ JPEGs).
  • 6.5 stops of in-body image stabilization versus the 5 stops of IBIS on the GH5 – a small but useful upgrade for low-light photography (and handheld videography).
  • (Slightly) increased resolution on the fully articulating touchscreen, though with a subtle decrease in size.

On the whole, upgrades for photographers are relatively minor. If you’re primarily a stills shooter, these enhancements probably won’t justify shelling out for the GH5 II over the GH5 (and you may be better off considering a different Panasonic camera).

But for hybrid shooters and videographers requiring top-notch recording and/or streaming capabilities, the GH5 II is certainly an appealing package.

Panasonic Lumix GH5 II: Price and release date

You can preorder the Panasonic Lumix GH5 II for a reasonable $ 1699 USD ($ 2299 when bundled with the Leica 12-60mm f/2.8-4 lens). Orders will begin shipping in late June.

So if the GH5 II’s new features appeal to you, I highly recommend you check it out (though you should also keep an eye out for news regarding the just-announced Lumix GH6).

Now over to you:

What do you think of the Panasonic Lumix GH5 II? Are you disappointed by the lack of upgrades? Or pleased by what the GH5 II does include? Would you consider buying it? Share your thoughts in the comments below!

The post Panasonic Unveils the GH5 II, With Wireless Live Streaming and Improved IBIS appeared first on Digital Photography School. It was authored by Jaymes Dempsey.


Digital Photography School

 
Comments Off on Panasonic Unveils the GH5 II, With Wireless Live Streaming and Improved IBIS

Posted in Photography


15 Photo Essay Ideas (to Get Your Creative Juices Flowing)

27 May

The post 15 Photo Essay Ideas (to Get Your Creative Juices Flowing) appeared first on Digital Photography School. It was authored by Kevin Landwer-Johan.

photo essay ideas

Visual storytelling is a normal part of our everyday lives, but coming up with good photo essay ideas can be challenging. So in this article, I want to share some topics you can use to create interesting, compelling photo essays.

A single, strong photograph can convey a lot of information about its subject – but sometimes we have topics that require more than one image to do the job. That’s when it’s time to make a photo essay: a collection of pictures that together tell the bigger story of a chosen theme.

Here’s a brief list of ideas to get you started!

Karen woman portrait
Nikon D800 | 105mm | f/8 | 1/125s | ISO 400
© Kevin Landwer-Johan.

1. A day in the life

Your first photo essay idea is simple: Track a life over the course of one day. You might make an essay about someone else’s life. Or the life of a location, such as the sidewalk outside your house. 

The subject matter you choose is up to you. But start in the morning and create a series of images showing your subject over the course of a typical day.

(Alternatively, you can document your subject on a special day, like a birthday, a wedding, or some other celebration.)

woman with a backpack getting on a train photo essay ideas
Nikon D800 | 105mm | f/6.3 | 1/100s | ISO 400
© Kevin Landwer-Johan

2. Capture hands

Portraits focus on a subject’s face – but why not mix it up and make a photo essay that focuses on your subject’s hands?

(You can also focus on a collection of different people’s hands.)

Hands can tell you a lot about a person. And showing them in context is a great way to narrate a story.

people on a train
Nikon D800 | 35mm | f/5 | 1/80s | ISO 1600
© Kevin Landwer-Johan

3. A child and their parent

Photographs that catch the interaction between parents and children are special. A parent-child connection is strong and unique, so making powerful images isn’t challenging. You just need to be ready to capture the special moments as they happen. 

You might concentrate on a parent teaching their child. Or the pair playing sports. Or working on a special project.

Use your imagination, and you’ll have a great time with this theme.

4. Tell a local artist’s story 

I’ve always enjoyed photographing artists as they work; studios have a creative vibe, so the energy is already there. Bring your camera into this environment and try to tell the artist’s story!

An artist’s studio offers plenty of opportunities for wonderful photo essays. Think about the most fascinating aspects of the artist’s process. What do they do that makes their art special? Aim to show this in your photos.

Many people appreciate fine art, but they’re often not aware of what happens behind the scenes. So documenting an artist can produce fascinating visual stories.

artist at work with copper
Nikon D700 | 24mm | f/7.1 | 1/13s | ISO 1250
© Kevin Landwer-Johan

5. Show a tradesperson’s process

Do you have a plumber coming over to fix your kitchen sink? Is a builder making you a new deck?

Take photos while they work! Tell them what you want to do before you start, and don’t forget to share your photos with them.

They’ll probably appreciate seeing what they do from another perspective. They may even want to use your photos on their company website.

hot iron in crucible
Nikon D800 | 105mm | f/4.5 | 1/250s | ISO 1600
© Kevin Landwer-Johan

6. Cover a local community event

A school fundraiser, a tree-planting day at a park, or a parade; these are are all community events that make for good photo essay ideas.

Think like a photojournalist. What type of images would your editor want? Make sure to capture some wide-angle compositions, some medium shots, and some close-ups.

(Getting in close to show the details can often tell as much of a story as the wider pictures.)

7. Fresh market life

Markets are great for photography because there’s always plenty of activity and lots of characters. Think of how you can best illustrate the flow of life at the market. What are the vendors doing that’s most interesting? What are the habits of the shoppers?

Look to capture the essence of the place. Try to portray the people who work and shop there.

woman at the fresh market
Nikon D800 | 50mm | f/11 | 0.4s | ISO 100
© Kevin Landwer-Johan

8. Shoot the same location over time

What location do you visit regularly? Is there a way you can make an interesting photo essay about it?

Consider what you find most attractive and ugly about the place. Look for aspects that change over time. 

Any outdoor location will look different throughout the day. Also think about the changes that occur from season to season. Create an essay that tells the story of the place.

9. Photograph a garden through the seasons

It might be your own garden. It could be the neighbor’s. It could even be the garden at your local park.

Think about how the plants change during the course of a year. Capture photos of the most significant visual differences, then present them as a photo essay.

lotus flower
Nikon D800 | 105mm | f/11 | 1/125s | ISO 400
© Kevin Landwer-Johan

10. Pick a local cause to highlight

Photo essays can go beyond passive documentation; they can become a part of your activism, too!

So find a cause that matters to you. Tell the story of some aspect of community life that needs improvement. Is there an ongoing issue with litter in your area? How about traffic; is there a problematic intersection?

Document these issues, then make sure to show the photos to people responsible for taking action.

11. Making a meal

Photo essay ideas can be about simple, everyday things – like making a meal or a coffee.

How can you creatively illustrate something that seems so mundane? My guess is that, when you put your mind to it, you can come up with many unique perspectives, all of which will make great stories.

plate of Thai curry photo essay ideas
Nikon D800 | 55mm | f/5 | 1/125s | ISO 160
© Kevin Landwer-Johan

12. Religious traditions

Religion is often rich with visual expression in one form or another. So capture it!

Of course, you may need to narrow down your ideas and choose a specific aspect of worship to photograph. Aim to show what people do when they visit a holy place, or how they pray on their own. Illustrate what makes their faith real and what’s special about it.

photo essay idea monks walking
Nikon D800 | 35mm | f/4 | 1/200s | ISO 800
© Kevin Landwer-Johan

13. Historic sites

Historic sites are often iconic, and plenty of photographers take a snapshot or two.

But with a photo essay, you can illustrate the site’s history in greater depth.

Look for details of the location that many visitors miss. And use these to build an interesting story.

14. Cover a sports game

Most sports photographers aim for a stunning photo of the decisive moment – when the action is at its peak. But nailing shots like that can be very challenging.

So why not focus on something else? After all, sports involve so much more than a single moment. There’s training, preparation, and stretching. There’s the emotion following a victory or a tough loss.

These other subjects, when photographed carefully, can make for an interesting photo essay, too.

15. Photograph your pet

If you’re a pet owner, you already have the perfect subject for a photo essay!

All pets, with the possible exception of pet rocks, will provide you with a collection of interesting moments to photograph.

So collect these moments with your camera – then display them as a photo essay showing the nature and character of your pet.

Woman and elephant
Nikon D800 | 105mm | f/5.6 | 1/400s | ISO 400
© Kevin Landwer-Johan

Photo essay ideas: final words

Look at the world around you. Consider what you see every day. What aspects interest you the most? Photograph those things.

You’re bound to end up with some beautiful photo essays!

Now over to you:

Do you have any photo essays you’re proud of? Do you have any more photo essay ideas? Share your thoughts and images in the comments below!

The post 15 Photo Essay Ideas (to Get Your Creative Juices Flowing) appeared first on Digital Photography School. It was authored by Kevin Landwer-Johan.


Digital Photography School

 
Comments Off on 15 Photo Essay Ideas (to Get Your Creative Juices Flowing)

Posted in Photography


How to Do Noise Reduction in Lightroom (2021 Guide)

26 May

The post How to Do Noise Reduction in Lightroom (2021 Guide) appeared first on Digital Photography School. It was authored by Helen Bradley.

A guide to noise reduction in Lightroom

Are you struggling with noisy photos? You’re not alone.

Noise is a huge problem, and it can easily ruin an otherwise great photo – but fortunately, Lightroom’s noise reduction tool allows you to quickly and easily remove unwanted noise. Once you’re done, you’ll be left with clean, beautiful-looking images.

That’s what I talk about in this article. I’m going to show you the step-by-step process for getting rid of noise in Lightroom. And I’ll share plenty of tips along the way!

So if you’re ready to master noise reduction in Lightroom, then let’s get started.

Lightroom noise reduction before and after

A word of (noise reduction) warning

Noise reduction is great, and it can easily improve your images.

At the same time, it’s important to note that noise removal is generally achieved at the expense of image detail.

This is because the noise removal process smooths out noisy areas; this compromises fine detail. Also, the main Lightroom noise removal tool applies its fix to the entire image and not just the areas where noise is most visible – meaning that you’ll lose image quality even in low-noise locations.

Because of this, if you are a purist and noise reduction is an ongoing and significant need, then you should consider a dedicated program such as DeNoise AI, Neat Image, or Photo Ninja.

However, for most photographers – including many professionals – the noise reduction tools offered in Lightroom, assuming they’re applied judiciously, will suffice.

The two kinds of noise

There are two types of noise in photos: color noise and luminance noise.

Color noise appears as multicolored pixels. In the crop below, you can see many flecks of color, yet the area is supposed to be a solid blue:

Lightroom noise reduction step 1

Luminance noise is monochromatic, so it’s less colorful and more like grain. Here is luminance noise in an early morning sky:

Lightroom noise removal step 2

Lightroom noise reduction: step by step

Now let’s take a look at how you should approach noise reduction in Lightroom.

Step 1: Open the Detail panel

First, to remove noise from a photo, you’ll need to open the Detail panel in the Develop module. You’ll find sliders for luminance noise and for color noise:

Lightroom Detail panel

For RAW images, Lightroom automatically applies color noise reduction during the import process. By default, the Color slider will be set to 25 (with Detail and Smoothness set to 50). The Luminance slider will be set to 0, with Detail set to 50 and Contrast set to 0 (see the screenshot above).

Step 2: Identify the noise

Now comes the fun part. You’ll need to carefully observe your image – I recommend zooming in to 100 percent or more – with the aim of determining the type of noise present. In some cases, you may have both noise types; in other cases, only one noise type will be a problem.

(Quick tip: If you’re not sure what type of noise is in an image, boost both the Color and Luminance sliders to their maximum values and see what happens. If you have a lot of color noise, adjusting the Color slider should make a big difference, and if you have a lot of luminance noise, the Luminance slider will have the greater effect.)

Step 3: Increase the corresponding sliders

Once you know the type of noise you are trying to remove, drag the corresponding slider to the right. Aim to reduce the noise to an acceptable level, but avoid going too far. After all, the more noise reduction you use, the more detail you lose.

Step 4: Fine-tune additional sliders

Once you’ve adjusted the Luminance slider, adjust the Detail and Contrast sliders just below it. The Detail slider controls, well, detail – the higher the value, the more detail that’ll remain in the image. Of course, the more you boost the Detail slider, the less you’ll remove the actual noise. (And if you use a low Detail value, you will get a smoother result but with less detail).

Lightroom noise reduction step 4

The Contrast slider controls luminance contrast. The more you boost this slider, the more contrast you’ll get in the final image. You’ll also end up with more noise and mottling. Of course, lower Contrast values will give you a smoother, lower-noise result, but at the expense of reducing contrast.

For color noise, you also get two extra sliders: Detail and Smoothness.

The Detail slider controls the amount of detail left alone by Lightroom’s color noise reduction; boosting the slider will protect detail. Lower Detail values will give you some added smoothing of the color noise, but you may notice that colors bleed into each other. (Adjust the Smoothness slider to help reduce low-frequency color mottling artifacts.)

In this image, removing color noise leaves some luminance noise:

removing color noise

Then, once the color noise is removed, the Luminance slider can remove the remaining luminance noise:

removing luminance noise

When removing noise from an image, it helps to zoom to 100 percent. That way, you can see what is happening on a pixel level. (Though you also want to look at your image zoomed out! I recommend periodically zooming in and out to check the result.)

Local noise reduction

What if you want to target your noise reduction to a specific part of your image? Is that an option in Lightroom?

Yes, you can do this – sort of. You see, Lightroom does offer a Noise slider as part of its targeted adjustment panel. So you can apply noise reduction via the Adjustment Brush, the Radial Filter, or the Graduated Filter, and you’ll be able to limit noise reduction to the areas you want to affect, leaving the rest of the image unchanged.

targeted noise removal

But there is a major downside to this feature:

It only removes luminance noise (not color noise), and there’s no additional Detail or Contrast slider to help you fine-tune the results.

Still, for images suffering from luminance noise, it can be useful, so I do recommend you try it out.

Select the area you want to denoise, then boost the Noise slider. The selected area of your image will instantly become less noisy.

By the way, if you sharpen your images after removing noise, make sure to use a light touch – increasing sharpness can increase noise. I’d recommend using the Masking slider in the Detail panel to keep the sharpening applied only to areas with lots of detail.

How to do noise reduction in Lightroom: conclusion

Now that you’ve finished this article, you can confidently reduce noise in Lightroom – for clean, beautiful files.

So grab some noisy images, then test out your new noise reduction skills. And don’t be afraid to experiment with different slider strengths; if you don’t like a change, you can always adjust it right back.

Now over to you:

How do you do noise reduction to your images? Do you struggle? Share your thoughts in the comments below!

The post How to Do Noise Reduction in Lightroom (2021 Guide) appeared first on Digital Photography School. It was authored by Helen Bradley.


Digital Photography School

 
Comments Off on How to Do Noise Reduction in Lightroom (2021 Guide)

Posted in Photography


Camera Lens Will Not Retract – Here’s What To Do

26 May

Are you an avid photographer? Are you having problems with your camera lens retracting or are you simply wanting to learn more about the issue? Then you are in the right place! This article is going to discuss what to do when your camera lens will not retract including all the possible solutions. What does is mean that your lens Continue Reading
Photodoto

 
Comments Off on Camera Lens Will Not Retract – Here’s What To Do

Posted in Photography


How to Do Storytelling With Your Images: 8 Useful Tips

25 May

The post How to Do Storytelling With Your Images: 8 Useful Tips appeared first on Digital Photography School. It was authored by Ben McKechnie.

how to do storytelling with your images

As a photographer of people and cultures, I spend a lot of time thinking about storytelling with my images – how I can convey emotions and narratives through a few simple frames.

Beginners often fail to think about the storytelling aspect of photography, and that’s okay. When you’re just starting out, it’s important to focus on lighting, composition, and camera settings. But once you’ve familiarized yourself with those key concepts, what’s the next logical step? How do you hook people for more than just a few seconds?

Storytelling.

How to do storytelling With Your Images

In this article, I share eight tips to get you started with storytelling in photography, accompanied by my own images to help illustrate the points. The photos may be taken in far-flung locations, but I promise you: the tips I offer can be applied anywhere on Earth.

1. Include small details to tell a story in a single frame

Imagine your task is to tell the story of a person. A parent, or even yourself.

How would you do it?

A standard portrait wouldn’t tell the full story. A person’s full story is often in the details: a picture of their desk, travel books strewn across a bedroom floor, a close-up of their hands dirty from working in the garden, a wide-angle portrait of them surrounded by a few of their favorite things.

So the next time you’re photographing a person, try to include small details that add to their story.

How to do storytelling With Your Images

I didn’t visit India to focus my lens on poverty alone. However, when trying to tell the story of Mumbai, it would have been dishonest of me not to include it. Confronted with the scene above, I saw the gap between the rich and poor. The small details here are my subject’s plastic bag, the skin condition on his arm, and his frail body. A big (and still important) detail is his juxtaposition with a backdrop of expensive high-rise buildings.

2. Aim for variety in a series of shots

This storytelling tip is related to the last point:

You must take a variety of different images of a single situation. Whether you want to photograph a camel market in India, a farmers’ market in a Chicago suburb, or your niece’s birthday party, just creating one type of photo won’t tell the whole story.

Instead, you need portraits, wide-angle shots, shots from up high, shots from down low, action shots, zoomed-in details, and more. All of these perspectives combined tell the whole story.

In the image series below, I tried to tell the story of a sunrise hot air balloon flight over the ancient, temple-strewn plain of Bagan, Myanmar. Capturing a variety of images was key to my success.

do storytelling images

3. Take control of the entire frame

Now that you’re thinking about telling stories, you’re not just a photographer; you’re a storyteller, too. And that role involves taking control of the whole frame.

In other words:

Don’t just think about your subject, their lighting, their positioning. Be aware of the whole scene in front of you, including surrounding details, backdrops, shadows, bright areas, etc.

Sometimes, I lie flat on the ground with my camera. Why? I want to include environmental details in the frame that improve the shot through storytelling. I get strange looks, but I don’t care; it’s the price of telling the real story.

do storytelling images
The Holy Man of Umananda Island (Assam, India).
Here, I wasn’t just thinking about the position of this gentleman’s face. I was also aware of his three-headed Hindu spear – a key detail in his story – and the flowers on its tips.
do storytelling images riverfront barges
I tried to tell the whole story of this chaotic riverfront by zooming out and including multiple subjects (Dhaka, Bangladesh).

4. Plan ahead with a shot list

Whether you’re heading out into your hometown for some street photography or to the Eiffel Tower for some vacation photography, why not create a shot list? I’m talking about ideas for specific shots, angles you want to try, and people you might include in the frame.

Research the kind of shots that other photographers have taken at your destination. Seek out new angles that’ll produce fresh storytelling even at well-known locations.

do storytelling images taj mahal
A traditional Taj Mahal composition that I just had to include on my shot list. I focused on capturing beautiful light and clean lines instead of a brand-new angle.
do storytelling images dog taj mahal
Sometimes seeking out fresh angles is a real pain in the neck, especially when you’re photographing buildings like the Taj Mahal. I jumped for joy when I saw this dog showing the Taj some serious love at sunset. I’d like to think even animals can appreciate how awesome this building is.

5. Learn to narrow down, trim, and exclude

Uploading a hundred photos to Facebook, all of a similar setting and taken from the same few angles, is a surefire way to lose people’s attention. Those 100 photos could easily be narrowed down to the 10 essential storytelling shots.

So learn to be selective! Start sharing only your best images.

Loktak Lake (pictured below) was so spectacular that I wandered around a single hilltop taking hundreds of images. It was bliss. A lot of the results were great, but would I really want to dump them all online for friends, family, and followers to sift through? No, I would not!

Instead, it’s important to find a few favorites that tell your subject’s story:

How to do Storytelling With Your Images
Manipur, India
How to do Storytelling With Your Images
Manipur, India

6. Emotions are an important part of storytelling

To capture emotions, you’ll primarily need people and faces. Emotion can also be communicated through body language, so capturing whole bodies works sometimes, too.

How to do Storytelling With Your Images

At the marvelous Mother’s Market in Manipur, India, I met these lovely ladies (above) animatedly playing a board game. I broke the ice by asking if I could join in. They said “No,” but it made them laugh and I got permission to shoot away. The best photos came after they’d forgotten about me; their natural expressions returned and I was able to capture their emotions.

7. Don’t forget about the basics

In your bid to learn storytelling, don’t forget about settings, composition, and lighting. It’s all too easy to fall out of touch with photography basics, especially when you’re first learning to tell a story with pictures.

After all, when you’re thinking about storytelling, you might start to drift away from photographic fundamentals.

So instead of replacing composition, settings, and lighting with storytelling, make sure everything works together. A shot with beautiful light, excellent composition, perfect exposure, and a great story? That’s how you capture people’s attention!

How to do Storytelling With Your Images
A lady on a train in Shan State, Myanmar.

8. Use narrative structure

How does a traditional novel or movie work? Novels and movies are stories, so they contain beginnings, middles, and ends.

You can do the same with your photos!

If you’re just starting out taking a series of storytelling pictures, try creating a chronological narrative. It’s by no means the only or even recommended narrative structure to follow, but it’s a fun and easy way to practice.

You might tell the story of a single day in a place you know well. Start with sunrise, then take photos throughout the day as the light changes. Conclude the series with sunset and night shots.

Here, I attempted to tell the story of day and night on the rivers running through the cities of Chittagong and Dhaka:

How to do Storytelling With Your Images

Telling a story with pictures: final words

Now that you’ve finished this article, you’re ready to begin telling stories with your photos!

So remember these tips, get out there with your camera, and have fun.

Now over to you:

Have you tried doing storytelling photography? What was it like? Did you enjoy it? Share your thoughts and storytelling images in the comments below!

The post How to Do Storytelling With Your Images: 8 Useful Tips appeared first on Digital Photography School. It was authored by Ben McKechnie.


Digital Photography School

 
Comments Off on How to Do Storytelling With Your Images: 8 Useful Tips

Posted in Photography


The Best Lens for Street Photography: Top 11 Picks (in 2021)

24 May

The post The Best Lens for Street Photography: Top 11 Picks (in 2021) appeared first on Digital Photography School. It was authored by Simon Bond.

the best lens for street photography

What’s the best lens for street photography on the market today?

In this article, I’ll share my favorite street photography lenses, including options for all budgets and camera brands. I’ll also explain how you can pick the perfect street lens for your needs – by taking into account important factors such as focal length, sharpness, and low-light performance.

So if you like street photography and you’re looking to buy a new lens to improve your photos, then read on.

people walking on the street
Which direction will you go with your street photography?
Canon 5D Mark II | Canon 50mm f/1.2L | f/8 | 1/800s | ISO 320

1. Canon EF 50mm f/1.2L USM

best street photography lens Canon 50mm f/1.2

If you’re prepared to pay the price, then the Canon 50mm f/1.2L is one of the best lenses for street photography available today. The large aperture lets you photograph in low-light conditions without needing to boost the ISO, and the optics and build quality are outstanding. The 50mm f/1.2 works well for both street photography and street portraits (i.e., posed portraits with people on the streets), and the standard focal length offers enough reach for intimate compositions.

  • Low-light performance: Stellar; not many lenses have an aperture as large as f/1.2
  • Quality: Excellent build, just what you’d expect from a flagship Canon lens
  • Price: On the expensive side ($ 1399 USD)
  • Weight: Pretty heavy, thanks to the solid build quality and wide maximum aperture

2. Canon EF 50mm f/1.8 STM

Canon 50mm f/1.8

Like the 50mm f/1.2, above, the Canon 50mm f/1.8 STM is a great lens to have in your street photography bag – in fact, there are plenty of reasons to buy it over the f/1.2 version. For one, the cheaper price is going to be much more appealing, especially if you’re new to photography and not yet ready to commit to more expensive gear. And the 50mm f/1.8 is also much smaller and lighter than its bulky f/1.2 sibling. While low-light performance isn’t on par with other lenses on this list, you can still count on the 50mm f/1.8 in the shade and at night.

  • Low-light performance: Pretty good, thanks to a relatively large maximum aperture
  • Quality: Good, but not as solid as the f/1.2 version (above)
  • Price: You can pick up this lens for just over $ 100 USD – it’s just about the cheapest lens you can buy
  • Weight: The size and weight of this lens make it easy to carry around

3. Canon EF 135mm f/2L USM

Canon 135mm f/2

Those looking for a longer street photography lens could do a lot worse than the Canon 135mm f/2L. At 135mm, you’ll be able to photograph your street scenes from a distance, though the size of the 135mm f/2 makes discreet shooting difficult. It’s a great lens for separating your main subject from a busy background – you can use that extra focal length to compress the scene, and the f/2 aperture helps achieve outstanding background bokeh. And while the 135mm f/2 isn’t as forgiving as a 50mm lens, you can use it in low light, especially at f/2.

  • Low-light performance: Good for the longer 135mm focal length
  • Quality: A great build that’s usable in all weather conditions
  • Price: Reasonable ($ 999 USD) for a high-level lens
  • Weight: Relatively heavy, but much lighter than a 70-200mm f/2.8

4. Nikon AF-S 50mm f/1.8G

Nikon 50mm f/1.8

Nikon users looking for an affordable street photography lens should consider the 50mm f/1.8G. It offers good quality with an aperture that’s large enough for most situations, plus the 50mm focal length is a street photography classic. Nice build, weight, and size make it a great option for any Nikon street photographer.

  • Low-light performance: Good for most situations
  • Quality: Well built
  • Price: The most affordable lens for Nikon street photographers (that offers a decent maximum aperture)
  • Weight: The slightly smaller aperture means less lens glass, which means it’s easy to carry

5. Nikon 24-85mm f/2.8-4D

Nikon 24-85mm

Thanks to its zoom range, the Nikon 24-85mm offers a little more flexibility than other options on this list – and it can double as a general-purpose lens, too. It’s a step up from a kit lens and offers you an aperture of f/2.8 on the wide end. This lens covers the 50mm focal distance that many consider optimal for street photography, and you’ll be able to zoom in and out, a major advantage if you want to frame a photo quickly without needing to move. The major downside is the 24-85mm’s low-light capabilities; the f/2.8 to f/4 maximum aperture just won’t be enough for some situations.

  • Low-light performance: Decent, but not what you get with a prime lens
  • Quality: Good overall quality for street photography
  • Price: In the midrange price bracket (around $ 750 USD). You’re paying for a zoom lens with a large maximum aperture.
  • Weight: The lens is heavier than a prime lens (a compromise for more focal length flexibility)

6. Sony 35mm f/2.8 Sonnar T FE ZA

Sony 35mm

While 35mm is on the wider side for street photography, the Sony 35mm f/2.8 is great for those with an APS-C sensor who want to photograph with a 50mm field of view. Build quality is good, so you can shoot in most conditions. And while the f/2.8 aperture isn’t ideal for nighttime outings, it’s more than enough for daytime and twilight street photography.

  • Low-light performance: It’s going to be more of a challenge to use this lens in dim light, though the wide focal length means you can handhold at a slightly slower shutter speed.
  • Quality: It’s a nice lens, and its compact size is a definite plus for street photography
  • Price: In the midrange price bracket ($ 799 USD)
  • Weight: Coming in at just 4.2 oz (119g), this lens isn’t heavy

7. Sony E 50mm f/1.8 OSS

Sony 50mm f/1.8 OSS

If you’re just getting into street photography, you’re a Sony APS-C user, and you want an affordable option, then the Sony 50mm f/1.8 could be the lens for you. The sleek, compact design makes it ideal for the street photographer, and its fast focusing is important for nailing the perfect shot. You get a 75mm effective focal length, which is a bit tight for some photographers – but if you like the narrower field of view, then the 50mm f/1.8 is a perfect choice.

  • Low-light performance: The larger maximum aperture is good for most low-light situations
  • Quality: Well built; ideal for both beginners and more experienced photographers
  • Price: Offers great value (around $ 350 USD)
  • Weight: Standard primes aren’t usually heavy, and this lens weighs just over 7 oz (200 g)

8. Fujinon XF 35mm f/1.4 R

Fujinon 35mm f/1.4

The Fujinon 35mm f/1.4 is a great lens for any Fujifilm camera user, whether you’re interested in street photography, portraits, or simply creating abstract bokeh. The lens is sharp, has decent focus speeds, and offers an f/1.4 for nice blurred-out backgrounds and nighttime photography. The bokeh effect is especially good (and can produce very nice street photography backgrounds).

  • Low-light performance: With a 35mm focal length and a maximum aperture of f/1.4, this lens is ideal for low-light shooting.
  • Quality: A solid, dependable lens; will keep up with the fast pace of street photography
  • Price: Midrange ($ 599 USD), thanks to the wide maximum aperture
  • Weight: Decent to carry around for a day on the street

9. Fujinon XF 56mm f/1.2 R

Fujinon 56mm f/1.2

The Fujinon 56mm f/1.2 offers a wide maximum aperture, one that’s perfect for low-light street photography, plus it can generate beautiful backgrounds. The focal length is on the long side – on Fujifilm APS-C cameras, it’s an effective 84mm – but you can use it for close-ups, tighter scenics, and intimate street portraits. And for an f/1.2 lens, the price is pretty reasonable!

  • Low-light performance: You’re not going to get a better lens than this for low-light scenes
  • Quality: This is a great piece of glass that produces excellent images
  • Price: Quality lenses cost a lot; this lens will set you back around $ 1000 USD
  • Weight: It’s heavier than most of the primes on this list, but that’s one of the tradeoffs for such a wide maximum aperture

10. Sigma 35mm f/1.4 ART DG HSM

Sigma 35mm f/1.4

Sigma has been making excellent lenses with its ART series, and the 35mm f/1.4 is no exception. The lens comes in mounts for all the major camera manufacturers, including Nikon, Canon, and Sony, and while it’s a third-party lens, it does well against the other glass on this list. The large aperture and medium-wide focal length make this an ideal lens for any street photographer, whether shooting in the day or at night. It really is one of the best lenses for street photography available today, and it’s cheaper than the high-end lenses offered by other major manufacturers.

  • Low-light performance: Strong. This is a fast lens that allows for great images in tricky lighting
  • Quality: Very nice; Sigma is one of the best third-party manufacturers, and the ART series is top-notch
  • Price: For around $ 700 USD, you’re picking up excellent glass at a midrange price.
  • Weight: The Sigma 35mm f/1.4 is on the heavier end of the scale

11. Tamron 24-70mm f/2.8 Di VC USD G2

Tamron 24-70mm f/2.8

Looking for a versatile street photography lens? The Tamron 24-70mm offers a similar focal range to a kit lens but with a fast f/2.8 aperture. You get significant flexibility thanks to the wide-to-telephoto zoom capabilities, so you can easily capture street photos that require rapid changes in composition. The downside is this lens’s size and weight (f/2.8 zoom lenses are always on the heavier side). For a zoom lens, the f/2.8 aperture is impressive and will let you blur out backgrounds, though you might prefer a larger-apertured prime lens in low light. Bottom line: The 24-70mm is a good daytime street photography lens, and it’s also perfect for other types of photography, such as travel.

  • Low-light performance: Not the best; you’ll primarily use this lens in the daytime
  • Quality: Good quality, with image stabilization compensating for the smaller aperture
  • Price: On the pricier side ($ 1200 USD), though it is multifunctional thanks to its range of focal lengths
  • Weight: Pretty heavy, but the zoom range lets you carry one lens rather than several

Factors to consider before buying a street photography lens

All the lenses on this list are great, but the final decision is up to you – and should depend on your shooting style and preferred type of street photography.

So here are the key items to consider when looking for the perfect street photography lens:

Focal length

Many photographers say the best focal length for street photography is 50mm, and 50mm lenses do offer a great perspective (plus, this field of view has been popularized by many famous street photographers). Those who like the 50mm focal length but use crop sensors should go for a 35mm lens.

That said, you don’t need to feel constrained by what has come before, and wider focal lengths are becoming more popular among street photographers.

best street photography lens nighttime
Nighttime street photography needs a larger aperture or a high ISO.
Canon 5D Mark II | Canon 50mm f/1.2L | f/2 | 1/400s | ISO 500

Low-light performance

For moody and dramatic street photos, you’ll often need to shoot in low light. You might find yourself doing street photography in a dingy indoor market, at twilight, or at night – and in all of those situations, a lens with a large aperture provides a major advantage. Yes, modern cameras perform well at high ISOs, which negates the need for a high aperture to some extent. However, a large aperture is still required if you want beautiful bokeh lights in the background of your low-light photos.

Size and weight

To get great street photos, you’ll need to be out walking for much of the day. This means a smaller, lighter setup is a big help. Try to pick just one lens and keep it as light as possible.

Autofocus speed

Street photography is often done in fast-paced and dynamic environments, so if your lens is too slow to focus, you’ll miss a lot of shots. You need a lens that focuses almost instantly, especially if you hope to capture action-oriented street images.

Sharpness

Pretty much all forms of photography require sharpness, and street photography is no exception. Look for a lens that gives you crisp, clear, detailed photos. Some street photographers do like a softer, grainier look, but you can add this in post-processing. Generally speaking, the sharper the lens, the better.

street at night
Canon 5D Mark II | Canon 50mm f/1.2L | f/2 | 1/60s | ISO 1000

Time to choose the best lens for street photography

Now that you’ve finished this article, you should be ready to choose the right street photography lens for your needs.

Remember: the best street photography lens is the one that matches the aesthetic you want to create. So don’t think too much about the popularity of different lenses; instead, ask yourself how they’ll work with your interests and style.

Now over to you:

Which of these lenses is your favorite? Is there one in particular that appeals to you for street shooting? Share your thoughts in the comments below!

the best street photography lens
The best lens for street photography will allow you to get close to the action!
Canon 5D Mark II | Canon 17-40mm f/4L | 24mm | f/4 | 1/60s | ISO 2500

The post The Best Lens for Street Photography: Top 11 Picks (in 2021) appeared first on Digital Photography School. It was authored by Simon Bond.


Digital Photography School

 
Comments Off on The Best Lens for Street Photography: Top 11 Picks (in 2021)

Posted in Photography


11 Sunset Photography Tips for Beautiful Results

23 May

The post 11 Sunset Photography Tips for Beautiful Results appeared first on Digital Photography School. It was authored by Darren Rowse.

sunset photography tips for beautiful results

If you’re looking to do gorgeous sunset photography, then you’ve come to the right place.

Because in this article, I’m going to share 11 simple tips that will instantly improve your sunset photos.

Specifically, I’m going to explain:

  • How to capture beautiful sunset tones consistently
  • How to create balanced, pro-level sunset compositions
  • The best type of weather for sunset photos
  • Much more!In fact, sunsets (and sunrises) aren’t even difficult to photograph!

Ready to become a sunset photography master?

Let’s dive right in.

1. For the best shots, plan ahead

While you can sometimes capture beautiful sunset shots without any forethought…

…the best shots usually come from real planning.

So scope out places that might be good for sunsets the day or two before your shoot. Look for interesting locations – locations where you can photograph the sun all the way down to the horizon, and where there will be opportunities for shots that include foreground elements and silhouettes.

Sunsets only take a few minutes, which is why you want to think about these elements before the sunset begins. Otherwise, you might miss the best shots.

Find out when the sun will set, then arrive at least half an hour beforehand. It’s often in the lead up to a sunset that the real magic happens.

And keep an eye on the weather. There are a variety of different types of sunsets that produce a range of different types of lights and patterns in the sky. Don’t just head out on clear days, because while these can produce some wonderful colors, it’s usually the days with (partial) clouds when the real action happens.

(Also, dust and smoke in the air can produce amazing results, too.)

Consider the equipment you might need. Take a tripod, lenses with a range of focal lengths, and extra batteries.

That way, when the sky turns beautiful, you’ll be ready!

sunset photography tips dock with boat

2. Shoot at a variety of focal lengths

Most sunsets are photographed with wide-angle lenses, and these focal lengths can make for beautiful images. A lens in the 10-30mm range will give you sweeping shots of your sunset scene.

However, if you want the sun itself to be a main feature of the shot, you’ll need to zoom right in. The sun is just half a degree across, so when you shoot with a wide-angle lens, the sun will be tiny in the frame. If you want to highlight the sun, you’ll need to zoom in with a 200mm lens or longer.

(This, in turn, will increase your need for a tripod!)

Also, be hyper-aware of eye-safety concerns: looking at the sun is always dangerous. And it’s even more dangerous when you look at it through a telephoto lens. So if you do include the sun in your composition, never look through your camera’s optical viewfinder. Instead, use Live View to check your composition and exposure on the rear LCD.

(If you use a mirrorless camera, this won’t be an issue. You can safely look at the sun through the electronic viewfinder.)

sunset over a misty valley

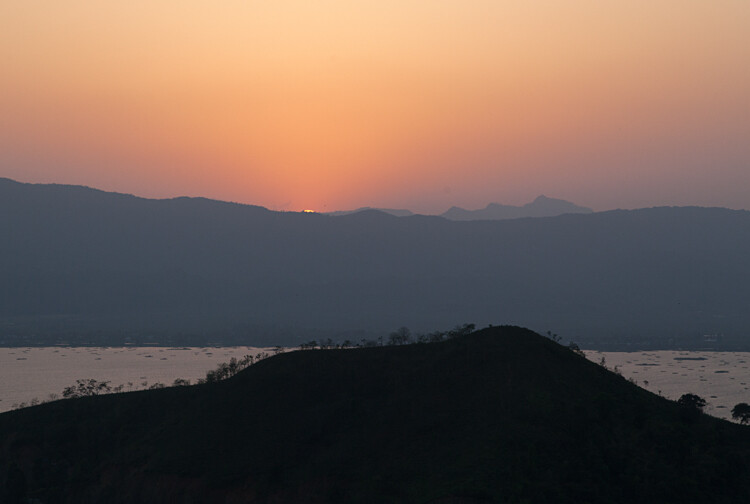
3. Use the rule of thirds to improve your sunset photography compositions

The rule of thirds states that you should position key elements of your scene a third of the way into the frame.

So instead of putting the horizon in the center of the composition, put it toward the top or the bottom, like this:

tree at sunset

Do you see how the horizon is a third of the way up from the bottom? That’s what the rule of thirds suggests.

And it’s not just about horizons. You can also use the rule of thirds to position the sun, foreground elements, background elements, you name it.

Of course, the rule of thirds isn’t a requirement. And you can break the rule of thirds for stunning results in certain situations.

But in general, the rule of thirds is a great starting point – so unless you have a good reason to do otherwise, I highly recommend you follow it!

4. Experiment with different exposures (to achieve a magical result)

First things first:

When doing sunset photography, you should always shoot with a semi-automatic or Manual mode. Don’t let your camera dictate your settings for you (in other words: get off Auto mode immediately!).

So before starting a sunset shoot, switch your camera over to Aperture Priority mode, Shutter Priority mode, or Manual mode.

And don’t just take one shot at one exposure. Instead, take a variety of shots at different exposures.

So while you can try a “standard” exposure based on your camera’s recommendation…

…don’t be afraid to underexpose by raising your shutter speed or narrowing your aperture. And don’t be afraid to overexpose by doing the opposite.

silhouetted skyline

The great thing about sunsets is that there is no one “right” exposure. You can get stunning results with underexposure and overexposure; the key is to experiment.

(Personally, I tend to start with a relatively quick shutter speed, then slowly work down to slower shutter speeds for brighter, more luminous shots.)

5. Bracket often

In the previous tip, I talked about experimenting with different exposures.

But did you know that there’s a technique, called bracketing, that guides you in your exposure experimentation?

Here’s how it works:

First, take a photo using your camera’s suggested settings.

Then adjust the settings (either manually or via exposure compensation) to slightly underexpose the photo and then to slightly overexpose the photo.

So if your camera says to shoot at f/8, you would take your first shot at f/8, as recommended. But your second shot would be at f/5.6, and your third shot would be at f/11.

That way, you’d end up with a “standard” shot, a darker shot, and a brighter shot, all of which will give you different colors and effects.

It’s a good way to guide your experimentation, and it’s also a good way to create “insurance” photos – so that, if you overexpose the standard shot on accident, you still have a darker file on your memory card.

Make sense?

sunset photography tips sunbeams

6. Auto Exposure Lock is your friend

Bracketing can be a lot of fun, but it also takes time – and it’s not the most precise way to create a well-exposed image.

That’s where Auto Exposure Lock (AEL) comes in handy.

Using AEL is simple. First, you point your camera at the area of the scene you want perfectly exposed, such as a beautiful foreground feature.

Then lock the exposure.

Finally, reframe the picture (while maintaining the exposure lock).

Basically, it lets you determine the exposure without interference from the ultra-bright sunset, which can wreak havoc on a camera’s meter.

Also note that you can use Auto Exposure Lock to create beautiful silhouettes; just point your camera at the brightest part of the sky, lock the exposure, and then reframe with a foreground subject. The result will look like this:

horse silhouette

Cool, right?

7. For the best colors, get off Auto White Balance

Your white balance setting adjusts the temperature of the colors in your scene.

So depending on the white balance, you’ll end up with a cooler (bluer) photo or a warmer (redder) photo.

When the white balance is set to Auto, your camera will automatically deal with the color temperature. And while this can sometimes work, it often gives subpar results – where you lose the warm golden tones of your sunset.

So instead of using Auto White Balance, switch your camera to the Cloudy or Shade presets, which will warm things up a little.

Alternatively, if you’re shooting a sunset and you do want a cooler, moody shot, you can experiment with other white balance settings, such as Incandescent.

One more thing:

If you shoot in RAW, it’s true that you can always tweak the white balance during post-processing. However, this is often pretty inconvenient; after all, how much time do you want to spend adjusting the white balance in front of your computer?

Which is why it’s worth getting the white balance right in-camera.

8. Always bring a tripod for the sharpest results

If you’re shooting at longer shutter speeds, such as 1/60s and beyond, then a tripod makes a huge difference.

It’ll keep your camera stable – so that your files remain tack sharp.

When you’re out doing sunset photography, you don’t need to start the shoot with a tripod, because the minutes leading up to a sunset bring plenty of light.

But as the sun sinks on the horizon, a tripod will become more and more necessary. (And by the time the sun is gone, a tripod will be absolutely essential.)

Note that you might want to use a tripod for your whole photoshoot, especially if you plan to capture long exposures that feature moving water, like this one:

long exposure sunset photography

What if you don’t have a tripod? Or you forget to bring one?

In such cases, I recommend you stabilize your camera against an object. You can put it on the hood of a car, or you can just set it on the ground; whatever allows you to minimize movement as much as possible.

9. Don’t be afraid to focus manually

We all love autofocus – but sometimes, when shooting in extreme lighting conditions, autofocus just won’t get the job done. Your lens will hunt all around, and the shot will end up out of focus.

That’s where manual focus comes in handy.

Now, not all lenses support manual focus. Some only allow for autofocusing, in which case you’re out of luck.

But many lenses do let you focus manually (and you can generally activate manual focus by pushing the AF/MF switch on the lens barrel to MF).

So when your lens starts to hunt, don’t fret; just swap over to manual focus and keep shooting!

10. Shoot more than just the sunset

Here’s one of the many wonderful things about sunsets:

They don’t just create wonderful colors in the sky; they also cast a beautiful golden light that is great for other types of photography!

So as the sunset progresses, keep an eye on other photographic opportunities around you. For instance, you can capture portrait, landscape, or macro shots. In the light of the setting sun, it’ll all turn out amazing!

portrait silhouette with sunstar

11. Keep shooting (even after the sun is gone)

A sunset constantly changes over time – which means that every additional minute is an opportunity for a different shot.

So don’t take a few shots and call it an evening. Instead, stick around and photograph the sun as it goes down. You can continue to capture the same composition, or you can test out different compositions; the key is to keep your camera out and your finger on the shutter button.

Also make sure to capture different exposures (bracket!) and consider working with different focal lengths, as I’ve discussed above.

And finally:

Don’t pack up once the sun is gone. The period after the sun has disappeared – called the blue hour – can be great for photography, too, thanks to its beautiful colors and ethereal light. So if you still have the energy, keep finding compositions until the colors have vanished completely from the horizon.

sunset photography tips

Sunset photography tips: conclusion

Now that you know these tips, you’re well on your way to capturing some stunning sunset photography of your own.

So the next time the sun starts to get low in the sky…

…grab your camera and head outside!

Amazing images await.

Now over to you:

Which of these sunset photography tips is your favorite? Are you going to use any of them the next time you photograph a sunset? Share your thoughts (and sunset photos) in the comments below!

The post 11 Sunset Photography Tips for Beautiful Results appeared first on Digital Photography School. It was authored by Darren Rowse.


Digital Photography School

 
Comments Off on 11 Sunset Photography Tips for Beautiful Results

Posted in Photography


How to Achieve Blurred Backgrounds in Portrait Photography

22 May

The post How to Achieve Blurred Backgrounds in Portrait Photography appeared first on Digital Photography School. It was authored by Darlene Hildebrandt.

how to achieve blurred backgrounds

How can you create a beautiful, soft blurred background, like the one you see below?

background blur camera

It’s a question I hear over and over from my students. But there’s a major misconception among new portrait photographers: that to achieve such a stunning background blur, you need to go out and buy an expensive lens.

And this is just plain wrong.

Because while it’s true that certain (often expensive) lenses are better for creating blurred backgrounds, it’s also true that several other key factors go into achieving the soft background look – and most photographers fail to consider these factors and how they can be used for gorgeous results.

In other words:

You are capable of creating a lovely blurred background, and you can probably do it with the lenses you already own.

So if you want to learn how to create that gorgeous background, then read on!

Four factors affect background blur

Whenever you see a beautifully blurred background, know that four factors together produced the effect:

  • the aperture setting
  • the focal length of the lens
  • the distance between the subject and the background
  • the distance between your camera and the subject

If you use a wide aperture, you’ll get a blurry background, sure – and this is what most photographers think of when they see beautiful background bokeh.

But you can use a relatively narrow aperture and achieve the same look with a longer focal length, or by increasing the subject-background distance, or by getting closer to your subject.

So even if you have a lens with a relatively narrow maximum aperture, such as f/5.6, you can get the look you’re after. You just have to carefully control the other background blur factors.

Make sense?

The background blur factors: a quick demonstration

To demonstrate the factors affecting background blur, I’ve created some example photos of a friend’s daughter (she was a more willing subject than my husband!).

This first set of images was taken with my subject about two feet away from the front door of the house. The focal lengths used for all the example shots are (on a full-frame body) 16mm, 35mm, 70mm, and 150mm; note that I backed up with each shot to keep the framing constant. Also, I am deliberately not divulging my aperture, though it is the same for every image.

subject with different focal lengths

Now, the second set of images below was taken with my subject about 20 feet away from the house. Again, each time I changed focal lengths, I moved farther away to keep my subject the same size in the frame.

example portraits with subject farther from background

Now take a careful look at each set of images. What do you see?

Did you notice how much softer the background is in the second set of images? Especially at the 150mm focal length?

Remember: All eight images were taken with the same aperture. The only adjustment made for the first set is the lens focal length. And the only difference between the first set and the second set is the distance between the subject and the background; I had my subject move several feet forward.

But what about the aperture?

As you know, I deliberately withheld the aperture – but would you be surprised if I said that all the images were taken at f/5.6?

It’s true! I used an f/5.6 aperture for each shot. Not the first aperture you think of when someone says “blurred background,” right?

Which means that, as long as you have a lens that can shoot at f/5.6, you can get the same exact look.

One more comparison using f/2.8

Just to further prove the point, here are two more sets of images. All the shots are taken at f/2.8, though the first set shows my subject positioned close to the house, whereas the second set shows my subject positioned away from the house.

Can you see how much more the focal length and the distance between the subject and the background affect the background compared to the wide aperture? There’s not a big difference between these shots and the shots at f/5.6 – but there is a huge difference between the images shot at different focal lengths, as well as the images shot with the subject close versus far from the background.

background blur at f/2.8 examples
background blur at f/2.8 (taken farther away from the background)

Capturing blurred backgrounds: key takeaways

While using a wide aperture is a factor in creating a blurred background, it is not the only factor. And in my opinion, it’s not the most important.

Instead, if you want to create beautiful backgrounds, make sure you:

  • Use a longer lens (I generally shoot at 85mm or longer for portraits)
  • Ask your subject to move away from the background (note that this also depends on the environment, so make sure you do a bit of location-scouting before taking out your camera!)

You can also consider getting closer to your subject; this will increase the blur, though it’ll also tighten up your framing – just something to keep in mind.

Now, go look at the image at the top of the article again.

It, too, was taken at f/5.6! Bet you didn’t guess that the first time you looked at it, am I right?

And here’s one last set of examples to show you the power of a long focal length plus a distant background:

portrait of girl at f/2.8 background blur camera
Taken with a 200mm lens at f/2.8
portrait of girl at f/2.8 with blurry background
200mm lens at f/2.8
portrait of girl at f/5.6 blurry background in-camera
200mm lens at f/5.6

Background blur: final words

Now that you’ve finished this article, you know how to create stunning background blur – and you know that you don’t need an expensive f/1.2 lens to make it happen.

In fact, I challenge you to test this out yourself. Find a willing subject, start them close to the background, then slowly move them forward. Test out different focal lengths, different apertures, and different distances to your subject.

In the end, you’ll have some stunning shots – even if you only shoot at f/5.6 and beyond.

Now over to you:

Do you struggle to get perfect blurred backgrounds? Which of the tips from this article are you going to use first? Share your thoughts in the comments below!

The post How to Achieve Blurred Backgrounds in Portrait Photography appeared first on Digital Photography School. It was authored by Darlene Hildebrandt.


Digital Photography School

 
Comments Off on How to Achieve Blurred Backgrounds in Portrait Photography

Posted in Photography