Who doesn’t want special super powers? Popular culture is awash these days with characters with added extras. To date, these include wizards with magic wands, Jedi’s with light sabers, and now there are photographers with pixelsticks! That’s right, welcome to the future because the pixelstick is here and it’s going to change the way you do photography if you embrace it. The pixelstick enables you to make amazing light paintings in camera, so let’s take a look at it and see why it’s an essential purchase for those who like creative photography.
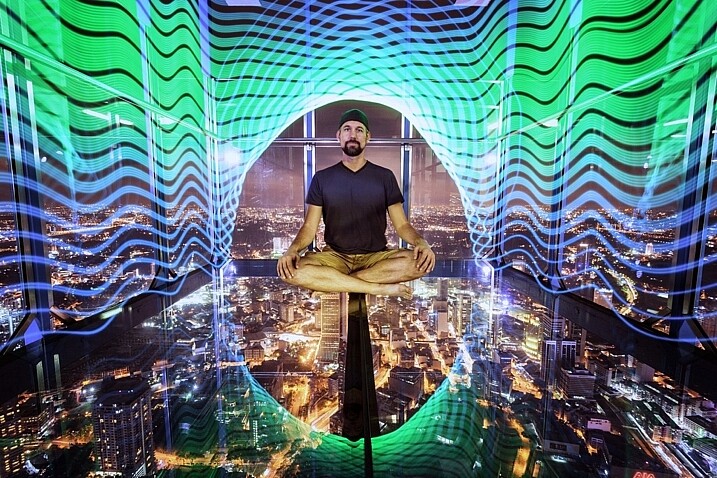
The light from the pixelstick perfectly framed my friend and fellow DPS writer, Pete DeMarco.
What is light painting?
Light painting is a technique you can use to create fascinating images. To do it you need to photograph at night, use long exposure, and have a light source. You can divide light painting into two types, those that you do in front of the camera, and those you do with the camera.
- Light painting with the camera: Using the camera to light paint is called kinetic light painting and involves techniques such as zoom bursts, or camera rotation.
- Lighting painting in front of the camera: You can also move lit or glowing objects in front of the camera during a long exposure, to paint the scene in front of the camera.
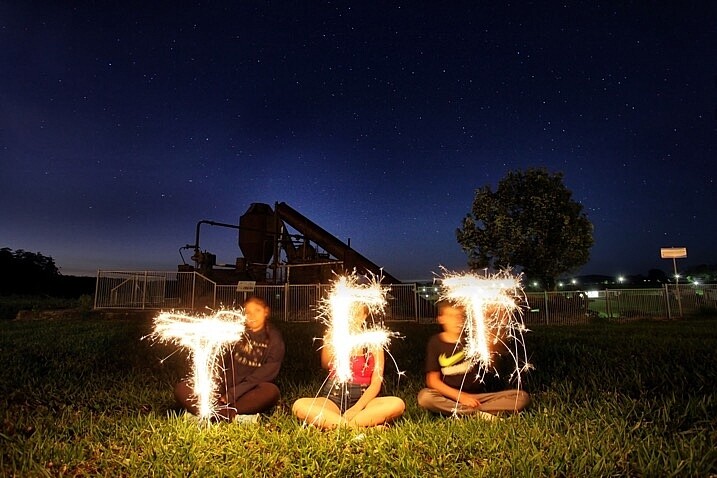
In many cases the first time you do any light painting it will be to spell your name using sparklers or a flashlight. The next step if you became more serious would usually be making light orbs, and other light painting shapes with things like fairy lights. Now there is the pixelstick, which makes light painting both easier to do, and more sophisticated.
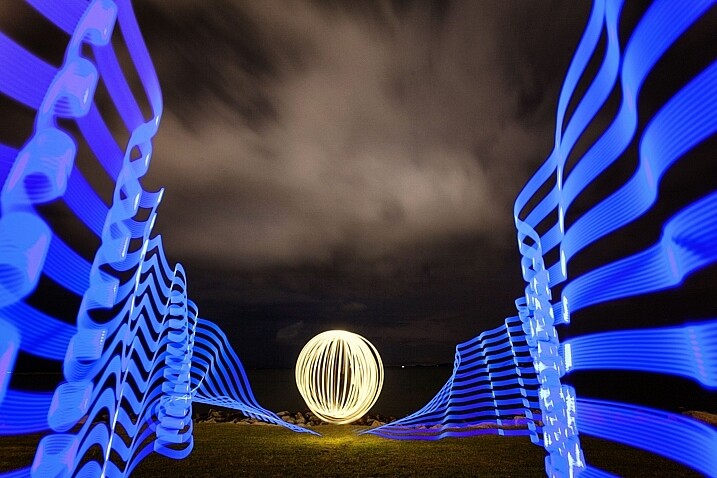
Light orbs are a lot of fun to create and it’s even more fun to light paint with the pixelstick as well.
The game changer, introducing the pixelstick
The pixelstick is the result of the inevitable evolution of light painting, and the advancement of technology. The pixelstick is a product designed and produced by bitbanger labs, following a successful Kickstarter fundraising campaign. The neat thing about the pixelstick is that you can program it to create any light pattern you want, in fact, you can even use it to create light painted pictures.
This is possible through importing BMP files onto an SD card, which can then be slotted into the pixelstick’s operating system. You have control of many useful aspects, brightness of the light, the speed of the pattern transmission, repeat firing of the pattern, white balance, and delayed fire, are some of the useful functions.
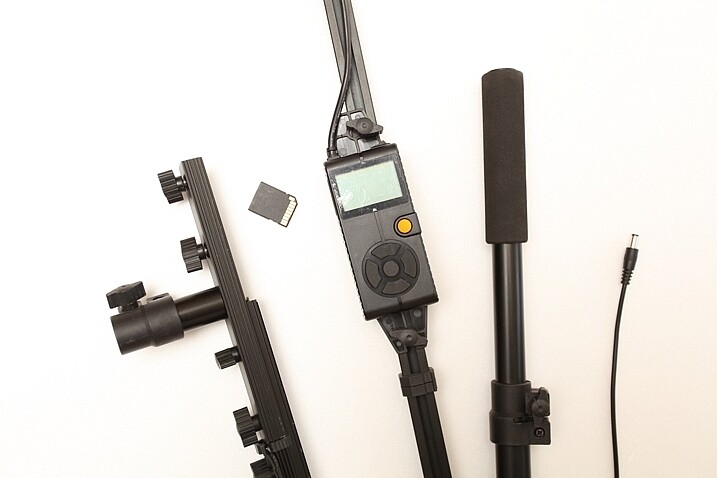
The pixelstick comes with a controller that you can use to change the light painting design.
Vital stats, what you need to know about the pixelstick
The pixelstick at full length is great for light painting, but not so good for traveling. It’s fortunate that the design allows you to break it down to half its length, and store it in the bag. But, the length is still too long for hand luggage on a plane, which presents a problem if you plan on using it in more exotic locales. The essential information about the pixelstick and what comes with it are:
- Comprised of a strip of 200 RGB LED lights, allowing for a combination of 16 million colors.
- Has an aluminum case housing, to protect the LEDs from damage.
- Full-length 187cm (73.5 inches), and a storage length of 109cm (43 inchses).
- Weight is 1.8kg (4 pounds).
- The device uses 8 AA batteries.
- There is a control center with a battery pouch that attaches to the stick, with cables to connect everything together.
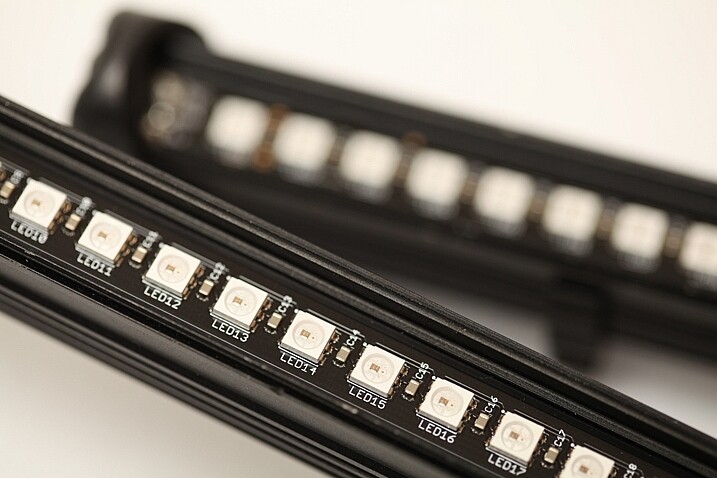
The 200 LED lights come enclosed in a light-weight metal case which protects them from any damage.
How to do light painting
Light painting is a long exposure technique, which you’ll need a tripod to achieve. You can follow the steps set out below, or for a more detailed guide check out: Beginner’s Guide to Light Painting .
- Choose a location and time of day that will be dark. You need to be able to expose for at least 10 seconds in most cases, so locations with less ambient light are ideal.
- Dress in black clothes, this will minimize the chance of you showing up in the photo.
- Place your camera on a tripod, and compose your scene. As you’re light painting, make sure there is enough space within the composition set aside for the design. In other words, plan where and how big the light design will be, then make sure it will all be contained inside the frame.
- Take the light source into the scene you composed, turn it on, and leave it in front of the camera.
- Turn on your camera’s LiveView function, and focus on the light source using manual focus (use the + or zoom button to show a magnified view which will make it easier for you to focus). Leave the camera in manual focus to make sure your focus point remains the same.
- Set the camera’s self-timer to 10 seconds, and begin the countdown. If you have a remote shutter release you may prefer to use that to trigger their camera.
- While the camera is counting down, move into position in front of the camera with your light source in hand.
- Just before the shutter releases, begin your light painting pattern.
- Carry out any light painting you wish to do. Then, once you have finished painting, turn off your light source and move out of the frame.
- Go back to your camera and wait for the exposure to finish. Check your result and repeat if necessary.
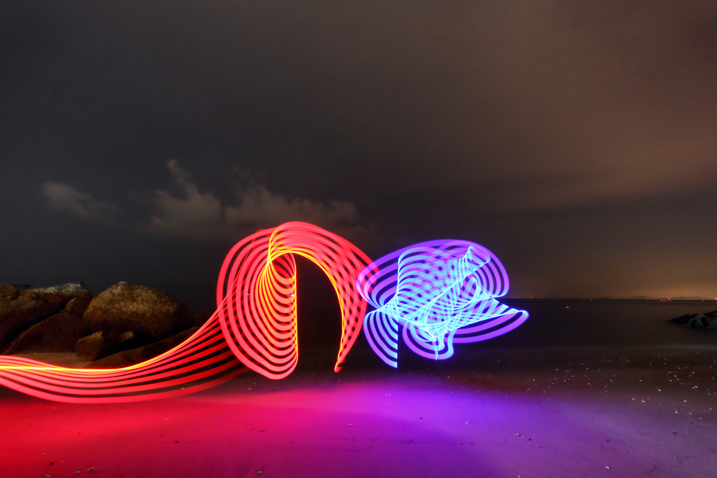
A lot of people have fun using sparklers to create light paintings. These look nice, but the pixelstick takes it to the next level.
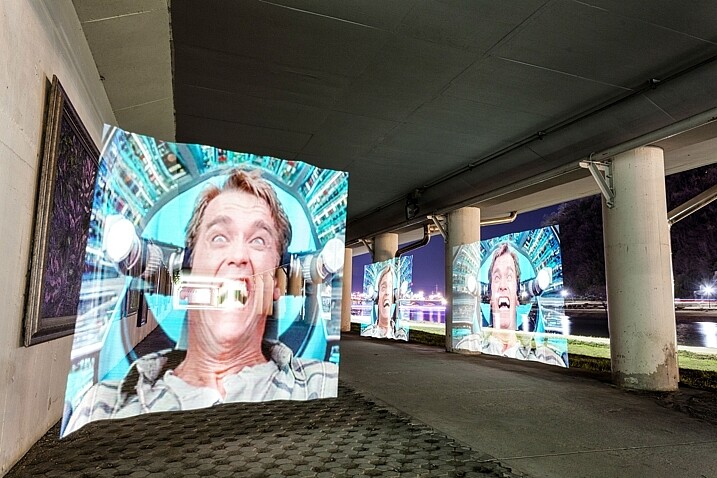
Using the pixelstick to create abstract light paintings
There are many different types of light sources, the pixelstick is just one example. However, these effects can also be achieved by using something as simple as a kid’s toy light saber. The focal point of your image is going to be the light painting itself, or perhaps an architectural feature that you’ll emphasize with light.
The main thing is to keep it simple, with the light flowing through the scene. If you over-elaborate and make too many movements then it’s the digital equivalent of scribbling on a piece of paper, and it usually doesn’t turn out well. So when you’re making abstract light paintings, keep these things in mind:
- Keep the line flowing. You probably know leading lines work well in photos, and light painting is a great way of introducing some into your frame. Have a plan for the direction the line will flow in your frame, and how it will lead the viewer’s eye to the point of interest.
- Use repetition. Having a pattern in your frame and repeating it makes a nice light painting. Repetition often works well for photographs, and the control you have with the pixelstick allows you to do this more easily.
- Keep it simple. There is a temptation to overcook (do too much) a light painting. With practice, you’ll find the strongest scenes use a more minimalist approach. A simple rotation of the pixelstick or light saber is often all that’s needed.
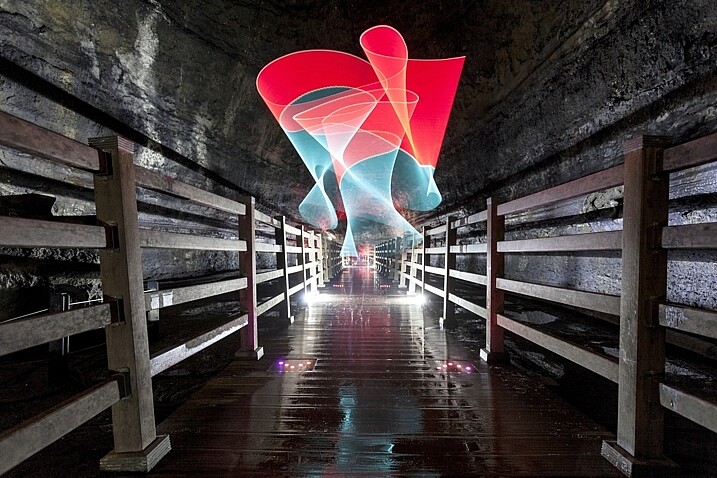
The pixelstick is really good for abstract work. The preset light patterns that come with the stick will help get you going quickly.
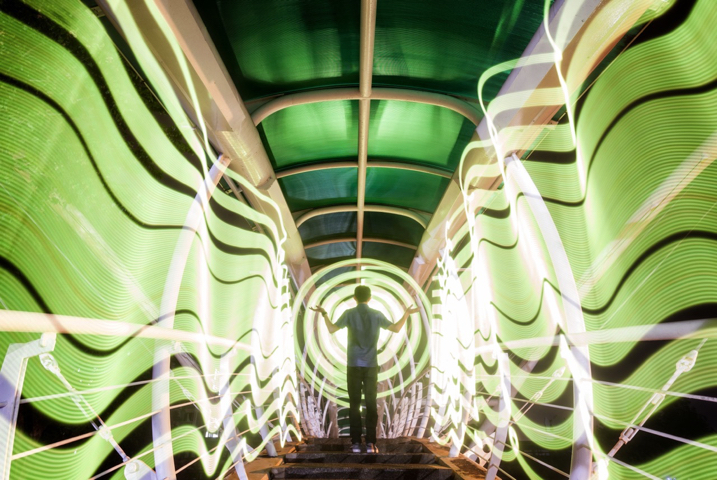
The most effective light paintings happen when things are kept simple.
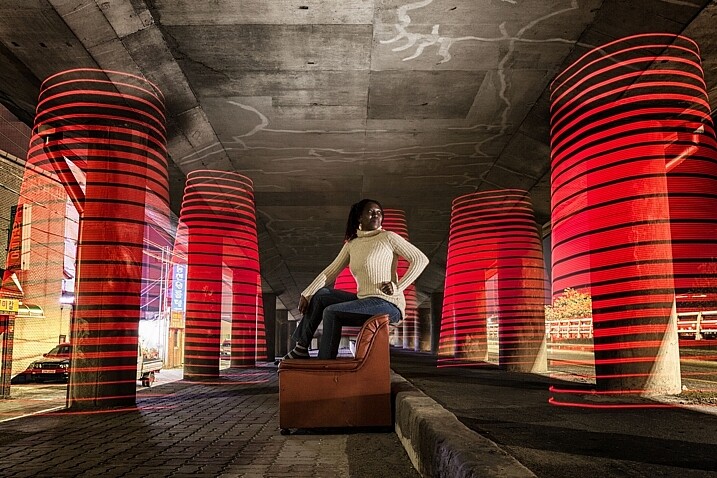
The pixelstick for portraits
The pixelstick can be used to frame a model, and/or create leading lines towards the subject making it a powerful tool for portrait photographers. The difficulty you will encounter when shooting long exposures with a model is freezing them so they’re sharp. The pixelstick itself isn’t any better than other light painting tools you can use, but the following tips can help.
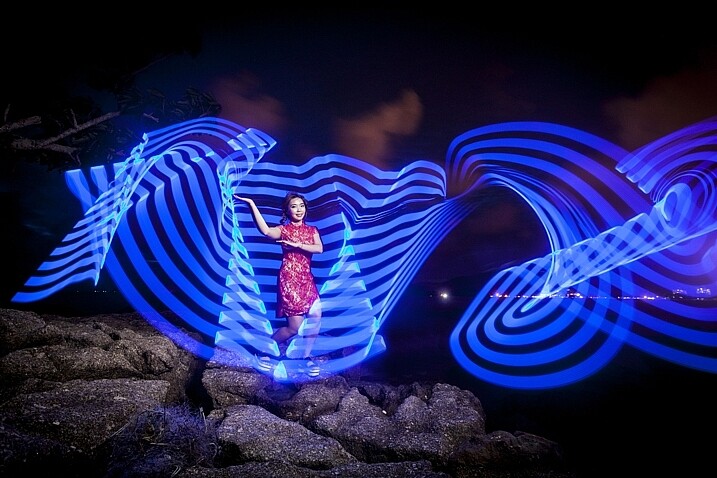
In this photo, a Jinbei 600 flash was used to light the model, while the pixelstick produced the light painting around her.
- Keep the exposures short. The shorter the exposure, the less chance there is your model will move. This will mean shorter, simpler light paintings.
- Use strobes to light the model. Using a strobe (flash) to light your model means that any movement in the model is less likely to show.
- Ask the model to hold still. This is easier said than done, but if your model can hold really still for 20 seconds, then you can create longer more complicated light paintings.
- Have the model face away from the camera. Any movement of the model’s face will show in the image. So, having the model face away from the camera helps it look less obvious.
Where the pixelstick really works well is how you make it interact with your model. This may mean that the colors in the light painting contrast with the color of the model’s clothes. Or maybe you can make the model appear to be holding some of the painted light. The creative potential of light painting combined with a model is vast, so you should have fun.
Asking the model to face away from the camera makes it much easier to mask any movements there may have been during a long exposure.
Light painting for product photography
The customization available with the pixelstick makes it a fantastic choice for product photography. One of the main niche genres is car photography, where the ribbon lines or checkered flag designs can be used.
This technique is similar to photographing a model, only your product won’t move, which allows for longer exposures. You can program in the name of the product, or even the company’s logo. The pixelstick really beats other types of light painting hands down, as the light design can be made to specifically match the product or branding.
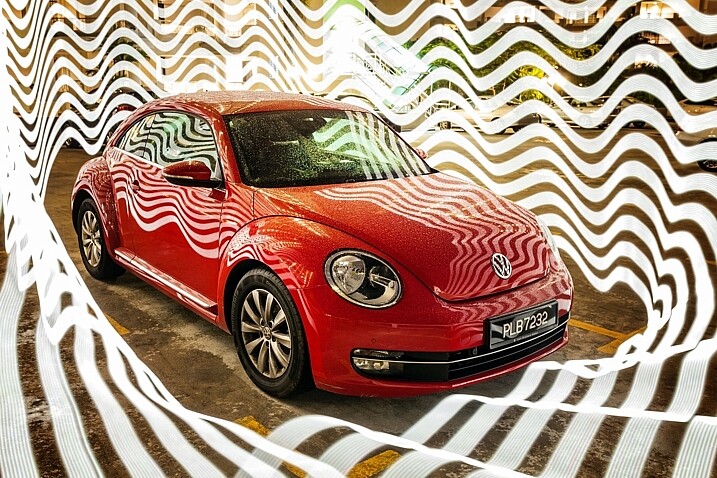
Cars are great subjects for light painting of all forms. The pixelstick provides more options for experimenting.
Personalizing your light design
The ribbon presets, and the downloadable BMP files that come with pixelstick provide a lot of creative variety. But the real fun starts once you begin to add your own designs into the pixelstick. It’s this feature more than any other that gives this tool its power. The creativity is really infinite so here are a few ideas for you:
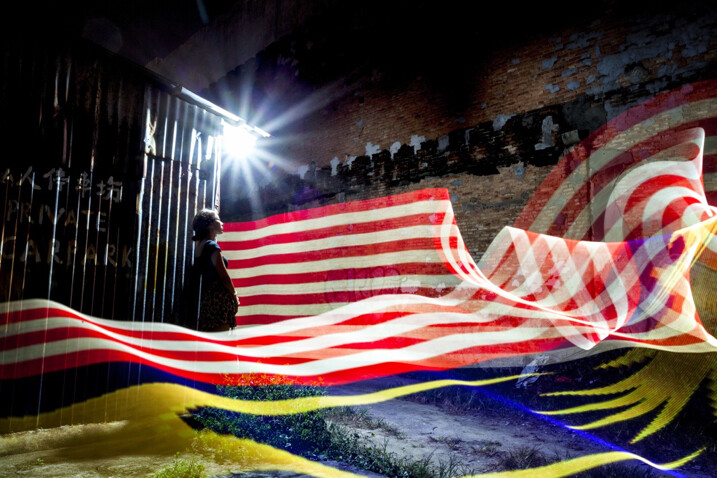
- Find images through creative commons of national flags.
- Edit the color scheme of some of the downloadable patterns that pixelstick provides.
- Photograph textures shots of leaf beds or brick walls and use them to light paint.
- Use your own landscape photos.
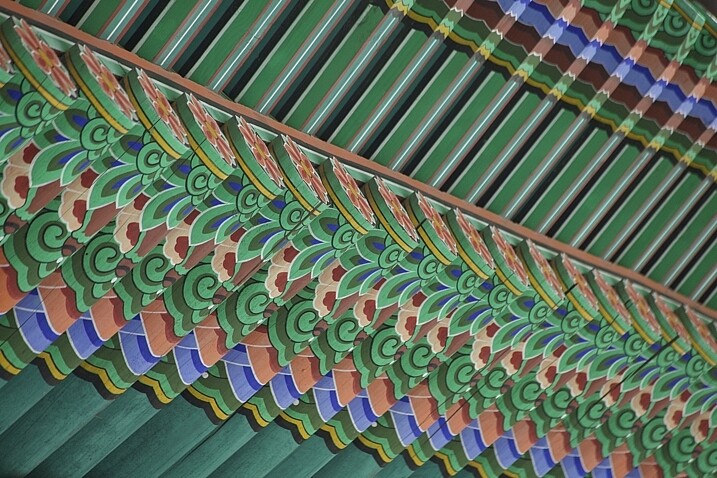
The texture and pattern of this traditional Korean roof made for a great light painting pattern.
Converting your files for use with the pixelstick could not be easier. Pixelstick has a drag and drop service on their website where you can do this easily. Alternatively, you could design and edit your image with Photoshop. Your image needs to be sized to 200 pixels high, with the length being as long as you desire. Once this is done the file needs to be flipped counter clockwise and saved as a BMP file. When creating a new file, any black areas will appear as blank (no light) when the light painting occurs.
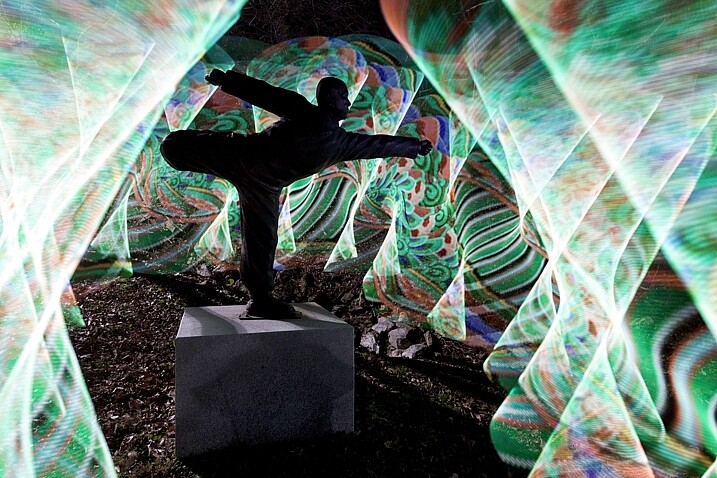
In this photo, the area around the statue of a Buddhist grandmaster has been light painted using the traditional Korean pattern I created (above) as the light source.
Vibrant videos with the pixelstick
The pixelstick’s scope of creativity goes beyond still photography, and it can do amazing things for animation. You are going to create a stop motion video with the pixelstick, and use a series of long exposure photos to make this. Think of an animation flipbook, only this is the digital version of that.
Steps to create an animated GIF
Animating a single scene with the pixelstick could not be easier. Follow these steps to make an animated gif (like the one below) or perhaps a short video. You don’t need a pixelstick to create this type of animation of course, but you have a lot more options at your fingertips if you do.
The pixelstick can also be used for make smaller gif animations. The creative potential here is huge.
- Set your camera on a tripod, and ensure it doesn’t move.
- Compose your scene, and decide where your light painting animation will occur.
- Use a remote cable shutter release, this will prevent any movement of the camera.
- Allow a long enough exposure for you to complete the light painting.
- Begin the exposure, and move into the frame to start and complete the light painting.
- Repeat the exposure and the same light painting at least 10 times.
- Take your camera home, and import the photos to your computer.
- You now need to import the files to photoshop. To do this go to file>scripts>load files into stack.
- Open the timeline window, and select “create frame animation”. This will import one frame into your animation.
- On the right-hand side of the timeline window click the menu option, and select “create frames from layers”. Now reverse the order of the frames.
- Hit play and remove any frames that interrupt the flow of your animation.
- The file is now ready, export it as a gif file.
Stop-motion videos
Creating a longer stop-motion video is very similar to making an animation, in essence, you’re just making an extended version. As opposed to repeating a light painting many times, you may well simply move through a scene when making this type of video.
It’s better to use a dedicated stop-motion app for making this type of video, with stop-motion studios for windows, and istopmotion for mac being a couple examples of options.
One frame from the series used to make the stop-motion video below.
Conclusion
The pixelstick really is a magical tool. You can create spellbinding images that will wow your friends if you decide to purchase one. The size of the stick is something of a double-edged sword, thought. It allows for bigger more dramatic light paintings, but it is also harder to transport, even when broken down into its carry bag. Is the pixelstick worth dropping the extra cash on, versus a cheaper D.I.Y. light stick? If you’re serious about improving your light painting, then yes it’s worth the money in my opinion.
The ability to customize the type of light emitted gives you so much control. Doing this with a DIY light-stick would take many hours, and in many cases would be impossible to replicate what the pixelstick does. At around $ 350, you could spend more money on other photography gear without getting the same level of creative energy you get from this tool. Whether you’re interested in still photos or animation, this will quickly become a vital part of your setup.
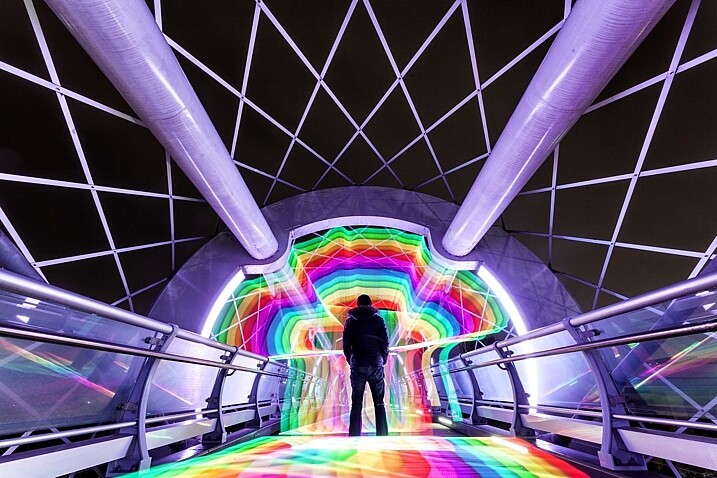
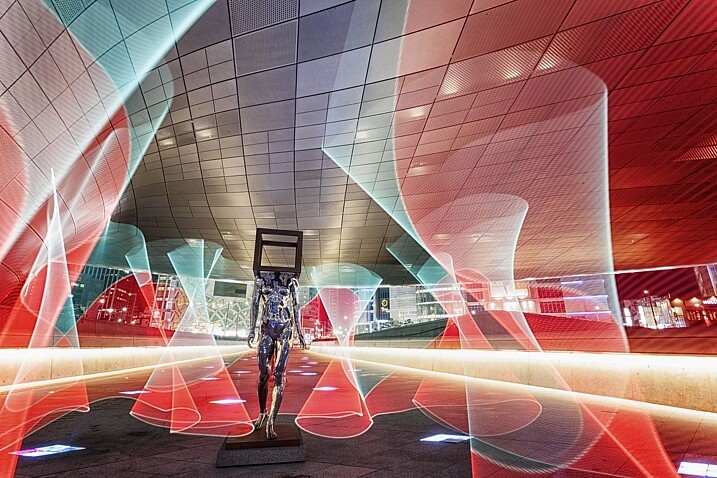
The way you make light interact with the surroundings can be highly effective.
The light paintings the pixelstick is capable of are highly sophisticated.
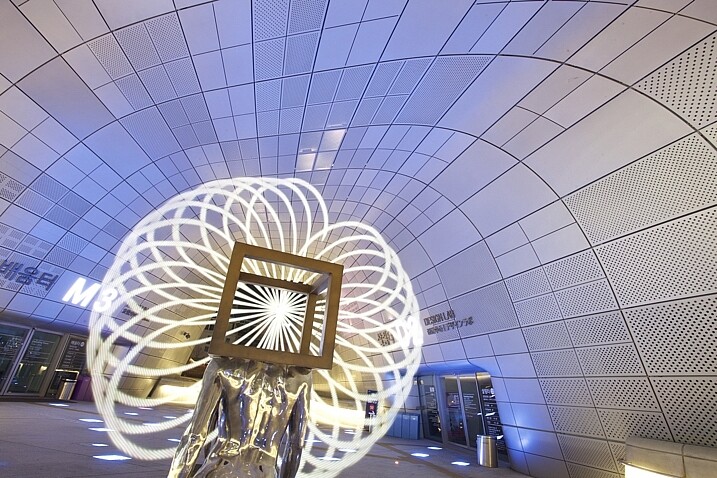
In this image, the pixelstick was used to add repetition to the scene, and create an otherworldly feel.
The flow and lines that you can create with the pixelstick make the photo stand out much more.
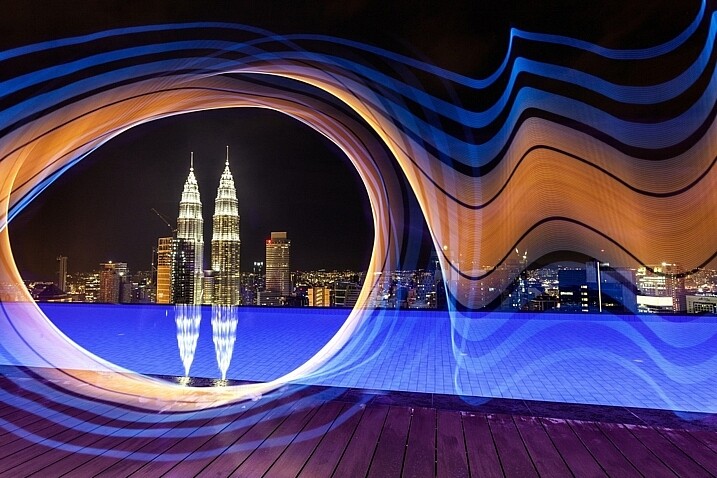
The Petronas towers in Kuala Lumpur are framed using light from the pixelstick, adding a lot of interest to this photo.
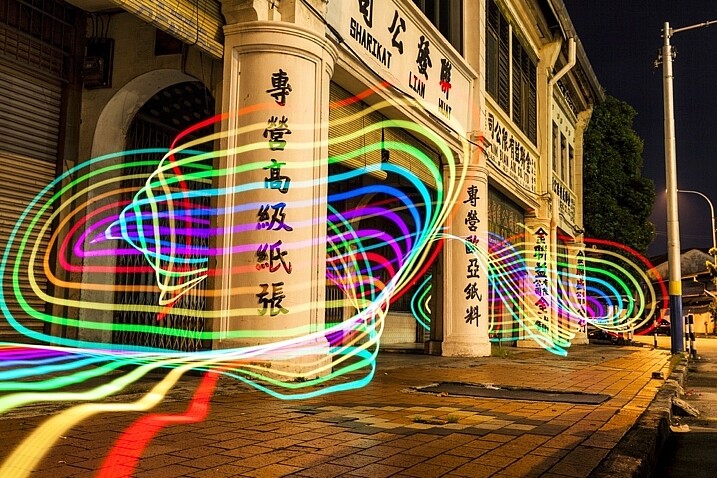
The light weaves in and out of the pillars, adding direction to this photo.
googletag.cmd.push(function() {
tablet_slots.push( googletag.defineSlot( “/1005424/_dPSv4_tab-all-article-bottom_(300×250)”, [300, 250], “pb-ad-78623” ).addService( googletag.pubads() ) ); } );
googletag.cmd.push(function() {
mobile_slots.push( googletag.defineSlot( “/1005424/_dPSv4_mob-all-article-bottom_(300×250)”, [300, 250], “pb-ad-78158” ).addService( googletag.pubads() ) ); } );
The post How to Create Magic in Your Photos with the Pixelstick by Simon Bond appeared first on Digital Photography School.

Digital Photography School


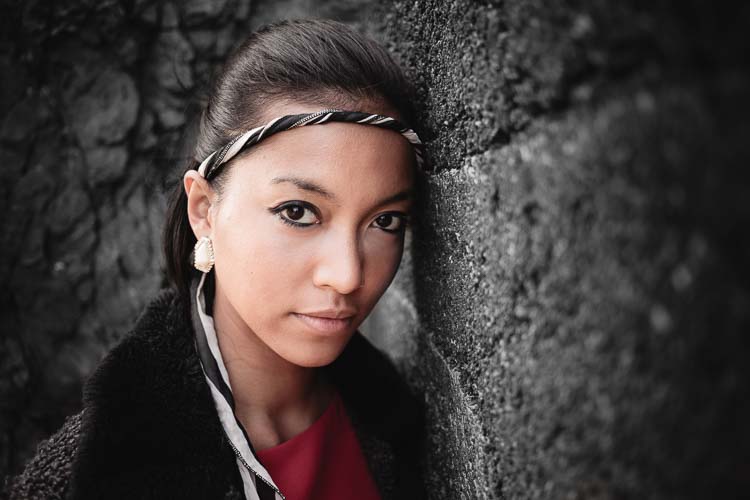
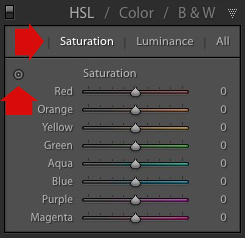
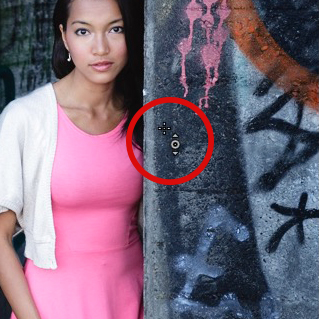
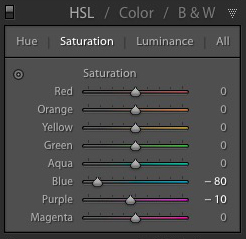
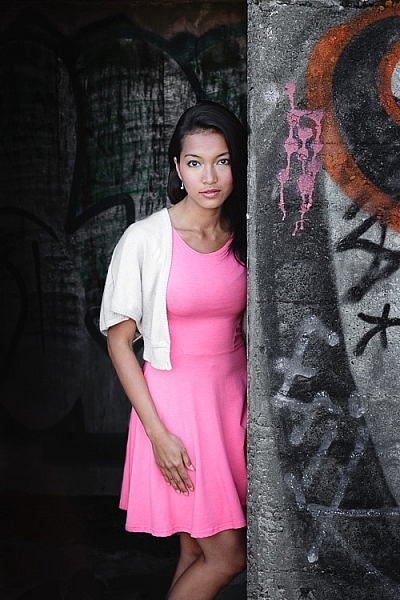
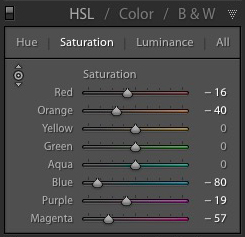
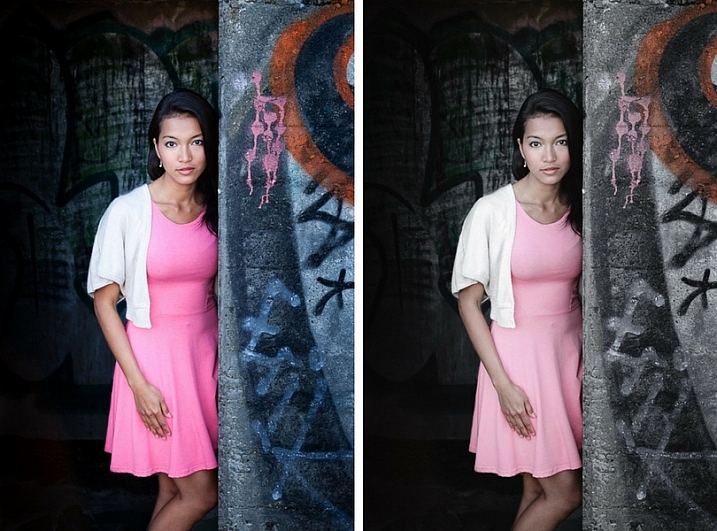
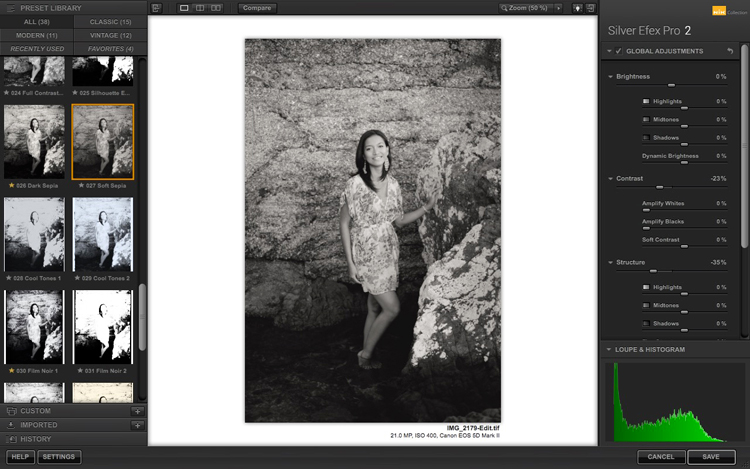
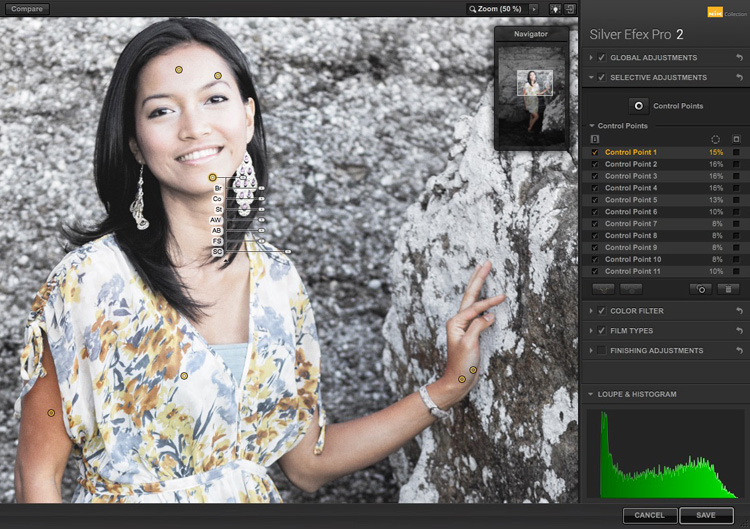
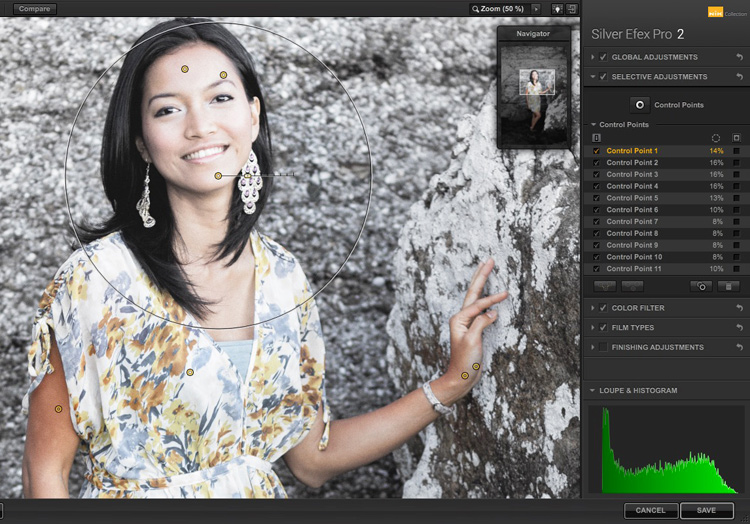
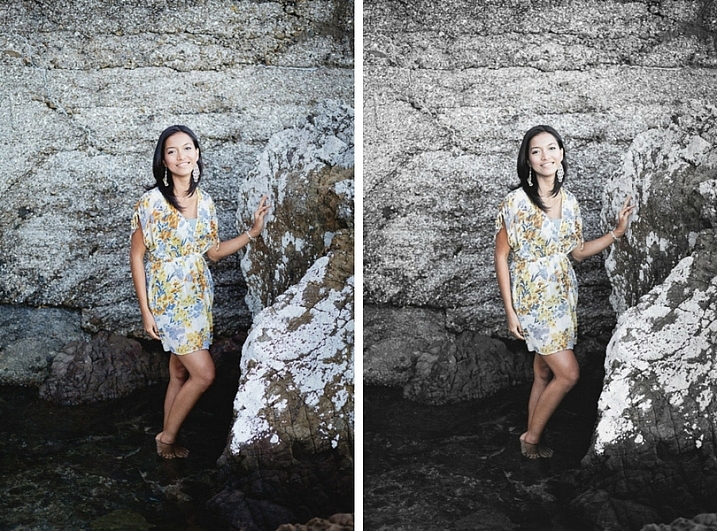
 Selective coloring is a post-processing technique where you convert an image to black and white, but leave part of it in color. It has a bad reputation because it can be used to create some truly horrendous images where the only thing on display is the photographer’s lack of ability.


You must be logged in to post a comment.