The post Weekly Photo Challenge – Old appeared first on Digital Photography School. It was authored by Sime.
The theme this week was going to be ‘Cold’ but then I thought of all the people in snow&ice I’ve seen online this week and thought no, they’re likely quite done with ‘cold’ and then I realised I’d missed the C and thought I’d stick with ‘Old’ An old scene, an old object like some of my tools, below, or an old person’s portrait even? (And if any of you young people find and post a photo of me, there’s gonna be trouble haha!)
This Week Your Challenge Theme is #dPSOld
With the theme #dPSOld some things you can think about when you’re taking your photos are:
Detail – showing details, lines, cracks, wear.
Story – work at telling a story with your image.
Nothing old? Consider working on your image in post and going for ‘vintage’ look? (Here are some examples)
Don’t forget, you can go back and try ALL of our CHALLENGES over HERE!
Old tools or old cars, they have to be two of my favourite ‘old’ things to photograph! What can you find in your neighbourhood or in your house that you can photograph for this week’s challenge!
That time in Cuba – gtvone
You can upload your photo here (comments down below) or over in our Facebook Group.
Share them on Instagram or Twitter and use the hashtag #dPSMirror so we can see them!
Great! Where do I upload my photos?
Simply upload your shot into the comments field (look for the little camera icon in the Disqus comments section) and they’ll get embedded for us all to see. Or, if you’d prefer, upload them to your favourite photo-sharing site and leave the link to them.
The post Weekly Photo Challenge – Old appeared first on Digital Photography School. It was authored by Sime.
The post The Pentax K-3 Mark III Will Not Launch Next Week appeared first on Digital Photography School. It was authored by Jaymes Dempsey.
The Pentax K-3 Mark III will not launch at next week’s CP+ imaging show as was initially promised, but will instead be delayed for the foreseeable future.
Back in October 2020, Pentax officially announced its long-awaited APS-C DSLR, the K-3 Mark III. The company released a camera spec list, and stated that “the launch target is around the period of the CP+ camera exhibition, which will be held from February 25 to 28 in 2021.”
But now, just days before the CP+ exhibition, Pentax released a statement acknowledging a hold-up; specifically, “some of the product parts are delayed, and [Pentax has] determined that development will require a greater amount of time for [the company] to achieve the exceptional performance and finest quality that is the hallmark of next [sic] APS-C flagship model.”
Pentax did not offer a new expected launch date, but promised to “inform [consumers] again in the near future.”
According to the original announcement, the K-3 Mark III will pack 26 MP of resolution, a sensor that can shoot up to an astonishing ISO 1,600,000, plus in-body image stabilization, 12 frames per second continuous shooting, dual card slots, and more.
Fans who have waited for the K-3 Mark III will no doubt be aggravated by this delay, especially because Pentax had originally teased a K-3 Mark III launch for the end of 2020. And the announcement comes at an unfortunate time; the mirrorless market seems to solidify further with every passing day, and the relative success of mirrorless threatens to leave Pentax, a DSLR-focused brand, in the dust.
In other words:
Pentax needs a win, and this delay suggests they won’t get it.
So if you were anticipating the release of the K-3 Mark III, you’ll have to hunker down yet again. While the camera will likely debut eventually, there’s no telling when that day will come.
Now over to you:
What do you think of this Pentax delay? Are you interested in the K-3 Mark III? Do you think the camera will ever come out? Share your thoughts in the comments below!
The post The Pentax K-3 Mark III Will Not Launch Next Week appeared first on Digital Photography School. It was authored by Jaymes Dempsey.
The first image sent back to Earth from Perseverance following its successful landing on Mars. You can see Perseverance’s shadow in the foreground. Image credit: NASA
On July 30, 2020, NASA launched its Mars Perseverance Rover on an Atlas V rocket from Cape Canaveral Air Force Station in Florida. Yesterday, February 18, 2021, Perseverance landed successfully on the red planet.
The 2,260-pound (1,025kg) rover touched down with precision at an ancient river delta site in Jezero Crater. Perseverance is exploring an area where a lake existed nearly 4 billion years ago. The Perseverance mission has numerous objectives, including exploring its geologically diverse landing site, assessing ancient habitability, seeking signs of ancient life, gathering rock and soil samples, and demonstrating technology for future exploration by robots and humans alike.
Map showing Perseverance’s landing site at the Jezero Crater on Mars. Image credit: NASA
In the video below, you can see mission control react when Perseverance landed on Mars. Mission control was recorded using an Insta360 Pro 2 camera. When using a compatible browser, you can rotate the camera around mission control. The moment of elation is around the 1:46:00 mark. It’s an emotional moment for the team, and it’s cool to see it captured in 360 degrees.
Perseverance will spend at least one Martian year (about two Earth years) exploring the landing site region. Onboard are seven instruments, including the MastCam-Z, SuperCam, Planetary Instrument for X-ray Lithochemistry (PIXL), and Scanning Habitable Environments with Raman and Luminescence for Organics and Chemicals (SHERLOC). The Mastcam-Z is an advanced camera system with panoramic and stereoscopic imaging capabilities. The camera, which can zoom, will analyze the minerals of the Martian surface. SuperCam is provides imaging, chemical composition analysis, and mineralogy at a distance.
Engineers working on Perseverance. Image credit: NASA
PIXL is an X-ray fluorescence spectrometer and high-resolution imager. PIXL will map the elemental composition of surface materials. SHERLOC provides fine-scale imaging and uses an ultraviolet laser to map mineralogy and organic compounds. SHERLOC is the first UV Raman spectrometer to land on Mars. SHERLOC also includes a high-res color camera for microscopic imaging of Mars’ surface.
Mission control. Image credit: NASA
It’s difficult to overstate what an accomplishment it is to land not only NASA’s most ambitious Mars rover yet, but also to do so during a pandemic. As Chelsea Gohd writes for Space.com, ‘This mission didn’t just propel technology and science forward, it demonstrated the incredible Perseverance of the human spirit. Despite everything, the teams at NASA were able to accomplish this incredible feat, which, even in ‘normal times,’ would have been difficult.’ Matt Wallace of NASA’s Jet Propulsion Laboratory (JPL) shared a similar sentiment following Perseverance’s successful landing, ‘It’s been a tough year. It’s been tough to do this mission in this environment. But the team, like they have with every other challenge, has stepped up to it…’
An illustration of the Perseverance rover. Image credit: NASA
If NASA had been forced to delay the launch from last July, the launch window would have been pushed back 26 months due to planetary alignment. Perseverance is a $ 2.7B mission, so a more than two-year delay is a tough pill to swallow. Instead, NASA was swift to enact COVID protocols, which came with unique challenges and ultimately allowed the mission to continue as scheduled.
This is the first image Perseverance sent back to Earth following its successful landing on Mars. Image credit: NASA
Back to yesterday’s historic landing. Perseverance, or ‘Percy’ as some at mission control call the rover, landed at 3:55 p.m. ET. The landing went smoothly, and Percy wasted no time sending its first image back to Earth. Perseverance then sent a second image, showing the view from the rear of the spacecraft. Both images were captured using onboard ‘hazard cameras,’ and the protective covers were still in place. Future images will be more detailed and impressive, but these are nonetheless important photos. The images will be used to help the team very precisely locate Perseverance’s landing site on the Martian surface.
The second image shows the view from the rear of Perseverance. Image credit: NASA
For Perseverance, the next few days on Mars will be spent exploring the area. Its handlers will come to grips with the area and stabilize the rover’s onboard systems, including communications systems that will allow specialized software to be uploaded from Earth.
A 3D-printed model of MastCam-Z. Image credit: NASA
Per Space.com, ‘Perservance’s head-like, instrument-laden mast will also be deployed in these first few sols, allowing capture of great new imagery. For example, the rover’s MastCam-Z camera system is scheduled to take its first color panorama on sol 3.’ Mars 2020 deputy project manager Jennifer Trosper says that NASA will do about four days transitioning to new software before digging its teeth into planned scientific endeavors. It’s taken a considerable amount of time, money, and work to get to this point so that the team won’t rush anything.
As you can see in this diagram, Perseverance includes a lot of onboard instruments and equipment. Among other objectives, the rover will use its instruments to analyze and gather information on the chemical and mineral composition of the Martian surface. Image credit: NASA
Perseverance includes an onboard helicopter, Ingenuity. The four-pound helicopter will drop from the rover soon and, if all goes well, become the blueprint for future extraterrestrial exploration.
An illustration of NASA’s new Mars helicopter, Ingenuity. Its maiden flight will mark the first powered flight on another world. Image credit: NASA
If you want to take part in the celebration of Perseverance’s successful landing, NASA has set up a Mars Photo Booth. You can upload a selfie and place yourself on Mars, in mission control, or in front of a handful of other backgrounds.
There’s a lot to look forward to over the next Martian year (and hopefully longer). Perseverance includes 23 cameras, so we should be treated to some amazing imagery throughout 2021 and beyond.
Leica has introduced the APO-Summicron-SL 28mm F2 ASPH lens for full-frame L-mount bodies. It features 13 elements, 6 of which are aspherical; several of the elements are of the anomalous partial dispersion type to reduce chromatic aberration.
The lens can focus as close as 24cm (9.5″) and the maximum magnification is 0.2X. The focus group is driven by a stepping motor that Leica calls ‘Dual Syncro Drive’. The 28mm F2 has a newly designed manual focus ring that uses magnetic fields to improve responsiveness and precision.
The 28mm F2 is weather-sealed and weighs in at 700g (1.5lbs) without its hood. It accepts 67mm filters.
The APO-Summicron-SL 28mm F2 ASPH is now available for $ 5195.
Press release:
Leica Launches the APO-Summicron-SL 28 f/2 ASPH.:
Exemplifying A Commitment to Developing High-Performing Innovative Technologies in the World of Camera Optics
February 18, 2021. With the APO-Summicron-SL 28 f/2 ASPH., Leica Camera presents yet another high-performance wide-angle lens for the Leica SL-System. The APO-Summicron-SL 28 f/2 ASPH. is the latest addition to the ever-expanding APO-Summicron-SL series that includes a lens range renowned for its top-level optical performance and extremely fast and reliable autofocus.
Following the existing focal lengths of 35, 50, 75 and 90 mm, the APO-Summicron-SL 28 f/2 ASPH. is the first true wide-angle prime lens in this series, making the APO-Summicron-SL 28 f/2 ASPH. especially suitable for reportage, interior and architectural photography. Its maximum aperture can be used without any loss of image quality and offers additional creative possibilities through the exquisite balance of sharp subjects and lovely soft background blur. Thanks to the L-Mount standard, the APO-Summicron-SL 28 f/2 ASPH. is equally compatible with cameras made by other partners of the L-Mount Alliance that have been equipped with the Leica-developed lens mount.
As is universally appreciated with all Leica lenses, the fastest aperture delivers maximum performance. As a result, reducing the aperture is only necessary for compositional and creative purposes. Leica lenses always deliver an exceptional quality of natural skin tones, soft transitions into creamy bokeh, contrast-rich details and edge-to-edge sharpness across a distortion-free image. Yet the APO-Summicron-SL 28 f/2 ASPH. is further distinguished by its apochromatic correction, which is a notable feature in a lens of this focal length, and its six aspherical lens surfaces. To ensure the optimal correction of chromatic aberrations, the majority of the grouped lens elements feature anomalous partial dispersion and are made of high-quality specialized glass. The end result is a wide-angle lens that delivers impeccable images complete with the “Leica Look” to help realize a creative vision in any avenue of photography.
The autofocus drive of all APO-Summicron-SL lenses utilizes extremely robust and high-performance stepping motors with DSD® (Dual Syncro Drive™). This enables the AF to travel the entire focusing range in around 250 milliseconds. Leica Camera also takes an innovative approach to manual focusing technology, including an entirely new manual focus ring construction in the form of an embedded ring magnet with alternating north-south polarization. When the ring is turned, the magnetic field changes its polarity. A sensor monitors the status of the magnetic field and sends the data to the main processor. The drive then shifts the lens to the corresponding focusing position based on the angle of rotation and the rotational speed, delivering even faster and more precise manual focusing to match the lens’s quick and accurate autofocus.
Both the construction and design of the cutting-edge APO-Summicron-SL series represent the next step forward in the development of lenses for the Leica SL-System. New, extremely precise manufacturing methods and measuring technologies have been developed specifically for the production of these lenses, resulting in more compact dimensions as well as truly outstanding imaging performance. In the construction of the APO-Summicron-SL lenses, particular attention has been paid to the prevention of stray light and reflections by applying a high-quality coating to the lens surfaces. Thanks to their effective sealing against dust, moisture, and water spray, as well as the Aquadura coating of the exposed lens surfaces, these extremely durable lenses can be used in nearly any weather condition without any cause for concern. The ever-expanding portfolio of Leica SL lenses are built to withstand the elements and the test of time, matching its futureproof counterparts in the SL2 and SL2-S with their rugged construction and continuing firmware development ensuring a long service life.
The APO-Summicron-SL 28 f/2 ASPH. is available now at Leica Stores, Boutiques and Dealers for $ 5,195.00.
About Leica Camera
Leica represents a union of craftsmanship, design and experience. It is a beautiful collision of art and engineering, and the future of form and functionality. Leica Camera, headquartered in Wetzlar, Germany, is an internationally operating, premium-segment manufacturer of cameras and sport optics products. The legendary status of the Leica brand is founded on a long tradition of excellence in the supreme quality and performance of cameras and lenses, and the iconic images that artists and photojournalists everywhere captured with them. For more information about Leica visit www.leicacamerausa.com, or follow the brand on Facebook, Instagram and Twitter.
The post Black and White Still Life Photography: How to Do It (And Why It Matters) appeared first on Digital Photography School. It was authored by Rick Ohnsman.
In the quest to improve your photography, sometimes the best approach is to slow down, concentrate on the basics, and be purposeful and deliberate. Working in black and white will do that. Making still life images will do that.
Combine the two, and you get black and white still life photography – which is an excellent way to make some great images and become a better photographer while you’re at it.
One of my most successful images of all time is this very minimalistic monochrome composition. It taps into the power of black and white and still life.
The power of monochrome
I will often use the terms monochrome and black and white interchangeably, but there is a subtle difference.
Black and white photos are just that: images with tones from white through black and all shades of gray, but with no color information whatsoever.
A monochrome image, on the other hand, might have a color tint. For instance, you can create a warm, sepia-toned shot or a cool, cyanotype photo. A single color – with various shades – would be present in the image.
A sepia-toned image is monochrome, but not black and white in the purest sense.
But note that this article applies to both black and white photography and monochrome photography equally.
Why black and white?
Early photographers had no choice because they couldn’t shoot in color. Monochrome images were all they could make.
Of course, this ultimately was not a serious limitation; many of the most iconic photographs ever taken are black and white. Surely even non-photographers have seen what might be one of the most famous black and white still life photos of all time, “Pepper No. 30” by Edward Weston. And I can confidently say that Weston’s photo would not be better if it had been made in color.
Today, the default choice of most photographers is color. Because our world is in color – as are most of the photos we encounter – “seeing” in black and white is a skill you must develop.
You must learn to look at a subject with an eye toward the basics – the “bones” of an image, if you will. Shape, form, tone, and texture are those bones, and the best black and white images play to those strengths, where color is unnecessary and even a distraction.
Is this the yellow brick road? Perhaps, but the strength of the shot is “good bones” in all the areas monochrome excels: shape, form, tone, and texture. It also utilizes some good compositional elements. Color is not needed.
Learning to see in black and white will, of course, make you a better black and white photographer. But if you can see in black and white while recognizing and taking advantage of the structural elements of a subject, you’ll become a better color photographer, as well.
Color then becomes an enhancement to an already-good image – one with a solid “bone structure” of shape, form, tone, and texture.
Why still life?
My two favorite genres of photography are probably still life and landscape.
Why?
It could be because they are so opposite. In landscape photography, you can rarely move the subjects in your scene, you compose by where you stand, and you don’t have much control over the light. Often, you must wait for the light to be just right, and you must be ready if and when such a moment happens.
The elements, the layout, the composition, the lighting, the camera position; you’re in control of everything when you make a still life photo.
Still life photography makes you the master. You set the scene, deciding what to add in and take out. You arrange the objects for the best composition, you choose the camera position, the lighting, and any additional components comprising your shot.
Then, when you’re satisfied and ready, you take the photo.
In a word, still life photography give you complete control.
Where can you find subjects for black and white still life photography? Where can’t you?! How about the silverware drawer? Here are some creative still lifes with a few forks.
You might also find good still life subjects in the vegetable bin….
…or get back to the “roots of photography” with a subject like this.
When considering subjects for black and white still life photography, remember what gives an image “good bones:”
Shape, form…
…tone…
…and texture.
Then add another distinct advantage. Consider this definition:
“A still life is a work of art depicting mostly inanimate subject matter, typically commonplace objects which are either natural (food, flowers, dead animals, plants, rocks, shells, etc.) or man-made (drinking glasses, books, vases, jewelry, coins, pipes, etc.).”
A real advantage of still life photography is that your subjects are still. They don’t move.
So in still life photography, it won’t matter if your shutter speed is 1/30s or 30 seconds. Being able to have such flexibility over your choice of aperture, shutter speed, and ISO is huge, and it opens up all kinds of possibilities that other genres of photography don’t offer.
Light painting is one of those unique possibilities. Since you don’t have to deal with a moving subject, you’re free to “paint” a subject with light during an extended exposure.
And this makes for some dramatic still life shots:
A still life subject that doesn’t move lends itself well to light painting. If you need a 15-second exposure and still want to stick with ISO 100, it’s no problem.
Lighting
Lighting for black and white still life photography comes back to the advantage we already identified:
Control.
The lighting instruments you choose, the modifiers you use, the number of lights and their placement – it’s all within your control.
Let’s break this down a bit more:
White balance – Since you’re processing in black and white, you can ignore the color temperature of your lighting instruments. And this frees you up to use all kinds of light sources, from flashlights, LEDs, and daylight to candlelight, fluorescent lights, and incandescent lights. Yes, as you convert an image into black and white, the color tones will respond differently. But you can handle adjusting your black and white tones if your white balance is initially off. I’ve often “rescued” impossibly bad color images simply by converting to black and white.
Placement – We spoke about the “bones” of shape, form, tone, and texture, which exist in all photos but are more readily apparent in black and white. In black and white still life photography, you get the opportunity to accentuate these “bones” with your careful consideration of lighting placement and control. Want to emphasize texture? Rake a hard light across the subject from the back or side at a low angle. Do you want a soft look? Try a broad light source, like a softbox, that illuminates the subject from the front. You can light your subject to create the look and mood you’re after. As the saying goes, “No rules, just right.”
Want to create some dramatic texture? Use a single hard light source – in this case, a simple flashlight – and rake it across your subject’s surface from the side.
Or you could have the low, late afternoon sun backlight your subject, again to emphasize texture.
A camera trick to help your visualization
In order to make this trick work, you must shoot in RAW.
(Also, I highly recommend you shoot in RAW all the time. Here’s why this is important.)
Now, when shooting in a RAW format, your camera will always capture a color image (and that is what you want).
The playback image you see on the rear LCD, however, will not be the RAW file. Instead, it’ll be a JPEG representation of the image.
So if you want to get better at seeing in black and white, why not switch the JPEG to black and white while keeping the RAW image in color? That way, after taking an image, you can immediately see it in monochrome – but you’ll still keep all the color details for post-processing later.
Bruce Wunderlich, a fellow dPS writer, describes how to set up your camera to do this. He promotes it as a way to better compose color photos, and it is good for that – but if monochrome is where you’re headed, it’s even more beneficial.
So read Bruce’s piece, set up your camera accordingly, and you will have a real aid in making black and white photos.
A still life doesn’t have to be a tabletop object, nor must it be shot under artificial light. This agricultural implement was shot outdoors in bright sunlight. The story of the shot is the repeating patterns. The yellow and red colors of the machine would only have distracted the viewer. Having my LCD set to preview the image in black and white helped me visualize the shot!
Editing for black and white
After a session of black and white still life photography, you’ll bring the images into post-processing as RAW color images.
Color?
Yes. Even if you’ve set up your camera using the recommendation above – where the LCD displays your images in black and white – your actual RAW images are still in color.
That’s a good thing. It’s during editing that you will convert your photos to black and white.
This will allow you to determine how various colors will be converted to monochrome. For instance, back in the black and white film days, you could darken the sky by shooting with a red filter. Because the red filter would block most of the blue light, the sky was rendered very dark on the black and white film.
Today we can create those effects during editing. When converting from color to monochrome, you can adjust the luminance of specific colors (e.g., you can darken the reds, the blues, and the yellows), thus affecting the overall look of the image.
Lightroom offers a nice black and white conversion tool, and there are a number of good articles on black and white conversion in Lightroom, such as this one by Andrew Gibson. You may also wish to try other methods of black and white conversion. A popular option is the Nik Silver Efex Pro plug-in from DxO, but there are dozens of other programs and methods for converting from color to black and white.
Without the limitations of having to make the color in a photo “look right,” you are free to creatively take the tonality in your black and white images wherever your creativity leads you.
The original image at left; a black and white conversion with boosted green luminance in the center; a black and white conversion with decreased green luminance on the right.
Age your photo
Here’s another fun black and white still life photography trick:
Replicate a vintage black and white look!
First, make sure you find the right subject. I recommend working with old collectible objects. Then capture the shot and enhance it afterward with effects such as sepia toning.
It can be a fun and instructional exercise to gather some objects, set up a pleasing composition, light it, photograph it, and create a monochrome file complete with sepia toning.
Collect some items to create a theme, make your still life black and white image, then edit it to produce a “period look.”
Take your “aged” still life even further with some special effects!
Gather some objects, decide how you want to set your scene, light it, take your shot, then go for an antique look with a sepia tone. Canon 50D | Canon 50mm f/1.8 | 1/15s | f/22 | ISO 800
Black and white still life photography: Now go do it!
You can and should read up on the concepts and techniques of photography, but there’s only so far “book learning” will take you.
Black and white still life photography will slow you down, make you think, concentrate your efforts, and force you to really study things.
You just have to dive in and do it!
So gather some subjects, decide how to arrange and light them, determine where you want to place your camera, what focal length you will use, how you will expose the image – all of those things.
Think about what you’re doing, what you’re trying to communicate, and why you’re making the photo.
Take your shot, evaluate it, consider what might make it better, and shoot it again.
Then repeat! There’s no hurry. You’re making photographs, not taking snapshots. You are the master when you practice black and white still life photography.
And that, as they say, is the beauty of it. Go make some great shots!
As always, leave your comments, questions, and photos in the comments section below. Best wishes!
This was shot outdoors after the early morning dew beaded up on this lupine leaf. I put a piece of black cardboard behind the leaf, then did some further clean-up in the edit.
The post Black and White Still Life Photography: How to Do It (And Why It Matters) appeared first on Digital Photography School. It was authored by Rick Ohnsman.
Nikon Japan has announced (machine-translated) it’s developed a 17.84-megapixel 1”-type multi-layer CMOS image sensor that can capture high dynamic range video at up to 1,000 frames per second.
Nikon is known to use Sony sensors in a number of its imaging products, but it also develops its own sensor technology. Case in point is this new 1”-type backside-illuminated (BSI) CMOS sensor, which offers high-speed capture with impressive dynamic range in a square capture format.
The stacked sensor uses 17.84 million 2.7?m pixels (4224×4224 pixels) to capture video at up to 1,000 frames per second with 110dB dynamic range. If dropped to 60fps, the dynamic range jumps to 134dB.
Nikon doesn’t specify what kind of products this sensor is destined for, but based on its square format and hint at its use in ‘industrial fields such as automobiles,’ it’s unlikely we’ll see this in a consumer camera anytime soon.
The post How to Create Cool Effects Using Displacement Maps in Affinity Photo appeared first on Digital Photography School. It was authored by Kevin Landwer-Johan.
Adding natural-looking text to a photo can be challenging. But with displacement maps in Affinity Photo, you can easily produce awesome-looking text blends.
In fact, it takes just a few clicks to merge text with a second photo, so that it looks like the text was there all along.
There are a couple of different ways to achieve this look in Affinity Photo. If you’re used to other image manipulation software, you may be familiar with some of the steps. And if you’re new to Affinity Photo, you may not be aware of the features that make creating cool effects using displacement maps even easier.
So let’s dive right in!
What are displacement maps in Affinity Photo?
Displacement maps in Affinity Photo allow the texture of an image to be mapped onto another layer.
Displacement maps are commonly used to add natural-looking text to an image. You can use them when you want to place a logo or text on a t-shirt or make text look like a natural part of a scene.
How to create a displacement map: Step-by-step instructions
As with pretty much any editing effect, there is more than one way to reach your end goal.
In this article, I will show you a simple, step-by-step method I use to create displacement maps in Affinity Photo.
Specifically, I’ll use Affinity Photo’s Displace filter.
Using the Displace filter is a great way to work with displacement maps. It’s quick, easy, and non-destructive.
This means you have a great deal of control. You can apply your Displace filter and tweak it as much as you like – without permanently altering the underlying photo.
Step 1: Open your mapping image
Select the image you plan to modify. Open it in Affinity Photo.
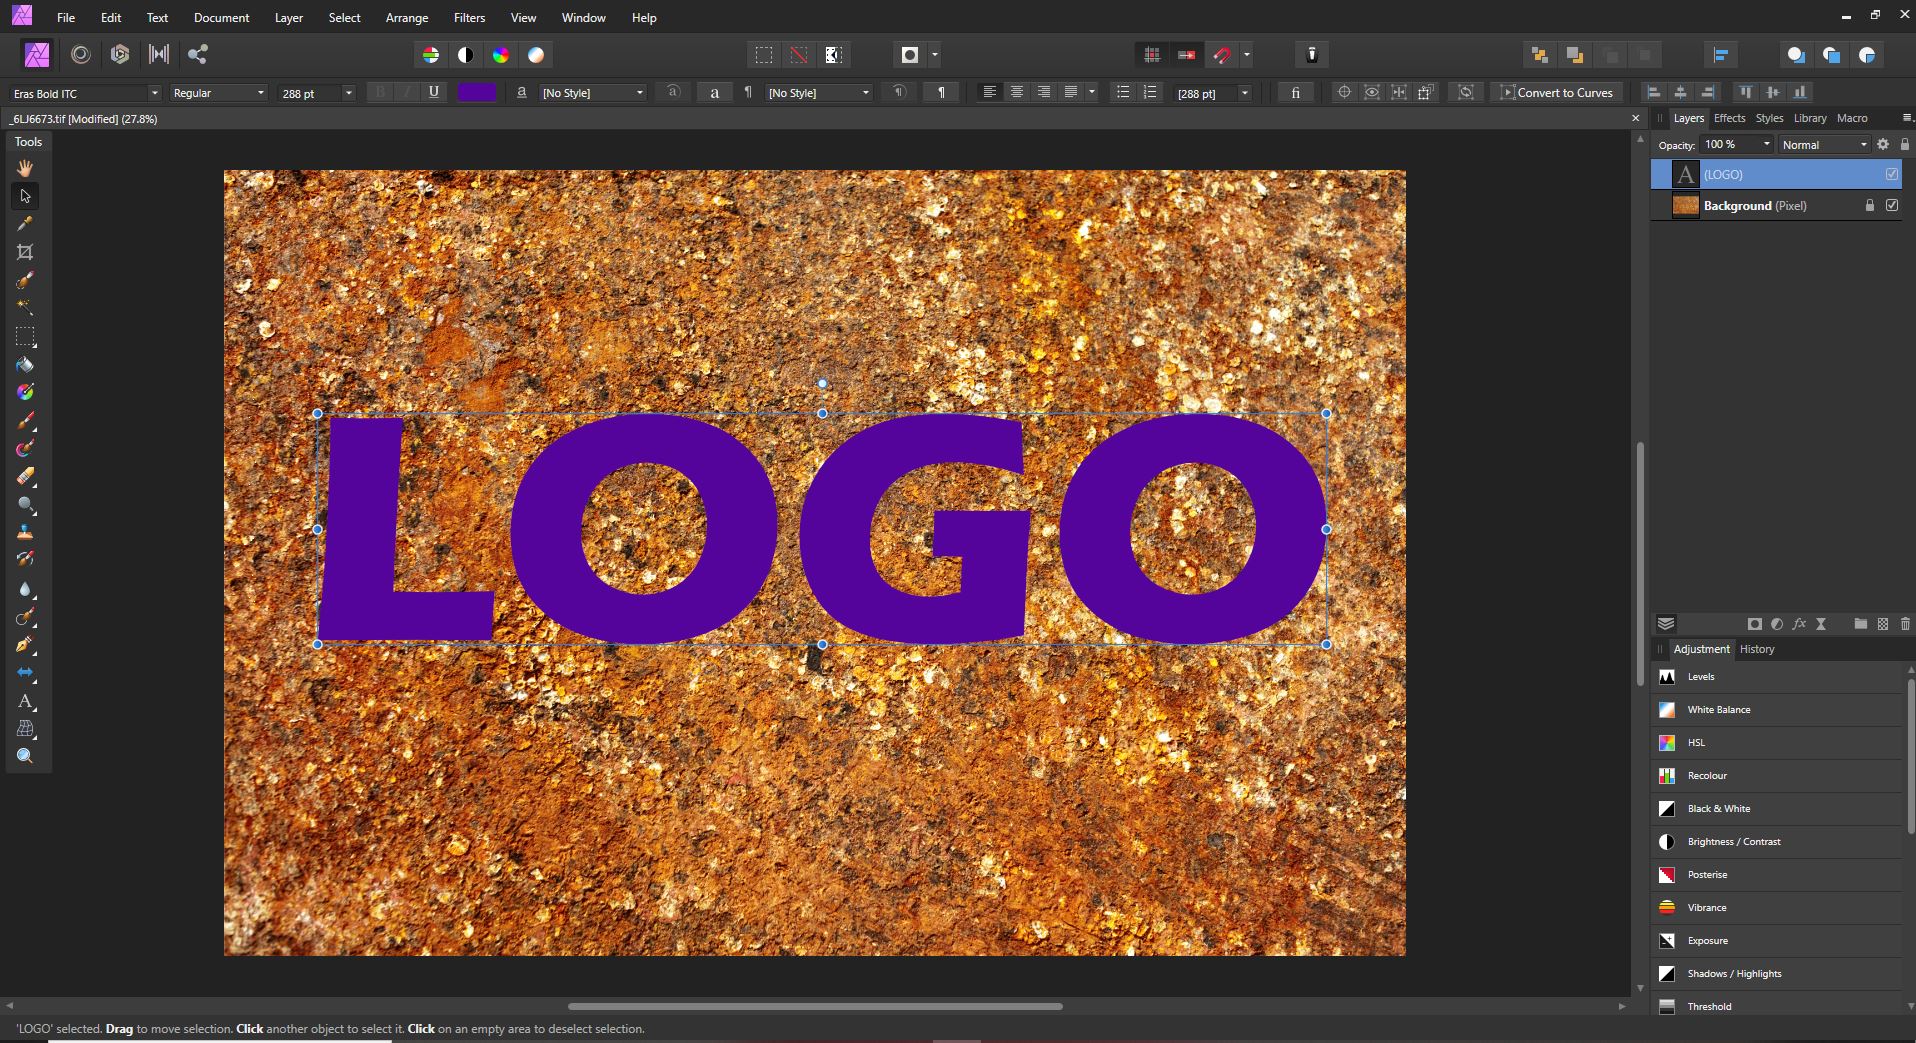
Step 2: Add text or your logo
Locate the file with your text or logo, then drag and drop it onto the underlying image file.
You can use a TIFF or PNG file with transparency. Alternatively, type in the text you want to use, as I’ve done in my example file (below).
Position your image or text where you want it to appear. If you’ve chosen to type your text, pick the font and color you think will best suit your needs.
Step 3: Create a live filter layer
In the top menu, choose Layer.
Then go down to New Live Filter Layer>Distort>Displace Filter.
In the Layers panel, you will now see a live displacement map filter added to your logo or text layer.
Step 4: Choose a displacement map
In the displacement map dialog box, you will have the option of loading a map from a file or loading it from other layers. Sometimes you may have a separate image you want to use as your mapping layer. In this example, I will show you how to use the lower layer to create a displacement map, because this is what will typically provide you with a great result.
Click on the option to Load Map From Layers Beneath. At this point, depending on the resolution of the photo you are working with, you may begin to see the effects of the mapping filter.
(But don’t worry if you can’t yet see this; we’ll work on the effect in the next steps.)
Step 5: Adjust the displacement strength
Use the slider in the Displace filter dialog box to increase or decrease the strength of the filter.
Adjust the filter intensity until your top layer merges naturally with the image below.
Note that this is just the first level of adjustment. In the next steps, you’ll discover how to fine-tune the result, so don’t be concerned if you can’t yet get your image looking exactly how you want.
Step 6: Rasterize the text layer
At this point, if you are working with a text layer or some other non-rasterized layer, you need to rasterize it so the next step will work.
Right-click on the text layer and select Rasterize.
Step 7: Control your blending options
Now it’s time to further adjust how your text or logo blends with the layer beneath it.
Click on the cog icon in the Layers panel. (It’s between the blend mode drop-down and the padlock icon.)
A new dialog box will appear; this lets you control the blending options for your layer. Note the two curves graphs:
You’ll want to use the rightmost curve, labeled Underlying Composition Ranges. But before you start, make sure to uncheck the Linear box below it.
Now click and drag from the top left of this curve. Watch as your text or logo further blends with the layer beneath. Continue to click and drag on the curve until you have a look you’re happy with.
Step 8: Tweak the displacement amount
If you’ve merged an image rather than text, you can now go back and tweak the Displace filter.
(If you merged text, this option won’t be available, because the filter is combined with the text layer when it’s rasterized.)
Step 9: Change the blend mode
For further control, you can select a different blend mode for your text or logo layer.
Scroll through the options in the blend mode drop-down box until you find one that best fits the look you want.
You can also decrease the opacity of the top layer so the underlying texture shows through more.
Using displacement maps in Affinity Photo: Conclusion
The key to success in all photo manipulation is experimentation.
So if you want to create a stunning result, use these steps as guidelines, but don’t be afraid to play around. Push the boundaries!
Using displacement maps in Affinity Photo is fun and non-destructive. This means you can try as many options as you like without permanently affecting your images!
Now over to you:
How do you plan to use displacement maps? Share your thoughts (and images) in the comments below!
The post How to Create Cool Effects Using Displacement Maps in Affinity Photo appeared first on Digital Photography School. It was authored by Kevin Landwer-Johan.
The post 7 Tips – How to Add Depth and Dimension into Your Photos appeared first on Digital Photography School. It was authored by Andrew S. Gibson.
How can you add depth in photography? And how can you make your photos look stunningly three-dimensional?
Depth helps create a sense of place, and it draws the viewer into your images. Plus, it’s a great way to take your compositions to the next level, fast.
In this article, you’ll find seven techniques and tips, all designed to help you convey a stronger sense of depth in your photos.
Let’s get started!
1. Use leading lines
Here’s one of the easiest ways to convey depth in photography:
Use a wide-angle lens and include leading lines that move from the bottom of the frame to the top.
This technique is mainly used in landscape and architectural photos, but you can also incorporate leading lines into portraits, street shots, and more.
The lines don’t have to be obvious. For instance, take a look at this photo:
The rocks form natural lines that lead the eye from the foreground to the island on the horizon.
This photo has a similarly subtle set of leading lines:
The waterways in the middle distance lead the eye to the mountains. But the lines are meandering, rather than straight, which helps give the image a more organic feel – one that fits well with the theme of the landscape.
2. Use perspective
This photo demonstrates how lines can add depth in a different way:
The buildings form converging lines that disappear towards the horizon, creating an effective sense of depth.
Note that this technique is similar to an artist’s use of perspective. I’ve added an overlay so you can see how it works:
3. Think foreground, middle ground, and background
Most photographers are familiar with the rule of thirds, but when it comes to conveying a sense of depth, it is helpful to break the photo up into a different set of thirds:
The foreground, middle ground, and background.
What you’re looking for is a way of connecting each portion of the photo while pulling the viewer’s eye from foreground to background. Having three zones in the image – zones that are distinct but linked – will help create a sense of depth and three-dimensionality.
Leading lines are one way of linking the three zones, but lines are not always present in a scene. So when there are no lines to be found, you’ll need to work with some other compositional element.
Often, this simply means including something interesting in the foreground.
For example, in the photo below, there are some buildings in the background, a concrete jetty in the middle ground, and the edge of another jetty in the foreground. I included the foreground jetty to help create a sense of depth.
Here’s another example:
Do you see how adding the rocks to the foreground creates a composition with three distinct zones (foreground, middle ground, and background)?
And once the zones are present, you get a sense of depth, with the viewer’s eye moving through the shot.
It helps that the wide-angle lens makes the rocks seem quite large in comparison to the distant cliffs.
4. Use aerial perspective
Another technique that helps convey a sense of depth in photography is aerial (or atmospheric) perspective.
This is where the atmospheric conditions make objects in the distance appear hazy.
Of course, you’re often limited by the environmental conditions – but as soon as you see haze in the distance, I highly recommend you try to find a way to include it in your composition.
In the photo below, you can see that the trees in the distance on the left side are obscured by atmospheric haze, which adds depth:
And the depth is further enhanced by the converging lines formed by the walls. So the two techniques actually work together to give increased depth to the final shot:
5. Shoot through a foreground object
The techniques I’ve shared above work well with wide-angle lenses, but are less helpful if you’re using telephoto lenses.
You see, telephoto lenses put distance between you and your subject, which leads to a flatter perspective overall (i.e., a perspective with less depth).
That said, there are still some techniques you can use with telephoto lenses to create a sense of depth.
One method is to shoot through something that is between you and the subject (such as grass, twigs, or windows).
In the photo below, the subject is the setting sun. I shot through the grass (and I actually focused on the grass, throwing the sun slightly out of focus) to add a sense of depth to what otherwise would have been a very flat image.
You can also use this technique with portraits. I created the portrait below by shooting through the branches of a tree:
So the next time you’re shooting a subject with a telephoto lens, look around for objects to shoot through. I guarantee you’ll find an object or two – which you can then use to create depth!
6. Use selective focus
Selective focus is a technique where you deliberately set a wide aperture and focus on the subject (and create a blurry background in the process).
It’s especially effective with portraits, as the blur helps separate the model from the background – and ultimately creates a sense of depth.
The following portrait was taken at f/2.0 with the lens focused on the model’s eyes:
Do you see how the blurry background and the sharp subject creates a three-dimensional image?
That’s the power of selective focus!
7. Convey depth through color
Here’s a question to ask yourself:
What happens to colors in the background when you use a selective focus technique (as discussed in the previous tip)?
You see, when the background is out of focus, colors merge into each other.
And if you arrange your colors carefully, you can achieve a nice contrast between the colors in the background and those on the subject.
What does this do?
It conveys depth!
For example, check out the colors in this portrait:
The background is nearly white, whereas the man’s sweater and hair is a darker red; this separates him from the background.
In fact, you can take this idea to its extreme by using an off-camera flash fitted with an orange gel. When you do this, the model will be lit by orange light (from the gelled flash), but the background will be lit by colder ambient light.
(This technique works well at dusk when the ambient light has a natural blue color.)
Ultimately, you’ll get a nice contrast between the warmer model and the cooler background. For the example below, the model was lit by a single speedlight fitted with a 60 cm softbox and an orange gel.
How to add dimension and depth in photography: Conclusion
Now that you’ve finished this article, you should be well-prepared to create photos with plenty of depth and dimension!
So go out and practice some of the techniques I’ve discussed.
Now over to you:
What other ideas do you have for creating and adding depth in photography? Please let us know in the comments below!
The post 7 Tips – How to Add Depth and Dimension into Your Photos appeared first on Digital Photography School. It was authored by Andrew S. Gibson.
The post Is the Online Photography Community Toxic? appeared first on Digital Photography School. It was authored by Carl Spring.
Is the online photography community toxic? It certainly feels like it sometimes.
There seems to be a lot of toxicity to go around right now – and not just in photography.
Every time I look at social media these days, things get angry very quickly. You only have to look at anything political on Twitter and it generally takes just a few tweets before everything descends into accusations and hatred.
When I look at the photography groups I follow, I’m sad to say I tend to find similar issues. Not in every group, but you only have to look at news of any camera release before things generally descend into tribalism:
“My brand is way better! What were they thinking? This is garbage!”
And my personal favorite:
“You call yourself a professional with opinions like that?”
Sometimes it’s easy to drop the popcorn meme and sit back and enjoy the fireworks. But it does make me question whether there is value in staying in these groups and reading these sites (and comment threads). For pretty much all of us, photography is a hobby that some of us have been lucky enough to turn into our career.
So we need to think about why the photography community can be so toxic.
And we need to ask ourselves:
How can we do better?
Why are online communities toxic?
There any many in-depth essays from people way more qualified than I who have looked into this. It tends to boil down to the fact that not looking in someone’s eyes when you are talking to them removes inhibitions. There is no person and no feelings to be seen, just text on a screen.
That, combined with the ability to hide behind a username, gives people the power to be the vilest version of themselves without consequence.
It’s hard not to retaliate when faced with somebody sniping at you, whether you’re talking online or in person. However, what makes things harder is the fact that, when talking online, we lose the subtlety of delivery and expression.
I am sure everyone reading this has received an email, got the tone completely wrong, and sent a blunt reply. Our ability to articulate through speech is much more advanced and allows for many more subtleties than the written word.
This inability to read tone can get amplified when people from different backgrounds and cultures clash. The internet is worldwide, and as such, cultural differences can be misunderstood and can lead to innocent comments being taken the wrong way.
Finally, we need to take into account the stresses of real life. These days, we tend to lead less social lives. We work longer hours in incredibly stressful jobs where we cannot always say what we want to due to the repercussions.
So we need an outlet for our frustration.
Each of us responds in a different way. For some, it may be going for a run, whereas others may blast away their stresses on the latest first-person shooter video game.
But some people haven’t found a healthy outlet for their frustration, and the release of their anger occurs in online conversations.
With photography, every discussion tends to have two opposite viewpoints. And so, depending on the way your brain is wired, you may struggle to see other community members’ points of view.
Let me explain what I mean in the next section:
The horizon is crooked. What a joke! Idiot!
Two schools of thought: technical and artistic
Have you ever seen someone from an arts background make conversation with someone from an academic background?
It’s usually very awkward, and both individuals will struggle to find some common ground.
Because while artists tend to deal with unquantifiable factors such as feeling and emotion, academics prefer to work with facts and theory.
Photography, however, is the point at which science and art meet. This brings in two distinct schools of thought – which tend to be polar opposites of each other.
Those who prefer the academic side of photography enjoy technical perfection. The fact that engineers made sensors with the ability to capture so much detail and lenses that are so amazingly sharp is fascinating to them. They look at composition based on mathematical formulae, and past this, they may struggle to make sense of their art.
On the other hand, there are artistic photographers. Those who like lenses that have character, those who do not mind blur in photographs. Those for whom the feeling and the moment are the keys to the perfect photograph, not how sharp it is or whether it follows the golden ratio.
These photographers feel the confines of technology should not stop them from capturing the perfect moment.
Who is right in this argument depends on where you sit on the scale. Without getting too psychological about it, people generally fall into one of two character types: academic or creative. This is due to the makeup of each person’s brain and goes some way toward explaining these differing schools of thought and why people don’t see eye to eye.
In other words:
People are approaching the same problem from different angles.
But this doesn’t explain why there can be so many arguments about photography brands. For this, we need to look at sports teams and the problems of tribalism.
What the hell is this?! Are you trying to be Banksy or something?
Tribalism
Tribalism is clearly present in sports. But is it also rife in photography?
As photographers, we tend to find a brand that we like, and we stick with it. If the company (and their marketing team) do their job properly, we become loyal to that brand.
Now, we invest a lot in photography from an emotional standpoint. We all know that feeling when you get a shot that turns out better than you expected. It releases the same chemicals in the brain as when your favorite sports team scores.
And the camera you used to take the photograph becomes your team. Your investment in the camera (both emotionally and financially) means it plays a part in your victories.
Ultimately, your camera brand becomes part of your photography and therefore part of you.
They should have called it the H5 for “hot.” Canon sucks!
Over time, this can lead to tribalism. You love your brand, your brand has helped you in many photographic victories, and in many cases, it has been with you since your youth. So hearing someone talk badly about the brand you shoot with becomes associated with them talking badly about you. You feel the need to defend yourself and your team.
We also tend to surround ourselves with people who love the same brands that we do, which reinforces our opinions. Canon users frequent Canon groups, where Canon is the best and everyone else sucks. The same with Sony, with Nikon, and with every brand. This leads to our opinions becoming reinforced by those we surround ourselves with, cementing the inevitable tribalism.
No brand seems to personify this tribalism more than Sony. If Sony were a football team (or soccer, depending on where you’re from), it would be Manchester United – a team with incredibly adoring fans, but that is also despised by many others.
I have wasted too much of my life reading comment sections of Sony releases (and every brand!) that erupt into arguments about how much Sony rules or Sony sucks. Each time fans attack, then defend their side until the final whistle.
However, unlike sports, these arguments always end in a draw. Nobody wins, nobody loses. It just creates a deeper rivalry between those on either side of the argument and increases tensions for the next meeting.
Also, when you’ve invested thousands into a system, you don’t want to feel like you’ve made the wrong decision. You need to be secure in the knowledge that you have made the right choice, which leads nicely to my next point:
Do Sony users have their own chant yet?
Insecurity
It’s scary to put something that you are so passionate about out into the world.
Sharing a photograph you are proud of is like putting a part of yourself out there for people to talk about. And to have people pick your photo apart can be soul-destroying. It can feel like people are saying that they don’t like you.
How people deal with this critique differs. Some people get depressed and withdraw. Others don’t take criticism very well and lash out toward those giving the critique. It depends on the person, their mood, and a multitude of factors that, quite frankly, are none of anyone else’s business.
A photo similar to yours getting more likes doesn’t mean anything. Unfortunately, thanks to social media, we are now conditioned to associate likes with validation.
Personally, I feel this is shallow, meaningless, and only serves to stroke the ego rather than nourish the soul. However, some see likes and positive comments as the holy grail of photography. It all comes back to our cultural values and our personal belief system.
Art is subjective by nature; remember, we are allowed to have different opinions. It’s not a bad thing to disagree with other people, but it is important that you respect other opinions. It is okay to agree to disagree.
And always try to remember:
Different is good.
Otherwise, there would only be one camera brand, one style of photography, one editing style. It’s also fine to be passionate and argue your case, but always keep it civil. Your bad day, boredom, and whatever else you have going on have nothing to do with your “opponent” or their creativity.
Remember that ripping something to pieces just to make yourself feel better is a pretty lousy way to interact with other people.
Which brings me to my final point:
It’s just a nice-colored leaf. It sucks, right? I mean, how many leaf photos does one article need?
Some people are simply not very nice
All groups have people that are amazing, kind, and like helping others out.
Unfortunately, all groups also contain people who are simply not nice.
And these are the ones who make the online photography community toxic.
There is nothing much you can do about it, apart from blocking those who you simply cannot agree with and trying not to let them bother you. Life is too short.
For some, going online to try and get a reaction from people is almost like a sport. And what better place to spark a reaction than a creative space where people are giving something of themselves?
A seagull! Jeez, you can’t even find a rare bird of prey to photograph. Give up as a bird photographer!
What’s it like having to moderate all of this?
While websites and forums may seem full of hate, remember that there are moderators behind these pages trying their hardest to make people’s experience the best it can be.
I caught up with Simon, who moderates the Digital Photography School Facebook page and works with other camera companies’ social media, to see what it is like trying to keep a photography community a nice place for users to interact.
Here’s our exchange:
Can you describe your job and how it works?
I’ve been a social media/community manager for about 12 years now – 10 full time, and part-time for the two prior. I manage all aspects of social media, from content creation to community management to customer support.
Have things gotten better or worse over that time?
When Digital Photography School was in its infancy, I was working in the VBulletin forums that we had back then. I don’t think things have become particularly worse or better. I think, ever since people had a platform where they could speak their mind with little (to them) consequence, we’ve seen people talking without thinking.
How much toxicity do you deal with on a day-to-day basis in your work?
I see negativity on many levels every day: commentary on politics and religion, right through to “your horizon is crooked, are you stupid?” The sad part of what I see is that, with minor wording changes in the photography space, I think there’s potential for a lot less online anger and toxicity. From “Your horizon’s crooked, idiot!” to “I wonder how this photo would look if you straightened up that horizon?”
What is the most common thing that sparks arguments/toxicity in your experience?
In my opinion, insensitivity is what sparks most negative sentiment online. From insulting someone’s photography skills to insulting their way of life, we never can know what someone’s going through on the other end of that interaction; someone has a bad day and takes a comment badly, and up and up it goes until someone’s very upset. I see it daily.
Do you feel that photography is better or worse than other communities for this type of behavior?
I feel like photography is similar to any other, but I’ve always asked myself why. (I mean, I feel like I know the answer! We are making our vision come to life through photography, and when someone leaves an insensitive comment, we respond passionately…)
As someone who sees the worst of the photography community, does it depress you how bad it has become? Do you tend to avoid parts of the community due to this?
It does depress me. Obviously, it’s a little different for me than I guess most people, as it’s my job to wade into those conversations where it has an impact on a community that I manage or a brand that I manage, so I can’t avoid it. If I were a reader or contributor in one of our groups or on the blog, after seeing the conversations that I have seen spiral out of control so many times, I’d teach myself to have patience with people and to skip through threads that made me angry or sad; life is too short for that stuff!
What one thing would you ask of dPS readers when they are posting comments that could be considered obnoxious/rude/toxic?
I don’t want to ever control people’s commentary on a topic; sometimes I need to close and remove threads or give people little “timeouts.” But I’d ask that, if they were replying to something that made them angry, to maybe take a minute and think through what is happening in that thread; find a different way to respond. Don’t use incendiary phrases like “You’re an idiot!” It never achieves anything. Be kind.
You didn’t use a tripod for a long exposure?! How can you call yourself a photographer?
How can we do better?
To conclude, I wanted to find a way to try and help the photography community. After many hours of thought, I came up with four simple words you should think about before you post to a website. They are as follows:
Don’t be a jerk!
I hope that helps.
Now over to you:
How do you feel about the photography community? Do you think that things are pretty toxic? How does that make you feel, and what can be done to make things better? Share your thoughts in the comments below!
The post Is the Online Photography Community Toxic? appeared first on Digital Photography School. It was authored by Carl Spring.
The post 20 Dos and Don’ts for Shooting the Moon appeared first on Digital Photography School. It was authored by Bruce Wunderlich.
If you’ve ever tried shooting the moon, you’ve probably discovered that it’s actually a pretty tricky subject!
But don’t worry; there are some tips and techniques you can use to quickly improve your moon photography.
In this article, let’s look at some dos and don’ts to take your moon images from snapshots to stunning art.
The April moon, called the “Pink Moon,” rising over Marietta, Ohio. The setting sun lit the city with a warm glow.
1. Do use a tripod
One of the most important pieces of equipment for shooting the moon is a good tripod.
Since the moon is so small, it is very important to have a sturdy foundation, because even the most minute movement of the camera will cause your image to blur.
You might think that, if you use a fast-enough shutter speed, you can handhold the camera. But since your subject is so small in the frame, even small movements will be exaggerated.
2. Don’t use a slow shutter speed
While it’s a good idea to use a tripod, you must avoid using a slow shutter speed.
Why?
Because the moon is actually moving very quickly around the earth. The moon is so distant, it doesn’t appear to be traveling very fast. But if you let your shutter speed relax too much, you’ll end up with all sorts of unwanted motion blur.
A good rule of thumb for tack-sharp moon photography is to shoot at 1/125s or faster.
3. Do use a telephoto lens
To successfully capture any kind of detail on the moon, you need at least a 300mm telephoto lens.
If you want the moon to take up the entire frame, you will need around an 800mm lens.
4. Don’t use any filters on your lens
To prevent any chance of a blurry image, don’t use any filters.
Yes, even remove the UV filter. This may sound scary if you never remove the UV filter from your lens, but in this case, it’s best to set it aside.
Some may suggest using a neutral density (ND) filter for moon photography to cut back on the bright light of the moon. But all this will do is require a slower shutter speed, and you want to use the fastest shutter speed possible to get that crisp, tack-sharp image.
5. Do try the Looney 11 Rule
The Looney 11 Rule is similar to the Sunny 16 Rule. It’s designed to help you exposure properly when shooting the moon, while also ensuring you get a fast-enough shutter speed for sharp shots.
Here’s how it works:
Set your f-stop to f/11.
Then match the shutter speed to your ISO.
For example, if your ISO is set at 200, set your shutter speed to 1/200s.
(This is not an exact science, but it should give you a good starting point.)
6. Don’t use the shutter button to start your exposure
Do not manually press the shutter button or even touch your tripod when initiating your moon shot.
Remember that even the slightest touch could add enough vibration to blur the image.
Instead, use a cable release or remote trigger to start your exposure. If you don’t have either of these gadgets, use the self-timer feature on your camera.
7. Do use mirror lock-up
If you’re working with a DSLR and it has the option, lock up your mirror. This can greatly increase your chances of getting a tack-sharp moon image.
You see, even the slightest shake of your camera’s mirror can be enough to blur the shot. So if your camera has this option, use it!
Lock the mirror up and wait a few seconds to allow any vibrations to settle before beginning your exposure.
(If your camera doesn’t have a mirror lock-up option, you can always shoot in Live View, which will have the same effect!)
8. Don’t use image stabilization
Your lens’s (and camera’s) image stabilization technology must be turned off as soon as you put your camera on a tripod.
Turning on an image stabilization feature with your camera mounted on a tripod will actually create blur in your image!
9. Do know the cycles of the moon
Use The Photographer’s Ephemeris app to predict the location of the moonrise.
There are 29.5 days between full moons.
And by learning when the full moon will come, you can ensure you get the best-looking moon in your shots!
There are many online and smartphone applications that can help you track the phases of the moon. One must-have app is The Photographer’s Ephemeris, which will give you the phases of the moon, and also show you when and where the moon will appear in the sky.
This is especially useful when planning your moon shoots. The full moon is very popular and photogenic, but it’s also the brightest and the most difficult to expose correctly.
The side lighting of a gibbous moon produces some interesting shadows which may allow you to capture craters and mountains. The crescent moon is, of course, the darkest stage, but one that may offer some interesting effects when added to a nighttime landscape.
10. Don’t always place the moon in the center of the frame
Putting the moon in the center of the frame – especially if there’s nothing else in the shot – is boring.
It’s been done a million times before. So try to put the moon off-center.
Oh, and make sure to include other interesting objects in the frame!
That’s how you’ll end up with a truly impressive moon photo.
Don’t just place the moon in an empty sky. Including a foreground object will create a more dramatic image.
11. Do switch to manual focus
There are a couple of different methods you can use to focus on the moon.
First, try using your camera’s autofocus to make the moon tack sharp. Then, once you have a desirable point of focus, turn off the autofocus and switch to manual focus.
Alternatively, you can start by setting your lens to manual focus. With your camera’s Live View feature turned on, zoom in on the moon and turn the manual focus ring until the moon becomes sharp. Then do not touch the ring again.
12. Don’t just shoot the moon at night
The best time to photograph the moon is just after it rises or just before it sets, when it’s low in the sky.
Why is this important?
For one, when the moon is near the horizon, it will appear larger in your images (due to a trick of the eye).
Also, as the full moon rises, the sun will be setting, and as the full moon sets, the sun will be rising. This can give you great lighting to accentuate foreground objects.
Note that shooting the moon in the daytime (e.g., in the late afternoon) will give you the opportunity to include foreground objects, and you may also be able to capture some craters on the moon’s surface.
The June full moon, called the “Honey Moon,” captured as it sets at sunrise.
13. Do use exposure bracketing
Once you have found an exposure that you’re happy with, it’s best to bracket around that setting.
You see, the view of your images in the dark, on the back of your camera, can often be deceiving. In the dark, images always appear brighter on the camera LCD than they are when opened on your computer.
So after you’re satisfied with the exposure you have dialed in, bracket two stops under and two stops over, just to ensure that you get a result you’ll be happy with later.
14. Don’t use Auto White Balance
Using Auto White Balance will give you very inconsistent results.
Instead, I recommend you try the daylight white balance preset. And if you’re looking for a different effect, try the tungsten or cloudy presets.
Don’t be afraid to experiment.
And remember:
If you are shooting in RAW, you can change the white balance in post-production.
15. Don’t depend on your meter
In general, your camera’s light meter will be fooled by the amount of light reflecting off the moon.
So make sure you constantly check your LCD and histogram to ensure you’ve nailed the exposure.
Also, it is important to note that, as the moon rises, the exposure will change. The moon gets brighter as it rises, so you’ll need to keep adjusting your shutter speed to compensate.
16. Do shoot the moon in RAW
Shooting in RAW will allow you to capture more details of the moon’s surface, and also give you more latitude for adjustments in Lightroom and Photoshop.
So, unless you are not at all comfortable with using camera RAW software, always shoot the moon in RAW.
17. Don’t be afraid to crop your images
Unless you are shooting with a very large telephoto lens, you will want to crop your image to display the moon at a decent size.
But remember:
The more you crop, the more you reduce your ability to print at a high resolution.
18. Do tweak and sharpen
Most moon photography is going to require some post-processing in Photoshop or other photo editing software. Adding clarity and contrast will help bring out details, and this will enhance the craters and mountains of the moon.
As mentioned above, the white balance and exposure may also be adjusted to achieve a nice result, as both are somewhat difficult to perfect in-camera.
19. Don’t be afraid to get creative
Here’s the truth:
Most great moon photography has been manipulated in post-production, because of the difficulty of capturing a great moon shot in one image.
So don’t be afraid to get creative.
For instance, you might create a composite, as I did for this image:
Be creative! I combined two images to make this composite.
A popular method used by many photographers is to combine two exposures: one set to bring out the best of the foreground landscape, and a second exposed for the moon.
When combining these two images, try enlarging the moon slightly to achieve a more dramatic effect, but don’t overdo it to the point that it looks fake. The moon needs to look believable, unless you are going for a science fiction effect (which isn’t always a bad idea, creatively speaking!).
Two exposures were combined to make this final image. One image was exposed for the landscape and the other for the moon. The moon was enlarged slightly for dramatic effect.
20. Do practice, practice, practice
You now know everything you need to get started with moon photography.
So get out there and shoot the moon!
Remember that moon photography is not as easy as it looks, so if your first results are not as dramatic as you expected, then keep trying!
Now I’d like to see some of your moon images! Please share any moon shots in the comments below.
The post 20 Dos and Don’ts for Shooting the Moon appeared first on Digital Photography School. It was authored by Bruce Wunderlich.


You must be logged in to post a comment.