The post Sigma Announces the 28-70mm f/2.8 – Small, Light, and Well-Priced appeared first on Digital Photography School. It was authored by Jaymes Dempsey.
Earlier this week, Sigma announced its upcoming lens:
The 28-70mm f/2.8 DG DN Contemporary, designed for Sony E-mount and Leica L-mount, and billed as “the world’s smallest f/2.8 standard zoom for mirrorless systems.”
Sigma already sells a 24-70mm f/2.8 ART lens, but the new 28-70mm features a few key improvements, including the smaller size, plus a near-50% weight reduction for an impressively portable package.
Unlike most f/2.8 zooms, the Sigma 28-70mm is ideal for travel photography, street photography, and even casual walkaround photography. I’m not sure I’d label it as truly compact, but it’s certainly small for an f/2.8 zoom, and will appeal to plenty of on-the-go photographers who require both low-light capabilities and flexibility.
If you’ve previously found yourself frustrated by the mirrorless, big-lens-on-a-small-body problem, the 28-70mm may be exactly what you need. Take a look at the lens mounted on a mirrorless body:
The setup looks comfortable, well-balanced, and just all-around nice to use.
Compared to most standard f/2.8 zooms, you do lose a few millimeters on the wide end. Is that a problem? That depends on your shooting style, because the difference between 24mm and 28mm isn’t trivial – you’ll lose out on the opportunity to get that sweeping wide-angle look – but assuming you don’t plan to use the 28-70mm for frequent landscape or architecture shooting, you should be fine.
Sigma claims “superb build quality,” and from the pictures, I can certainly believe it. Check out the 28-70mm f/2.8 up close:
There’s just something about the modern Sigma design that screams quality, and – bonus! – the lens looks pretty darn sleek.
Of course, no great lens is complete without stellar optics, and the 28-70mm f/2.8’s sharpness remains to be seen. But Sigma is confident in the 28-70mm’s performance, stating that “this large-aperture standard zoom delivers outstanding image quality that rivals Art line lenses.”
If Sigma’s evaluation is accurate, then I can certainly see the 28-70 making its way into the bags of quite a few photographers – including the aforementioned travel photographers and street photographers, but also portrait photographers, event photographers, and even landscape photographers who don’t mind the limited focal length.
As for the price, it’s a very reasonable$ 899. That’s cheaper than the Sigma 24-70mm f/2.8 and the Tamron 24-70mm f/2.8 (plus there’s the Nikon and Canon versions for mirrorless, but those are unmentionably expensive).
So if you’re a Sony mirrorless or L-mount shooter and you’re after a compact f/2.8 zoom that won’t put a huge dent in your wallet, the Sigma 28-70mm f/2.8 is certainly worth a look.
It’ll begin shipping on March 12th, but you can currently preorder the Sony version here and the L-mount version here.
Now over to you:
What do you think of this new lens from Sigma? Is it one you’ll consider purchasing? Share your thoughts in the comments below!
The post Sigma Announces the 28-70mm f/2.8 – Small, Light, and Well-Priced appeared first on Digital Photography School. It was authored by Jaymes Dempsey.
Earlier this week, Sony Nordic accidentally sent out a newsletter with details of the next firmware update for its a7S III mirrorless camera. Now, firmware version 2.00 for the a7S III is live and ready to download for all.
As mentioned in our initial coverage, firmware version 2.00 now includes Sony’s S-Cinetone color profile, first seen in its F6X Cinema Line camera and ‘inspired by the color science used in Sony’s flagship VENICE cinema camera.’
The color profile, which Sony says ‘delivers natural mid-tones, plus soft colors and gorgeous highlights’ can be used for monitoring only or as a ‘baked-in’ look so the footage is graded for less work in post-production. The update also improves Active Mode with 5-axis optical in-body image stabilization.
You can download firmware version 2.00 for the Sony a7S III on Sony’s support website. Sony notes macOS Big Sur is not supported at this time.
The post 12 Tips for Beautiful Long Exposure Night Photography appeared first on Digital Photography School. It was authored by Matt Murray.
Long exposure night photography can seem tough.
But it doesn’t have to be.
Because there are a few simple tricks you can use…
…that’ll ensure you get great long exposures, consistently.
And that’s what this article is all about. I’m going to give you 12 easy tips for long exposure night photos. Specifically, I’ll tell you:
Every piece of gear you need for pro-level night photography
The simple secrets for keeping your long exposure shots sharp
The best time of day to capture long exposure night photos (hint: It’s not at all what you’d expect!)
Plus a whole lot more.
Are you’re ready to become a master of long exposure night photography?
Let’s get started.
1. Scout your location ahead of time
Most photographers think that scouting is overkill.
But here’s the thing:
Knowing where the best locations are for night photography ahead of time can pay huge dividends.
It means you won’t have to work out where to set up when you arrive.
(And setting up is very stressful if you can’t find a spot and the sun is sinking rapidly!)
If you can, scout your location at the same time of day you plan on shooting. This will give you a good idea of what lighting to expect.
Have a good look around the area. And ask yourself:
Will there be any trees or obstacles blocking my view? Are there any lights in the vicinity – such as streetlights or floodlights – that will affect my images?
When choosing your location, also look for sources of movement, including:
Crowds of people
Cars that create dramatic light trails
Boats skimming across the water
Why?
Because movement is great for long exposure photos!
In this photo of the Royal Queensland Show, both lights and people are creating a sense of movement.
If you’re not able to scout a location beforehand, consider your options.
For instance, you can turn up an hour or two before sunset to find the best location.
Or you can research the location by looking through social media. This will give you ideas for potential locations – including what they look like at night.
To learn more about the virtual scouting process, check out this article: Top Tips for Photographing the Best a City has to Offer in 48 Hours.
2. Consider taking multiple shots
Once you’ve determined your shooting location, here’s what to think about next:
Whether you will move your camera and tripod around on the shoot (changing locations, capturing different compositions, and/or using different focal lengths), or whether you will take a series of images that are exactly the same (perhaps for blending in Photoshop).
If you’ve decided on the latter, it can be worth taking a second camera and tripod with you; that way, you can take additional shots and make the most of your trip.
3. Use a checklist to pack your gear
Night photography requires a lot of equipment.
So before you go out to shoot, I highly recommend you create a checklist for packing your kit.
This is a great memory aid and will ensure that you don’t forget anything. Here are some of the things I have on my gear checklist:
Cameras and lenses
Fully-charged camera battery. If you’re capturing multiple images of the same scene to blend in Photoshop, you will have a very hard time lining them all up later on if you have to move your camera to change batteries.
Spare batteries
One or two tripods
Tripod base plates (these small rectangular bits of kit can be the difference between a successful shoot and a disaster!)
SD cards. Make sure you have a formatted card in your camera ready to go, as well as spares.
Water and snacks
Wireless headphones. Often, I’ll be in the same location taking images for several hours. If there’s not a fellow photographer to chat with, I listen to podcasts or music.
4. Set up early and be mindful of others
Try to arrive early so you can set up and be prepared at your preferred location.
When you set up your camera and tripod, be mindful of pedestrians, cyclists, and traffic in the area. Don’t place your gear where it will obstruct paths or where people could trip over it.
Always make sure your gear is not in the way of others during a night shoot in a busy area.
5. Shoot during blue hour for the best skies
If you want to create the most striking long exposure night photography, then I highly recommend you shoot during blue hour.
Specifically, start capturing images as the sun is setting, and keep photographing until all the color has drained from the sky.
That’s how you’ll get images with drama, like the one below:
The best time to take night photos is when there is still color in the sky!
6. Use a tripod
You must use a tripod for sharp long exposure night photography.
Otherwise, your photos will be full of blur.
I bought a Manfrotto tripod in 2005, and it’s still going strong! I also have a smaller, lighter MeFoto tripod for travel.
Owning several tripod quick release plates is also a good idea. That way, you can detach your camera from the tripod whenever you need (and stick it back on quickly, as well!).
A good-quality tripod is a solid investment for long exposure night photographers.
7. Turn on your camera’s electronic level
Most cameras have a built-in guide or electronic level.
If your camera has one, then turn it on.
Why is an electronic level useful?
It’ll let you know if your camera is crooked, just like an old-fashioned spirit level. And you can adjust your camera so that every single image comes back straight.
(On my Fujifilm X cameras, this is a horizontal line across the screen that turns green when the camera is level.)
Of course, you can always straighten the horizon in a program such as Lightroom or Photoshop.
But this can get annoying, especially if it’s a frequent problem.
So find the electronic level, and make sure it’s active before you start shooting.
8. Use a remote release
When taking long exposures, you must minimize any movement of the camera during an exposure.
Which means that you cannot press the shutter button.
Why?
No matter how careful you are, when you tap the shutter, you may create camera shake. And end up with blurry images.
One way to avoid camera shake is to use a remote release. These are small accessories that plug into a socket on the side of your camera, allowing you to trigger the shutter without pressing the shutter button.
Many camera companies also have a smartphone app you can use to activate the shutter of your camera.
You can trigger many cameras via an app.
9. Use the self-timer feature
Here’s a second way for you to minimize camera movement during an exposure:
Use your camera’s self-timer feature. I actually prefer this method of hitting the shutter button for two reasons:
I usually take two cameras on shoots, so using a smartphone app is not an option since it can only connect to one camera at a time.
The two cameras I take use different types of remote releases, and I’d rather not have to remember to bring both of those accessories.
Instead, I recommend you set up a two-second self-timer delay in advance. That way, you can hit the shutter button, wait for any vibrations to fade, then get a tack-sharp shot.
(Just remember to deactivate the self-timer feature after the shoot is over!)
The self-timer feature is a great way to minimize camera shake.
10. Try interval shooting for great results
Do you want to capture the beauty of a scene over a long period of time?
Try interval shooting.
With interval shooting, you can fire off photos with a set time interval (so you capture one photo every two minutes, for example).
I set my camera to take a photo every two minutes during the early part of my shoots, then – when the light starts to get interesting and the city lights come on – I set my camera to take a photo ever 20 or 30 seconds.
You can also set this feature to stop after a certain number of exposures.
Handy, right?
Interval shooting essentially sets your camera on autopilot, leaving you free to take images with a second camera.
Just be careful not to bump or move your main camera when adjusting settings during your shoot.
11. Turn off image stabilization
If you want sharp long exposure photos, you must turn off camera and lens image stabilization.
Now, you’re probably thinking:
What? Image stabilization makes photos sharper, not blurry!
And you’re right…
…mostly.
But remember:
You should always use a tripod for long exposure night photography.
And when image stabilization meets a tripod, it causes problems. You see, your tripod should be completely still, yet your image stabilization technology will often move your camera and/or lens slightly – resulting in unwanted blur.
Some newer lenses can sense when a camera is mounted on a tripod and turn off image stabilization automatically.
But I recommend you check, just to be sure.
12. Always stay safe!
This is of paramount importance when taking photos at night.
Always be aware of your surroundings and pay attention to who is nearby. I usually have my bag zipped up and next to me at all times.
Often, I put one of my bag straps around my leg so no one can try to run off with my kit.
And while I take wireless headphones, I would only ever use them in busy locations where I feel safe.
Always be aware of your surroundings when shooting in remote places or late at night.
Long exposure night photography: Final words
I hope you’ve enjoyed this guide to long exposure night photography.
While shooting at night may seem difficult, with some extra thought and planning, you’ll capture some stunning images!
Of course, the best way to improve your photography is to get out there and practice as much as you can.
Now over to you:
Which of these long exposure night photography tips is your favorite? Which one do you plan to use the next time you’re out shooting? Let me know in the comments below!
The post 12 Tips for Beautiful Long Exposure Night Photography appeared first on Digital Photography School. It was authored by Matt Murray.
With all the recent excitement surrounding NASA’s Perseverance rover landing on Mars and new images, we’ve got space on the brain. This month, NASA published a beautiful image of the gas giant Jupiter that its Juno spacecraft captured in late 2020.
NASA’s Juno spacecraft has been orbiting Jupiter since July 5, 2016. The spacecraft was launched from Cape Canaveral Air Force Station on August 5, 2011. The latest image, seen below, was captured on December 30, 2020, during Juno’s 31st close flyby of Jupiter.
‘Citizen scientist Tanya Oleksuik created this color-enhanced image using data from the JunoCam camera…At the time, the spacecraft was about 31,000 mi (about 50,000 km) from the planet’s cloud tops, at a latitude of about 50° South.’ Image credit: NASA/JPL-Caltech/SwRI/MSSS. Click to enlarge.
This excellent shot shows Jupiter’s turbulent atmosphere and includes several of Jupiter’s southern jet streams. Jupiter’s famous Great Red Spot is visible on the horizon as well. With the aid of imagery and the numerous scientific instruments onboard Juno, scientists discovered that the planet’s atmospheric jet streams extend further than previously thought. Recent evidence shows that the jet streams and belts penetrate up to 1,800 mi (3,000 km) down into the planet.
JunoCam (JCM) is a visible-light camera/telescope. Malin Space Science Systems built the camera. It has a field of view of 58° and includes four filters, three of which are used for visible light photography. The camera is fixed to Juno, so it gets one chance for observation when Juno orbits Jupiter. JCM uses a Kodak image sensor, the Kodak KAI-2020, and records 1,600 x 1,200 pixel images, which is fewer than 2MP. Due to the incredible distance of Juno from Earth, which is more than 550 million miles, only limited data can be transmitted from Juno to Earth during each 11-day orbital cycle.
Image credit: NASA. Click to enlarge.
Citizens are encouraged to download and process JunoCam images. Raw images are available to view and download here. If you’d like to learn more about NASA Citizen Science projects, visit the dedicated Citizen Science website.
Artist concept of Juno. Credits: NASA/JPL-Caltech
The Juno mission’s primary objective is to improve our understanding of Jupiter’s origin and evolution. Juno and its onboard instruments are used to determine how much water is in Jupiter’s atmosphere, analyze the planet’s atmosphere, map magnetic and gravity fields, explore the planet’s magnetosphere, and more. As of now, the Juno mission is due to end in September 2025, so there’ll be plenty of more images to come in the next few years. You can learn more about Juno here.
The post How to Remove Wrinkles From Clothes in Photoshop (Fast and Effectively) appeared first on Digital Photography School. It was authored by Ana Mireles.
Did you know that you can easily remove wrinkles from clothes in Photoshop?
Wrinkled clothing is one of those details that gets easily overlooked. You just don’t notice them until you get back home, open your image, and see a big, ugly wrinkle ruining your photo.
Fortunately, there are several simple ways to get rid of those wrinkles and keep clothing looking as good as new!
And in this article, I’ll show you the techniques for quick and easy wrinkle removal.
Let’s get started.
Why do you need to remove wrinkles from clothes in Photoshop?
Wrinkles are distracting.
In fact, most people underestimate how eye-catching wrinkles can be.
And if you’re after a great image, then everything in the shot needs to work together and guide the viewer’s eye toward key compositional elements.
That’s why wrinkles can have such a negative impact. Viewers will get fixated on the flaw instead of considering what they love about your photo.
And if you plan on doing professional portraiture, you must get wrinkles under control.
Because here’s the truth:
Often, the difference between a professional photo and one taken by a beginner is merely attention to detail.
(Detail such as wrinkles!)
Removing wrinkles from clothes in Photoshop: The basics
There are many tools you can use to easily remove wrinkles from clothes in Photoshop.
But the most popular options are the healing tools.
Now, there are three healing tools in Photoshop: the Healing Brush tool, the Spot Healing Brush tool, and the Patch tool. Each of these can be used to “iron” your clothes and remove wrinkles in Photoshop.
When you heal an image, Photoshop samples pixels from the area’s surroundings and then matches the texture and lighting to the pixels being healed. That way, the retouch blends with nearby elements.
Now, the Spot Healing Brush will automatically determine the best pixels to sample, so all you have to do is set the size and hardness of the brush and paint over the wrinkle. Photoshop takes care of the rest.
Note that the Mode menu (in the top bar) allows you to choose the Spot Healing Brush painting mode. For removing wrinkles in clothes, the best option here is Replace. You see, fabric always has texture, and the Replace mode allows you to preserve this even as you heal away wrinkles.
You can then choose the Healing Type. You have three options: Content-Aware, Create Texture, and Proximity Match.
There’s no single “best” pick; instead, just experiment to see which one works best for your photo. In the example above, I found that Content-Aware gave the best results.
The Healing Brush tool works the same way, except that you choose the pixels you want to sample. Simply hold the Alt/Option key and click on the area from which you want to sample, then release the Alt/Option key and click on the pixels you want to heal.
Finally, the Patch tool lets you draw a selection around the area that you want to heal, then drag it toward the pixels that you want to source.
The Patch tool will allow you to work faster, as you can cover large areas with each retouch. Don’t overdo it, though. If the area is too big, the Patch tool won’t do a great job – so you need to find the right balance.
You can also move the Diffusion slider to adjust the blending speed and quality. Use lower values for pixels that have a lot of detail and higher values for smoother areas.
Challenges when removing clothing wrinkles
When you are removing a single, isolated wrinkle, things are not very complicated. However, when there are many wrinkles or you have large areas to cover, you can run into trouble.
Some of the most common issues when using any of the healing tools – as well as the Clone Stamp tool – are the accidental patterns you can create.
To avoid this, adjust the size and hardness of your brush. Also, change the source point and distance to avoid any recognizable repetitions. Finally, vary the blend mode and the opacity.
Keep in mind that, while you don’t want to create accidental patterns, you do need to follow the patterns of the fabric’s design and texture.
That’s the challenge.
Another difficulty is maintaining luminosity. Always clone or heal from places where the brightness appears to match the surroundings, though this doesn’t necessarily mean you should source pixels from right next to your wrinkle.
Otherwise, while you might not notice your heal on the first brushstroke, you will after a handful of strokes.
So when you have to work with big areas, it’s better to use an advanced technique (which I explain in the next section).
An advanced technique for removing wrinkles from clothes in Photoshop: Frequency separation
Frequency separation is a popular, high-level technique for retouching skin blemishes.
But it’s also fantastic for getting rid of wrinkles in fabric.
The basic idea is that you separate the texture and the color into two different layers.
To do this, create two copies of the original layer.
Then hide the top copy by clicking on the eye icon next to it.
Select the middle layer (i.e., the layer sandwiched between the top copy and the original). If you want, you can rename it Color.
Select Filter>Blur>Gaussian Blur. Drag the slider until you don’t see the details of the fabric.
Now enable the top layer again and select it. You can rename this one Texture.
Select Image>Apply Image.
In the dialog box, choose the layer called Color. Then select Subtract as the blending mode.
Finally, set the Opacity to 100%, the Scale to 2, and the Offset to 128. Then click OK.
Now head to the Layers panel. Make sure the Texture layer is selected, then set the blend mode to Linear Light.
And that’s the basics of frequency separation – now your photo is divided up into Texture and Color layers. And you can heal each layer separately!
Also, if you feel that the subject is too flat after applying this frequency separation technique, you can dodge and burn to bring back some dimensionality.
How to remove wrinkles from clothing in Photoshop: Conclusion
You should now be able to confidently remove wrinkles of any type – with just a few quick edits in Photoshop.
In fact, I used very extreme examples for this article, and it’s unlikely you’ll face wrinkles that serious unless you don’t iron anything at all.
(In fact, I recommend you or your client/model do a bit of ironing before a photoshoot, just to save time in editing later.)
I hope that, the next time you need to remove wrinkles from clothes in Photoshop, these techniques can be of help!
Now over to you:
Have you ever been faced with frustrating wrinkles in your photos? How did you get rid of them? Share your thoughts and images in the comments below!
The post How to Remove Wrinkles From Clothes in Photoshop (Fast and Effectively) appeared first on Digital Photography School. It was authored by Ana Mireles.
The post What’s the Best Aperture for Portraits? appeared first on Digital Photography School. It was authored by Simon Ringsmuth.
Choosing the best aperture for portraits doesn’t have to be complicated…
…but there are some guidelines to follow if you want your shots to look stunning.
And in this article, I’m going to break it down for you. I’ll share with you my favorite apertures for different types of portraits – so that you can confidently pick the perfect aperture whenever you’re out shooting!
Why is aperture important in portrait photography?
Aperture matters for several reasons:
First, aperture is one of the three components of exposure. If you don’t get your aperture right, you might end up with a too-dark or too-light image.
And, because of its effect on exposure, your aperture limits your shutter speed and ISO.
The right aperture also puts your viewer’s attention squarely on your subject and regulates your depth of field to get just the right amount of background blur.
Now, the best portrait lenses have wide apertures of f/2.8 to f/1.2. With these lenses, you can capture photos in virtually any lighting condition, plus you can create dreamy bokeh behind your subject.
As you consider what aperture to use when shooting portraits, you also need to pay attention to the focal length of your lenses, as well as how close you’ll get to your subjects.
A wide aperture on a 35mm lens won’t blur the background as much as a wide aperture on an 85mm lens. Also, longer focal lengths require fast shutter speeds to reduce vibration, unless the lens or camera has built-in stabilization. Wide apertures can help get those fast shutter speeds without requiring a high ISO (and a high ISO might result in unwanted noise or grain).
The best aperture for individual portraits is f/2 to f/2.8. If you’re shooting two people, use f/4. For more than two people, shoot at f/5.6.
These aren’t the only apertures you can use, and there are certainly other elements to consider. But if you want great results, you can’t go wrong with these rules of thumb.
They’ll help ensure your portraits are sharp and your subjects are all in focus.
Apertures in portrait photography: A detailed breakdown
Unfortunately, there is no single best aperture for portraits. There are myriad factors that affect the final photo, so you’ll need to adjust your aperture depending on your subject.
Let’s take a closer look at some different shooting scenarios and the apertures I recommend:
The best aperture for individual portraits
While I stand by my earlier recommendation for an f/2 to f/2.8 aperture, you should consider those apertures as starting points, or as an insurance policy of sorts. Depth of field is so thin at wider apertures that it’s best to start a bit smaller than your lens’s maximum aperture value, simply to make sure your bases are covered.
After all, shooting at f/1.2 can keep a person’s eyelashes in focus while their iris ends up blurry!
Note that, when using a wider focal length, you can shoot at larger apertures, because the depth of field won’t be as shallow.
For example, if you use a 35mm prime lens, you can go all the way to f/1.8 or wider and keep plenty of your subject in focus.
One caveat: Some lenses, especially less-expensive zooms and even some primes, lose sharpness at maximum apertures. For that reason, I recommend shooting conservatively and not always going as wide as you can.
Of course, each lens is different, so test out different apertures and see what you’re comfortable with.
I like to take a two-pronged approach when shooting portraits.
First, I always use Aperture Priority mode paired with Auto ISO. This lets me specify the aperture while my camera takes care of the shutter speed and ISO.
Since the aperture is my primary consideration, I need to get that right. As long as my camera doesn’t drop below a certain shutter speed or go beyond a specific ISO value, I know my photos will be fine.
Second, I always start by taking several shots with a smaller aperture. It’s how I cover my bases; that way, I know I have at least some shots where everything is in focus and the depth of field isn’t too shallow.
Then, like stepping on the gas pedal of a sports car, I spin my camera dial and widen the aperture. This lets me turn my portraits up to 11, and clients love the results – but I know that, if my depth of field does turn out too shallow and something isn’t in focus, I can always rely on the narrow-aperture shots I started with.
Nikon D750 | Nikon 85mm f/1.8G | 1/180s | f/1.8 | ISO 250. I took lots of shots at f/2.8 and then went all the way to f/1.8, knowing I had a fallback plan if the wide-aperture photos didn’t turn out sharp. Fortunately, the f/1.8 shots were great!
The best aperture for small group photos
Selecting the right aperture for small groups depends on a number of factors.
Though you can’t go wrong with f/4, there are variables to consider that will help you get the best shots possible.
(One reason f/4 works well is that it gives you depth of field wiggle room while still producing great results.)
When photographing a single subject, it’s essential to get the eyes in focus, or at least the one eye that is closest to the camera.
But when working with small groups, you ideally want everyone’s eyes in focus. So the depth of field should be wider, which requires a smaller aperture.
Fortunately, when shooting groups, you’ll be positioned farther back from your subjects, and this will deepen the depth of field.
An f/4 aperture strikes a great balance between blurring the background, sharpening your subjects, and giving your clients frame-worthy photos.
Note that apertures wider than f/4 can work, but people must be aligned perfectly with one another; otherwise, there’s a good chance someone will be out of focus.
So apertures such as f/3.5 and f/2.8 tempt fate, and you might not realize it until it’s too late.
In fact, if your subjects are too far out of alignment, even f/4 won’t do the trick. Look at the photo below; the mother is holding her son on her lap, and his eyes are sharp while her head is blurry. She is only a few inches behind her son, and f/4 resulted in her being out of focus:
Nikon D750 | Nikon 85mm f/1.8 | 1/250s | f/4 | ISO 800. The mother’s eyes are just a bit blurry, which could have been fixed by using a smaller aperture of f/5.6.
Even though f/4 is my go-to aperture for small group photos, it’s a good idea to get shots at smaller apertures, as well. Otherwise, things can get so chaotic that you might not have time to check all your shots, and only after you load your images in Lightroom will you realize that you didn’t get everyone in focus.
This has happened to me more than I care to admit! For that reason, I recommend taking some pictures at f/5.6 even if you’re pretty sure you nailed the shot at f/4.
And by all means, go wider, too. Just be aware that, as the number of people increases, you are far less likely to get everyone in focus.
Nikon D750 | Nikon 85mm f/1.8 | 1/250s | f/3.3 | ISO 500. I opened up the aperture after getting several great shots at f/4, and I ended up with some beautiful images.
The best aperture for large group photos
The larger the group, the smaller the aperture, right?
Unfortunately, it’s not that simple. Smaller apertures mean less light enters the lens, so you have to use slower shutter speeds and/or higher ISO values.
Plus, shrinking the aperture keeps the background sharp – so you won’t get the creamy background that many clients love.
Therefore, f/5.6 is a great place to start when dealing with large groups.
There are exceptions to this guideline. You can use a wider aperture if you’re able to get everyone positioned (somewhat) in alignment.
Of course, this isn’t always possible, especially when kids are involved, since they tend to be somewhat less predictable. But if you have the option, it’s worth trying larger apertures.
That is, as long as you’ve already captured some small-aperture photos to make sure your bases are covered!
When doing large group shots, you are usually standing much farther away, so depth of field isn’t as much of an issue compared to single-person portraits.
You still have to be careful when using wide apertures, but sometimes you simply need to let in a lot of light and a wide aperture is the best option.
When shooting the image below, I was losing daylight as a light drizzle came on. I lined everyone up on my homemade photo benches and shot this picture at f/4.
After getting a couple of shots at f/4 and f/5.6, I went all the way down to f/2.8. The result is okay, but the adults in the back row are just a bit out of focus. The image isn’t worthy of printing; let it serve as a cautionary tale about the importance of using smaller apertures like f/5.6 for large groups.
Doing extreme close-up portraits, whether with macro lenses or close-up filters, can be exceedingly tricky.
Why?
Because the depth of field is incredibly thin. Wider apertures further increase this issue, so it’s best to shoot in well-lit conditions and use a small aperture like f/5.6.
Nikon D750 | Nikon 50mm f/1.8 with a close-up filter | 1/90s | f/5.6 | ISO 6400
Wide apertures can work fine when doing macro photography with still subjects, but people (especially young children) move around so much that it helps to have some depth of field breathing room.
Nikon D750 | Nikon 50mm f/1.8 with a close-up filter | 1/180s | f/5.6 | ISO 6400
The best aperture for portraits: Final words
Choosing the best aperture for portraits isn’t difficult, but it does take a bit of experience and practice.
I recommend starting with the advice I’ve laid out here, but don’t be afraid to tweak it to suit your own style.
For example, you can’t go wrong shooting single-person portraits at f/2.8 – but over time, you may decide you prefer going much wider.
Or perhaps your clients like the look of smaller apertures with more depth of field. The choice is yours, and as long as you like the results, then there’s no bad option!
A: Certainly! Many lenses have a maximum aperture of f/2.8 and this is a great middle ground for letting in enough light while still keeping the depth of field under control.
Q: I only have a kit lens. Can I use it for portraits?
A: Kit lenses work just fine for portraits, though they typically don’t have apertures that go as wide as prime lenses. I recommend zooming in as far as your kit lens will go and using your maximum aperture, even though it might only be f/5.6. This will blur the background as much as possible.
Q: Can I shoot large group portraits with very wide apertures?
A: Yes, but make sure everyone is lined up so your depth of field is under control. I shot this group photo at f/2, and it only worked because everyone was in a straight line:
Q: I want to use a very wide aperture in bright sunlight, but my photos always turn out overexposed. How can I prevent this?
A: You’ll either need a very fast shutter speed or an ND filter.
Q: Do I need to get an expensive f/1.4 lens to shoot portraits?
A: Absolutely not! F/1.8 prime lenses are outstanding for portraits and won’t break the bank. Canon and Nikon make affordable 50mm f/1.8 lenses, and many other manufacturers have relatively inexpensive options, as well. Don’t ever fall into the trap of thinking you have to spend thousands of dollars to get great portraits!
Q: My camera has a Portrait mode. Should I use that for portrait photography?
A: You can, though I recommend using Aperture Priority mode; it lets you select the exact aperture you want to use. Portrait mode tries to make decisions based on available light and can give you apertures that are wider or narrower than what you might want.
The post What’s the Best Aperture for Portraits? appeared first on Digital Photography School. It was authored by Simon Ringsmuth.
The post How to Take Creative Landscape Shots Using Intentional Camera Movement appeared first on Digital Photography School. It was authored by Richard Beech.
If you’re looking to capture some unique, creative photos, then I highly recommend trying out intentional camera movement photography.
Now, many photographic situations rely on ensuring your camera is still as possible during exposure for pin-sharp images. But is keeping your camera still always a good thing?
Instead, why not throw caution to the wind, move your camera while the shutter is open, and explore the range of creative opportunities this offers you as a photographer?
In this article, I’ll show you how to do exactly that!
What is intentional camera movement and why should you use it?
Intentional camera movement (or ICM for short) is a photographic technique where you move the camera as the image is taken.
One example of ICM is panning. The camera follows a moving subject in order to keep the subject sharp and the background blurred.
But while panning can get some great results, it’s actually a pretty tame form of ICM. Moving your camera during the exposure can open up many more creative options for you to try out.
In particular, intentional camera movement can be used to take some truly unique landscape shots. The technique can be exceptionally liberating, and by reducing the number of sharp details in a landscape, it allows you to concentrate on line, form, and color in your images.
In fact, with ICM, a scene that you may ordinarily consider too cluttered might just come to life – by letting you blend colors and shapes for an interesting abstract shot.
One of the reasons I have grown to love ICM is that it enables you to capture a landscape in a unique and personal way that cannot easily be reproduced. It can even breathe new life into overly familiar scenes, letting you see and capture something unique about a location you may have photographed many times before.
If you’re struggling to find inspiration for your next photographic project, or you want to get your creative juices flowing, intentional camera movement is a technique that you should try at least once.
In fact, it’s relatively easy to take some striking shots with ICM.
Plus, it can be a lot of fun!
So let’s take a look at how intentional camera movement photography actually works:
The best settings for intentional camera movement photography
A key factor to get right when using ICM is your shutter speed.
You see, the exposure needs to be long enough to capture significant motion blur (though different shutter speeds will give different effects).
In general, I recommend anything from 1/3s or 1/2s all the way down to multi-second exposures. Of course, you’re always free to experiment with faster or slower shutter speeds; the core of a creative technique like ICM is simply playing around.
Because of these lengthy shutter speeds, shooting in low-light conditions is ideal for ICM. During the daytime, it can be harder to achieve the required shutter speeds, even at your camera’s lowest ISO setting and your lens’s smallest aperture (i.e., highest f-stop number).
If you do decide to shoot in the day, you may need to use a polarizing filter, a neutral density (ND) filter, or a combination of both. Personally, I prefer to use a polarizing filter as a starting point, as this helps to boost colors and cut down on reflections and glare. I will then add a 2-stop or a 4-stop ND filter if the shutter speed needs to be slowed down any further.
When starting out with ICM, it can help to shoot in Shutter Priority mode. Set the shutter speed to around half a second to start, then turn the ISO to the lowest available setting on your camera.
Once you have practiced at this shutter speed, you can use longer exposure times thanks to a combination of low light and filters.
Make sure you focus manually in advance, and turn off the autofocus to prevent the camera from searching for focus during the long exposure.
Also, if you are using a lens that has image stabilization, remember to turn this off.
How to move your camera
Once you have taken control of the shutter speed, the next step is to determine how you’ll move the camera after pressing the shutter button.
Get creative; there are no rules! You can move the camera vertically, horizontally, or diagonally. You can move it fast or slow. Alternatively, you can rotate the camera 360 degrees to create a spiral effect, or change the focal length on a zoom lens during exposure to create a zoom effect.
With practice, you can combine two or more of these movements to create something truly unique. The look and feel of your final images will be determined by the speed, direction, and smoothness of your chosen movements.
Note that you can always use a tripod to control the camera movement. This will help you to capture a smoother result, which can be useful if you wish to retain a straight horizon line.
(Personally, I prefer to work handheld when moving the camera, as it offers greater flexibility and provides more opportunities to experiment with different movements.)
Bold movements can sometimes be more effective, as there is a risk that subtle movements may end up looking like camera shake in the final image.
So bear in mind:
While waving your camera around may not come naturally and may result in you getting some funny looks from amused onlookers, the end results will definitely be worth it!
What to shoot for the best results
Now that you know how to capture beautiful ICM photos, all that’s left is to pick your ICM subjects.
A good place to begin is by looking for locations that offer striking colors, lines, or patterns.
Forests are a favorite ICM subject of mine, particularly during the spring and autumn seasons. Clean, parallel lines provided by the trees, as well as the vibrant colors of nature (created by flowers in the spring and fallen leaves in autumn), lend themselves to a vertical camera movement shot. The movement can be from the top down or from the bottom up, and it can be fast or slow; it really just depends on the effect you wish to capture and how experimental you want to be.
Seascapes can be a good starting point for side-to-side camera movement, where you pan the camera in line with the horizon. Alternatively, in rougher waters, you can try to match the movement of your camera to the movement of the waves for an altogether different effect.
Shooting at sunrise or sunset can provide you with a greater variety of colors to work with, and shooting city lights after dark can also offer a wide range of creative options.
Once you’ve identified a suitable location, you will probably find yourself taking multiple shots with various different movements.
(I should warn you that intentional camera movement photography can sometimes be quite addictive, and you’ll often find your memory cards filling up quickly!)
You may find it useful to set your camera to shoot in burst mode so that you can take a series of shots in quick succession while moving the camera in a particular direction.
That way, you’ll end up with a lot of images to choose from – plus, every new shot will offer you a slightly different composition and effect!
A few intentional camera movement tips
As with any type of photography, images created using intentional camera movement are not going to be to everybody’s taste.
It’s a highly subjective art form, and what works for you will not work for others.
Also, keep in mind basic principles of photography, such as composition and exposure – these are still very important!
Also, while the ICM technique will give you a very abstract result, you may find it helpful to have at least one element of the scene sharp or recognizable in the final image.
Finally, there is an element of trial and error when starting out with intentional camera movement. You’ll quickly find out what works for you and what doesn’t; this will help you develop your own style.
And don’t be too concerned if you do not get an effect you like right away – the technique can be quite hit-and-miss sometimes. Take a lot of shots, and don’t be too quick to delete images that you feel haven’t worked. There is a chance that, after a few days, you may take another look and see something that you like, after all!
Intentional camera movement photography: The next step
One of the great things about intentional camera movement photography is that it is all about how you express yourself!
Think of your camera as your paintbrush.
Get creative, have fun, and start seeing landscapes in an exciting new way.
Now over to you:
Do you have any intentional camera movement photos you’d like to share? Please feel free to display them in the comments below!
The post How to Take Creative Landscape Shots Using Intentional Camera Movement appeared first on Digital Photography School. It was authored by Richard Beech.
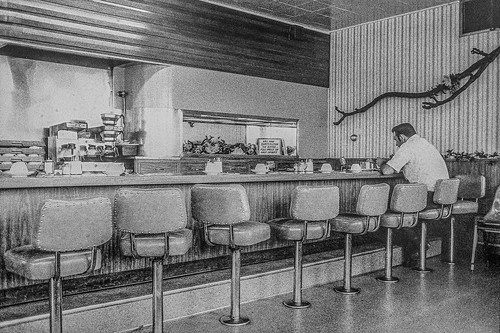
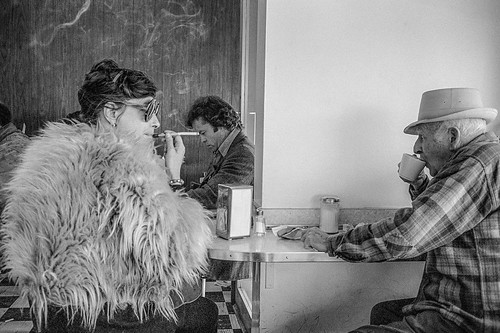
“It seems to me that the subject of Bill Dane’s pictures is the discovery of lyric beauty in Oakland, or the discovery of surprise and delight in what we had been told was a wasteland of boredom, the discovery of classical measure in the heart of God’s own junkyard, the discovery of a kind of optimism, still available at least to the eye.” John Szarkowski, director of photography, Museum of Modern art 1962-1991
I received Bill Dane’s wonderful book, Bill Dane Pictures …it’s not pretty. 50 Years of Photographs I’m still in love, in the mail today.
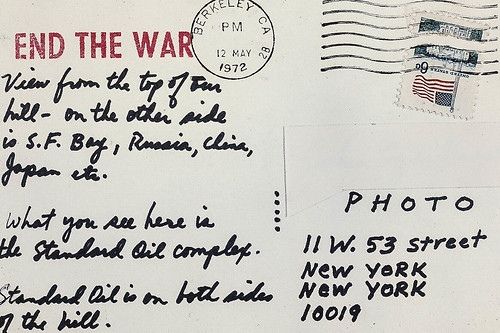
For those unfamiliar with his work, Dane has been actively photographing the world around him for over 50 years. Since 1969 he has generously mailed over 50,000 of his photographs as postcards to people. More recently he has been active on Flickr where he continues day in and day out to share his world with the rest of us.
Yesterday he shared a diner scene from Tracy, California in 1970, earlier today he shared a bit more abstract flower from Oakland in 2011.
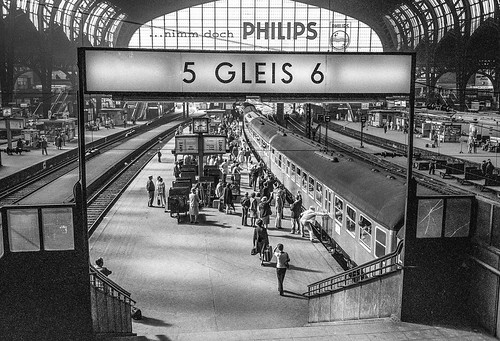
As you work through his flickstream you find yourself moving from Las Vegas in 1972 to Mexico City in 1974 to Olympia, Washington in 2018. The one constant thing is that Bill is there with his camera walking you through his unique view of the world. His view of the world, as his book title admits, is not always pretty, but it is like no other photographer you’ve probably ever seen. It’s not easy work to get through but it’s rewarding when you do.
Accompanying his images in the book are his own sttaccato like typed words. Like a beat poet Bill opines on his own photographic path as well what he sees around him — words to go with the pictures. It’s part personal history/biography, part documentary, part politics, part life vision — always poetic.
“Hunt treasure strike-snap-gather edit judge
I still photograph like it’s 1969 sort of
Advancing weaving focused scanning dam Bill hold still
Leica Rangerfinders straightforward refinement guess settings real good
Film has wonder dept forging Tri-X darkrooms mail
Costco for color prints to edit send
2007 My last film camera Contax SLR zoom-macro
Digital Nikon D80 with the 28-105 macro”
In my own artist’s statement, I quote the great Charles Bukowski who once said that endurance is more important than truth. As far as endurance goes Bill’s got it. He’s got it in spades and you have to admire that. Bill’s spent time hanging out at workshops with Friedlander and Arbus. He’s had shows at MoMA, his photographs hang in the permanent collections of MoMA, SFMOMA, the Art Institute of Chicago — and yet here he is day in and day out still putting work up out there for the public where? At Flickr? Yes, at our beloved Flickr.
Interestingly enough the title of Bill’s book actually comes from Bukowski’s poem “I Met A Genius.” The poem is about a 6 year old boy on a train ride with Bukowski who sees the sea for the first time and remarks upon seeing it that “it’s not pretty.” It’s the sort of innocent honest insight that can come from a child who has not been saddled down with society’s version of the sea as a remarkable and beautiful scene, the way most artists might present it.
Bill gives us a messy world, it’s not always pretty, but it’s worthwhile to see it as he shares it. It is a bit of a junkyard as Szarkowski suggests, but there is beauty in the junkyard as well.
Weighing in at over 300 pages of high quality printing and limited to only 500 copies, do yourself a favor and pick this one up before it sells out and before one of these big name museums decides to do a retrospective. You’ll have an original collector’s item. Bill Dane is a treasure — and so are his flickrstream and book.
As its name implies, the Blackmagic Ursa Pro 12K shoots 12K video. But it also includes features that mirrorless camera makers could learn from. Jordan shows us what he likes about Blackmagic’s design – and what it’s like to shoot in 12K.
Subscribe to our YouTube channel to get new episodes of DPReview TV every week.
The post How to Find Good Locations for Family Portraits appeared first on Digital Photography School. It was authored by Hunter McRae.
When you’re shooting a family portrait, about nine times out of ten the client will ask, “Do you have a place you typically like to photograph?”
We all do, of course, but if you take every portrait client to the same location, your portfolio will develop an undesirable, repetitive consistency.
That’s why it’s important to thoroughly scout the area where you live and work, to build a list of go-to spots for any scenario, circumstance, and style.
So think about your city, and build a list of these places where you can shoot:
A field or shoreline with broad vistas to capture the aura and glow of twilight
A similar outdoor venue with features like tall grass or trees to provide a backdrop
An outdoor area with full shade, appropriate for shooting at midday
A covered outdoor space like a gazebo or covered porch for shoots in inclement weather
An indoor space with high ceilings and lots of windows for natural light
Because most family portrait sessions will include a variety of backdrops and poses, the perfect shooting location contains all of these elements. But that’s pretty rare and hard to find.
Finally, make sure that you have the required permits, permissions, and licenses to shoot in your desired locations, whether they’re public or private (many municipalities require a business license to shoot in public places like parks and beaches).
Once you’ve built your list of go-to locations, you’re ready to schedule a session with a client.
Here are the two scenarios that could play out:
Scenario 1: The client has already chosen a location
It’s rare for a client to be dead set on a location, but sometimes there’s a family home or a special place with memories where they’d like to be photographed. Or maybe there’s an extended family gathered together already, and they’d like to keep the photoshoot as easy as possible by having you come to them. If you’re shooting for next year’s holiday portrait or another special event, your client may also choose a place that fits the theme, such as an evergreen forest or a snowy landscape.
If you’re not familiar with the location, ask questions about it when confirming the shoot. You may discover that you need to bring extra equipment, such as speedlights to fill in shadows (if, for instance, your client is hoping for a family portrait underneath a moss-strewn oak tree at two o’clock in the afternoon).
Likewise, indoor photoshoots – such as people gathered around the fireplace or around a Christmas tree, for example – may present difficulties with lighting that you’ll want to consider and be prepared for prior to the actual shoot. When feasible, visit the site of any session before arriving for the actual job.
Scenario 2: The client is open to your location suggestions
This is the more common scenario, and it allows you to pull out that list of locations you’ve already scouted.
Start by getting a sense of the feeling the family wants to capture in their photos. If you’re doing a holiday family portrait, the client may prefer a warm and rustic theme over something bright and urban, for example.
Timing should also affect your decision of where to shoot. When possible, schedule sessions for an hour to an hour and a half before sunset, giving you time to arrive and chat, time to get the family comfortable with your presence and style, and then time to be fully ready to capture beautiful, stunning portraits just when the changing light is at its peak.
Sunset (and sunrise) shoots
For golden hour sessions, just after sunrise and just before sunset, choose a location that ideally has both broad vistas and objects of interest.
For example, if you’re shooting on the beach, don’t just choose a spot with wide-open sand (plus houses and passersby). Instead, aim to find a section of beach with sand dunes, tall grass, driftwood, or even distant trees.
These objects help frame the image and make it more interesting, without distracting from the subjects of the photograph. The same rules apply in a desert, lake, or city park scenario.
Midday shoots on a sunny day
The challenge with shooting at midday is the shadows. You don’t want your subjects to squint in full sun, and you don’t want shadows from tree branches or from other obstructions blocking portions of their faces. The key to shooting at sunny midday is to put your subjects fully in the shade.
When a client wants to schedule a midday session, I often lean toward urban areas with architectural interest. If your city or town has a historic neighborhood, seek out alleyways, parks, cobblestone streets, or even sidewalks that are shaded at midday, but that still present a beautiful surrounding for your subjects.
Cloudy day shoots
It’s a huge misconception that overcast days are bad for family portraits. Clients may be discouraged by the threat of rain, but encourage them with the news that cloud coverage actually makes for beautiful outdoor shots – there’s no squinting, plus there’s nice, even light.
That said, if there’s no drama in the sky (i.e., no dark clouds swirling on the horizon), an overcast day may be less exciting when shooting in broad vistas and open spaces.
Instead, turn to your surrounding objects (trees, historic buildings, etc.) to provide the intrigue in the photograph. Or add a pop of color with balloons and other props.
On an overcast day, a local mural can actually make for a perfect backdrop – just make sure your subjects wear muted tones (black, white, gray, or beige) rather than colorful attire that might clash with the art.
Final tips and tricks for finding family portrait locations
Start by putting together your list of portrait locations. And make sure that where you decide to shoot won’t be crowded at the time you’re there; the last thing you want is a bunch of strangers in your backgrounds.
Finally, be flexible. Not every shoot will be perfect, but it’s your job as the photographer to ensure that your clients have an enjoyable experience. Have confidence in your skills, and work around obstacles as they arise. If you are engaged and the subjects are happy, it’s possible to create gorgeous family portraits that your clients can share on cards, calendars, and gifts throughout the year.
Now over to you:
How do you choose family portrait locations? Do you have a favorite type of location? Share your thoughts in the comments below!
The post How to Find Good Locations for Family Portraits appeared first on Digital Photography School. It was authored by Hunter McRae.


You must be logged in to post a comment.